


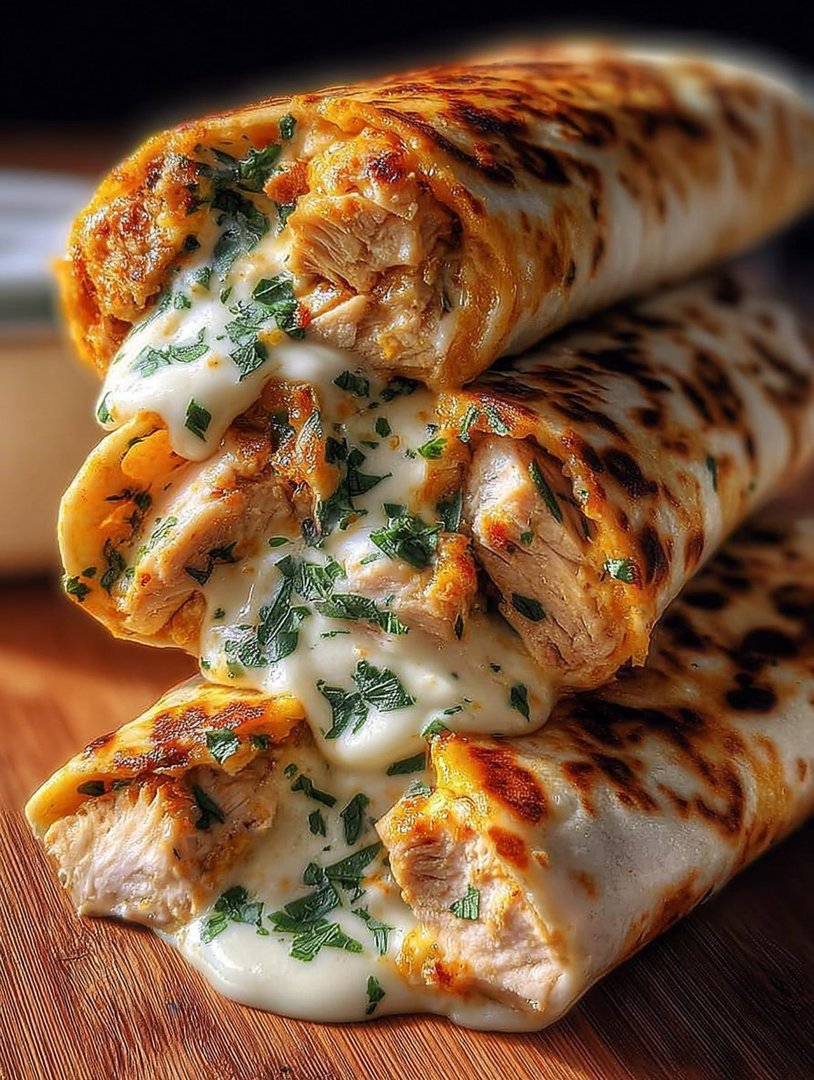
If heaven had a scent, it would probably be the intoxicating blend of roasted garlic and melted mozzarella wafting from theseOoey-Gooey Cheesy Garlic Chicken Wraps. Forget sad desk lunches; this recipe is the culinary equivalent of winning the lottery while wearing your comfiest pajamas.
There is nothing quite like biting into that crispy exterior only to be met by a creamy, savory filling that demands a happy dance right there in your kitchen. Get ready to ditch the takeout menus forever because dinner just got significantly better and far more exciting.
- Effortless weeknight preparation ensures you spend less time cooking and more time enjoying this incredibly satisfying family meal.
- The intense garlic butter coating combined with the rich, melted cheese filling creates an unforgettable flavor profile that everyone will adore.
- Visually appealing golden-brown wraps promise a crunchy texture that beautifully complements the tender, savory shredded chicken inside.
- This recipe is wonderfully versatile, allowing for easy substitutions of vegetables or different cheeses to suit various dietary preferences and pantry stock.
The Culinary Saga of the Weeknight Hero
I understand the struggle. You’ve just battled traffic, navigated a mountain of emails, and the last thing your brain wants to do is calculate complex culinary ratios. You need dinner, and you need it to feel like a warm hug from a very skilled chef who happens to love garlic. This is exactly why the Ooey-Gooey Cheesy Garlic Chicken Wraps entered my life—not as a mere meal, but as a weekly savior, a beacon of cheesy, garlicky hope.
My inaugural attempt at these wraps was born purely out of desperation. My pantry looked like a post-apocalyptic movie set, featuring only stray tortillas, some leftover rotisserie chicken, and an alarming amount of cheese ends. I decided to lean into the chaos. If you can’t beat the weeknight fatigue, you might as well smother it in garlic butter and bake it until golden. The results were so overwhelmingly positive that my partner, usually stoic about dinner, started referring to them simply as “The Goodness.” That’s when you know you’ve struck gold.
The Secret Weapon: Maximizing the Garlic Butter Factor
The success of these wraps isn’t just in the filling, which, while marvelous, only plays a supporting role. The true star is the exterior garlic butter bath. We aren’t simply brushing butter on the outside; we are achieving a level of saturation that transforms the humble tortilla into a flaky, aromatic, golden vessel capable of carrying immense savory weight. If you think you’ve added enough garlic, please, pause and add just a little bit more. Garlic measures are suggestions, not rules, and in this kitchen, we believe in aggressive flavor profiles.
When melting the butter, make sure you use medium-low heat. You want the garlic to infuse slowly without burning—burnt garlic tastes tragically bitter, and we are aiming for triumph here. Stirring in some dried parsley flakes not only adds a lovely fleck of color but also a fresh herbaceous note that cuts through the richness of the cheese and the butter. This meticulous, loving attention to the garlic butter is the defining difference between a good chicken wrap and an earth-shatteringly fantastic Ooey-Gooey Cheesy Garlic Chicken Wrap. This is where the magic truly happens, transforming simple ingredients into something transcendent.
Ingredients for Ooey-Gooey Cheesy Garlic Chicken Wraps
Here’s what you’ll need to make this delicious dish:
- Cooked Chicken BreastThis recipe works best with shredded, fully cooked chicken. Rotisserie chicken is a phenomenal time saver and provides great moisture.
- Cream CheeseUse the full-fat block style, softened to room temperature, which will give the filling its essential creamy texture.
- Mozzarella CheeseFreshly shredded mozzarella melts better and offers that incredible stringy pull that defines the “ooey-gooey” experience.
- Cheddar CheeseA sharp or medium cheddar is recommended for adding a robust, savory depth that balances the mild mozzarella.
- ButterUnsalted butter is preferred, allowing you to control the overall saltiness of the final garlic glaze for the wraps.
- Fresh Garlic ClovesSince garlic is the primary flavor profile, use fresh cloves, minced very finely, for the most pungent and aromatic results.
- Dried Italian SeasoningThis blend adds complexity to the filling, complementing the chicken and elevating the overall savory taste.
- Dried Parsley FlakesUsed primarily for the garlic butter glaze to provide color and a subtle freshness that brightens the flavor.
- Large Flour TortillasOpt for soft, large (burrito-size) tortillas as they are flexible enough to fold without tearing when heavily filled.
- Chicken BrothA splash of low-sodium chicken broth can be used to moisten the chicken filling if it seems too dry after mixing the cheeses.
The full ingredients list, including measurements, is provided in the recipe card directly below.
Crafting the Perfect Filling: Tips and Tricks
The filling is where we achieve that perfect balance between savory chicken, intense garlic, and maximum melt factor. Remember, the goal is not just to mix ingredients, but to create a structurally sound, highly flavorful paste that won’t leak out of the tortilla during baking. If the filling is too loose, your wraps will burst, leading to a tragic, albeit tasty, cheese eruption all over your baking sheet. We must prevent this calamity.
Achieving Optimal Creaminess
Start by ensuring your cream cheese is properly softened. Trying to mix cold cream cheese with shredded chicken is like trying to herd cats—it’s unnecessarily difficult and messy. If you forgot to take it out, a quick 15 seconds in the microwave should do the trick. Once soft, incorporate the cream cheese, shredded chicken, and seasonings (Italian seasoning, a little salt, and pepper) together thoroughly. This forms the adhesive base.
Next, fold in the shredded mozzarella and cheddar. Don’t overmix at this stage; you want the cheese pieces to remain distinct so they melt beautifully inside the wrap. If your filling seems too stiff—perhaps your chicken was particularly dry—add a tablespoon of chicken broth at a time until the mixture holds together but remains scoopable. This filling should taste good enough to eat straight with a spoon (but please, reserve some for the wraps). Prep time for the filling should take no longer than 15 minutes, making this an ideal quick-prep meal.
How to Make Ooey-Gooey Cheesy Garlic Chicken Wraps
Follow these simple steps to prepare this delicious dish:
Step 1: Prepare the Garlic Butter and Baking Area
Preheat your oven to 375°F (190°C). Spray a large baking sheet with nonstick cooking spray or line it with parchment paper for easy cleanup. In a small saucepan, melt the butter over low heat. Once melted, stir in the finely minced fresh garlic and the dried parsley flakes. Let this mixture gently infuse for about three minutes, making sure the garlic does not brown or burn.
Step 2: Assemble the Creamy Chicken Filling
In a medium mixing bowl, combine the shredded cooked chicken, softened cream cheese, shredded mozzarella, cheddar cheese, and Italian seasoning. Season generously with salt and black pepper. Mix vigorously until all ingredients are evenly distributed and the filling is thick, creamy, and cohesive. Check the flavor and adjust seasoning as necessary.
Step 3: Fill and Roll the Wraps
Lay a tortilla flat on a clean surface. Place about one-third cup of the cheesy chicken mixture slightly off-center on the tortilla. Fold the sides of the tortilla inward over the filling, then roll tightly from the bottom edge up, similar to wrapping a burrito. Ensure the seams are tight to prevent leakage during baking. Repeat this process until all wraps are assembled.
Step 4: The Flavor Bath and Baking
Arrange the rolled wraps seam-side down on the prepared baking sheet. Generously brush the tops and sides of each wrap with the prepared garlic butter mixture. Do not be shy—this is the key to the golden, crispy exterior. Bake theOoey-Gooey Cheesy Garlic Chicken Wrapsfor 18 to 22 minutes, or until they are golden brown, sizzling slightly, and the internal cheese is completely melted.
Serving Suggestions and Customization for Your Wraps
When those glorious, golden wraps emerge from the oven, they will be unbelievably hot and intensely aromatic. Allow them to cool for just five minutes on the baking sheet—the residual heat helps the structure set and prevents immediate third-degree burns on the roof of your mouth. These wraps are substantial enough to be a complete meal on their own, thanks to the rich filling and satisfying breading, but they pair beautifully with simple, fresh sides.
Pairing Perfection and Flavor Variations
To cut through the richness of the cheese and garlic, a crisp, acidic side dish is mandatory. A simple mixed green salad dressed with a bright lemon vinaigrette works wonders. Alternatively, a crunchy coleslaw or even a quick cucumber and tomato salad offers that refreshing contrast. For dipping, a side of warm marinara sauce is traditional, but don’t underestimate the power of ranch or even a tangy buffalo sauce stirred into a little sour cream for a mild kick.
If you enjoy a bit of heat, try adding a pinch of red pepper flakes into the chicken filling before rolling. For vegetable enthusiasts, finely chopped spinach or sautéed mushrooms can be folded into the chicken mixture to boost texture and nutrition. You can also experiment with different cheeses; swapping the cheddar for provolone or smoked Gouda will dramatically change the flavor profile. These customization options ensure that theOoey-Gooey Cheesy Garlic Chicken Wrapsnever become boring, keeping them firmly in the rotation of weeknight heroes.
Transfer the golden-brown wraps to plates and serve immediately with your favorite side for the ultimate comfort meal experience. Enjoy the immediate satisfaction!
The Accidental Discovery of Sunshine on a Plate
I invented this recipe on a Tuesday when the fridge was bare, and my mood matched the weather—gray. Necessity forced creativity, leading to a glorious mashup of leftover chicken and too much cheese. The result? Pure, unadulterated sunshine folded into a tortilla.
Perfecting the Cooking Process
Efficiency is key. First, shred and season your chicken beautifully. Next, build and roll the wraps tightly. Finally, use a hot skillet with a dab of oil and toast them until golden brown, ensuring the interior cheese reaches maximum meltiness.
Add Your Touch
Feeling adventurous? Swap mozzarella for pepper jack for a kick, or include sautéed mushrooms and caramelized onions. Instead of plain ranch, use a creamy chipotle dressing. You can also substitute the tortillas with large lettuce cups for a lighter twist.
Storing & Reheating
Store cooled wraps in an airtight container for up to three days. To reheat, avoid the microwave! Use a toaster oven or skillet on medium-low heat for about five minutes per side to retain that essential crispy exterior and glorious cheese pull.
Let’s be honest, we all have those moments when dinner needs to happen yesterday, but the energy reserves are hovering around zero. You crave comfort food, but deep-frying anything feels like too much commitment. Fear not, friends, because I have unlocked the secret weapon of weeknight cuisine: the almighty, unbelievably satisfyingOoey-Gooey Cheesy Garlic Chicken Wraps. These wraps are not just food; they are portable pockets of sheer joy, engineered for maximum flavor deployment with minimal effort.
My relationship with this dish started, as most great culinary adventures do, purely out of desperation and an abundance of shredded roast chicken lingering suspiciously in the back of the refrigerator. I needed a hero, and garlic butter stepped up, wearing a cheese cape. The secret lies in treating the humble tortilla like a sophisticated pastry crust, basting it with melted butter infused with enough garlic to ward off vampires (and boring dinners). This is the recipe that cures the common case of “What’s for dinner?” malaise.
The Anatomy of the Perfect Pocket
What makes these wraps transcendent? It is the combination of textures. You need tender, juicy chicken, softened by a creamy base, enveloped in that glorious tangle of melted cheese, and then sealed within a perfectly crispy, garlicky shell. We aren’t just layering ingredients; we are building an edible fortress of deliciousness designed to make your eyes roll back in delight. We prioritize the melt factor, ensuring every bite contains that satisfying cheese stretch.
Required Ingredients List
- 2 cups cooked, shredded chicken breast (rotisserie chicken works wonders)
- 1 cup shredded mozzarella cheese (low-moisture, full-fat is best)
- 1/2 cup shredded Monterey Jack or sharp cheddar cheese
- 1/2 cup creamy filling base (cream cheese or Greek yogurt mixed with a splash of chicken broth)
- 1 teaspoon dried Italian seasoning
- 1/2 teaspoon black pepper
- 8 large flour tortillas (burrito size)
- 1/2 cup unsalted butter, melted
- 4 cloves garlic, minced finely
- 1 tablespoon fresh parsley, chopped (for garnish and flavor)
Preparation: The Road to Maximum Goo
Preparing the filling is ridiculously easy. Think of it as mixing up the world’s most luxurious chicken salad, minus the mayo stress. You start by taking your cooked chicken. Make sure it is finely shredded; this helps integrate it perfectly into the cheesy binding mixture. Place the chicken in a large bowl. Next, add the mozzarella, the Monterey Jack, the creamy filling base, Italian seasoning, and pepper. Stir this mixture vigorously until everything holds hands and becomes one cohesive, delicious blob. This is the heart of your wrap, so taste it now and adjust the seasoning if necessary. Maybe it needs a dash more pepper? Go for it. Don’t be shy about seasoning generously; the tortilla and butter will balance the intensity.
Now, let’s talk about the magic butter. In a small, separate bowl, combine the melted butter and the minced garlic. Stir them together and let this mixture sit for a few minutes. This process allows the garlic to infuse deeply into the butter, creating the golden essence we will paint onto our wraps. This garlic butter is non-negotiable; it defines the entire experience of theOoey-Gooey Cheesy Garlic Chicken Wraps. The aroma alone will convince your neighbors to knock on your door.
Rolling and Toasting Your Masterpieces
Lay out your tortillas on a clean surface. Place about half a cup of the chicken and cheese filling just off-center toward the bottom of each tortilla. Don’t overfill, or you will experience a catastrophic cheese breach during toasting. Fold the sides inward first, snug against the filling. Then, tightly roll the tortilla up from the bottom, creating a neat, sealed package, much like wrapping a culinary gift to yourself. Ensure the edges are tucked tightly to prevent any filling escape.
Once all your wraps are rolled, it is time for the final, transformative step. Brush the top, sides, and bottom of each wrap generously with the fragrant garlic butter mixture. If you love garlic, feel free to give them a second coating; we support bold flavor choices here. The butter does two things: it provides that irresistible, savory flavor, and it ensures the tortilla toasts to a deep, beautiful, shatteringly crispy gold in the skillet. This crust is crucial for the overall success of the wrap.
Heat a large non-stick skillet over medium heat. You want it hot enough to crisp the exterior quickly without burning the garlic. Place two or three wraps in the skillet, seam-side down first, to seal them securely. Cook for three to four minutes per side, pressing down lightly with a spatula to ensure good contact and even browning. When they are a beautiful golden brown and the cheese is visibly bubbling within, transfer them immediately to a cutting board. Slice them in half diagonally—that reveal of the stretching cheese is mandatory—and sprinkle with fresh parsley before serving. These cheesy chicken wraps are best enjoyed immediately, straight from the pan.
- Don’t skimp on the cheese quality:Use high-quality, full-fat cheese for the best melt and stretch; cheaper alternatives often become grainy when exposed to high heat.
- Ensure the chicken is cool:Mixing warm chicken into the cheese filling often causes premature melting, making the mixture harder to handle and roll neatly.
- Master the seam-side start:Always place the wraps seam-side down in the hot pan first; this ensures the seam seals immediately and prevents your fillings from escaping.
The first time I served these, my usually reserved brother-in-law ate three and then asked if he could take the last two home. That’s when I knew I had officially created a winner.
Conclusion for Ooey-Gooey Cheesy Garlic Chicken Wraps
TheseOoey-Gooey Cheesy Garlic Chicken Wrapstruly redefine weeknight dining. They deliver maximum flavor and comfort with minimum effort, combining tender chicken, rich garlic butter, and an epic cheese pull inside a crispy tortilla shell. Whether you are battling dinner boredom or feeding a hungry crowd, this recipe is your golden ticket. Remember to butter boldly, roll tightly, and enjoy the instant gratification only these phenomenal wraps can provide. Give them a try tonight; your taste buds will send a thank-you note.
Print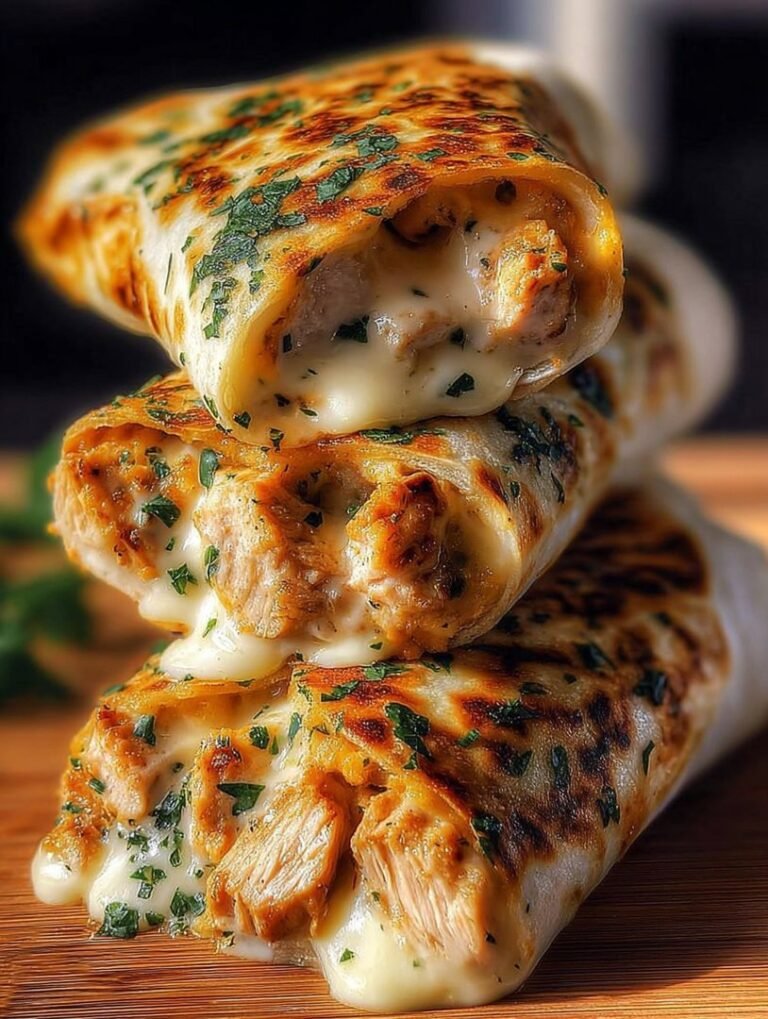
Ooey-Gooey Cheesy Garlic Chicken Wraps
**1. (Flavor Focus)** These wraps redefine comfort food! Creamy mozzarella, rich cream cheese, and sharp garlic coat tender shredded chicken, baked until golden.
- Total Time: 35 minutes
- Yield: 4 servings 1x
Ingredients
- 1 pound cooked, shredded chicken breast
- 1.5 cups shredded mozzarella cheese
- 4 ounces cream cheese, softened
- 6 large flour tortillas (burrito size)
- 3 cloves garlic, freshly minced
- 1/4 cup mayonnaise or sour cream
- 2 tablespoons unsalted butter, melted
- 1 teaspoon dried Italian seasoning
Instructions
- Step 1: Preheat oven to 375°F (190°C). In a large mixing bowl, combine the shredded chicken, softened cream cheese, mozzarella cheese, mayonnaise, and minced garlic. Stir until the mixture is thoroughly combined and creamy.
- Step 2: Lay a tortilla flat on a clean surface. Spoon approximately 1/3 cup of the chicken mixture down the center of the tortilla, leaving 1 inch of space at the top and bottom. Fold the sides inward, then tightly roll the tortilla from the bottom up to create a sealed wrap. Repeat with the remaining tortillas and filling.
- Step 3: Prepare the garlic butter wash. In a small bowl, melt the unsalted butter and stir in the dried Italian seasoning. Place the assembled wraps seam-side down on a baking sheet lined with parchment paper, and brush the tops and sides generously with the prepared garlic butter.
- Step 4: Bake the wraps for 12 to 15 minutes, or until the tortillas are golden brown and crisp, and the interior cheese is fully melted and "ooey-gooey." Serve immediately with your preferred dipping sauce (such as ranch or marinara).
Notes
- Store cooled leftovers tightly wrapped or in an airtight container in the refrigerator for up to 3 days; the tortillas may soften slightly.
- To revive the crispy texture, reheat leftover wraps in a toaster oven or a standard oven at 350°F (175°C) for about 8-10 minutes, skipping the microwave to avoid a soggy finish.
- Elevate the experience by serving these rich wraps alongside a bright, crisp side salad tossed in a vinaigrette to cut through the gooey richness.
- Ensure your cream cheese is truly room temperature or slightly warmed before mixing, as this is the secret to achieving that smooth, fully 'ooey-gooey' internal texture without lumps.
- Prep Time: 15 minutes
- Cook Time: 20 minutes
- Method: Stovetop
- Cuisine: American


Leave a Comment