

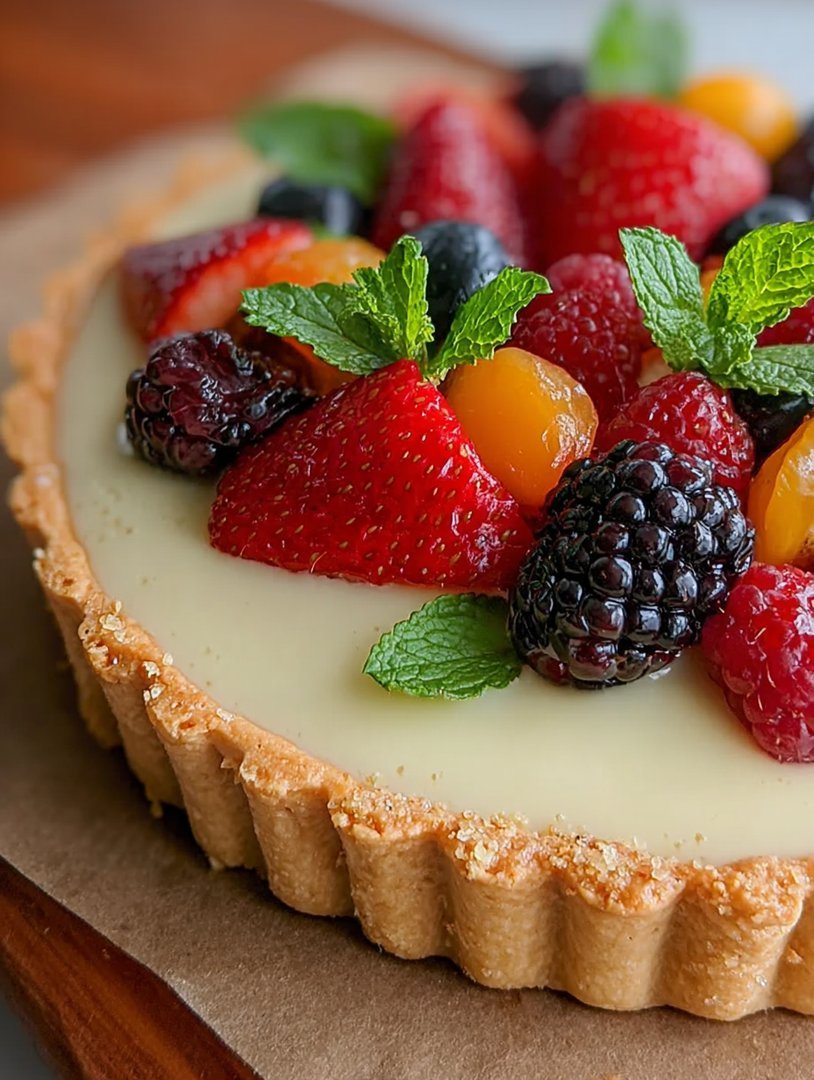
When the kitchen smells like sunshine and vanilla, you know something magical is happening. I’m talking about the ultimate dessert dilemma solver: the stunning, irresistibleVanilla Custard Fruit Tart.
It’s the perfect centerpiece, demanding attention with its vibrant colors and creamy, dreamy filling. Forget complicated bakes; this recipe makes elegance genuinely effortless.
- The rich, velvety smooth vanilla cream melts perfectly on your tongue, balancing the crisp, buttery shortbread crust beautifully.
- Achieve showstopper visual appeal effortlessly by arranging seasonal berries and tropical fruits in artistic, dazzling patterns.
- This dessert is incredibly versatile; easily adapt the fruit topping based on what looks freshest and ripest at the market right now.
- Preparation is simpler than you think, making it an ideal choice for last minute celebrations or sophisticated weeknight treats.
My relationship with the classic fruit tart started with mild competitive chaos. I once decided to host a garden party—a civilized, delightful affair—but neglected to plan dessert. Two hours before guests arrived, I realized all I had were some pantry staples, a few dozen eggs, and a crippling fear of failure. That, my friends, is how desperation birthed brilliance, resulting in this foolproof method for making the most magnificentVanilla Custard Fruit Tartyou have ever tasted.
The Accidental Masterpiece: Crafting the Shell
The foundation of any great tart isn’t the filling; it’s the crust. Think of the crust as the sturdy, reliable friend who holds the emotional mess together. If your crust is soggy, crumbly, or tastes like regret, the whole operation fails. We are aiming for a Pâté De Volaille Sablée—a buttery, shortbread-style shell that snaps when you bite it. This recipe calls for a pre-baked crust, often referred to as blind baking, which is non-negotiable for preventing the dreaded “custard seep.” I learned this the hard way when a tart I once made collapsed faster than my enthusiasm for cleaning up after baking.
To blind bake successfully, line your prepared tart pan (preferably one with a removable bottom) with the chilled dough. Prick the bottom aggressively with a fork—it should look like a crime scene. Then, line it with parchment paper and fill it completely with pie weights or dried beans. Bake until the edges are golden brown, remove the weights, and finish baking until the bottom looks dry and lightly toasted. This prevents shrinkage and creates a watertight barrier for the filling. Remember, patience is crucial here. Rushing the blind bake is like trying to convince a cat to take a bath; it will end poorly for everyone involved.
Choosing the Perfect Crust Texture
While many recipes call for an all-butter crust, incorporating a small amount of powdered sugar can prevent the crust from becoming overly tough. If you prefer a nuttier flavor that complements the creamy filling, you could lightly toast some finely ground almonds and mix them into the flour mixture before chilling the dough. This adds a subtle complexity without overpowering the delicate vanilla flavor. Ensure your butter is ice cold when cutting it into the flour; this technique creates those beautiful, flaky layers that give the tart its satisfying crunch. If the butter starts warming up, stop, put the dough in the freezer for ten minutes, and resume when it’s rock hard again. Warm butter equals chewy crust, and we are not aiming for dessert rubber here.
Mastering the Silky Custard Filling
The heart of this recipe is the vanilla custard, or Crème Pâtissière. Achieving that perfect, wobble-but-firm texture is often seen as intimidating, but I promise it’s simpler than calculating your monthly budget. The secret lies in consistent stirring, high-quality ingredients, and respecting the temperature of the dairy. You need full-fat milk, the finest alcohol-free vanilla extract (or better yet, a vanilla bean if you’re feeling fancy), and cornstarch, which is our stabilization superhero. Cornstarch ensures the custard sets beautifully without requiring any animal-derived gelling agents, keeping the texture delightfully pure and creamy.
Start by heating the milk and vanilla until just simmering. In a separate bowl, whisk the sugar, cornstarch, and egg yolks until they are pale yellow and look like thick ribbon candy. This mixture is called the ‘blanchiment,’ and getting it right is crucial for a smooth custard. If you skip the proper whisking, you risk lumps, and lumps are the enemy of elegance. The key is to fully dissolve the sugar and integrate the cornstarch before adding the hot milk. Remember: hot liquid goes into the cold egg mixture, never the other way around, unless you enjoy making sweet scrambled eggs.
The Tempering Tango: Preventing Scrambled Eggs
Tempering is the process of gradually raising the temperature of the egg yolks by adding hot liquid slowly. Take about a cup of the hot milk mixture and slowly pour it into the egg yolk mixture while whisking vigorously. This warms the eggs gently, preventing them from coagulating immediately when they hit the full pot of hot milk. Once incorporated, pour the warmed egg mixture back into the main saucepan with the remaining milk. Cook over medium heat, stirring constantly, especially scraping the corners and bottom of the pan. The custard will seem liquid, then suddenly thicken dramatically. Cook for one minute after it reaches maximum thickness—this ensures the cornstarch is fully activated and cooked out. Once done, press plastic wrap directly onto the surface of the custard to prevent a skin from forming, and chill it completely. This chilling stage is vital; warm custard will turn your crisp tart shell into soup.
Assembly and Presentation: The Grand Finale
Once your pastry cream is completely cool and firm (it should be thick enough to spread easily), it’s time to fill the cooled tart shell. Spread the cream evenly inside the crust, ensuring the surface is smooth and slightly domed. This is where the fun begins—the fruit selection. For a classic look, I usually opt for a mix of vibrant colors: crimson strawberries, deep purple blueberries, and bright green kiwi slices. But feel free to embrace tropical flavors like mango or passion fruit. Whatever you choose, make sure the fruit is dry. Watery fruit will break down the crust prematurely and dilute the rich flavor of the vanilla cream.
Arranging the fruit is an art, but don’t overthink it. Start from the outside edge and work your way inward, creating concentric circles or a radiating spoke pattern. If you cut the fruit uniformly, the result will look incredibly professional. To give the finished tart that professional shine and to prevent the fruit from drying out, brush it lightly with an apricot glaze or a simple clear glaze made from heated apple juice mixed with a touch of cornstarch or pectin. This small step makes a massive difference, locking in freshness and giving the wholeVanilla Custard Fruit Tarta gorgeous, glossy finish that screams “I know what I’m doing!”
This tart is truly a masterpiece that feels much fancier than the effort required. It’s the dessert that wins over crowds and secures your spot as the household baker, even if you started the journey with mild panic and a handful of forgotten ingredients. Just remember the cold butter, the gentle tempering, and the dry fruit, and you are guaranteed success.
Ingredients for Vanilla Custard Fruit Tart
Here’s what you’ll need to make this delicious dish:
- All-Purpose FlourThe base of the buttery shortbread crust; measure accurately to ensure the correct structure.
- Unsalted ButterMust be ice cold for the crust preparation and softened for enriching the final custard.
- Granulated SugarUsed both in the crust for tenderness and in the custard for sweetness and structure stabilization.
- Large Egg YolksThese are essential for thickening the custard; save the egg whites for another recipe.
- Whole MilkProvides the richness and creamy texture necessary for an authentic Crème Pâtissière.
- CornstarchOur primary thickening agent for the custard, ensuring a smooth, stable, and clean set without carrageenan.
- Pure Alcohol-Free Vanilla ExtractUse a high-quality extract or the seeds scraped from one vanilla bean for the best flavor infusion.
- Fresh FruitsA variety of seasonal berries (strawberries, blueberries) and sliced stone fruit for a vibrant, attractive topping.
- Apricot Jam or Apple Juice ConcentrateUsed for making the final glaze that provides shine and seals the fruit topping.
The full ingredients list, including measurements, is provided in the recipe card directly below.
How to Make Vanilla Custard Fruit Tart
Follow these simple steps to prepare this delicious dish:
Step 1: Preparing and Blind Baking the Tart Shell
Preheat your oven to 375°F (190°C). Prepare the Pâté De Volaille Sablée dough using ice-cold butter and flour, then chill for at least 30 minutes. Press the chilled dough into a 9-inch tart pan with a removable bottom. Line the shell with parchment paper and fill with pie weights or dried beans. Blind bake for 15 minutes, remove the weights, then bake for another 5–10 minutes until golden and dry. Cool completely on a wire rack.
Step 2: Starting the Crème Pâtissière Base
In a medium saucepan, gently heat the milk and alcohol-free vanilla extract until small bubbles appear around the edges; do not boil. While the milk heats, whisk the egg yolks, sugar, and cornstarch together in a large bowl until the mixture is pale yellow and smooth. Ensure there are no lumps of cornstarch remaining.
Step 3: Tempering and Cooking the Custard
Slowly ladle about one cup of the hot milk into the egg yolk mixture while continuously whisking vigorously. This step tempers the eggs. Once mixed, pour the warmed egg mixture back into the saucepan with the remaining milk. Cook over medium heat, stirring constantly with a rubber spatula, until the mixture thickens dramatically and begins to bubble slowly. Cook for one full minute after thickening to ensure the cornstarch is activated.
Step 4: Chilling the Pastry Cream
Immediately remove the custard from the heat and strain it through a fine-mesh sieve into a clean bowl to ensure ultimate smoothness. Press plastic wrap directly onto the surface of the custard to prevent a skin from forming as it cools. Chill the pastry cream in the refrigerator for at least 3 hours, or until it is completely cold and firm enough to spread easily.
Step 5: Filling the Tart Shell and Arranging the Fruit
Once the tart shell and custard are completely cooled, spoon the pastry cream into the baked crust, spreading it evenly across the bottom. Arrange your prepared, dry fruits—such as sliced strawberries, raspberries, and kiwis—in a decorative pattern across the top of the custard.
Step 6: Glazing for Shine and Preservation
In a small saucepan, heat the apricot jam or apple juice concentrate gently until liquid and smooth. If using jam, push it through a fine-mesh sieve for a clear glaze. Brush the warm glaze lightly over all the arranged fruit and the exposed edges of the crust for a professional, glossy finish. Transfer to plates and drizzle with sauce for the perfect finishing touch.
The Accidental Discovery of Sunshine on a Plate
I initially attempted a complicated chocolate mousse, which failed spectacularly, resembling mud soup. Panicking before a dinner party, I grabbed shortbread dough and some leftover pastry cream. The resulting Vanilla Custard Fruit Tart wasn’t just a save; it was a revelation—pure, vibrant sunshine.
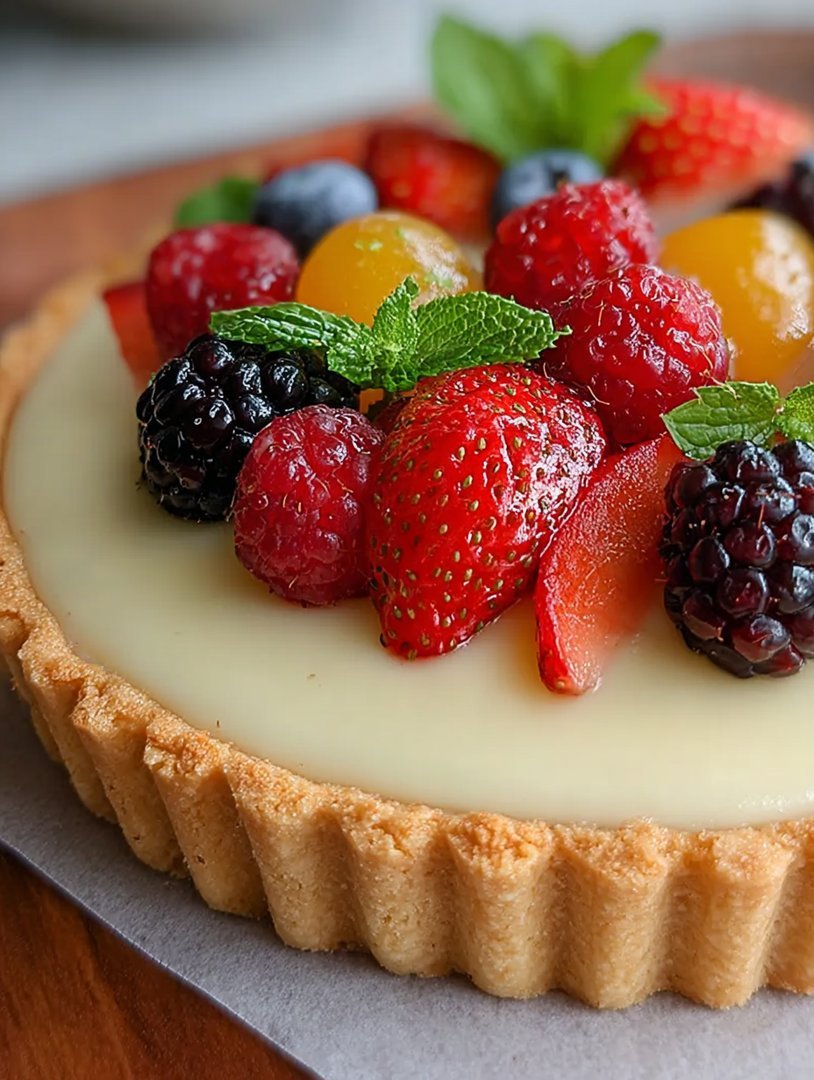
There is a special category of desserts reserved for the truly magnificent—the kind that makes people stop talking mid-sentence just to stare. This elegant, vibrant, and surprisingly straightforward tart belongs squarely in that category. If you thought perfect presentation required a culinary degree and access to highly specialized equipment, prepare to have your expectations gloriously shattered. The beauty of the homemadeVanilla Custard Fruit Tartlies in its simplicity: a crisp, buttery crust hugging a dreamy vanilla bean custard, all crowned with an edible mosaic of fresh, seasonal fruit. It is the perfect centerpiece for any gathering, demanding attention without requiring an entire weekend of preparation.
I first perfected this recipe during a bout of intense kitchen chaos, where every other complicated bake had gone sideways. I needed something reliable, something that felt both comforting and spectacularly chic. The secret, I learned, is obsessive chilling and treating the vanilla custard with the respect it deserves—no rushing the tempering process! When you achieve that perfect harmony between the snappy crust, the velvet custard, and the burst of fresh fruit, you realize you have unlocked a dessert superpower. Forget complicated layer cakes; this tart is effortless sophistication, ready to impress even the toughest critic (my Aunt Carol).
Ingredients: The Foundation of Flavor
We break this recipe down into three glorious components: the crust, the custard, and the dazzling topping. Using high-quality alcohol-free vanilla extract or, better yet, vanilla bean paste, will elevate this dessert from good to absolutely unforgettable.
For the Sweet Shortbread Crust
- 1 ½ cups all-purpose flour
- ½ cup powdered sugar
- ¼ teaspoon salt
- ½ cup (1 stick) unsalted butter, chilled and cubed
- 1 large egg yolk
- 1 tablespoon ice water (if needed)
For the Silky Vanilla Custard Filling
- 2 cups whole milk
- ½ cup heavy cream
- ½ cup granulated sugar, divided
- 1 vanilla bean, split and scraped (or 1 teaspoon vanilla bean paste)
- 4 large egg yolks
- ¼ cup cornstarch
- 2 tablespoons unsalted butter, cut into pieces
- Pinch of salt
For the Fruit Topping and Glaze
- 2 cups assorted fresh fruit (strawberries, raspberries, blueberries, kiwi slices, mandarins)
- ½ cup apricot jam (for glaze)
- 1 tablespoon water or fruit juice
Crafting the Perfect Vanilla Custard Fruit Tart
The journey to the ultimate tart requires patience, especially during the chilling phases. Do not skip the chilling; it is non-negotiable for crust integrity and custard silkiness. We are aiming for contrasting textures: crisp crust, creamy filling, and tender fruit.
Step 1: The Crust Commandment (Blind Baking)
In a large bowl, whisk together the flour, powdered sugar, and salt. Cut in the cold butter using a pastry blender or your fingertips until the mixture resembles coarse crumbs. Add the egg yolk and mix just until the dough comes together; if it seems too dry, add a tablespoon of ice water. Press the dough evenly into a 9-inch tart pan with a removable bottom. Prick the bottom all over with a fork.
Chill the crust for at least 30 minutes. Preheat your oven to 375°F (190°C). Line the chilled crust with parchment paper and fill it with pie weights or dried beans (this is the ‘blind’ part). Bake for 15 minutes. Remove the weights and paper, then bake for another 8–10 minutes, or until the crust is lightly golden brown. Let the baked crust cool completely on a wire rack—a crucial step to prevent a soggy bottom once the custard goes in.
Step 2: The Art of the Vanilla Custard
In a medium saucepan, combine the whole milk, heavy cream, half of the sugar, and the vanilla bean paste or seeds (along with the scraped pod, if using). Heat this mixture over medium heat until it is just simmering; do not let it boil. Remove the vanilla pod if used.
In a separate bowl, whisk together the remaining sugar, egg yolks, cornstarch, and salt until pale and smooth. This is your tempering base. Slowly ladle about one cup of the hot milk mixture into the egg mixture while whisking vigorously. This process gently warms the eggs, preventing them from scrambling.
Pour the tempered egg mixture back into the saucepan with the remaining hot milk. Whisk continuously over medium-low heat until the mixture thickens significantly and coats the back of a spoon, about 3 to 5 minutes. Remove the saucepan from the heat and stir in the two tablespoons of cold butter until fully melted and incorporated, giving the custard its luxurious sheen. Pour the custard through a fine-mesh sieve into a bowl to ensure maximum smoothness. Press plastic wrap directly onto the surface of the custard to prevent a skin from forming and chill it thoroughly for at least 4 hours, or preferably overnight.
Perfecting the Cooking Process
Start by blind baking the crust thoroughly until golden and cool it completely. Prepare the creamy vanilla custard while the crust cools, ensuring it thickens properly. Once both are chilled, assemble the tart immediately before serving, arranging the fruit beautifully for maximum impact.
Step 3: Assembly and Glazing
Once the crust is cool and the custard is firm and chilled, spoon the vanilla custard into the tart shell, spreading it gently with an offset spatula to create a smooth, level base. Now comes the fun part: arranging the fruit. Slice your strawberries and kiwi evenly and start laying them out in concentric circles or artistic patterns. Use varying colors and shapes to create a visual masterpiece.
For the professional glaze, combine the apricot jam and water or juice in a small saucepan. Heat gently until the jam is melted and loose. Push the warm glaze through a fine-mesh sieve to remove any lumps or fruit pieces. Using a pastry brush, gently brush the warm glaze over all the fruit. This locks in the freshness, adds a spectacular shine, and prevents the fruit from drying out. Serve immediately for the best contrast of textures.
Add Your Touch
Swap out strawberries and kiwi for tropical mango and pineapple, or use roasted grapes in the fall. For a zingy custard variation, infuse the milk with lemon zest. You can also press toasted coconut flakes into the crust before baking for added texture.
Expert Tips for a Stunning Tart
- Always use whole milk and heavy cream in the custard for the richest texture; skimming on fat yields a watery, sad result.
- Chill your tart shell thoroughly after blind baking; filling a warm shell guarantees a soggy bottom that ruins the texture contrast.
- For a flawless mirror glaze, gently warm apricot jam with a teaspoon of water and strain it before brushing lightly over the fruit.
My grandmother once declared this Vanilla Custard Fruit Tart so beautiful it was a shame to eat it. Then she ate three slices, which I think is the highest compliment a baker can receive.
Storing & Reheating
Store leftover tart loosely covered in the refrigerator for up to two days; note that the crust might soften slightly over time. Never freeze the finished tart, as the custard will separate disastrously upon thawing. Best results come from enjoying this beauty fresh.
Conclusion for Vanilla Custard Fruit Tart
Creating this stunning Vanilla Custard Fruit Tart is truly a journey from simple ingredients to edible artistry. We mastered the flaky crust, tamed the silky vanilla custard, and perfected the dazzling fruit arrangement. Remember the golden rule: chill everything thoroughly before assembly! This dessert proves that sometimes, the simplest flavors—rich vanilla and bright seasonal fruit—combine to create the most unforgettable centerpiece. Go forth and spread the joy of sunshine on a plate!
Print
Vanilla Custard Fruit Tart
Buttery shortbread perfection cradles silky, vanilla-infused crème pâtissière. This elegant tart requires precise blind baking and gentle tempering for a flawless filling.
- Total Time: 35 minutes
- Yield: 4 servings
Ingredients
- All-purpose flour: 1 ½ cups
- Unsalted butter (chilled and cubed): ½ cup (1 stick)
- Granulated sugar: ½ cup (divided)
- Whole milk: 1 ½ cups
- Large egg yolks: 4 large
- Cornstarch: 3 tablespoons
- Pure vanilla powder: 1 teaspoon
- Assorted fresh fruit (strawberries, kiwi, berries): 1 ½ cups, sliced
Instructions
- Step 1: Prepare and bake the tart shell. Cream together the butter and half the sugar, then mix in the flour to form a crumbly dough. Press the dough evenly into a 9-inch tart pan with a removable bottom, blind bake at 375°F (190°C) until light golden brown, then cool completely on a wire rack.
- Step 2: Start the vanilla custard (crème pâtissière). In a bowl, whisk the egg yolks, cornstarch, and remaining sugar until pale. Heat the whole milk in a saucepan until simmering; slowly temper the egg mixture by whisking in half of the hot milk.
- Step 3: Thicken and chill the custard. Pour the tempered mixture back into the saucepan with the remaining milk. Cook over medium heat, whisking constantly, until the mixture is very thick and coats the back of a spoon. Remove from heat, stir in alcohol-free vanilla extract, press plastic wrap directly onto the surface to prevent a skin from forming, and chill for a minimum of 3 hours.
- Step 4: Assemble the tart. Once the custard is fully chilled and firm, whisk it briefly to loosen it slightly, then spread the vanilla custard evenly into the cooled tart shell.
- Step 5: Decorate and finish. Arrange the fresh fruit slices decoratively over the surface of the custard. For shine, lightly brush the fruit with a warmed apricot or berry jam glaze. Chill the assembled tart for at least 30 minutes before slicing and serving.
Notes
- Store any leftover slices immediately in the refrigerator in an airtight container; this tart is best consumed within 48 hours before the buttery crust softens too much from the moisture of the custard.
- Ensure the assembled tart is thoroughly chilled for at least 30 minutes before slicing, as a cold custard filling allows for neat, defined slices that hold their shape perfectly.
- For a brighter flavor contrast, lightly brush the interior of the cooled tart shell with melted white chocolate before adding the custard to create a moisture barrier.
- To avoid a lumpy custard, temper the yolks slowly with the hot milk, then switch to a silicone whisk and whisk vigorously and continuously while cooking until the mixture visibly thickens into a glossy paste.
- Prep Time: 15 minutes
- Cook Time: 20 minutes
- Method: Stovetop
- Cuisine: American

Leave a Comment