

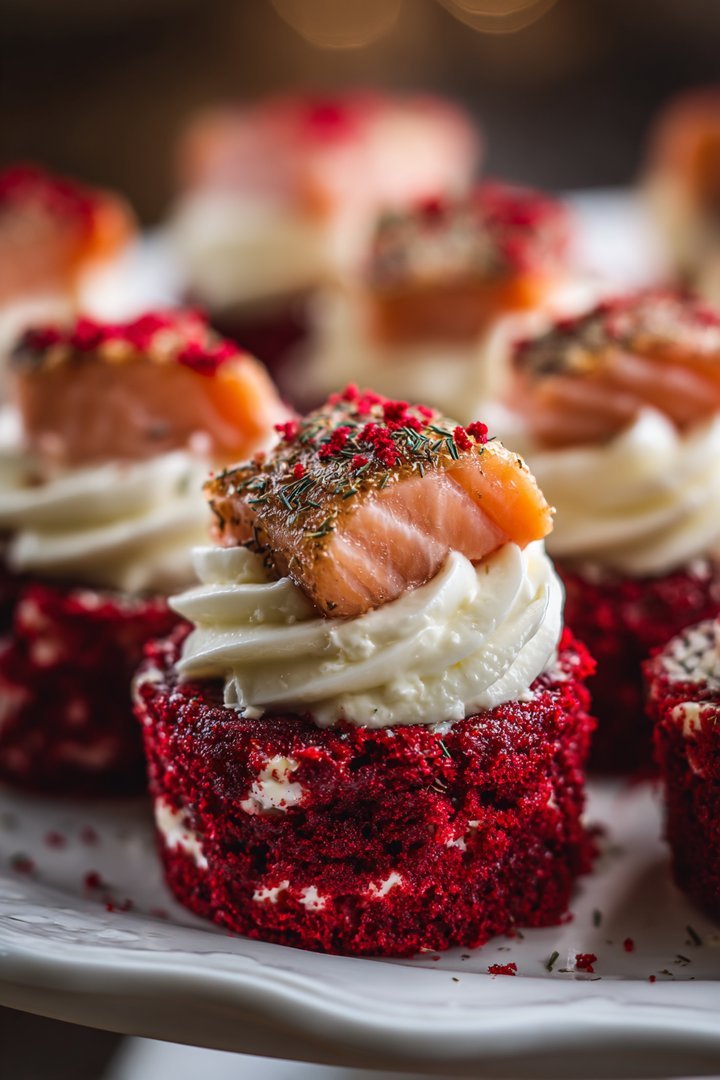
Imagine sinking your fork into a creamy, decadent dream, where the richness of cheesecake dances with the vibrant, tantalizing touch of red velvet. This isn’t just dessert; it’s The Ultimate Red Velvet Cheesecake, a culinary masterpiece that’s as delightful to look at as it is to devour.
This recipe is my love letter to all things delicious, inspired by countless experiments in my own kitchen. I remember one disastrous attempt involving a rogue food coloring incident that turned the cheesecake a shade of crimson that resembled something out of a horror movie. But fear not, this recipe has been refined to perfection, promising a perfect balance of flavor and visual appeal for any special occasion. Prepare for a flavor experience so incredible, that you will want to make this for every gathering.
- Effortless elegance: Achieve gourmet results with easy-to-follow instructions.
- Indulgent flavor: A harmonious blend of velvety cheesecake and rich red velvet.
- Visually stunning: Impress your guests with its vibrant color and beautiful layers.
- Versatile delight: Perfect for birthdays, holidays, or any celebration.
Ingredients for The Ultimate Red Velvet Cheesecake
Here’s what you’ll need to make this delicious dish:
The full ingredients list, including measurements, is provided in the recipe card directly below.
How to Make The Ultimate Red Velvet Cheesecake
Follow these simple steps to prepare this delicious dish:
Step 1: Prepare the Graham Cracker Crust
Preheat your oven to 350°F (175°C). Crush the graham crackers into fine crumbs using a food processor or by placing them in a ziplock bag and crushing them with a rolling pin. Mix the graham cracker crumbs with melted butter and press the mixture evenly into the bottom of a 9-inch springform pan. Bake for 8-10 minutes, then let cool completely.
Step 2: Mix the Red Velvet Cake Batter
In a large bowl, whisk together the flour, sugar, cocoa powder, baking soda, and salt. In a separate bowl, combine the buttermilk, vegetable oil, eggs, red food coloring, and Alcohol-free vanilla extract. Gradually add the wet ingredients to the dry ingredients, mixing until just combined. Be careful not to overmix.
Step 3: Bake the Red Velvet Layers
Divide the batter evenly between two 9-inch round cake pans lined with parchment paper. Bake for 25-30 minutes, or until a toothpick inserted into the center comes out clean. Let the cakes cool in the pans for 10 minutes, then transfer them to a wire rack to cool completely.
Step 4: Prepare the Cheesecake Filling
In a large bowl, beat the cream cheese and sour cream until smooth and creamy. Gradually add the powdered sugar, mixing until well combined. In a small saucepan, whisk the agar-agar powder with 1/4 cup of water. Bring to a simmer over medium heat, stirring constantly, until the agar-agar is completely dissolved. Let cool slightly, then whisk it into the cream cheese mixture.
Step 5: Assemble The Ultimate Red Velvet Cheesecake
Once the red velvet cakes are completely cool, level them with a serrated knife if necessary. Place one cake layer on top of the graham cracker crust in the springform pan. Pour half of the cheesecake filling over the cake layer, then top with the second cake layer. Pour the remaining cheesecake filling over the top.
Step 6: Chill and Serve
Cover the springform pan with plastic wrap and refrigerate for at least 6 hours, or preferably overnight, to allow the cheesecake to set completely. Before serving, carefully remove the cheesecake from the springform pan. Garnish with fresh berries, chocolate shavings, or a dusting of cocoa powder for an elegant touch. Cut into slices and serve chilled.
Perfecting the Cooking Process
To achieve cheesecake nirvana, nail your timing. First, blend the red velvet base ingredients and get it baking. While that’s happening, whip up the dreamy cheesecake filling. Layer them carefully and let that oven do its magic. This ensures even baking and prevents any sad, cracked surfaces.
Add Your Touch
Feeling adventurous? Swap out some of the cream cheese for mascarpone for an extra layer of decadence. Instead of traditional red food coloring, try using beet juice powder for a more natural hue. A dash of alcohol-free almond extract can also elevate the flavor profile beautifully. Let your taste buds guide you!
Storing & Reheating
This masterpiece is best enjoyed chilled. Store any leftovers in an airtight container in the refrigerator for up to four days. While reheating isn’t really a thing for cheesecake, letting it sit at room temperature for about 15 minutes before serving enhances its creamy texture.
Here are a few tips to ensure your red velvet cheesecake is a showstopper:
- Don’t overmix the cheesecake batter! Overmixing incorporates too much air, which can cause cracks during baking. Mix until just combined for a smooth, creamy texture.
- Use a water bath to bake your cheesecake. This gentle cooking method helps prevent cracking and ensures even baking, resulting in a perfectly smooth top.
- Let the cheesecake cool completely in the oven with the door ajar. This gradual cooling process helps prevent the cheesecake from sinking or cracking due to rapid temperature changes.
(Personal anecdote formated as paragraph subheading)
I remember making this for my friend Sarah’s birthday. She claimed it was the best cheesecake she had ever tasted. The red velvet and cheesecake combination was an absolute hit with everyone.
Let’s dive into the delicious world of the ultimate red velvet cheesecake, a dessert that combines the best of both worlds!
What Makes This The Ultimate Red Velvet Cheesecake?
This isn’t just any cheesecake; it’s the *ultimate* red velvet cheesecake. It’s a decadent masterpiece that perfectly marries the tangy richness of classic cheesecake with the subtle cocoa notes and vibrant color of red velvet cake. Think of it as a dessert superhero, swooping in to save the day (or at least your sweet tooth). Why settle for one dessert when you can have two in one spectacular creation?
This recipe is designed to be approachable for bakers of all skill levels. We’ll break down each step, offering tips and tricks to ensure your cheesecake is a showstopper. Get ready to impress your friends, family, or even just yourself with this irresistible treat.
Ingredients You’ll Need For The Ultimate Red Velvet Cheesecake
Before we get started, let’s gather our ingredients. Don’t worry, you probably have many of these in your pantry already.
**For the Red Velvet Layer: **
- 2 1/2 cups all-purpose flour: The foundation of our red velvet goodness.
- 2 cups granulated sugar: For sweetness and to keep things interesting.
- 1 teaspoon baking soda: This gives the cake its beautiful lift.
- 1 teaspoon baking powder: Works with the baking soda for a perfect rise.
- 1 teaspoon salt: Enhances the flavors and balances the sweetness.
- 1 cup buttermilk: Adds moisture and tanginess, crucial for red velvet.
- 1 cup vegetable oil: Keeps the cake moist and tender.
- 2 large eggs: Binds the ingredients and adds richness.
- 2 tablespoons unsweetened cocoa powder: Provides that signature cocoa flavor.
- 1 teaspoon Alcohol-free vanilla extract: Enhances all the flavors.
- 1 ounce red food coloring: For that iconic red velvet hue. You can use gel or liquid.
- 1 tablespoon white vinegar: Reacts with the baking soda for extra lift.
**For the Cheesecake Layer: **
- 32 ounces cream cheese, softened: The star of the cheesecake show! Make sure it’s fully softened to avoid lumps.
- 1 1/2 cups granulated sugar: Sweetens the cheesecake and helps create a smooth texture.
- 4 large eggs: Adds richness and structure to the cheesecake.
- 1/2 cup sour cream: Adds tanginess and moisture.
- 2 teaspoons Alcohol-free vanilla extract: Enhances the cheesecake flavor.
**For the Crust: **
- 1 1/2 cups chocolate wafer crumbs: Provides a delicious and sturdy base.
- 6 tablespoons unsalted butter, melted: Binds the crust together.
Gathering Your Equipment
Before you begin, make sure you have the necessary equipment. A 9-inch springform pan is essential for easy removal of the cheesecake. You’ll also need mixing bowls, a stand mixer or hand mixer, measuring cups and spoons, and parchment paper.
Step-by-Step Instructions For The Ultimate Red Velvet Cheesecake
Alright, let’s get baking! Follow these simple steps to create your very own ultimate red velvet cheesecake.
Preparing the Chocolate Wafer Crust
First, let’s tackle the crust. In a medium bowl, combine the chocolate wafer crumbs and melted butter. Press the mixture evenly into the bottom of your springform pan. For a super sturdy crust, you can pre-bake it in a 350°F (175°C) oven for about 8 minutes.
Making the Red Velvet Layer
Now for the red velvet magic! In a large bowl, whisk together the flour, sugar, baking soda, baking powder, and salt. In a separate bowl, combine the buttermilk, oil, eggs, cocoa powder, and Alcohol-free vanilla extract. Add the wet ingredients to the dry ingredients and mix until just combined. Be careful not to overmix!
In a small bowl, combine the red food coloring and vinegar. Add this mixture to the batter and mix until evenly colored. Pour the red velvet batter into the springform pan, over the chocolate wafer crust.
Crafting the Cheesecake Layer
Time for the creamy, dreamy cheesecake layer. In a large bowl, beat the softened cream cheese and sugar until smooth and creamy. Add the eggs one at a time, mixing well after each addition. Stir in the sour cream and Alcohol-free vanilla extract. Gently pour the cheesecake batter over the red velvet layer in the springform pan.
Baking Your Culinary Masterpiece
Now comes the crucial part: baking! Preheat your oven to 325°F (160°C). For best results, bake the cheesecake in a water bath. To do this, wrap the bottom of the springform pan in aluminum foil to prevent water from seeping in. Place the wrapped pan in a larger baking dish and fill the dish with hot water, about halfway up the sides of the springform pan.
Bake for 60-70 minutes, or until the cheesecake is set around the edges but still slightly jiggly in the center. Turn off the oven and let the cheesecake cool in the oven with the door ajar for an hour. This gradual cooling process helps prevent cracking.
Chilling and Serving
Once the cheesecake has cooled in the oven, remove it from the water bath and let it cool completely on a wire rack. Then, cover it with plastic wrap and refrigerate for at least 4 hours, or preferably overnight.
When you’re ready to serve, carefully remove the cheesecake from the springform pan. You can garnish it with a dusting of cocoa powder, a drizzle of melted white chocolate, or fresh berries.
Troubleshooting Common Cheesecake Issues
Even the best bakers sometimes encounter hiccups. Here are some solutions to common cheesecake problems:
- **Cracked Cheesecake:** This is usually caused by baking the cheesecake at too high a temperature or cooling it too quickly. Using a water bath and cooling the cheesecake gradually in the oven can help prevent cracks.
- **Lumpy Cheesecake:** This is often due to not softening the cream cheese properly. Make sure your cream cheese is fully softened before you start mixing.
- **Soggy Crust:** This can happen if the crust isn’t pre-baked or if the cheesecake filling is too wet. Pre-baking the crust can help prevent sogginess.
Exploring Different Crust Options
While we used a chocolate wafer crust in this recipe, feel free to experiment with other crust options. Graham cracker crusts, or even a red velvet cookie crumb crust, can be delicious alternatives.
Serving Suggestions for the Ultimate Red Velvet Cheesecake
This red velvet cheesecake is delicious on its own, but here are a few serving suggestions to take it to the next level:
- **Whipped Cream:** A dollop of freshly whipped cream adds a light and airy touch.
- **Berry Compote:** A homemade berry compote provides a sweet and tart contrast.
- **Chocolate Sauce:** A drizzle of warm chocolate sauce adds extra decadence.
Making It A Festive Dessert
This cheesecake is perfect for any occasion, from birthdays to holidays. For a festive touch, decorate it with holiday-themed sprinkles or edible glitter.
Variations on The Ultimate Red Velvet Cheesecake
Want to put your own spin on this recipe? Here are a few variations to try:
- **Mini Cheesecakes:** Make individual mini cheesecakes using muffin tins. This is great for parties!
- **Red Velvet Cheesecake Bars:** Bake the cheesecake in a rectangular pan and cut it into bars for a portable treat.
- **Red Velvet Swirl Cheesecake:** Swirl some extra red velvet batter into the cheesecake batter for a marbled effect.
Conclusion for The Ultimate Red Velvet Cheesecake
So there you have it! The Ultimate Red Velvet Cheesecake, a dessert that’s as fun to make as it is to eat. It’s a delightful fusion of classic flavors, perfect for any occasion. With its vibrant color, creamy texture, and irresistible taste, it’s guaranteed to impress. Don’t be intimidated; with a few simple tips and tricks, you can create a show-stopping cheesecake that everyone will rave about. Now, go forth and bake something amazing! You deserve it, and so do your taste buds.
Print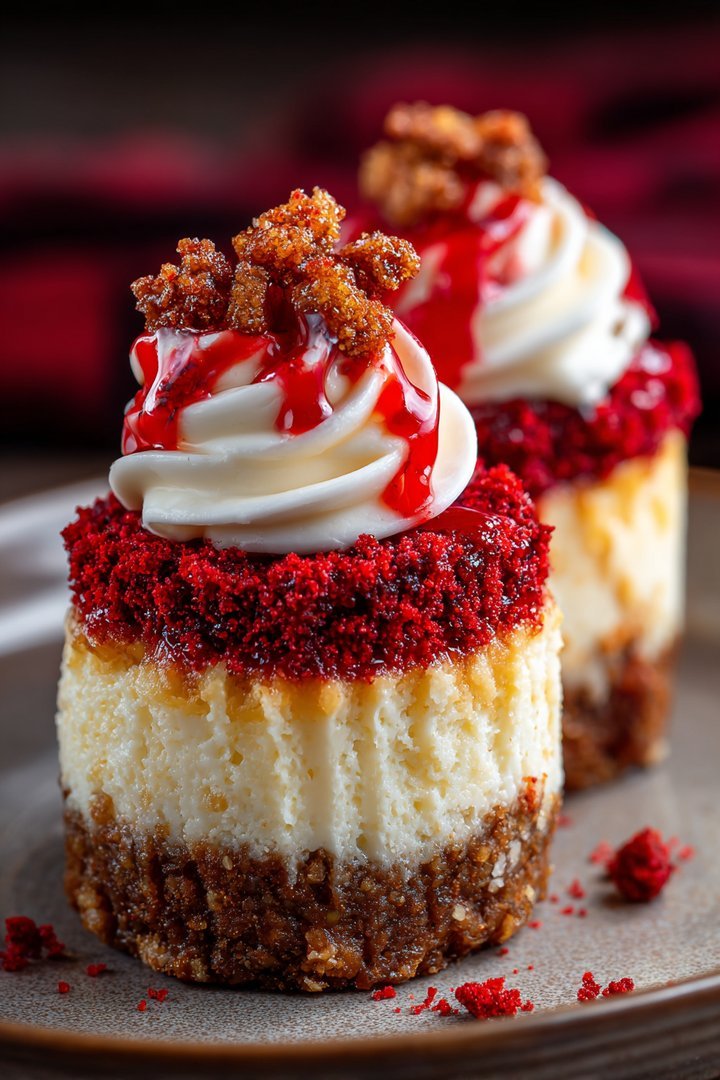
The Ultimate Red Velvet Cheesecake
Delicious the ultimate red velvet cheesecake recipe with detailed instructions and nutritional information.
- Total Time: 35 minutes
- Yield: 4 servings
Ingredients
- All-purpose flour: 2 cups
- Granulated sugar: 1 3/4 cups
- Unsweetened cocoa powder: 2 tablespoons
- Baking soda: 1 teaspoon
- Buttermilk: 1 cup
- Vegetable oil: 1/2 cup
- Red food coloring: 2 ounces
- Cream cheese (softened): 32 ounces
Instructions
- Step 1: Preheat oven to 350°F (175°C). Grease and flour a 9-inch springform pan. In a large bowl, whisk together flour, sugar, cocoa powder, and baking soda.
- Step 2: In a separate bowl, combine buttermilk, oil, red food coloring, vanilla extract and eggs. Add the wet ingredients to the dry ingredients and mix until just combined. Do not overmix.
- Step 3: Pour batter into prepared pan and bake for 30-35 minutes, or until a toothpick inserted into the center comes out clean. Let cool completely in the pan on a wire rack.
- Step 4: For the cheesecake layer, beat the softened cream cheese and sugar until smooth. Add eggs one at a time, beating well after each addition. Gently fold in the sour cream and vanilla extract.
- Step 5: Pour cheesecake mixture over the cooled red velvet cake layer. Bake for another 50-60 minutes, or until the edges are set but the center still jiggles slightly. Turn off the oven and let the cheesecake cool in the oven for 1 hour with the door slightly ajar.
Notes
- For best results, store leftover cheesecake tightly covered in the refrigerator for up to 3 days to maintain its creamy texture.
- If you want to slightly warm a slice, microwave it in 10-second intervals to avoid melting the cheesecake layer.
- Serve with a dollop of lightly sweetened whipped cream and a dusting of cocoa powder for an elegant presentation.
- To prevent cracks in the cheesecake, ensure your cream cheese is thoroughly softened and avoid overbaking; a slight jiggle in the center is key.
- Prep Time: 15 minutes
- Cook Time: 20 minutes
- Method: Stovetop
- Cuisine: American
FAQs
What makes The Ultimate Red Velvet Cheesecake so special?
Well, picture this: You’re at a party, and everyone’s gathered around the dessert table, eyes gleaming. Then, *bam*, they see it: The Ultimate Red Velvet Cheesecake. It’s not just a dessert; it’s a showstopper! We’ve taken the classic red velvet cake, known for its cocoa undertones and vibrant color, and swirled it into a creamy cheesecake batter. This creates a dessert that’s both familiar and unexpectedly decadent. The flavors dance on your tongue. It combines the tangy cheesecake, the slight chocolate hint from the red velvet, and a rich, smooth texture. It’s unforgettable!
How do I prevent cracks in my cheesecake?
Ah, the dreaded cheesecake crack! It’s a common baking woe, but don’t fret! The secret is gentle baking and cooling. Use a water bath! This creates a humid environment that prevents the cheesecake from drying out too quickly, which can cause cracks. Also, avoid opening the oven door during baking. Temperature fluctuations are a no-no. Once it’s done, turn off the oven and let the cheesecake cool inside with the door slightly ajar for about an hour. Then, move it to the fridge for several hours before serving. Patience is key, and your cheesecake will thank you!
Can I make this Red Velvet Cheesecake ahead of time?
Absolutely! In fact, I highly recommend it. The Ultimate Red Velvet Cheesecake is actually better the next day (or even the day after that, shhh!). The flavors meld together and the texture becomes even more luscious as it chills in the refrigerator. Just make sure to wrap it tightly in plastic wrap to prevent it from absorbing any fridge odors. When you’re ready to serve, let it sit at room temperature for about 15-20 minutes to soften slightly. Your future self will thank you for planning ahead and having this incredible treat ready to go.
What kind of cream cheese should I use for this cheesecake recipe?
Full-fat cream cheese is essential for achieving that creamy, decadent texture we all crave in a cheesecake. Don’t even think about using the reduced-fat stuff! It just doesn’t have the same richness. Make sure your cream cheese is softened to room temperature before you start mixing. This will help prevent lumps and ensure a smooth, velvety batter. Trust me, the extra fat is worth every single calorie in the delicious The Ultimate Red Velvet Cheesecake. Go big or go home, right?

Leave a Comment