

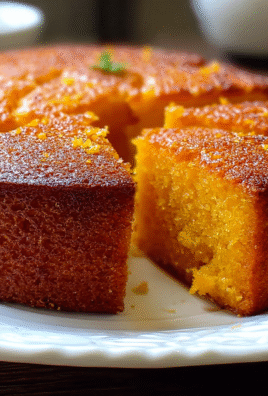
Salted Honey Pie: A Perfect Blend of Sweet and Salty – it’s a symphony of flavors that dance on your tongue, a sweet serenade punctuated by a salty wink. Imagine golden honey, its floral notes embracing a whisper of sea salt, all nestled in a buttery, flaky crust.
This isn’t just dessert; it’s a hug from your grandma, a summer picnic under the willow tree, and a cozy evening by the fire, all rolled into one delightful pie. It’s the kind of treat that makes you close your eyes, sigh contentedly, and maybe, just maybe, lick the plate clean when no one’s looking. It’s nostalgia with a pinch of panache.
- Effortlessly balances the sweetness of honey with a delightful salty counterpoint.
- Offers a unique flavor profile that’s both comforting and surprisingly sophisticated.
- Boasts a beautiful golden hue and a rustic charm that’s visually appealing.
- Perfect for any occasion, from casual weeknight dinners to elegant celebrations.
Ingredients for Salted Honey Pie: A Perfect Blend of Sweet and Salty
Here’s what you’ll need to make this delicious dish:
The full ingredients list, including measurements, is provided in the recipe card directly below.
How to Make Salted Honey Pie: A Perfect Blend of Sweet and Salty
Follow these simple steps to prepare this delicious dish:
Step 1: Prepare the Pie Crust
In a large bowl, whisk together the flour, sugar, and salt. Cut in the cold butter using a pastry blender or your fingers until the mixture resembles coarse crumbs. Gradually add the ice water, mixing until the dough just comes together. Form the dough into a disc, wrap it in plastic wrap, and chill in the refrigerator for at least 30 minutes.
Step 2: Roll Out and Shape the Crust
On a lightly floured surface, roll out the chilled dough to a 12-inch circle. Carefully transfer the dough to a 9-inch pie plate. Trim the edges and crimp the crust decoratively. Preheat oven to 375°F (190°C).
Step 3: Make the Honey Filling
In a medium bowl, whisk together the honey, heavy cream, eggs, Alcohol-free vanilla extract, and sea salt until smooth. Be careful not to over-whisk.
Step 4: Bake the Pie
Pour the honey filling into the prepared pie crust. Bake for 45-55 minutes, or until the filling is set but still slightly jiggly in the center. If the crust starts to brown too quickly, cover the edges with foil.
Step 5: Cool and Serve
Let the pie cool completely on a wire rack before slicing and serving. This allows the filling to set properly.
Transfer to plates and drizzle with a little extra honey and a sprinkle of sea salt for the perfect finishing touch. Enjoy!
Salted Honey Pie: A Perfect Blend of Sweet and Salty – A Culinary Adventure
I once watched a cooking show where the chef declared, “Salt is the new sugar!” I scoffed, dramatically clutching my chocolate bar. Little did I know, I was about to embark on a culinary quest that would change my perspective forever. That quest led me to the absolutely delightful, unexpectedly addictive, and utterly fantastic Salted Honey Pie: A Perfect Blend of Sweet and Salty.
Why Salted Honey Pie Will Conquer Your Taste Buds
Let’s be honest, pie is already pretty great. It’s comforting, nostalgic, and the perfect vehicle for, well, just about anything delicious. But this isn’t your grandma’s apple pie (unless your grandma is secretly a culinary genius with a penchant for avant-garde desserts). The magic lies in the contrast: the soothing sweetness of honey perfectly balanced by a generous pinch of salt. The first bite is a revelation. It’s like a tiny explosion of flavor in your mouth, a delicate dance between opposing forces that somehow create perfect harmony. Seriously, prepare to be amazed. It’s a sweet treat with a savory twist that will leave you wanting more.
Gathering Your Ingredients: The A-Team of Pie Perfection
Before we dive into creating this masterpiece, let’s gather our ingredients. Don’t worry, you won’t need any exotic unicorn tears or sustainably harvested moonbeams. Just good, honest ingredients that you can probably find in your pantry right now.
Here’s what you’ll need:
- **For the Crust:**
- 1 ½ cups all-purpose flour
- ½ teaspoon salt
- ½ cup (1 stick) cold unsalted butter, cut into cubes
- ¼ cup ice water
- **For the Filling:**
- 1 cup honey (local is always a plus!)
- ½ cup heavy cream
- ¼ cup unsalted butter, melted
- 2 large eggs
- 2 large egg yolks
- 1 teaspoon Alcohol-free vanilla extract
- 1 teaspoon apple cider vinegar (Trust me on this one!)
- 1 teaspoon sea salt (flaky is best for that extra oomph)
Now, I know what you’re thinking: “Apple cider vinegar in a pie? Is she crazy?” Trust me, it’s not crazy. It’s genius! The vinegar adds just a hint of tanginess that cuts through the sweetness of the honey and elevates the whole flavor profile. Think of it as the secret weapon in your quest for pie perfection.
Crafting the Crust: The Foundation of Flavor
Alright, let’s talk crust. You can, of course, use a store-bought crust. No judgment here. But if you’re feeling adventurous (and want to earn some serious baking bragging rights), I highly recommend making your own. It’s easier than you think, and the results are SO worth it.
1. **Mix the Dry Ingredients: ** In a large bowl, whisk together the flour and salt.
2. **Cut in the Butter: ** Add the cold butter cubes and use a pastry blender (or your fingers) to cut the butter into the flour until the mixture resembles coarse crumbs. The key here is to keep the butter cold. This creates those lovely flaky layers we all crave.
3. **Add the Water: ** Gradually add the ice water, one tablespoon at a time, mixing until the dough just comes together. Don’t overmix!
4. **Chill Out: ** Form the dough into a disk, wrap it in plastic wrap, and refrigerate for at least 30 minutes. This allows the gluten to relax and prevents the crust from shrinking during baking.
While the dough is chilling, you can start prepping the filling. Multitasking, people!
Whipping Up the Filling: Sweetness and Saltiness Unite
Okay, now for the star of the show: the Salted Honey Pie filling. This is where the magic happens.
1. **Whisk Away: ** In a medium bowl, whisk together the honey, heavy cream, melted butter, eggs, egg yolks, Alcohol-free vanilla extract, and apple cider vinegar.
2. **Salt Bae Moment: ** Add the sea salt. Don’t be shy! This is what gives the pie its signature salted flavor.
That’s it! The filling is ready. See? I told you it was easy.
Assembling Your Masterpiece: From Dough to Deliciousness
Now for the grand finale: assembling the pie.
1. **Roll Out the Dough: ** On a lightly floured surface, roll out the chilled dough into a 12-inch circle.
2. **Transfer to Pie Plate: ** Carefully transfer the dough to a 9-inch pie plate. Crimp the edges decoratively.
3. **Pour in the Filling: ** Pour the honey filling into the crust.
4. **Bake Time: ** Bake in a preheated oven at 350°F (175°C) for 45-55 minutes, or until the filling is set but still slightly jiggly in the center.
5. **Cool Completely: ** Let the pie cool completely on a wire rack before serving. This is crucial! The filling needs time to set up properly.
The Moment of Truth: Serving and Savoring
Finally, the moment you’ve been waiting for: tasting your masterpiece! Slice yourself a generous piece of Salted Honey Pie and prepare for a flavor explosion. The sweet honey, the rich custard, the flaky crust, and that hint of saltiness… it’s pure pie perfection.
Optional (but highly recommended) toppings: a dollop of whipped cream, a drizzle of extra honey, or a sprinkle of flaky sea salt.
Perfecting the Cooking Process

For maximum efficiency, prepare the crust ahead of time and chill it while the oven preheats. Combine all filling ingredients while the crust chills to streamline the assembly process. This ensures a smooth and enjoyable baking experience.
Add Your Touch
Feel free to experiment with different types of honey, such as buckwheat or wildflower, to add unique flavor nuances. Add a pinch of cinnamon or nutmeg to the filling for a warmer, spicier twist. A few drops of lemon juice can enhance the tanginess.
Storing & Reheating
Store leftover Salted Honey Pie in the refrigerator, covered, for up to 3 days. To reheat, warm individual slices in a preheated oven at 300°F (150°C) for about 10 minutes, or until heated through.
Here are some tips for baking success:
- Make sure your butter is very cold when making the crust. This is key to creating those flaky layers.
- Don’t overbake the pie! The filling should still be slightly jiggly in the center when you take it out of the oven. It will continue to set as it cools.
- If the crust starts to brown too quickly, tent it with foil during the last 15-20 minutes of baking.
(Personal anecdote formated as paragraph subheading)
My friends declared that it tasted like a “fancy fair food,” which I took as a huge compliment! It disappeared within minutes.
Salted Honey Pie: A Perfect Blend of Sweet and Salty is a Definite Keeper
So there you have it: my ode to the Salted Honey Pie: A Perfect Blend of Sweet and Salty. It’s a dessert that’s both comforting and exciting, familiar and unexpected. It’s the kind of pie that will make you say, “Wow, I didn’t know pie could taste like this!” And who knows, maybe you’ll even start declaring, “Salt is the new sugar!” (Okay, maybe not. But you’ll definitely appreciate the magic of salt in your desserts). Happy baking!
Conclusion for Salted Honey Pie: A Perfect Blend of Sweet and Salty
This Salted Honey Pie: A Perfect Blend of Sweet and Salty is a delightful dessert that combines the comforting sweetness of honey with a surprising hint of salt. This unique combination creates a symphony of flavors that will leave everyone wanting more. Whether you choose a homemade crust or a store-bought shortcut, the rich, flavorful filling is the star of the show. Easy to make ahead and perfect for any occasion, this pie is sure to become a new favorite. Enjoy every delicious bite!
Print
Salted Honey Pie: A Perfect Blend of Sweet and Salty
Delicious salted honey pie: a perfect blend of sweet and salty recipe with detailed instructions and nutritional information.
- Total Time: 35 minutes
- Yield: 4 servings
Ingredients
- All-purpose flour: 1 1/2 cups
- Unsalted butter, cold and cubed: 12 tablespoons
- Ice water: 5-7 tablespoons
- Honey: 3/4 cup
- Heavy cream: 1/2 cup
- Large eggs: 3
- Vanilla extract: 1 teaspoon
- Sea salt: 1 teaspoon
Instructions
- Step 1: Prepare the crust. In a large bowl, combine flour and salt. Cut in the cold butter using a pastry blender or your fingers until the mixture resembles coarse crumbs. Gradually add ice water, one tablespoon at a time, mixing until the dough just comes together.
- Step 2: Wrap the dough in plastic wrap and chill for at least 30 minutes. Roll out the dough on a lightly floured surface to a 12-inch circle. Transfer to a 9-inch pie plate, trim the edges, and crimp.
- Step 3: Preheat oven to 350°F (175°C). In a medium bowl, whisk together honey, heavy cream, eggs, vanilla extract, and sea salt until well combined.
- Step 4: Pour the honey mixture into the prepared pie crust.
- Step 5: Bake for 40-50 minutes, or until the filling is set around the edges but still slightly wobbly in the center.
- Step 6: Let the pie cool completely on a wire rack before slicing and serving. Refrigerate leftovers.
Notes
- For best flavor, store leftover Salted Honey Pie in the refrigerator, covered, for up to 3 days.
- Gently warm individual slices in the microwave for 15-20 seconds to enhance the honey flavor.
- A dollop of whipped cream or a scoop of vanilla ice cream perfectly complements the pie's sweet and salty notes.
- Be careful not to overbake; the filling should have a slight jiggle when you take it out, as it will continue to set as it cools.
- Prep Time: 15 minutes
- Cook Time: 20 minutes
- Method: Stovetop
- Cuisine: American
FAQs
How do I store leftover Salted Honey Pie?
Storing leftover Salted Honey Pie is simple! Just cover it loosely with plastic wrap or foil, or place it in an airtight container. Keep it in the refrigerator, and it will stay delicious for up to three days. The cool temperature helps maintain the pie’s texture and flavor, ensuring each slice is as delightful as the first. If you want to keep it longer, you can freeze individual slices for up to a month. Just thaw them in the refrigerator before serving. This pie is so good; leftovers are a rare occurrence, but it’s always good to know how to preserve the magic!
Can I use a store-bought crust for this Salted Honey Pie?
Absolutely! While a homemade crust adds a special touch, using a store-bought crust is a fantastic time-saver. Opt for a high-quality, all-butter crust for the best flavor. Make sure to blind-bake it according to the package instructions to prevent a soggy bottom. No one will judge you for taking a shortcut, especially when the filling is this amazing. In fact, using a store-bought crust lets you focus all your energy on creating that perfect salted honey filling, which is the real star of the show.
What kind of honey is best for Salted Honey Pie?
The best honey for this pie is one with a rich, distinct flavor. Wildflower honey or buckwheat honey will add a unique depth to the pie. However, you can also use clover honey for a milder, classic honey taste. Experimenting with different types of honey can transform the pie’s flavor profile, so don’t be afraid to try something new. Just be sure to choose a high-quality honey for the best results. Remember, the honey is a key component, so make it count!
Can I make this Salted Honey Pie ahead of time?
Yes, you can definitely make this Salted Honey Pie ahead of time! The filling actually benefits from resting, as the flavors meld together beautifully. You can prepare the entire pie a day in advance and store it in the refrigerator. Just let it come to room temperature slightly before serving to enhance the honey flavor and crust texture. This makes it an ideal dessert for holidays or dinner parties when you want to get ahead on your baking. Plus, it’s one less thing to worry about on the day of your event!


Leave a Comment