

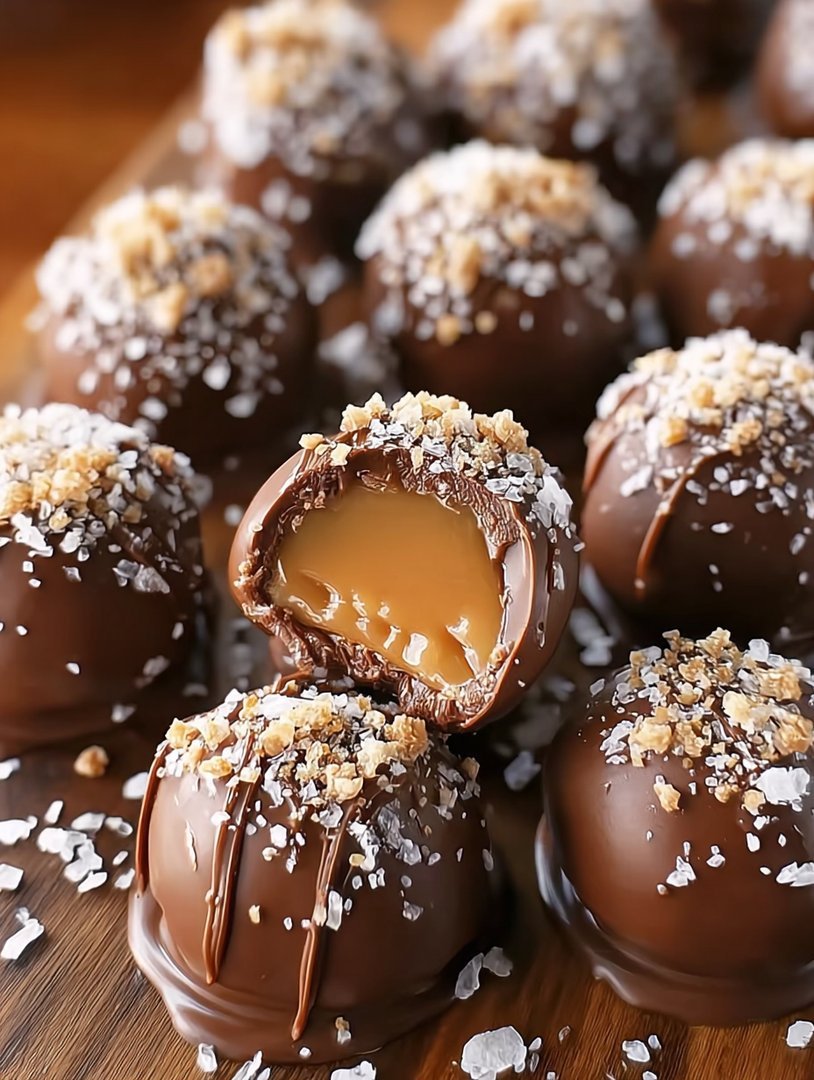
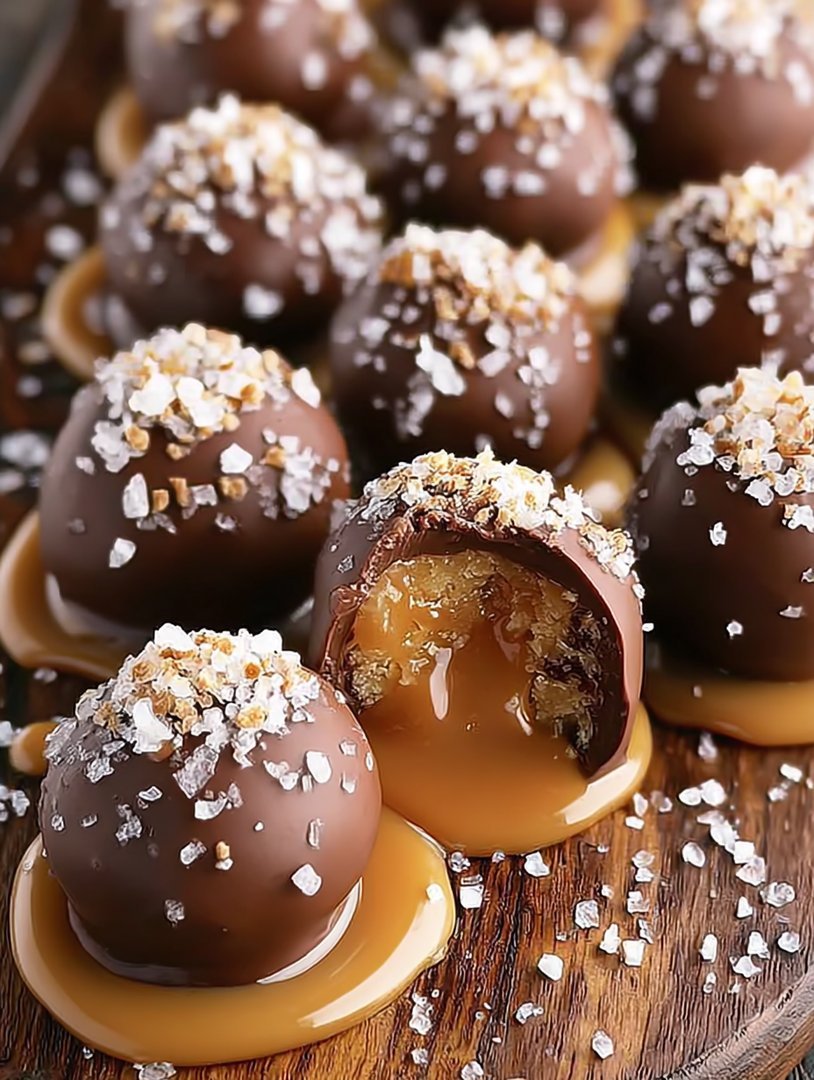
Remember that time you tried to make fancy desserts and ended up with a melted disaster? TheseSalted Caramel Truffleserase those memories completely, proving that decadent indulgence doesn’t require a culinary degree.
They deliver that perfect marriage of deep, dark chocolate and sweet, savory caramel—a masterpiece in miniature, guaranteed to make you the hero of any gathering.
- Rich, deep chocolate ganache perfectly balances the sweet and salty punch of homemade caramel sauce for complex and memorable flavor.
- Effortless preparation allows even beginner bakers to create professional-quality, decadent candy with minimal fuss and only basic kitchen tools.
- Their elegant, dust-coated presentation makes these delightful spheres ideal for gifting, impressive dessert platters, or a sophisticated midnight snack.
- Customize these gourmet bites by rolling them in toasted coconut, crushed pecans, or festive sprinkles for holiday versatility and visual appeal.
Ingredients for Salted Caramel Truffles
Here’s what you’ll need to make this delicious dish:
- Dark ChocolateSelect a high-quality chocolate (at least 60% cacao) for the best flavor foundation; standard chocolate chips work, but quality bars melt smoother.
- Heavy CreamThis provides the necessary fat content for a rich, silky ganache that will firm up perfectly when chilled.
- Unsalted ButterUse good quality dairy butter to add richness and depth to both the caramel and the chocolate base.
- Granulated SugarThe base for the luxurious caramel sauce; ensure it is fully melted and golden brown before adding other ingredients.
- Vanilla Bean PasteA small amount enhances the overall sweetness and complexity of the chocolate flavor profile.
- Sea Salt FlakesEssential for the “salted” element, use flaky salt like Maldon for a delightful textural crunch and burst of salinity.
- Cocoa Powder or Confectioners’ SugarUsed for dusting the finished truffles to prevent sticking and give them their classic elegant look.
The full ingredients list, including measurements, is provided in the recipe card directly below.
How to Make Salted Caramel Truffles
Follow these simple steps to prepare this delicious dish:
- Step 1: Crafting the Liquid Gold Caramel
In a heavy-bottomed saucepan, heat the granulated sugar over medium heat without stirring. Allow the sugar to melt slowly until it turns a rich amber color. Remove the pan from the heat immediately and whisk in the unsalted butter until smooth. Carefully pour in the heavy cream—be cautious, as the mixture will bubble vigorously—and stir until fully incorporated and smooth. Finally, stir in 1 teaspoon of sea salt and set the caramel aside to cool slightly.
- Step 2: Preparing the Decadent Ganache Base
Place the chopped dark chocolate or chocolate chips in a heatproof bowl. In a separate saucepan, heat the remaining heavy cream just until simmering, then pour the hot cream over the chocolate. Let it stand undisturbed for five minutes to allow the chocolate to melt completely. Add the vanilla bean paste, then stir gently from the center outwards until the mixture forms a homogenous, glossy ganache.
- Step 3: Combining, Chilling, and Setting
Once the caramel has cooled to lukewarm, reserve about 2 tablespoons for drizzling later. Gently fold the remaining caramel into the chocolate ganache until it creates beautiful, deep caramel swirls throughout the mixture. Cover the bowl and refrigerate for at least 4 hours, or preferably overnight, until the mixture is firm enough to roll without sticking excessively to your hands.
- Step 4: Rolling and Finishing the Truffles
Line a baking sheet with parchment paper. Use a small cookie scoop or two teaspoons to portion the chilled ganache mixture. Quickly roll each portion between your palms into uniform spheres. Immediately roll the spheres in a shallow dish of cocoa powder or confectioners’ sugar until fully coated. Return the finishedSalted Caramel Trufflesto the prepared baking sheet.
Transfer the finished truffles to an airtight container and store them in the refrigerator, pulling them out about 20 minutes before serving for the optimal soft texture.
The Secret to Perfect Salted Caramel Truffles
Making truffles sounds incredibly fancy, conjuring images of white gloves and Parisian confectioneries, but the reality is beautifully simple. The success of these delicious little bombs of flavor hinges entirely on mastering two core elements: the ganache and the caramel. If you get these two textures right, the rest is just rolling and dusting.
Why Texture Matters: Mastering the Ganache
Ganache is fundamentally an emulsion—a delicate blend of fat (from the cream) and cocoa solids (from the chocolate). When you heat the cream, it helps the chocolate melt uniformly, and the stirring action emulsifies the mixture, trapping the fat molecules within the liquid. A common mistake is overheating the cream, which can cause the ganache to separate or become grainy. You only want the cream to simmer slightly; do not allow it to boil vigorously. Another critical factor is the chocolate quality. Better chocolate contains more cocoa butter, leading to a smoother, shinier ganache that sets perfectly. If your ganache looks oily or separated, try stirring in one teaspoon of room-temperature cream—it often helps shock the fats back into emulsion.
The key to perfect rolling is achieving the correct chilled consistency. If you try to roll the ganache too early, you end up with a sticky mess resembling chocolate mud, which is hilarious but frustrating. If you chill it too long, it becomes rock hard and cracks when rolled. The ideal texture is firm yet pliable, similar to modeling clay. This usually takes between four and six hours in a standard refrigerator. If you are short on time, you can chill the mixture in the freezer for about 90 minutes, checking every 30 minutes, but be vigilant to prevent freezing.
The Science of the Salted Caramel Swirl
Caramel, at its heart, is caramelized sugar. Heating sugar transforms sucrose into hundreds of compounds, giving it that distinctively deep, complex flavor that plain sugar lacks. For a flawless sauce, consistency in heat is crucial. Use a medium heat setting and resist the urge to stir the sugar until most of it has melted. Stirring introduces air and can cause crystallization, leading to grainy caramel. Once the sugar achieves a rich amber, adding the butter and cream stops the caramelization process immediately. The salty element is not just for taste; salt is a flavor enhancer that cuts through the intense sweetness of the chocolate and sugar, elevating the overall sensory experience. Using flaky sea salt, rather than fine table salt, provides pockets of salinity that burst in your mouth, providing a delightful textural contrast with the smooth truffle coating.
Troubleshooting Common Truffle Mistakes
Even seasoned home cooks sometimes hit bumps when attempting confectionery. Because these delightful spheres rely on precise ratios and temperatures, a small misstep can sometimes affect the final outcome. Fortunately, most truffle issues are easily salvageable with a little kitchen know-how.
My Ganache is Too Runny!
If your ganache mixture feels too liquid after several hours of chilling, there are a few potential culprits. Often, this happens if the cream-to-chocolate ratio was slightly off, or if you used chocolate with a lower cocoa solid content (which has fewer stabilizers). Do not panic. Simply melt 2 to 4 ounces of additional dark chocolate and stir it into your runny mixture. This boosts the chocolate solids and helps the mixture set firmer when refrigerated. Alternatively, you can add 1 tablespoon of finely powdered cocoa powder, which acts as a binder and thickens the mixture without significantly altering the flavor.
How to Get Perfectly Round Shapes
Achieving those bakery-worthy, perfectly round spheres requires patience and the right temperature. If the mixture starts sticking to your hands during rolling, your hands are too warm, or the ganache has softened too much. The trick is to work quickly in small batches. Use disposable gloves if your hands run hot. If you find the entire batch has become too soft, place the entire tray back into the refrigerator for 15 minutes to firm up again. Using a melon baller or a small cookie scoop ensures uniform portions, making the final rolling much easier and resulting in consistently sized Salted Caramel Truffles.
Flavor Variations and Customization
While the classicSalted Caramel Trufflesare spectacular on their own, half the fun of making homemade candy is experimenting with flavor infusions and coatings. These variations allow you to tailor the truffles to different occasions or dietary preferences, keeping your dessert plate fresh and exciting.
Consider introducing a citrus twist by grating the zest of one orange into the warm cream before pouring it over the chocolate. The orange complements the dark chocolate beautifully and adds a refreshing note. For a spiced version ideal for autumn, stir in a quarter teaspoon of finely ground cardamom or cinnamon into the ganache mixture. If you love a mocha flavor, substitute 2 tablespoons of the heavy cream with very strong, freshly brewed coffee or espresso.
Exciting Coating Ideas
The final coating defines the visual appeal and adds crucial texture. Moving beyond standard cocoa powder opens up a world of possibilities. Try rolling the truffles in finely chopped toasted pecans, almonds, or walnuts for a delightful crunch. For an extremely elegant look, temper a small amount of dark chocolate and dip the finished truffles, creating a hard, glossy shell. You can also mix freeze-dried raspberry powder with confectioners’ sugar for a vibrant pink coating that offers a tart contrast to the rich caramel interior. Another simple but stunning option is simply rolling them in edible gold dust for an immediate wow factor at holiday parties.
Remember that truffles make fantastic gifts. Place a selection of different coatings in small cellophane bags tied with a ribbon, and you have a gourmet present that costs far less than buying similar items from a specialty chocolatier.
Frequently Asked Questions About Making Gourmet Truffles
How long do homemade Salted Caramel Truffles last?
When stored properly in an airtight container in the refrigerator, these truffles maintain their freshness and flavor for up to two weeks. However, due to their irresistible nature, they rarely last longer than a weekend.
Can I freeze the truffle mixture?
Yes, you can freeze truffles. Roll them into balls first, place them on a parchment-lined tray until solid, then transfer them to a freezer-safe bag. They will keep well for up to three months. Thaw them overnight in the refrigerator before serving.
What kind of salt works best for the salted caramel element?
Flaky sea salt, such as Maldon, is superior for achieving the perfect “salt pop.” Its pyramid shape and delicate crunch offer a better texture and flavor release compared to fine table salt, which tends to dissolve too quickly into the caramel.
Is it possible to make the caramel without using butter?
While butter provides necessary fat and flavor depth, you can substitute it with a high-quality, non-dairy butter alternative. Ensure the substitute has a similar high-fat content to achieve the right creamy texture in the finished caramel sauce.
Welcome, fellow dessert enthusiasts! Have you ever tried to make that fancy, gourmet treat—the kind that costs an arm and a leg at boutique candy shops—only to have it turn into a sticky, sad mess? Yeah, me too. I spent years chasing the elusive balance of buttery sweetness and sharp salinity, convinced that professional pastry chefs had some secret handshake I wasn’t privy to. I imagined them in white coats, guarding the single, perfect recipe for salted caramel truffles.
But guess what? They don’t. The magic of truly incredible, melt-in-your-mouth confections lies entirely in technique, patience, and using quality ingredients. We are about to unlock the culinary vault and craft homemadeSalted Caramel Trufflesthat are so ridiculously good, they should probably be illegal. These aren’t just candies; they are little spheres of pure, unadulterated bliss that provide the perfect combination of rich chocolate and deep, complex caramel. Forget those chalky, mass-produced versions; once you try this recipe, you will be hosting your own fancy chocolate tasting parties.
Ingredients for Divine Caramelized Spheres
For the Caramel Ganache Base
- 1 cup (240ml) heavy cream (35% fat)
- 1 cup (200g) granulated sugar
- 6 tablespoons (85g) unsalted butter, cubed
- 1 teaspoon vanilla bean paste
- 1 teaspoon high-quality flaked sea salt (plus more for garnish)
- 12 ounces (340g) high-quality dark chocolate (at least 60% cacao), finely chopped
For Rolling and Finishing
- ½ cup unsweetened cocoa powder
- ¼ cup finely chopped pecans or walnuts (optional)
The Essential Equipment Checklist
You don’t need a professional kitchen, but a few tools make this process seamless. You will definitely need a heavy-bottomed saucepan to prevent the caramel from scorching, a reliable candy thermometer (though we will use visual cues, it’s a good backup), and a sturdy rubber spatula for mixing the ganache. Also, ensure you have a few small baking sheets lined with parchment paper ready for cooling and setting the chocolate delights.
Step-by-Step: Crafting Your Salted Caramel Truffles
Making caramel can feel intimidating, but remember: confidence is key. If you panic and stir prematurely, you invite crystallization, and nobody wants crunchy caramel. Follow these steps meticulously for smooth, silky results every single time.
Mastering the Caramel
- In your heavy-bottomed saucepan, spread the granulated sugar evenly across the bottom. Place the pan over medium heat. Do not stir initially.
- Watch patiently as the sugar begins to melt around the edges. Once you see liquid forming, you can gently swirl the pan to encourage even melting. Wait until all the sugar has liquefied and turned a deep amber color, resembling dark honey. This usually takes about 8 to 10 minutes. The darker the color, the deeper the flavor, but beware of burning.
- Remove the caramel immediately from the heat. Carefully whisk in the cubed butter until fully melted. The mixture will bubble vigorously; this is normal.
- Slowly pour the heavy cream into the caramel mixture while continuously whisking. Again, it will bubble and seize slightly, but keep whisking until everything is smooth and uniform.
- Stir in the vanilla bean paste and one teaspoon of flaked sea salt. Set the salted caramel mixture aside for five minutes to cool slightly.
Creating the Silky Ganache
- Place the finely chopped dark chocolate in a heatproof bowl.
- Pour the warm caramel mixture over the chopped chocolate. Let it sit undisturbed for three minutes. This allows the heat of the caramel to melt the chocolate evenly.
- Using a rubber spatula, begin stirring gently from the center outwards until the mixture becomes a smooth, glossy emulsion—your ganache.
- Cover the bowl and refrigerate the ganache for at least 4 hours, or preferably overnight. The mixture must be firm enough to scoop and roll without sticking excessively to your hands.
Rolling and Finishing the Gourmet Confections
- Once the ganache is firm, use a small cookie scoop or two spoons to measure out uniform portions (about 1 tablespoon each).
- Working quickly, roll the portions between your palms to form smooth spheres. If the mixture gets too sticky, place it back in the fridge for 15 minutes.
- Place the cocoa powder (and optional chopped nuts) in a shallow dish. Roll the caramel spheres immediately in the coating until completely covered.
- Transfer the finished truffles to a serving platter or an airtight container. Sprinkle a tiny extra pinch of flaked salt on top of each treat just before serving for that final flavor burst.
Troubleshooting Common Truffle Issues
Even seasoned home cooks occasionally face hiccups, especially when working with temperature-sensitive ingredients like chocolate and caramel. Don’t worry if your first batch isn’t perfect; we have solutions for the most common truffle troubles.
Why is my ganache gritty or separated?
Gritty ganache often happens when the caramel crystallizes during the melting process. To avoid this, always start with a clean pan and avoid stirring the sugar until the edges begin to liquefy. If your ganache looks oily or separated, it means the emulsion broke. Try whisking in one teaspoon of warm cream or broth (if using savory caramel) until the mixture snaps back together, restoring its smooth, luxurious texture.
My truffles won’t hold their shape!
If your chocolate delights are too soft to roll, they simply need more time to chill. The ratio of cream to chocolate is crucial, but refrigeration time is equally important. Ensure they have spent at least four hours, or even overnight, in the coldest part of your fridge. If they are still too soft after a proper chill, you may need to gently remelt the mixture and add one or two ounces of extra chopped chocolate to stiffen the overall structure, then re-chill.
Perfecting the Cooking Process
For these gourmet confections, first create the luscious caramel base, ensuring it hits the perfect amber hue without burning. While the caramel cools slightly, melt your high-quality dark chocolate slowly. Combine them smoothly before chilling the ganache completely. This sequence guarantees a silky, uniform texture.
Add Your Touch
Elevate these treats by swapping the dark chocolate for milk chocolate for a milder flavor. Try adding a pinch of chili powder to the ganache for a spicy kick, or roll the finished chocolate delights in crushed freeze-dried raspberries instead of cocoa powder for a vibrant finish.
Storing & Reheating
Store your finished truffles in an airtight container in the refrigerator for up to two weeks, or freeze them for up to three months. Allow frozen treats to thaw overnight in the fridge before serving. Never reheat truffles; they lose their structure and satisfying snap.
My Aunt Mildred once tried to make these while distracting herself with a podcast, leading to a disastrously gritty batch. She learned quickly that crafting perfect chocolate confections requires absolute focus and patience.
Chef’s Expert Tips for Silky Smooth Results
- Always use heavy whipping cream (35% fat minimum) for the ganache. Low-fat substitutes prevent the smooth emulsion needed for heavenly texture.
- Use high-quality flaked sea salt, adding half during the caramel making and the rest right before rolling for maximum flavor impact.
- Do not rush the chilling phase. The ganache must be firm enough to scoop cleanly, typically requiring four hours or more in the refrigerator.
Frequently Asked Questions About Homemade Truffles
Can I use light brown sugar instead of granulated sugar for the caramel?
While possible, using brown sugar introduces molasses and moisture, which makes achieving that deep, clear amber caramel color much harder. Stick to pure white granulated sugar for the best control and flavor depth when making these specific salted caramel truffles.
What is the best way to handle the chocolate without melting it?
Your hands generate significant heat. Try wearing food-safe gloves when rolling the truffles. If the mixture starts becoming too soft during the rolling process, place the remaining ganache back into the refrigerator for 10 minutes to firm up again.
How do I ensure my caramel doesn’t crystallize?
The two main secrets are patience and cleanliness. First, do not stir the sugar until it is mostly melted. Second, if you are concerned, you can brush the sides of the saucepan with a pastry brush dipped in water to dissolve any stray sugar crystals before they can contaminate the mixture.
Can I skip the rolling in cocoa powder?
Absolutely! The cocoa powder provides a matte finish and prevents sticking, but you can substitute it with finely ground nuts, powdered sugar, or even dip the truffles in tempered chocolate for a hard shell finish. Rolling them in crushed candy cane during the holiday season is another favorite option!
There you have it—the definitive guide to making truly spectacular, show-stoppingSalted Caramel Trufflesright in your own kitchen. These little spheres of chocolate and caramel magic prove that the best desserts are often the ones made with simple ingredients and a little bit of loving effort. Now go forth, conquer that caramel, and try not to eat the entire batch in one sitting!
Conclusion for Salted Caramel Truffles
You have now conquered the magnificent world of ganache and the tricky art of caramel! These homemade Salted Caramel Truffles are the ultimate proof that a little effort in the kitchen yields enormous rewards in flavor. Whether you plan to hoard them for yourself (highly recommended) or share them with very deserving friends, the balance of rich dark chocolate, buttery caramel, and that essential pinch of sea salt creates perfection. Forget store-bought sweets; these luxurious caramel bonbons offer an irresistible, restaurant-quality treat. Go ahead, bask in the glory of your confectionery triumph—you absolutely earned that second (or third) truffle.
Print
Salted Caramel Truffles
Achieve professional-grade ganache! We teach you the hot-pour technique: deep amber scratch caramel meets 70% dark chocolate for intensely fudgy truffles.
- Total Time: 35 minutes
- Yield: 4 servings 1x
Ingredients
- 12 ounces high-quality dark chocolate (60-70%), finely chopped
- 1/2 cup heavy whipping cream
- 1/2 cup granulated sugar
- 2 tablespoons unsalted butter, softened
- 1 teaspoon flaky sea salt, divided
- 1 teaspoon alcohol-free vanilla extract
- 1/2 cup unsweetened cocoa powder, for coating
Instructions
- Step 1: Prepare the Caramel. In a medium saucepan, heat the granulated sugar over medium heat without stirring until it melts and turns a deep amber color. Remove from heat and carefully whisk in the butter, 1/2 teaspoon of the sea salt, and the heavy cream (the mixture will bubble vigorously). Stir until smooth.
- Step 2: Make the Ganache Base. Place the finely chopped chocolate in a heatproof bowl. Pour the hot salted caramel mixture over the chocolate. Let stand for 5 minutes, then stir slowly from the center outward until the mixture is completely smooth and emulsified. Stir in the vanilla powder.
- Step 3: Chill the Mixture. Cover the bowl tightly with plastic wrap, pressing the wrap directly onto the surface of the ganache to prevent a skin from forming. Refrigerate for at least 4 hours, or until the mixture is firm enough to easily scoop and roll.
- Step 4: Scoop and Shape. Line a baking sheet with parchment paper. Use a small truffle scoop or a teaspoon measure to portion the chilled ganache. Quickly roll the portions between your palms into smooth balls, working quickly so the mixture doesn't melt.
- Step 5: Coat the Truffles. Place the cocoa powder and the remaining 1/2 teaspoon of flaky sea salt in a shallow dish. Roll each truffle thoroughly in the mixture until fully coated. Store the finished Salted Caramel Truffles in an airtight container in the refrigerator until ready to serve.
Notes
- Keep truffles chilled in an airtight container for up to two weeks, but for the best flavor and texture, let them sit at room temperature for about 15 minutes before serving.
- If the ganache becomes too soft to roll while you are shaping the truffles, return the bowl to the refrigerator for 10 to 15 minutes to firm it up, as overly soft ganache often results in a greasy final coat.
- For a sophisticated dessert pairing, serve these alongside a strong espresso or a small glass of ruby grape juice with lemon to perfectly balance the sweetness and intensify the dark chocolate notes.
- When preparing the caramel, resist the urge to stir the sugar initially; simply swirl the pan and ensure you cook it to a deep amber hue—not just pale yellow—for that crucial complex, bittersweet depth.
- Prep Time: 15 minutes
- Cook Time: 20 minutes
- Method: Stovetop
- Cuisine: American
FAQs
Why are my truffles too soft, and how can I fix the consistency?
Achieving the perfect truffle texture is an art, not a science! If your mixture feels too soft, it usually means the ratio of cream to chocolate was slightly off, or the initial mixture was still warm when you started rolling. The best immediate fix is chilling—let the mixture rest in the refrigerator for an extra hour, or even overnight if necessary. If they still refuse to firm up, melt a little extra high-quality chocolate, let it cool slightly, and fold it into the ganache. This boosts the cocoa solids content, giving your delicious salted caramel truffles the structural integrity they deserve.
What are some fun ways to change up the flavor profile of these chocolate bonbons?
While the classic salted caramel combination is undeniably amazing, feel free to get creative with your flavor additions! You can infuse the heavy cream before mixing by steeping ingredients like espresso beans, cardamom pods, or a strip of fresh orange zest. For a textural element, try rolling the finished sweets in finely chopped toasted pecans, shredded coconut, or even a dusting of cocoa powder mixed with chili flakes for a subtle kick. Remember, these easy-to-make treats are simply vehicles for joy, so customize them to match your wildest cravings.
How long can I store homemade Salted Caramel Truffles, and should they be refrigerated?
These decadent homemade Salted Caramel Truffles store beautifully, provided they are kept in an airtight container. Because they contain fresh cream, refrigeration is generally recommended to maintain their structure and safety, especially in warmer climates. When stored in the fridge, they will maintain peak flavor and texture for up to two weeks. If you need a longer lifespan, you can freeze the uncoated truffles for up to three months. Just be sure to thaw them overnight in the refrigerator before rolling them in the final chocolate coating and serving them proudly.
My caramel seized or crystallized. What went wrong and how do I prevent it next time?
Caramel crystallization happens when sugar molecules stick together instead of dissolving smoothly, often triggered by a stray sugar crystal or stirring too early. The key to successful caramel is patience and vigilance. Ensure your saucepan is perfectly clean and avoid stirring the sugar mixture while it dissolves. Instead, swirl the pan gently. If crystallization starts, add a tablespoon of hot water or lemon juice and bring the mixture back up to a boil briefly; this might rescue it. Next time, try brushing down the sides of the pan with a wet pastry brush during cooking to dissolve any errant crystals.


Leave a Comment