

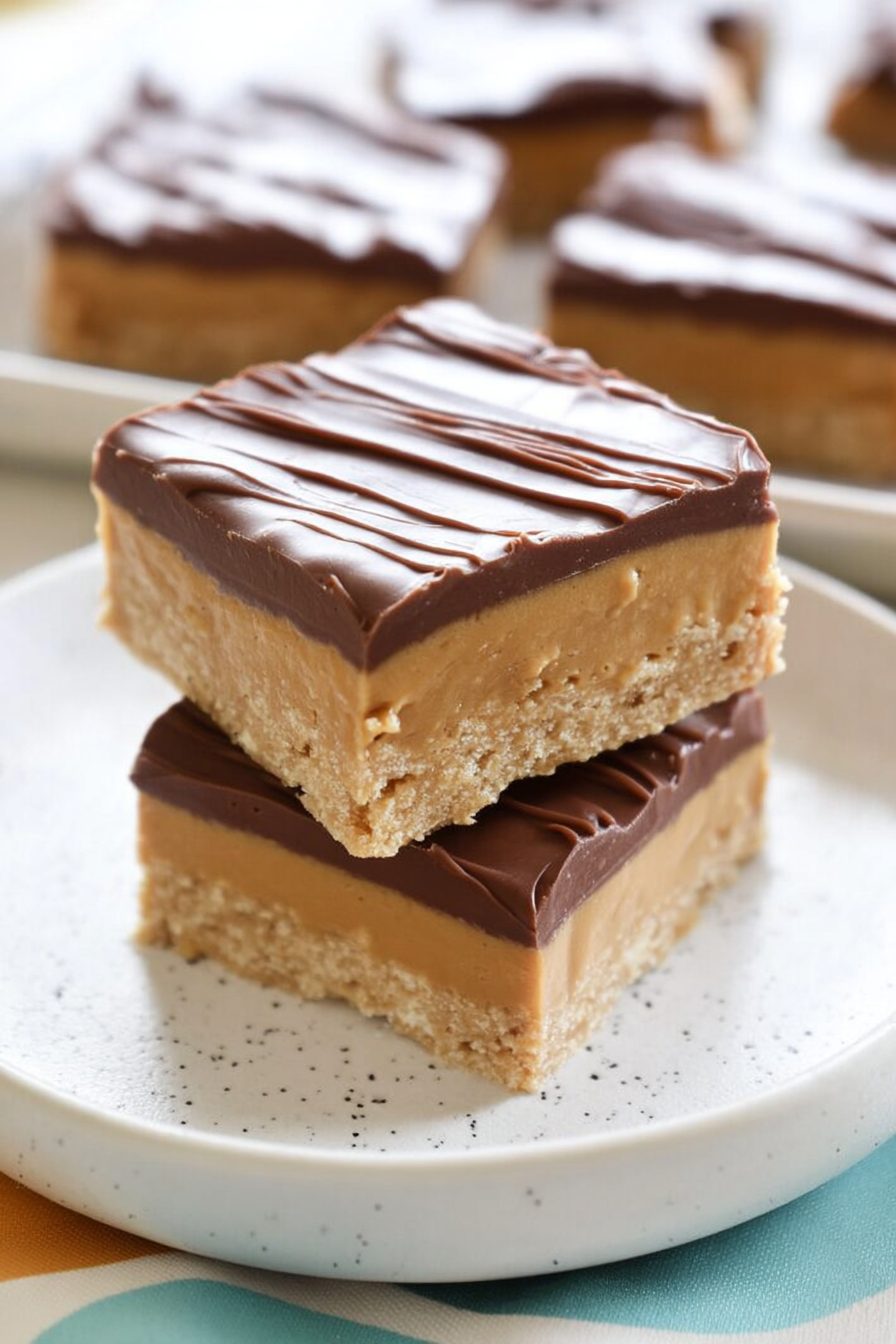
Oh my goodness, you guys, are you ready for a flavor explosion that’ll send your taste buds to peanut butter heaven? I’m talking about a Reese’s Peanut Butter No-Bake Bars Recipe so ridiculously easy and delicious, it’ll make you question your entire life’s choices (why did I spend so much time baking complicated cakes?). These bars are the epitome of sweet, salty, and totally addictive.
Imagine this: rich, creamy peanut butter mingling with the sweet crunch of chocolate, all held together by a magically simple no-bake base. These are the perfect after-school snack, a satisfying dessert, or a delightful contribution to any potluck. Get ready to make these amazing treats.
These Reese’s Peanut Butter No-Bake Bars are:
Effortlessly easy to make, requiring minimal baking skills and time.
An irresistible symphony of sweet and salty flavors that will leave you craving more.
Visually stunning with their layers of rich chocolate and peanut butter goodness.
Incredibly versatile, adaptable to various dietary needs and preferences (like ours!).
Ingredients for Reese’s Peanut Butter No-Bake Bars Recipe
Here’s what you’ll need to make this delicious dish:
The full ingredients list, including measurements, is provided in the recipe card directly below.
How to Make Reese’s Peanut Butter No-Bake Bars Recipe
Follow these simple steps to prepare this delicious dish:
Step 1: Prepare the Peanut Butter Base
In a medium bowl, combine the vegan butter and peanut butter. Make sure the butter is softened to ensure a smooth mixture. Beat with a mixer or a whisk until well combined and creamy. Gradually add the powdered sugar, mixing until everything is thoroughly incorporated and you have a smooth, thick paste.
Step 2: Assemble the Bars
Line an 8×8 inch baking pan with parchment paper, leaving some overhang on the sides to make lifting the bars easier later. Press the peanut butter mixture evenly into the prepared pan. This forms the base of our delicious no-bake bars.
Step 3: Melt the Chocolate
In a microwave-safe bowl, combine the vegan chocolate chips and agar-agar powder. Microwave in 30-second intervals, stirring after each, until the chocolate is completely melted and smooth. Stir in the plant-based milk and Alcohol-free vanilla extract until fully incorporated.
Step 4: Pour and Chill
Carefully pour the melted chocolate mixture over the peanut butter base. Use a spatula to spread it evenly. Cover the pan with plastic wrap and refrigerate for at least 2-3 hours, or until the chocolate layer is completely set. Patience, my friend, the deliciousness is worth the wait!
Step 5: Cut and Serve
Once the bars are firm, lift them out of the pan using the parchment paper overhang. Cut into squares and serve. These bars are best enjoyed chilled.
Step 6: Enjoy
And that’s it! You’ve officially mastered the art of making ridiculously delicious Reese’s Peanut Butter No-Bake Bars. Serve them with a glass of cold milk (plant-based, of course!), and prepare for a flavor party in your mouth!
Recipe Card for Reese’s Peanut Butter No-Bake Bars
(Insert Recipe Card Here – This would include detailed measurements for all ingredients and a printable version of the recipe)
Tips and Variations for Reese’s Peanut Butter No-Bake Bars
Feel free to experiment with different types of chocolate chips. Dark chocolate offers a more intense flavor, while milk chocolate provides a sweeter taste. You could also add a sprinkle of sea salt on top of the chocolate layer for an extra touch of salty sweetness.
If you want to add some crunch, consider sprinkling chopped nuts (like peanuts or pecans) on top of the peanut butter layer before adding the chocolate. Let your creativity run wild! These bars are incredibly versatile.
Remember, these no-bake bars are best enjoyed chilled. Allowing them to set properly in the refrigerator will ensure that they hold their shape and have the perfect texture. Refrigerate for at least 2-3 hours before cutting and serving.
Making these Reese’s Peanut Butter No-Bake Bars is a fun and rewarding experience. So gather your ingredients, put on your favorite playlist, and get ready to create a sweet treat that will impress everyone you know. Happy baking (or rather, no-baking!).
Perfecting the Cooking Process

First, prepare the peanut butter mixture ensuring it’s smooth and creamy. Then, combine the melted chocolate and peanut butter mixture. Finally, press the mixture into your pan and chill until firm. This sequence ensures a perfectly blended and set treat.
Add Your Touch
Swap the peanut butter for almond butter for a nutty twist. Experiment with different chocolate types; dark chocolate adds sophistication. Consider adding chopped nuts or pretzels for extra crunch and texture.
Storing & Reheating
Store your Reese’s Peanut Butter No-Bake Bars in an airtight container in the refrigerator for up to a week. To enjoy, simply let them sit at room temperature for a few minutes to soften slightly. No reheating needed!
Prepare your pan ahead of time to avoid last-minute scrambling. Make sure your chocolate is completely melted for a flawless mixture. Don’t overmix the peanut butter and chocolate; a few lumps add character.
My kids devoured the first batch of these Reese’s Peanut Butter No-Bake Bars faster than I could say “chocolate.” It became an instant family favorite, a perfect after-school or movie night treat.
Conclusion for Reese’s Peanut Butter No-Bake Bars Recipe
These Reese’s Peanut Butter No-Bake Bars are a delightful treat, simple to make and perfect for satisfying that sweet craving. The combination of creamy peanut butter, rich chocolate, and crunchy oats delivers a satisfying textural experience. Remember to let the mixture cool completely before adding the oats for optimal results. Store them in the fridge for easy snacking, and prepare for compliments galore! This no-bake recipe is a winner, guaranteed to become a family favorite.
Print
Reese’s Peanut Butter No-Bake Bars Recipe
Delicious reese’s peanut butter no-bake bars recipe recipe with detailed instructions and nutritional information.
- Total Time: 35 minutes
- Yield: 4 servings 1x
Ingredients
- 1 cup creamy peanut butter
- 1 cup powdered sugar
- 1/2 cup butter, unsalted
- 1 cup semi-sweet chocolate chips
- 1/2 cup milk chocolate chips
- 1/2 cup Reese's Peanut Butter Cups, chopped
- 1/4 cup Reese's Pieces candies (optional)
Instructions
- Step 1: In a medium saucepan over low heat, combine the peanut butter, powdered sugar, and butter. Stir constantly until the butter is completely melted and the mixture is smooth and well combined. Remove from heat.
- Step 2: Line an 8×8 inch baking dish with parchment paper, leaving an overhang on the sides to allow for easy lifting later.
- Step 3: Pour the peanut butter mixture into the prepared baking dish and spread evenly.
- Step 4: In a microwave-safe bowl, combine the semi-sweet and milk chocolate chips. Microwave in 30-second intervals, stirring after each, until the chocolate is melted and smooth. Stir in the chopped Reese's Peanut Butter Cups and optional Reese's Pieces.
- Step 5: Pour the melted chocolate mixture over the peanut butter layer and spread evenly.
- Step 6: Refrigerate for at least 2 hours, or until the bars are firm. Once firm, lift the bars out of the pan using the parchment paper overhang and cut into squares.
Notes
- Store these bars in an airtight container in the refrigerator for up to a week to maintain their freshness and prevent them from drying out.
- For a slightly gooier, warmer experience, let the bars sit at room temperature for about 15-20 minutes before serving.
- These bars are perfect alongside a scoop of vanilla ice cream for a decadent dessert or as a sweet treat with afternoon coffee.
- To prevent the chocolate from seizing, make sure the peanut butter mixture is completely cool before pouring the melted chocolate over it.
- Prep Time: 15 minutes
- Cook Time: 20 minutes
- Method: Stovetop
- Cuisine: American
FAQs
Can I make these Reese’s Peanut Butter No-Bake Bars ahead of time?
Absolutely! These bars are even better the next day, allowing the flavors to meld beautifully. Make them a day or two in advance and store them in an airtight container in the refrigerator. This will help prevent them from getting too soft. Trust me, the anticipation will only increase your enjoyment of these delightful treats. Don’t worry about them drying out; the peanut butter keeps them wonderfully moist.
What can I substitute for the peanut butter?
While peanut butter is the star of the show here, you could try substituting with sunflower seed butter or almond butter for a slightly different flavor profile. Bear in mind though, the taste will be noticeably different and might not quite capture that classic Reese’s essence. Experiment and find your favorite nut (or seed!) butter alternative for your Reese’s Peanut Butter No-Bake Bars recipe.
Are these Reese’s Peanut Butter No-Bake Bars gluten-free?
Yes! This Reese’s Peanut Butter No-Bake Bars recipe is naturally gluten-free, provided you use gluten-free oats. Always double-check your ingredient labels to be absolutely certain. This makes it a great option for those following a gluten-free diet, or for anyone who simply wants a delicious treat that’s free from gluten.
How do I make sure my Reese’s Peanut Butter No-Bake Bars set properly?
The key to perfectly set Reese’s Peanut Butter No-Bake Bars is to ensure your peanut butter mixture cools completely before adding the oats. If the mixture is too warm, the oats will absorb the liquid, resulting in a crumbly and less-than-perfect texture. Allow it to cool thoroughly, ideally in the refrigerator for about 30 minutes before stirring in the oats. Patience, young Padawan, is key to no-bake bar success.


Leave a Comment