

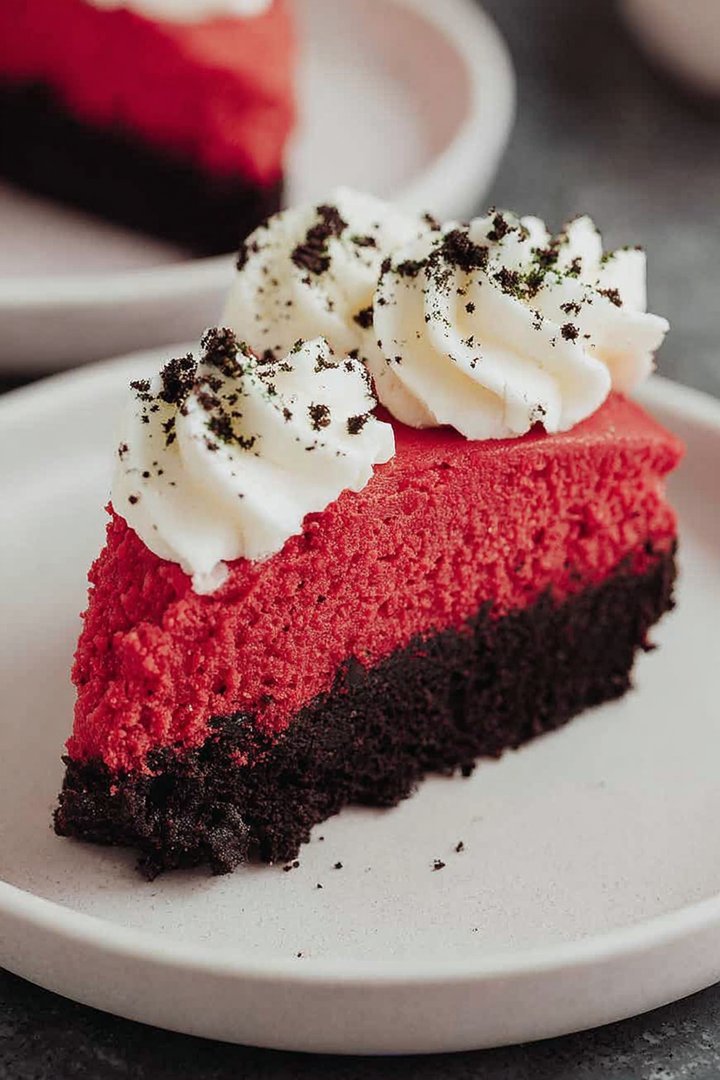
Imagine a dessert that hugs you from the inside out, a creamy dream swirled with crimson delight. That’s precisely what this **Red Velvet Cheesecake** offers, a symphony of textures and tastes that’s both decadent and deeply comforting.
This isn’t your grandma’s cheesecake (unless your grandma is a culinary rebel!). This **Red Velvet Cheesecake** marries the tangy richness of classic cheesecake with the subtle cocoa undertones of red velvet cake. It’s a treat that’s both familiar and excitingly new.
Why you’ll fall head-over-heels for this recipe:
- This recipe is so straightforward, even kitchen novices can whip up a masterpiece that will impress any crowd.
- The tantalizing blend of cream cheese tang and the light chocolate notes creates an irresistible flavor combination.
- The vibrant red hue against the creamy white filling is visually stunning, guaranteed to make a statement on any dessert table.
- Perfect for birthdays, holidays, or simply a “treat yourself” moment, this cheesecake is adaptable to any celebration.
Ingredients for Red Velvet Cheesecake
Here’s what you’ll need to make this delicious dish:
The full ingredients list, including measurements, is provided in the recipe card directly below.
How to Make Red Velvet Cheesecake
Follow these simple steps to prepare this delicious dish:
Step 1: Prepare the Red Velvet Cake Layer
Preheat oven to 350°F (175°C). Grease and flour a 9-inch round baking pan. In a large bowl, whisk together the flour, sugar, cocoa powder, baking soda, and salt.
Step 2: Combine Wet Ingredients
In a separate bowl, whisk together the buttermilk, oil, eggs, Alcohol-free vanilla extract, and red food coloring. Add the wet ingredients to the dry ingredients and mix until just combined.
Step 3: Bake the Cake Layer
Pour the batter into the prepared pan and bake for 25-30 minutes, or until a toothpick inserted into the center comes out clean. Let cool completely before crumbling.
Step 4: Make the Graham Cracker Crust
In a medium bowl, combine graham cracker crumbs and melted butter. Press the mixture into the bottom of a 9-inch springform pan to create a firm crust.
Step 5: Prepare the Cheesecake Filling
In a large bowl, beat the softened cream cheese, sour cream, and heavy cream until smooth. Gradually add powdered sugar and agar-agar powder, beating until well combined.
Step 6: Assemble the Cheesecake
Gently fold the crumbled red velvet cake into the cheesecake filling. Pour the mixture over the graham cracker crust in the springform pan.
Step 7: Chill and Serve
Cover the cheesecake with plastic wrap and refrigerate for at least 6 hours, or preferably overnight, to allow it to set completely. Before serving, carefully remove the sides of the springform pan. Slice and serve this rich, decadent, **Red Velvet Cheesecake**.
Perfecting the Cooking Process
To make the most of your time, start by preparing the cheesecake filling while the crust is chilling. Next, preheat your oven so it’s ready when the crust is set. Bake the cheesecake low and slow to avoid cracks, and let it cool gradually to ensure a creamy texture.
Add Your Touch
Feel free to experiment with your favorite cream cheese brands for subtle flavor variations. For a richer chocolate flavor, add a tablespoon of cocoa powder to the red velvet batter. You could also swirl in some cherry pie filling before baking for a fruity twist.
Storing & Reheating
Store your **red velvet cheesecake** in the refrigerator, covered, for up to five days. To reheat, let it sit at room temperature for about 30 minutes to soften slightly. Individual slices can be microwaved for 10-15 seconds for a quick treat.
Here are some tips to really nail this recipe:
- Make sure your cream cheese and eggs are at room temperature. This will ensure everything blends together smoothly without any lumps.
- Don’t overbake the cheesecake! A slight wobble in the center is what you’re looking for. It will continue to set as it cools.
- Resist the urge to open the oven while the cheesecake is baking. The sudden temperature change can cause cracks.
(Personal anecdote formated as paragraph subheading)
My friend Sarah once told me this was the best cheesecake she’d ever had, which, let’s be honest, is the highest compliment you can receive in the baking world. Her kids devoured it in minutes!
Let’s dive headfirst into the wonderful, slightly chaotic, and utterly delicious world of **Red Velvet Cheesecake**. Now, I know what you’re thinking: “Another cheesecake recipe? Groundbreaking.” But trust me, this isn’t your grandma’s plain-Jane cheesecake. This is a **red velvet cheesecake** explosion of flavor, a decadent dream, and a guaranteed crowd-pleaser.
I’m not going to lie; creating a perfect **red velvet cheesecake** is like conducting an orchestra of ingredients. There’s the tangy cream cheese, the subtle cocoa undertones of the red velvet, and the buttery, crumbly crust. It’s a symphony of textures and tastes, and when it all comes together, well, that’s when the magic happens.
Why This Recipe Rocks
Okay, so why should you bother with this recipe instead of the 10,000 other cheesecake recipes floating around the internet? Because this one is special, obviously! It’s got that irresistible red velvet flavor we all crave, combined with the creamy richness of a classic cheesecake. But more than that, it’s surprisingly easy to make. I’ve broken it down into simple steps, so even if you’re a baking newbie, you can pull this off.
This **red velvet cheesecake** isn’t just about the taste; it’s about the experience. It’s about the “oohs” and “aahs” when you unveil it at a party. It’s about the satisfying silence as everyone digs in. It’s about feeling like a baking rockstar, even if you accidentally set off the smoke alarm (we’ve all been there!).
The Star Ingredients
Let’s talk about the main players in this culinary masterpiece. We’re not dealing with divas here, but each ingredient has its role to play.
- **Cream Cheese:** This is the backbone of our cheesecake. Use full-fat cream cheese for the ultimate creamy texture. Don’t even think about using the low-fat stuff; it’s just not the same.
- **Sugar:** Sweetness is key, but we’re not going overboard. The sugar balances the tanginess of the cream cheese and adds a touch of caramelization during baking.
- **Eggs:** These bind everything together and give the cheesecake its structure. Make sure they’re at room temperature for the best results.
- **Red Food Coloring:** This is what gives our cheesecake that iconic red velvet hue. You can use gel food coloring for a more vibrant color.
- **Cocoa Powder:** Just a touch of cocoa powder adds depth and complexity to the flavor. Don’t skip it!
- **Vinegar:** A secret ingredient! Vinegar reacts with the buttermilk (or milk + lemon juice) to create that distinctive red velvet tang.
- **Alcohol-free vanilla extract:** Because everything is better with vanilla. It enhances all the other flavors and adds a warm, comforting aroma.
- **All-Purpose Flour:** Just a little bit helps to stabilize the cheesecake and prevent it from cracking.
Crust Me, This is Important
The crust is the foundation of our cheesecake, so we need to treat it with respect. A simple graham cracker crust is the perfect complement to the rich **red velvet cheesecake** filling.
**Ingredients: **
- 1 ½ cups graham cracker crumbs
- 5 tablespoons unsalted butter, melted
- ¼ cup sugar
**Instructions: **
1. In a medium bowl, combine the graham cracker crumbs, melted butter, and sugar. Mix until well combined.
2. Press the mixture firmly into the bottom of a 9-inch springform pan.
3. Bake in a preheated oven at 350°F (175°C) for 8-10 minutes, or until lightly golden brown.
4. Let cool completely before adding the filling.
If you’re feeling adventurous, you can try using chocolate graham crackers for a richer crust. Or, if you’re short on time, you can buy a pre-made graham cracker crust. Just make sure it’s a good quality one!
The Creamy Dreamy Filling
Now for the star of the show: the **red velvet cheesecake** filling. This is where the magic happens, folks.
**Ingredients: **
- 32 ounces cream cheese, softened
- 1 ¾ cups sugar
- 4 large eggs, at room temperature
- 2 tablespoons cocoa powder
- 1 teaspoon vinegar
- 1 teaspoon Alcohol-free vanilla extract
- 2 tablespoons all-purpose flour
- 1 ounce red food coloring
- ½ cup buttermilk (or ½ cup milk + ½ teaspoon lemon juice)
**Instructions: **
1. Preheat your oven to 325°F (160°C).
2. In a large bowl, beat the cream cheese and sugar until smooth and creamy. Make sure there are no lumps!
3. Add the eggs one at a time, beating well after each addition. Be careful not to overbeat the mixture, as this can cause cracks in the cheesecake.
4. In a separate bowl, whisk together the cocoa powder, vinegar, Alcohol-free vanilla extract, and red food coloring. Add this mixture to the cream cheese mixture and beat until well combined.
5. Stir in the flour and buttermilk until just combined.
6. Pour the filling over the cooled crust in the springform pan.
7. Bake for 65-75 minutes, or until the edges are set and the center is slightly wobbly.
8. Turn off the oven and let the cheesecake cool inside the oven with the door slightly ajar for 1 hour. This helps prevent cracking.
9. Remove the cheesecake from the oven and let it cool completely at room temperature.
10. Cover and refrigerate for at least 4 hours, or preferably overnight.
The Grand Finale: Frosting and Decoration
No **red velvet cheesecake** is complete without a luscious frosting. A simple cream cheese frosting is the perfect complement to the rich, tangy cheesecake.
**Ingredients: **
- 8 ounces cream cheese, softened
- ½ cup unsalted butter, softened
- 3 cups powdered sugar
- 1 teaspoon Alcohol-free vanilla extract
**Instructions: **
1. In a large bowl, beat the cream cheese and butter until smooth and creamy.
2. Gradually add the powdered sugar, beating until light and fluffy.
3. Stir in the Alcohol-free vanilla extract.
4. Frost the cooled cheesecake and decorate as desired.
For decoration, you can sprinkle some graham cracker crumbs, chocolate shavings, or fresh berries on top. Or, if you’re feeling fancy, you can pipe some swirls of frosting using a piping bag.
Troubleshooting Tips for the Perfect Cheesecake
Even the best bakers encounter problems sometimes. Here are some common cheesecake issues and how to fix them:
- **Cracked Cheesecake:** This is the most common cheesecake problem. To prevent cracking, avoid overbaking the cheesecake, cool it slowly in the oven, and don’t overbeat the batter.
- **Lumpy Filling:** Make sure your cream cheese is at room temperature and beat it until smooth before adding the other ingredients.
- **Soggy Crust:** Bake the crust separately before adding the filling to prevent it from becoming soggy.
- **Cheesecake Sticking to the Pan:** Grease the springform pan well and line the bottom with parchment paper.
Remember, practice makes perfect. Don’t get discouraged if your first **red velvet cheesecake** isn’t perfect. Just keep trying, and you’ll eventually create a masterpiece. And even if it’s not perfect, it’ll still taste delicious! After all, it’s **red velvet cheesecake**!
Variations to Spice Things Up
Want to take your **red velvet cheesecake** to the next level? Here are some fun variations to try:
- **Chocolate Chip Red Velvet Cheesecake:** Add chocolate chips to the filling for a chocolatey twist.
- **Oreo Red Velvet Cheesecake:** Crush some Oreos and add them to the crust or the filling.
- **Strawberry Red Velvet Cheesecake:** Swirl some strawberry puree into the filling for a fruity flavor.
- **Mini Red Velvet Cheesecakes:** Make individual cheesecakes in muffin tins for easy serving.
The possibilities are endless! Don’t be afraid to experiment and create your own unique version of **red velvet cheesecake**.
The Final Verdict: Worth the Effort?
Absolutely! This **red velvet cheesecake** is a showstopper, a crowd-pleaser, and a guaranteed way to impress your friends and family. It’s a bit of work, but the results are well worth the effort. Plus, you’ll feel like a baking genius when you pull it out of the oven.
So, go ahead and give this recipe a try. You won’t regret it. And who knows, you might just discover your new favorite dessert! Now, go forth and bake some cheesecake magic!
(Personal anecdote formated as paragraph subheading)
I accidentally used salted butter instead of unsalted once, and while it wasn’t ruined, it had a slightly… interesting flavor profile. Lesson learned: read the labels carefully!
Conclusion for Red Velvet Cheesecake:
So, there you have it! The ultimate Red Velvet Cheesecake recipe, ready to impress your friends, family, or just yourself (because, let’s be honest, you deserve it). Remember, the key is to embrace the process, don’t be afraid to experiment, and most importantly, have fun! From its eye-catching color to its unforgettable flavor, this Red Velvet Cheesecake is a guaranteed showstopper. Go ahead, bake a little magic and share a slice of happiness.
Print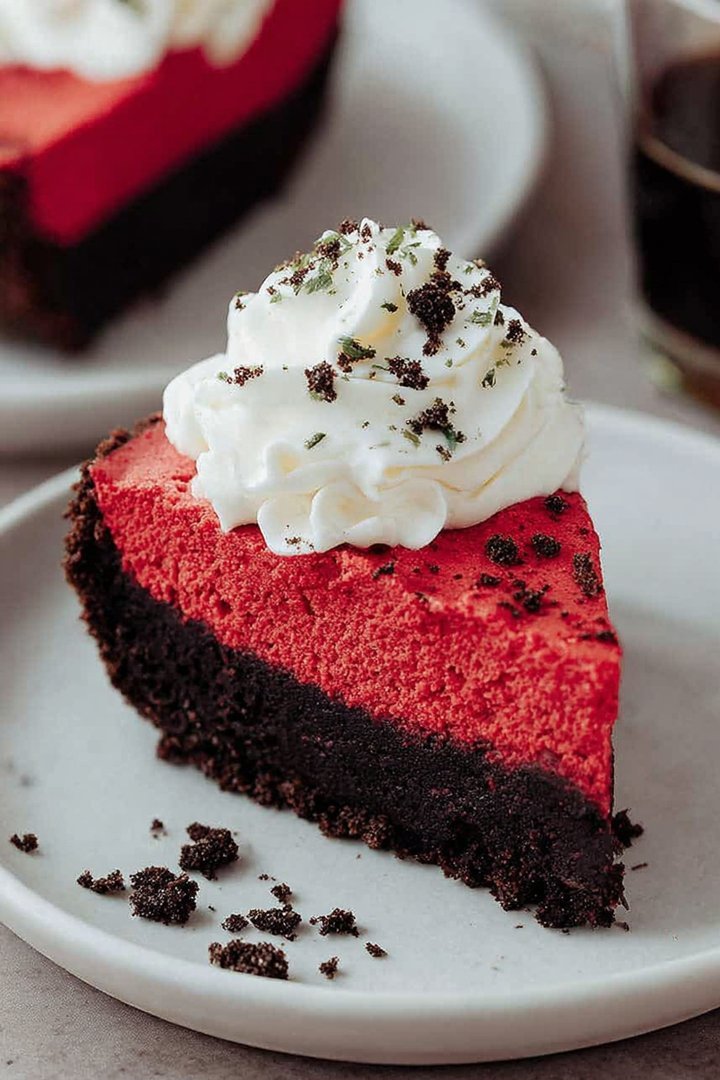
Red Velvet Cheesecake
Delicious red velvet cheesecake recipe with detailed instructions and nutritional information.
- Total Time: 35 minutes
- Yield: 4 servings 1x
Ingredients
- All-purpose flour 1 1/2 cups
- Granulated sugar 1 1/2 cups
- Unsweetened cocoa powder 2 tablespoons
- Baking soda 1 teaspoon
- Buttermilk 1 cup
- Vegetable oil 1/2 cup
- Cream cheese (softened) 32 ounces
- Eggs 4 large
Instructions
- Step 1: Preheat oven to 350°F (175°C). In a large bowl, whisk together flour, sugar, cocoa powder, baking soda, and salt.
- Step 2: In a separate bowl, combine buttermilk, oil, eggs, and red food coloring. Gradually add the wet ingredients to the dry ingredients, mixing until just combined. Do not overmix.
- Step 3: Pour batter into a greased and floured 9-inch springform pan. Bake for 30-35 minutes, or until a wooden skewer inserted into the center comes out clean. Let cool completely in the pan.
- Step 4: In a large bowl, beat softened cream cheese and sugar until smooth and creamy. Gently spread the cheesecake mixture evenly over the cooled red velvet cake layer.
- Step 5: Refrigerate the cheesecake for at least 4 hours, or preferably overnight, to allow it to set completely. Before serving, carefully remove the sides of the springform pan.
Notes
- For a cleaner cut, chill the cheesecake thoroughly before slicing.
- Store leftover Red Velvet Cheesecake tightly covered in the refrigerator for up to 5 days.
- Garnish each slice with a dollop of whipped cream and a sprinkle of cocoa powder for an elegant presentation.
- Don't overbake the cake layer; a slightly moist center will keep the cheesecake from becoming dry.
- Prep Time: 15 minutes
- Cook Time: 20 minutes
- Method: Stovetop
- Cuisine: American
FAQs:
What makes this Red Velvet Cheesecake so special?
Well, picture this: you’re at a fancy dessert buffet, eyes darting around like a kid in a candy store. Then, BAM! You spot it – this vibrant, crimson dream. Our Red Velvet Cheesecake isn’t just a dessert; it’s an experience. It’s the creamy, dreamy cheesecake filling meeting the subtle cocoa notes of red velvet, all riding on a delightfully crumbly base. It is the perfect balance between tangy and sweet, a dance of flavors that will make your taste buds throw a party. You won’t just eat it; you’ll *experience* it.
Can I make Red Velvet Cheesecake ahead of time?
Absolutely! In fact, I encourage it. Making your cheesecake a day or two in advance actually does wonders. The flavors meld together, the texture becomes even more decadent, and it saves you precious time on the day you want to serve it. Just make sure to wrap it tightly in plastic wrap and store it in the refrigerator. Think of it as giving your cheesecake a little spa day before its big debut. Plus, you’ll look super organized when your guests arrive, and who doesn’t love that?
How do I prevent cracks on my Red Velvet Cheesecake?
Ah, the dreaded cheesecake crack! Fear not, intrepid baker! There are a few tricks to avoid this culinary catastrophe. First, bake your cheesecake in a water bath – it creates a humid environment that helps the cheesecake bake evenly. Second, don’t overbake it. The center should still have a slight wiggle. Finally, let the cheesecake cool slowly in the oven with the door ajar. This gradual cooling process helps prevent the cheesecake from shrinking too quickly and cracking. With these tips, you’ll be a crack-free cheesecake champion.
What are some variations I can try with this Red Velvet Cheesecake recipe?
Feeling adventurous? Let’s jazz things up! You could swirl in some white chocolate ganache for an extra layer of indulgence. Or, how about adding a layer of cream cheese frosting on top? For a festive touch, sprinkle red velvet cake crumbs around the edges. You can also experiment with different extracts, like almond or peppermint, to create unique flavor profiles. Don’t be afraid to get creative and make this recipe your own. Think of it as your canvas, and cheesecake is your delicious masterpiece!

Leave a Comment