

Remember those dreadful mornings when you realized your lunch consisted solely of a questionable yogurt cup? The fridge stared back, judging your life choices. Suddenly, a hero emerges: theQuick & Easy Chicken Onigiri, the ultimate savior of busy schedules and rumbling tummies.
These perfect little handheld triangles of savory bliss are your passport to a delicious, fuss-free meal, guaranteed to make your coworkers deeply jealous of your superior snack game and culinary efficiency.
- Master this recipe in under 30 minutes, making it the fastest route to a gourmet-level, satisfying lunch you have ever experienced at home.
- Enjoy the complex, umami-rich filling of tender chicken and a savory soy marinade, perfectly balanced by the delightful texture of sticky Japanese rice.
- These photogenic rice triangles, wrapped in dark nori, look professionally crafted, yet require minimal skill to achieve aesthetic kitchen perfection.
- Ideal for picnics, school lunches, or a quick pre-workout boost, these portable snacks adapt effortlessly to any busy, on-the-go dining scenario.
Why Japanese Rice Balls are the Ultimate Lunch Upgrade
For decades, we suffered the tyranny of the soggy sandwich. We endured the sad desk salad that pretended to be filling but was secretly just expensive lettuce. Then, humanity discovered the beauty of Onigiri—the Japanese rice ball—and our collective lunchtime experience instantly improved. It’s the culinary equivalent of turning off the fluorescent office lights and replacing them with a warm, sunny glow.
Onigiri is inherently magical because it solves the biggest lunch problem: portability without structural failure. A taco falls apart. A burrito leaks. But the humble rice ball, when constructed correctly, holds its shape with the stoic reliability of a seasoned mountain climber. It’s also incredibly versatile. While sushi often requires raw fish and a specific set of tools, Onigiri demands only rice, filling, and the confidence to get a little sticky.
We chose theQuick & Easy Chicken Onigirispecifically because it taps into that perfect balance of familiar flavor and exotic presentation. The shredded chicken filling, coated in a homemade savory sauce, offers a protein punch that keeps you full for hours, unlike that aforementioned sad desk salad. Plus, pulling one of these out of your bag feels like presenting a treasure, not just lunch. You are about to become the most envied person in the break room.
The Essential Foundation: Mastering the Sticky Rice
Before you even think about the chicken filling, you must address the foundation: the rice. This recipe demands Japanese short-grain rice, often labeled as sushi rice. If you attempt this with long-grain Basmati or American instant rice, the resulting concoction will crumble into sad, unusable flakes the moment you try to shape it. Think of it as attempting to build a sandcastle with dry dust—it simply won’t cooperate.
Properly rinsing the rice is non-negotiable. You must wash the rice vigorously until the water runs clear. This process removes excess starch, which prevents the final product from becoming overly gooey and helps the grains maintain that crucial, sticky, individual integrity needed for successful shaping. Use a rice cooker if you have one, or cook it on the stovetop following the package instructions, ensuring it absorbs all the water. The key to perfect Onigiri is using rice that is warm, but not scalding hot, which allows the grains to bond tightly without burning your fingertips during the shaping process.
Ingredients for Quick & Easy Chicken Onigiri
Here’s what you’ll need to make this delicious dish:
- Japanese Short-Grain RiceThis sticky rice is the essential structural component; do not substitute it with long-grain rice, or your rice balls will disintegrate instantly.
- Cooked Chicken Breast or ThighsUse pre-cooked, shredded chicken (rotisserie chicken works wonders) to slash preparation time and enhance the speed of this recipe.
- Nori Seaweed SheetsThese edible seaweed sheets wrap the rice balls, adding a salty, umami kick and providing a handy grip area.
- Soy Sauce or TamariEssential for the deep, savory umami base of the chicken filling; choose Tamari for a gluten-free option if necessary.
- Sesame OilA few drops add a beautiful, nutty aroma and richness to the chicken filling, defining its authentic Asian flavor profile.
- Rice VinegarA touch of vinegar subtly seasons the cooked rice, giving it that classic subtle tang and preventing the rice from tasting bland.
- Granulated Sugar or Agave NectarBalances the saltiness of the soy sauce and helps the chicken filling caramelize slightly during cooking.
- Water or Chicken BrothUsed to create a thin sauce consistency, allowing the shredded chicken to fully absorb all the intense flavorings.
The full ingredients list, including measurements, is provided in the recipe card directly below.
How to Make Quick & Easy Chicken Onigiri
Follow these simple steps to prepare this delicious dish:
Step 1: Prepare the Rice and Filling Ingredients
First, rinse the Japanese short-grain rice thoroughly until the water is completely clear, then cook it according to package directions. While the rice cooks, shred your pre-cooked chicken. In a small bowl, combine the soy sauce, sesame oil, rice vinegar, sugar or agave, and a splash of water or chicken broth, mixing well until the sugar dissolves completely.
Step 2: Cook the Savory Chicken Filling
Heat a small non-stick pan over medium heat. Add the shredded chicken and pour the sauce mixture over it. Stir constantly for about 3 to 5 minutes until the liquid reduces substantially and coats the chicken completely, creating a sticky, intensely flavored filling. Remove the chicken from the heat and allow it to cool slightly.
Step 3: Season the Cooked Rice
Once the rice has finished cooking, transfer it to a large, non-metallic mixing bowl. Sprinkle a pinch of salt and a tiny dash of rice vinegar over the warm rice. Gently fold the seasonings into the rice using a paddle or spoon, being careful not to mash the grains, ensuring the seasoning is evenly distributed for maximum flavor.
Step 4: Shape the Onigiri Triangles
This is where the magic happens. Moisten your hands with water (this prevents sticking!) and lightly salt your palms. Take about 1/3 cup of the seasoned rice and flatten it in your palm to form a disk. Create a small indent in the center and place 1 to 2 teaspoons of the cooled chicken filling inside. Carefully fold the rice over the filling to seal it completely.
Step 5: Form the Classic Onigiri Shape
With the sealed ball of rice resting in one palm, use the heel of your other hand to press down gently on the sides, rotating the rice ball between your hands a few times. Apply firm, even pressure to form the classic triangle shape. This pressure is crucial for preventing the onigiri from falling apart when eaten.
Step 6: Finish with Nori
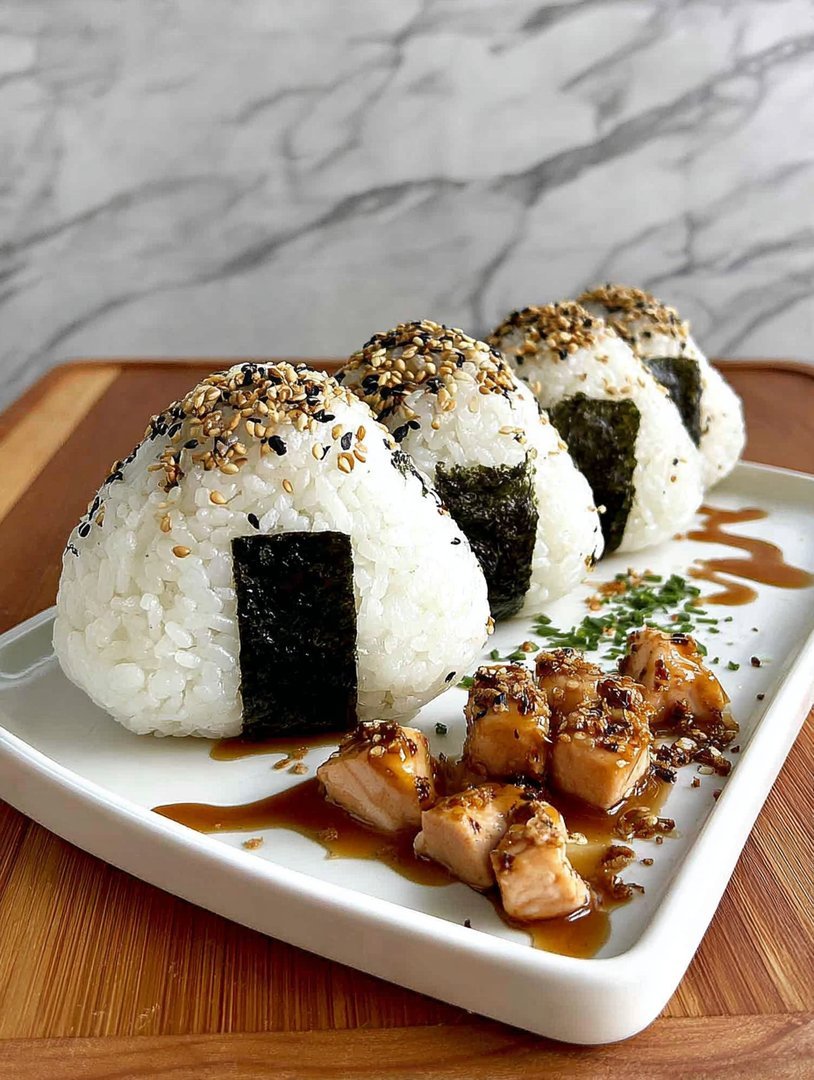
Cut the nori sheets into rectangular strips (about 1 inch wide and 3 inches long). Wrap one strip around the base of each shaped rice triangle, ensuring the nori adheres securely to the sticky rice. The nori serves as a handle, protecting your fingers from the rice and providing a welcome textural contrast.
Transfer the finishedQuick & Easy Chicken Onigirito a plate and serve immediately, or wrap them tightly in plastic cling film for perfect on-the-go snacking.
Tips for Perfect Onigiri Shaping
Shaping Onigiri might seem intimidating, especially if you aim for those perfectly sharp triangles seen in Japanese convenience stores. Don’t worry, even slightly misshapen ones taste incredible, but a few tricks will elevate your game. First, always wet your hands thoroughly before touching the rice and re-wet them frequently; sticky hands lead to messy shapes. Secondly, if you absolutely despise the sticky sensation of rice touching your hands, you can utilize a small piece of plastic wrap, pressing the rice and filling together inside the wrap before forming the shape. This technique guarantees mess-free, professional-looking rice balls every single time. Lastly, remember that the goal is firm cohesion, not aggressive squeezing—gentle, repetitive pressure creates a stable structure, while squeezing too hard results in mushy rice.
Another crucial tip is temperature control. Never attempt to shape the rice when it is piping hot, as the steam will burn your hands and the rice will be too soft to hold its structure. Wait until the rice is just warm—a comfortable temperature for handling—before you begin the filling and shaping process. The final texture should be firm enough to withstand transport but soft enough to be pleasant to chew. If your rice feels too dry and crumbly, it might need a tiny spritz of water before shaping to help the grains stick together properly.
Troubleshooting Common Onigiri Mishaps
Even the simplest recipes have potential pitfalls, and Onigiri is no exception. Let’s address the two most common disasters that threaten your perfect rice ball aspirations.
Why Does My Onigiri Fall Apart?
If your rice ball collapses into a pile of sad grains when you pick it up, the culprit is almost always the rice itself or insufficient pressure during shaping. You must use Japanese short-grain rice—it’s the glue that holds everything together. If you used the correct rice, you likely didn’t press hard enough. When shaping, press the rice firmly but quickly; the heat and pressure activate the starch and create those necessary bonds. Practice makes perfect, and the more you handle the rice, the better you will understand the amount of pressure needed.
Why is My Rice Too Sticky or Mushy?
Rice that is overly sticky or mushy usually points back to one of two errors: you didn’t rinse the rice enough, or you used too much water when cooking it. Remember that vigorous rinsing step in the beginning? That removes the surface starch, preventing a gummy texture. If the rice is already cooked and too wet, let it cool completely and spread it out on a baking sheet for about 15 minutes. This allows some of the excess moisture to evaporate, potentially saving your batch from total ruin and allowing you to move forward with the shaping process.
Finally, always store your finished Onigiri properly. While they taste best fresh, if you plan to save them, wrap each one individually in cling film immediately after shaping. If refrigerated without wrapping, the rice will dry out and harden quickly, becoming hard and less appetizing. Stored correctly, these handheld snacks make magnificent make-ahead options for meal prepping.
Frequently Asked Questions about Onigiri
Can I prepare the Chicken Onigiri filling in advance?
Absolutely! Preparing the savory chicken filling up to two days ahead of time is highly recommended, as this significantly cuts down the assembly time when you are ready to make your Onigiri.
How long does homemade Onigiri last?
Onigiri is best consumed within 24 hours of preparation, especially if stored at room temperature or refrigerated. If kept properly wrapped in the fridge, you can safely enjoy them for up to two days, though the rice texture might become slightly harder.
Is there a vegetarian alternative for the filling?
Yes, you can easily substitute the chicken with ingredients like marinated roasted mushrooms, savory edamame mixed with soy sauce and sesame, or even seasoned cooked firm tofu, maintaining the same umami profile.
What is the difference between Onigiri and Sushi?
Onigiri are fundamentally different from sushi; Onigiri are simply rice balls containing a filling and do not necessarily use vinegared rice, though we add a touch here for flavor. Sushi always uses specially vinegared rice and typically involves raw fish or specific cooked seafood ingredients.
We’ve all been there: standing in front of the refrigerator at 7:00 AM, staring blankly into the abyss of sad leftovers and half-empty condiment jars, desperately trying to construct a lunch that won’t make us weep by noon. The reality of adult lunch packing often involves rushed assembly and disappointing results, leading to expensive takeout habits or the dreaded “sad desk salad.” But what if I told you there was a solution, one so portable, so satisfying, and so incredibly charming, that it turns lunch prep into a delightful, almost meditative ritual?
Enter the humble Onigiri, Japan’s answer to the perfect fast snack. These molded rice balls, typically filled with savory delights and wrapped in a crisp strip of nori, are the ultimate handheld meal. Forget messy sandwiches or complex meal prepping; the beauty of the Onigiri lies in its simplicity and versatility. However, traditional fillings can sometimes require extra steps. We are streamlining the process today, focusing on maximum flavor with minimal effort. This recipe forQuick & Easy Chicken Onigiriis exactly what you need to transform your lunch game from zero to hero.
This isn’t just about mixing ingredients; it’s about creating a perfectly balanced, umami-rich filling that shines brightly against the backdrop of fluffy, slightly sticky rice. We’re using tender shredded chicken combined with a classic sweet and savory soy glaze—a flavor profile that is both comforting and highly addictive. Get ready to banish those lunchtime blues forever, because once you master this technique, you’ll find yourself proudly displaying your geometrically perfect rice triangles to anyone who dares to look.
The Legend of the Lunchbox Savior
The first time I attempted to make Onigiri, it was a disaster. I used the wrong kind of rice, the filling was too wet, and my finished product looked less like a graceful triangle and more like a misshapen, crumbly potato. I almost gave up. But persistence—and the promise of a perfect, inexpensive lunch—paid off. I realized the secret wasn’t culinary genius; it was attention to specific details, especially rice quality and filling texture. Once you crack those two elements, molding becomes intuitive.
Ingredients for Your Chicken Rice Masterpiece
Achieving the perfect texture requires short-grain Japanese rice (often labeled sushi rice), which possesses the necessary stickiness to hold its shape when molded. For the filling, we prioritize a juicy, flavorful chicken mix that won’t compromise the structure of the rice ball.
- 2 cups uncooked short-grain sushi rice
- 2 cups water (for cooking rice)
- 1 pound boneless, skinless chicken breast or thigh, cooked and finely shredded
- 2 tablespoons soy sauce
- 1 tablespoon rice vinegar
- 1 teaspoon brown sugar or maple syrup (as a rice vinegar with sugar substitute)
- 1 teaspoon freshly grated ginger
- ½ teaspoon sesame oil
- Pinch of black pepper
- Optional: Toasted white sesame seeds (for mixing into the rice)
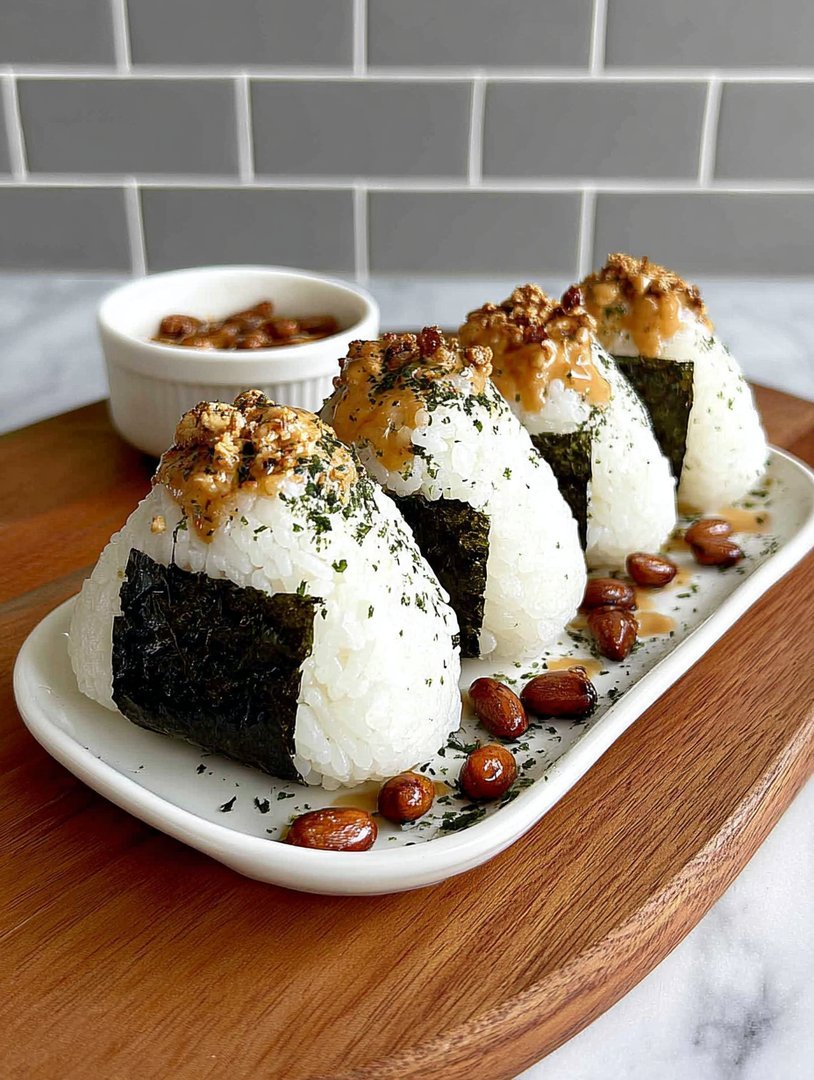
- 4–5 sheets of nori seaweed, cut into strips (about 1 inch wide and 4 inches long)
- Pinch of sea salt (for shaping)
Step-by-Step Guide to Shaping Success
The chicken filling itself should be prepared first. If you don’t have pre-cooked chicken, simply pan-fry or boil the chicken until fully cooked, then shred it using two forks. In a small saucepan, combine the shredded chicken, soy sauce, rice vinegar, brown sugar, ginger, sesame oil, and pepper. Simmer this mixture over medium heat for about 5 to 7 minutes, stirring frequently, until the glaze thickens slightly and the chicken has fully absorbed the flavor. Ensure the mixture is not runny; a thick, almost dry filling is essential for structural integrity.
Next, let the chicken filling cool completely. Meanwhile, focus on the rice. Rinse the short-grain rice several times until the water runs mostly clear. Cook the rice according to package directions—usually absorbing 2 cups of water in a rice cooker or stovetop pot. Once cooked, let the rice sit and cool slightly. It must be warm enough to be pliable but not so hot that it burns your hands or evaporates the moisture required for stickiness.
Now, the fun part: shaping. You can use plastic molds for perfect uniformity, but the traditional hand-shaping method is incredibly rewarding. First, lightly moisten your hands with water to prevent sticking and rub a tiny pinch of salt onto your palms for seasoning. Take about half a cup of rice and flatten it slightly in your palm. Create a small indentation in the center and spoon about 1 to 1.5 tablespoons of the cooled chicken mixture into the middle.
Gently cup your hand and bring the edges of the rice up and over the filling, completely sealing it inside. Now, using both hands, gently compress the rice into a ball. To create the iconic triangle shape, press the base flat and use your thumb and forefinger to create sharp corners, rotating the rice ball three times until a neat pyramid emerges. Finally, wrap a strip of nori around the base or side of the rice ball just before serving to add that vital crunch and act as a convenient handle.
Perfecting the Cooking Process
First, sauté the diced chicken until fully browned, creating depth of flavor before adding the sweet and savory glaze. While the chicken simmers, ensure your sushi rice is perfectly cooled and ready for molding, guaranteeing firm, non-sticky rice balls that maintain their structure without crumbling.
Add Your Touch
Try swapping the chicken filling for seasoned flaked salmon or shredded beef seasoned with teriyaki sauce for variety. You could also mix in toasted sesame seeds or a pinch of shichimi togarashi directly into the rice before shaping for a spicy kick, adding complexity to your portable chicken snacks.
My friend Sarah swore she couldn’t pack a decent lunch until she tried this recipe. She now calls them “rice triangles of joy” and takes them everywhere, proving even novice chefs can master this dish.
Chef’s Expert Shaping Tips
- Use wet hands when shaping the Onigiri to prevent the sticky rice from clinging to your palms, resulting in smooth, beautiful triangles every time.
- Ensure the rice is fully cooled before filling and molding. Warm rice is too fragile and prone to crumbling when pressure is applied.
- Only wrap the nori strip right before eating to prevent the seaweed from becoming soggy and losing its satisfying crisp texture.
Storing & Reheating
Store these portable snacks in an airtight container at room temperature for up to six hours, or refrigerate for up to two days. Avoid reheating, as cold rice holds its shape best, but if necessary, use a short burst in the microwave, remembering that texture may be slightly compromised.
Frequently Asked Questions About Quick & Easy Chicken Onigiri
Can I make the chicken filling spicy?
Absolutely! To add heat, incorporate a dash of sriracha or a small amount of chili garlic sauce into the chicken glaze while it is simmering. Alternatively, you can mix a little wasabi paste into the rice for a different kind of kick.
What is the best type of rice to use?
Short-grain Japanese sushi rice is non-negotiable for traditional Onigiri because it contains high levels of amylopectin, the starch responsible for its crucial stickiness. Medium-grain rice can work in a pinch, but long-grain rice like Basmati or Jasmine will not hold the molded shape.
How do I prevent the Onigiri from drying out?
Rice tends to dry out quickly, especially when refrigerated. If you are preparing them ahead of time, wrap each rice ball individually in plastic wrap before storing them in an airtight container. This locks in the moisture and keeps the rice soft and pliable.
Can I prepare the rice and chicken filling the day before?
>
Yes, preparing both components ahead of time is a fantastic strategy for efficient meal prep. Cook and cool the rice, and prepare the savory shredded chicken filling. Store them separately in the refrigerator overnight, and assemble the molded rice treats right before you plan to eat them or pack them for the next day.
What are some good dipping sauces for Onigiri?
While Quick & Easy Chicken Onigiri is flavorful on its own, a simple dipping sauce elevates the experience. Try a blend of soy sauce and ginger, or a thin glaze of sweetened rice vinegar and sesame oil. You can also mix mayonnaise with a small amount of chili paste for a creamy, spicy dipping option.
Mastering this simple technique means you’ll never suffer through another lackluster lunch again. These portable chicken snacks are proof that the most satisfying meals are often the simplest ones, and they certainly make you the envy of the break room. Now go forth, grab your rice, and start shaping your success!
Conclusion for Quick & Easy Chicken Onigiri
The Quick & Easy Chicken Onigiri recipe proves definitively that gourmet, satisfying meals do not require hours of complex labor or expensive ingredients. We conquered the bland lunch barrier by utilizing simple, tender seasoned chicken and perfectly sticky rice, creating a portable powerhouse snack ideal for any schedule. These delightful triangles are a testament to efficient cooking, offering a customizable, flavorful, and incredibly fun alternative to boring sandwiches. Whether you are meticulously prepping for the week or desperately need a rapid, fulfilling snack solution, this recipe ensures you always have a convenient, tasty bite ready to fuel your day with minimal fuss and maximum flavor.
Print
Quick & Easy Chicken Onigiri
Skip the takeout! Our Quick Chicken Onigiri features savory shredded chicken bound with Kewpie mayo, wrapped in seasoned sticky rice. Fast shaping steps included. Full nutritional info provided.
- Total Time: 35 minutes
- Yield: 4 servings 1x
Ingredients
- 2 cups Cooked short-grain rice (sticky rice), slightly cooled
- 1 cup Shredded cooked chicken (canned or rotisserie)
- 2 tablespoons Japanese mayonnaise (Kewpie recommended)
- 1 tablespoon Soy sauce (low sodium)
- 1 teaspoon Apple Juice With Sugar (sweet rice grape juice with vinegar)
- 1 teaspoon Toasted sesame oil
- 1/2 teaspoon Salt (for shaping hands)
- 3–4 sheets Dried nori (seaweed), cut into strips
Instructions
- Step 1: Prepare the chicken filling by combining the shredded chicken, mayonnaise, soy sauce, apple juice with sugar, and sesame oil in a small bowl. Mix thoroughly until the chicken is evenly coated and the mixture is well-bound.
- Step 2: Place a bowl of water and the salt near your work station. Moisten your hands with the water, then rub a pinch of salt onto your palms. This prevents the rice from sticking and lightly seasons the exterior of the onigiri.
- Step 3: Scoop about 1/2 cup of the cooked rice into the palm of one hand. Gently flatten the rice into a disc shape and create a shallow indentation in the center. Place 1 to 1.5 tablespoons of the chicken mixture into the indentation.
- Step 4: Scoop another smaller portion of rice (about 1/4 cup) and place it over the filling. Gently press the rice edges together to seal the filling completely inside, ensuring no gaps remain.
- Step 5: Firmly but carefully shape the rice into a compact triangle or ball, rotating it slowly between your hands until a solid shape is formed. Repeat the process until all the rice and filling are used.
- Step 6: Take a strip of nori seaweed and wrap it around the bottom base of the shaped rice ball, pressing gently so the nori adheres to the rice. Serve immediately or wrap in plastic wrap for later consumption.
Notes
- For best texture, store onigiri wrapped tightly in plastic at room temperature for immediate consumption, or refrigerate for up to 24 hours, placing a slightly damp paper towel in the container to combat rice hardening.
- To soften cold onigiri, microwave it for 20 to 30 seconds while still loosely wrapped in plastic wrap; the trapped steam prevents the rice from drying out and restores the sticky texture.
- Enjoy these savory rice balls as a perfect portable lunch or snack, complemented by quick pickled ginger (gari) or a simple warm cup of green tea.
- Do not skip the Step 2 hand seasoning: the salt applied to your palms is crucial for balancing the flavor profile by adding a subtle, savory crunch to the exterior rice that complements the rich chicken filling.
- Prep Time: 15 minutes
- Cook Time: 20 minutes
- Method: Stovetop
- Cuisine: American
FAQs
Can I make Quick & Easy Chicken Onigiri ahead of time for meal prep?
Absolutely! This is one of the best features of making Quick & Easy Chicken Onigiri. You can prepare them up to three days in advance, provided you store them correctly. Wrap each rice ball tightly in plastic wrap or parchment paper to prevent the rice from drying out. Store them in an airtight container in the refrigerator. When you are ready to eat, allow them to come to room temperature for about 30 minutes, as cold rice loses some of its texture and flavor. This preparation strategy makes busy morning lunch packing a breeze, keeping your snacks perfectly fresh.
What is the secret to preventing Onigiri rice from sticking to my hands?
The key to mastering the non-stick rice ball lies in three simple steps. First, ensure your hands are always damp—a small bowl of salted water nearby is essential for dipping between shaping each triangle. The salt adds flavor and helps preserve the rice slightly. Second, do not over-handle the rice; compact it firmly but quickly. Third, if you find traditional hand-shaping challenging, use a piece of plastic wrap or a specialty mold. Plastic wrap creates an invaluable barrier, allowing you to press the rice firmly without direct contact, ensuring perfect shaping every time without the mess.
What filling variations work well beyond the Quick & Easy Chicken Onigiri recipe?
While the classic chicken filling is unbeatable for speed and flavor, Onigiri is incredibly versatile. For a richer flavor profile, try savory slow-cooked beef seasoned with a touch of soy sauce and ginger. Another excellent choice is combining brightly flavored pickled vegetables, like shredded carrots and cucumber, mixed with a creamy, savory sauce. You could also use spiced crumbled turkey or even seasoned shiitake mushrooms for a powerful umami punch. Experimentation is highly encouraged—just ensure your chosen filling is not too wet, or it will compromise the crucial structural integrity of the rice ball.
Is there a specific type of rice I must use for successful shaping?
Yes, the rice choice is absolutely crucial for structural integrity when making rice balls. You must use cooked short-grain Japanese rice (Japonica) or medium-grain rice, often conveniently labeled as sushi rice. These varieties possess the necessary high starch content that becomes perfectly sticky when cooked, allowing the grains to adhere firmly together when pressed and hold their iconic shape. Do not attempt to use long-grain rice, such as Basmati or Jasmine, as it lacks the required cohesion and will inevitably crumble when you attempt to shape or enjoy your portable rice snack.


Leave a Comment