


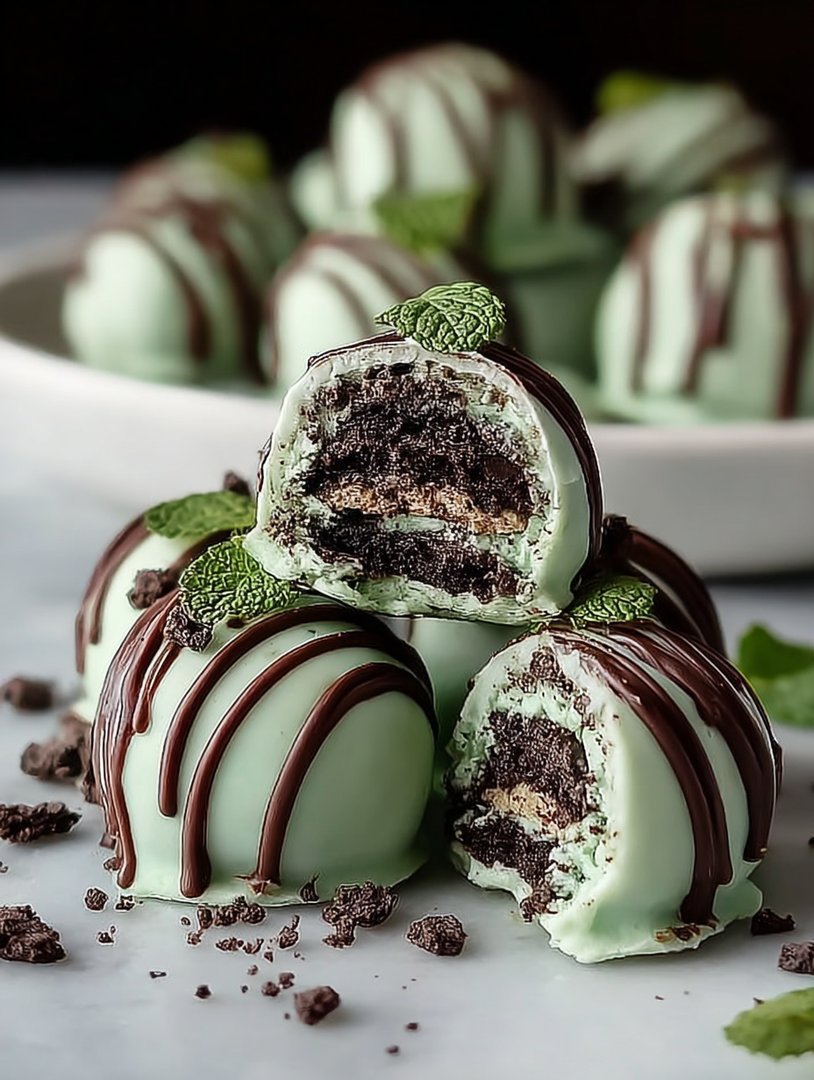
Remember those times when you desperately needed a decadent dessert but only had ten minutes of motivation? That’s where the legendaryMint Oreo Trufflesglide effortlessly into your kitchen repertoire. These little green and chocolate spheres are cool, creamy, and ridiculously simple to make, proving that the ultimate indulgence doesn’t require a culinary degree or hours of slaving over a hot stove.
Get ready to unleash your inner dessert genius because these truffles offer that perfect balance of refreshing mint and rich dark chocolate. They are always the first thing to vanish from any dessert platter, cementing their status as a no-bake superstar.
- Prep time is blissfully minimal, requiring zero baking and just simple chilling for a flawless, irresistible finish.
- The intense pairing of cool mint flavoring and deep chocolate creates an incredibly satisfying, refreshing sweet bite.
- Their vibrant green center, coated in rich chocolate, makes them an incredibly festive and appealing dessert centerpiece.
- These decadent treats are perfect for holiday platters, thoughtful quick gifts, or simply satisfying that sudden, intense craving for rich flavor.
The Magic of No-Bake Desserts and Why Truffles Reign Supreme
There is a special kind of comfort that comes from knowing you can achieve absolute culinary stardom without ever turning on the oven. No-bake desserts, and particularly truffles, are the unsung heroes of the modern kitchen. They demand minimal technical skill yet yield maximum flavor and visual impact. When you combine the iconic, crunchy sweetness of the world’s favorite sandwich cookie with soft, tangy cream cheese and refreshing mint, you create something truly otherworldly. This recipe forMint Oreo Trufflesis often referred to as the “lazy genius” of confectionery because the complexity of the flavor profile completely belies how easy they are to execute.
I learned this recipe purely out of necessity one frantic Winter Evening. I had promised my family a stunning dessert, and then promptly forgot that my ancient oven had decided to take a permanent holiday. Faced with a pantry full of cookies and a ticking clock, I stumbled upon the truffle concept. The results were immediate pandemonium—the kind where everyone pretends they don’t want the last one, but their hand is already hovering nervously over the plate. Since then, these easy chocolate treats have become my emergency secret weapon, saving every dinner party, birthday, and casual Tuesday that desperately needed a burst of joy.
The secret to achieving the perfect truffle texture lies in temperature control. You want the base mixture cold enough to hold its shape when rolled but warm enough initially to incorporate the cream cheese smoothly. Rushing the chilling process is the cardinal sin of truffle making. Think of the refrigerator as your co-chef; it’s doing the heavy lifting by firming up those lovely balls so they stand up proudly to their warm chocolate bath. Ignoring the chill time results in gooey, sticky frustration, and nobody wants to wrestle with melted, shapeless cookie dough.
Selecting Your Key Ingredients for Optimal Flavor
While the list of items needed is short, selecting high-quality components ensures your homemade chocolate delicacies truly shine. When working with simple recipes, the quality of each element is magnified. Opting for a full-fat cream cheese, for example, makes a significant difference in the smoothness and richness of the truffle core. Likewise, choosing a quality melting chocolate for the coating ensures a glossy, snappy exterior rather than a dull, waxy one. We aren’t making gourmet candy here, but we are making something spectacular, and that starts with mindful ingredient selection.
Ingredients for Mint Oreo Truffles
Here’s what you’ll need to make this delicious dish:
- Mint Sandwich CookiesUse the family-sized package, as you need sufficient crumbs to form a sturdy, flavorful base.
- Cream CheeseUse full-fat, softened cream cheese; this provides the essential binder and creamy texture that defines a perfect truffle.
- Dark or Milk Chocolate Melting WafersThese ensure a smooth, professional coating that sets quickly and easily without needing specialized tempering techniques.
- Coconut Oil or Neutral Vegetable ShorteningA tiny amount helps thin the melted chocolate, giving it a beautiful, glossy shine and making dipping much easier.
- Mint Extract (Optional)A few drops can enhance the mint flavor if you want an extra intense, cooling sensation in your treat.
- Green Food Coloring (Optional)Use gel coloring sparingly if you want to achieve a bright, festive green color for the truffle interior.
The full ingredients list, including measurements, is provided in the recipe card directly below.
How to Make Mint Oreo Truffles
Follow these simple steps to prepare this delicious dish:
Step 1: Crushing the Cookies to Perfection
Start by pulverizing the mint sandwich cookies. You can achieve this using a food processor, pulsing until the cookies resemble fine, uniform crumbs. If you don’t have a food processor, place the cookies in a heavy-duty resealable bag and use a rolling pin to crush them completely. Reserve about half a cup of the fine crumbs for later use as a decorative topping or to help thicken the mix if it’s too soft.
Step 2: Mixing and Flavoring the Truffle Base
In a large mixing bowl, combine the cookie crumbs with the softened cream cheese. Mix using a sturdy spatula or a hand mixer on low speed until everything is fully incorporated. The mixture should be thick and cohesive, pulling away from the sides of the bowl. At this stage, you may add the mint extract and green food coloring, mixing until the color is evenly distributed and the aroma is vibrant. If the mixture feels too sticky or wet, gradually add some of the reserved crumbs until it reaches a manageable, firm consistency.
Step 3: Rolling and the Essential Chill Time
Scoop the mixture using a small spoon or cookie scoop (about 1 to 1.5 tablespoons per truffle) and quickly roll it into smooth, dense balls. Place the rolled truffles onto a parchment-lined baking sheet. This part is crucial: transfer the sheet to the refrigerator and chill the truffles for at least two hours, or preferably until they are very firm, which makes dipping significantly cleaner.
Step 4: Preparing the Glossy Chocolate Coating
While the truffles are chilling, prepare your coating. Melt the chocolate wafers according to the package directions, either using short intervals in the microwave or a double boiler setup. Once melted and smooth, stir in the coconut oil or vegetable shortening. This addition is key; it ensures the chocolate is fluid enough for a thin, glossy coating and provides that satisfying break when you bite into the truffle.
Step 5: Dipping and Decorating the Chilled Truffles
Working quickly, use a dipping fork or a simple toothpick to submerge each cold truffle fully into the melted chocolate. Tap the fork gently against the side of the bowl to allow excess chocolate to drip off. Return the coated truffle to the parchment-lined sheet. Before the chocolate sets, sprinkle the top with any leftover cookie crumbs, or consider drizzling with a contrasting white chocolate for an elegant finish. If the dipping chocolate starts to thicken, return it to the heat source for 30 seconds to maintain fluidity.
Step 6: Final Setting and Serving
Once all the truffles are coated, return the sheet to the refrigerator for about 30 minutes to allow the chocolate shell to fully harden and set. Store them in an airtight container in the refrigerator. They are best served slightly chilled, straight from the fridge for that perfect, crisp outer shell and creamy, cool interior.
Troubleshooting Common Truffle Texture Challenges
Even though this recipe is incredibly straightforward, things can occasionally go sideways. Understanding the common pitfalls will ensure your batch ofMint Oreo Trufflesturns out exactly as planned—dense, creamy, and easy to handle. The biggest issue people face is a base that is too sticky. If your mixture feels more like putty than dough after mixing, this usually means your cream cheese was too warm or you didn’t crush the cookies finely enough. To fix this, simply add a tablespoon or two of powdered sugar or the reserved cookie crumbs until the consistency firms up. Then, give the mixture an extra 30 minutes in the freezer before attempting to roll.
Another common concern is cracking chocolate after the truffles have set. This often happens if the truffles are too cold when dipped into very warm chocolate. The rapid temperature change causes the chocolate shell to shrink and fracture. To prevent this, let the truffles sit at room temperature for five to ten minutes after removing them from the refrigerator, easing the temperature difference before their chocolate bath. Alternatively, ensure your melted chocolate is just warm enough to be liquid, not scorching hot. Using good quality melting wafers dramatically reduces the risk of seizing or cracking.
Tips for Achieving the Ultimate Smooth Chocolate Shell
The final shell is what gives these truffles their professional, polished appearance. If you want that bakery-quality shine, always use a small amount of fat, like coconut oil or vegetable shortening, in your melted chocolate. It’s a trick the pros use to thin the chocolate slightly and increase its sheen without compromising its ability to set firmly. Additionally, when you tap off the excess chocolate after dipping, do it gently but firmly. This removes the thick drips that pool at the base, keeping your truffles perfectly round and minimizing messy feet around the bottom.
For added visual appeal, try using both white chocolate and dark chocolate coatings. You can dip half the batch in dark chocolate and the other half in white chocolate, then use the opposing color for thin, decorative drizzles across the top. This contrast highlights the vibrant green interior when they are served and adds a layer of elegant sophistication to an already simple dessert. Remember, these truffles are incredibly resilient; you can re-roll and re-dip them if the first attempt isn’t perfect, making them a low-stress baking project perfect for beginners.
Life is too short for complicated baking. I learned this truth the hard way one Tuesday evening when I needed dessert, but my ambition had completely checked out. The oven seemed daunting, the measuring cups felt heavy, and the thought of dirtying multiple mixing bowls triggered immediate fatigue. I needed a hero, a quick, effortless treat that tasted like I’d spent all day perfecting it, ideally something green and glorious.
My kitchen cabinets, typically sparse, revealed a hidden gem: a forgotten bag of mint-flavored sandwich cookies and a fresh block of cream cheese chilling quietly in the back of the fridge. It was an alignment of confectionery stars. This discovery led to the greatest culinary shortcut of my life—the revelation of how simple, silky, and utterly addictive Mint Oreo Truffles truly are. These little spheres of joy require zero baking skills, minimal time, and maximum enthusiasm. They are perfect for parties, unexpected guests, or, let’s be honest, standing alone in the kitchen contemplating the meaning of dessert.
Forget the complexities of tempering chocolate or whipping stiff peaks. If you own a food processor and can operate a spoon, you are fully qualified to create these spectacular treats. They offer that iconic, refreshing burst of mint combined with rich, decadent chocolate coating. These truffles disappear faster than you can say, “Did someone eat the last one?”
Ingredients for Irresistible Mint Oreo Truffles
This recipe uses a shockingly small number of ingredients, proving that sometimes, simplicity truly is the key to happiness.
- 45 (about 1 package) mint-flavored sandwich cookies (such as Mint Oreos)
- 8 ounces (1 package) cream cheese, softened
- 12 ounces high-quality semi-sweet or dark chocolate melting wafers (or chocolate chips)
- 2 tablespoons refined coconut oil or vegetable shortening (optional, for thinning the chocolate)
- Pinch of fine sea salt (enhances the chocolate flavor)
- Optional decorations: additional crushed cookies, green sprinkles, or a white chocolate drizzle
Equipment Check: Your Truffle-Making Arsenal
You don’t need much fancy gear, but a powerful food processor will make your life infinitely easier.
- Food processor
- Mixing bowl
- Parchment-lined baking sheet
- Small scoop or teaspoon
- Microwave-safe bowl or double boiler for melting chocolate
Step-by-Step Guide to Perfect Mint Oreo Truffles
Crushing and Mixing the Base
The first step is arguably the most fun. Place the entire package of mint sandwich cookies into your food processor. Pulse the cookies until they resemble fine, uniform crumbs. We want flour-like consistency here, not chunky bits. If you don’t have a food processor, place the cookies in a sturdy zip-top bag and smash them vigorously with a rolling pin—it’s excellent stress relief, though results may be slightly less uniform.
Once the cookies are pulverized, add the softened cream cheese and a tiny pinch of salt to the crumbs in the food processor. Process until the mixture is fully combined and looks like dense, sticky dough. If the cream cheese was too cold, you might need to scrape down the sides a few times. The resulting texture should be easily pliable, but not greasy or runny. This mixture forms the heart of your beautiful Mint Oreo Truffles.
Chilling and Rolling
Now comes the waiting game, which is mandatory for perfect truffles. Scrape the dough into a bowl, cover it, and chill it in the refrigerator for at least 30 minutes. If you skip this step, the dough will stick to your hands like cement and refuse to form proper spheres. Chilling makes rolling a breeze.
Once chilled, use a small cookie scoop or a measuring spoon to portion out the truffle mixture. Roll these portions into smooth, one-inch balls. Place these perfectly formed spheres onto a parchment-lined baking sheet. After rolling all the truffles, place the tray back into the freezer for 15 minutes. This firm chill is essential for preventing the truffles from melting the moment they hit the warm chocolate coating.
The Chocolate Dip
While the truffle centers firm up, prepare your chocolate coating. In a microwave-safe bowl, combine the melting wafers or chocolate chips with the coconut oil or shortening (if using). Microwave in 30-second intervals, stirring well between each, until the chocolate is perfectly smooth and glossy. Using shortening or coconut oil helps the chocolate set smoothly and avoids a thick, sluggish coating. Ensure the melted chocolate is warm but not scorching hot.
Using a dipping tool or a fork, gently lower one truffle into the melted chocolate, ensuring it is fully submerged. Lift the truffle out, tap the fork gently against the side of the bowl to remove excess chocolate, and carefully place the dipped truffle back onto the parchment paper. Repeat this process quickly before the chocolate hardens.
Before the coating sets completely, add any desired decorations, such as a dusting of finely crushed cookies or a swirl of contrasting melted white chocolate. Return the finished Mint Oreo Truffles to the refrigerator immediately until the chocolate is fully set, usually about 20 minutes.
The Accidental Discovery of Sunshine on a Plate
This whole adventure started because my grandmother insisted I always keep cream cheese handy for “emergency cheesecake needs.” Turns out, emergency truffle needs are equally pressing, and these Mint Oreo Truffles delivered unexpected joy during a dreary winter evening, proving the simplest ingredients often create the most delightful surprise.
Perfecting the Cooking Process
The key to success with Mint Oreo Truffles involves sequential chilling: first, chill the dough for 30 minutes to make rolling possible, and then flash-freeze the rolled balls for 15 minutes right before dipping. This two-step chilling process ensures they hold their shape beautifully and prevents the chocolate from developing streaks or cracks.
Add Your Touch
You can easily customize these treats by swapping the mint cookies for peanut butter or red velvet varieties for different flavor profiles. For extra depth, mix in a teaspoon of vanilla bean paste or a hint of almond paste into the cream cheese mixture, or dip the finished truffles in ground pistachios instead of crushed cookies.
Storing & Reheating
Store your finished Mint Oreo Truffles in an airtight container in the refrigerator, where they will maintain their delicious texture for up to two weeks, though they rarely last that long. Freezing them extends their life to about three months; just thaw them in the fridge overnight before serving for the best experience.
Chef’s Essential Tips for Truffle Perfection
-
Ensure your cream cheese is truly soft, bordering on room temperature, before mixing it with the cookie crumbs; cold cream cheese will leave unmixed chunks in your truffle base, ruining the smooth texture.
-
If your chocolate becomes too thick during dipping, add a tiny bit more coconut oil (about a half teaspoon) and stir until it thins out, ensuring a nice, thin, professional-looking coating.
-
Use a specific dipping fork or even a toothpick to handle the truffles during coating; this minimizes fingerprints and prevents unnecessary loss of chocolate during the transfer process to the parchment paper.
My younger cousin once swore these Mint Oreo Truffles were store-bought, refusing to believe something so simple could taste this professional, which honestly, felt like the highest praise I could ever receive.
Conclusion for Mint Oreo Truffles
These magnificent, no-bake Mint Oreo Truffles are the ultimate dessert solution for anyone needing maximum flavor with minimal effort. Their irresistible mint and chocolate combination, coupled with a smooth, creamy center, guarantees they will be the star of any gathering. Remember the crucial steps: proper chilling of the dough, brief flash-freezing before dipping, and a glossy, fluid chocolate coating for the best results. Whether you are a novice cook or a seasoned baker taking a much-needed shortcut, these truffles deliver pure, effortless delight every single time. Stop stressing over complicated recipes and start rolling these decadent treats today; you deserve this sweet, refreshing indulgence.
Print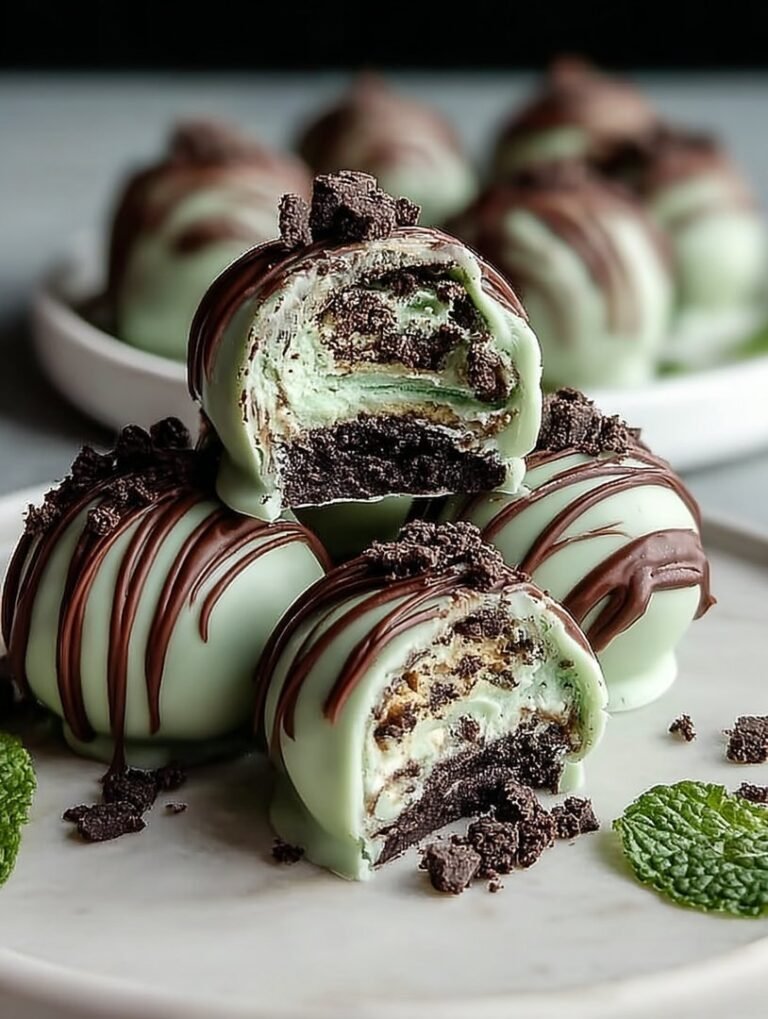
Mint Oreo Truffles
Skip the baking! Mint Oreos, cream cheese, and pure peppermint create a fudgy, cool center dipped in snappy white chocolate.
- Total Time: 35 minutes
- Yield: 4 servings 1x
Ingredients
- 1 (13.2 oz) package Mint Crème Oreo Cookies
- 8 oz cream cheese, softened
- 12 oz white chocolate melting wafers or almond bark
- 1/2 teaspoon pure peppermint extract
- 3 drops green gel food coloring (optional)
- 1/4 cup crushed Mint Oreo pieces or green sprinkles, for garnish
Instructions
- Step 1: Place the Mint Oreo cookies in a food processor and pulse until they are processed into very fine crumbs. Reserve about 1/4 cup of the crumbs for garnish, and place the remaining crumbs in a large mixing bowl.
- Step 2: Add the softened cream cheese, peppermint extract, and optional green food coloring (if using) to the bowl with the cookie crumbs. Use a sturdy spoon or an electric mixer on low speed to thoroughly combine the ingredients until a smooth, uniform dough forms.
- Step 3: Roll the mixture into 1-inch to 1.5-inch balls (truffles) and place them on a baking sheet lined with parchment paper. Transfer the sheet to the refrigerator and chill the truffles for at least 30 minutes, or until firm.
- Step 4: Melt the white chocolate wafers according to package directions, either in the microwave in 30-second increments or using a double boiler. Stir until completely smooth.
- Step 5: Dip one chilled truffle at a time into the melted chocolate, using a fork to completely coat it. Gently tap the fork on the edge of the bowl to remove excess chocolate, then return the truffle to the parchment-lined baking sheet.
- Step 6: Immediately sprinkle the reserved crushed Oreo crumbs or green sprinkles over the dipped truffles before the chocolate sets. Allow the chocolate coating to fully harden at room temperature or chill for 15 minutes before serving.
Notes
- Store finished truffles in an airtight container in the refrigerator for up to two weeks, or freeze them for up to three months, thawing in the fridge overnight before serving.
- For the best flavor and texture, remove the truffles from the refrigerator about 15 minutes before serving so the cream cheese center softens slightly but the chocolate coating remains firm.
- Serve these refreshing treats alongside a cup of hot cocoa or strong coffee, or pair them with a scoop of vanilla ice cream for a decadent, minty sundae topping.
- Ensure the truffles are thoroughly chilled (at least 30 minutes) before dipping; a very cold truffle prevents the melted white chocolate from seizing and ensures a clean, swift coating without crumbling the center.
- Prep Time: 15 minutes
- Cook Time: 20 minutes
- Method: Stovetop
- Cuisine: American


Leave a Comment