


The moment that rich, dark chocolate aroma hits your nose, you know you are about to experience magic. Forget complicated desserts; we are diving headfirst into the creamy, decadent world of fudge where childhood nostalgia meets grown-up indulgence.
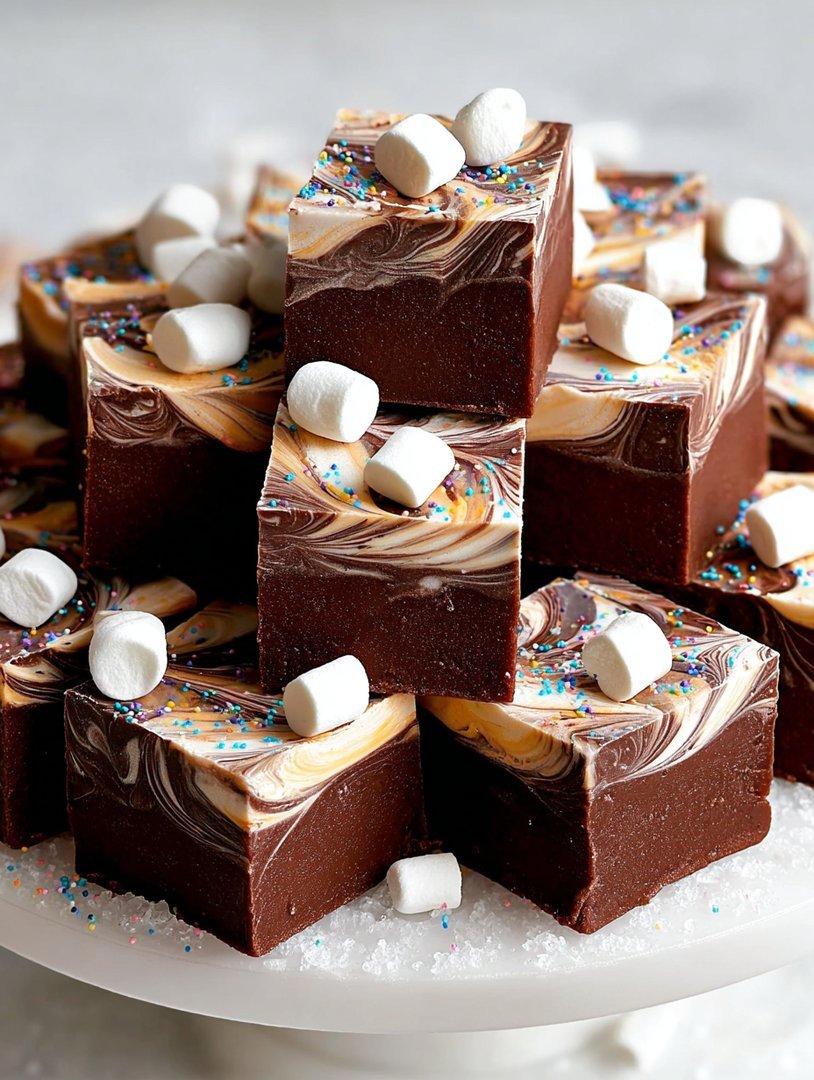
Get ready for a treat so irresistible it should come with a warning label. This easy recipe delivers the ultimate smooth, deep chocolate base perfectly contrasted by ribbons of gooey, sweetMarshmallow Swirl Fudge.
- Craft this dessert easily with minimal kitchen time, making it perfect for novice bakers and seasoned confectionery enthusiasts alike.
- Experience an incredible flavor profile featuring intense dark chocolate balanced harmoniously by the airy sweetness of the marshmallow.
- Achieve stunning visual appeal with beautiful, mesmerizing swirls that make this fudge ideal for gifting or holiday entertaining.
- This recipe is incredibly versatile, allowing you to easily customize it with nuts, extracts, or sprinkles to suit any seasonal occasion.
Ingredients for Marshmallow Swirl Fudge
Here’s what you’ll need to make this delicious dish:
- Chocolate Chips (Semi-Sweet or Dark)Select high-quality chips, as they form the foundation of the fudge’s deep, rich chocolate flavor profile.
- Sweetened Condensed MilkThis ingredient provides the essential sweetness and creamy texture, ensuring the fudge sets up perfectly without crystallization.
- Unsalted Butter (or Plant-Based Alternative)A small amount of butter adds richness and shine, contributing to that desirable velvety smooth mouthfeel.
- Vanilla PowderAlways use pure vanilla powder; it elevates the overall flavor and harmonizes the strong notes of chocolate and sugar.
- Marshmallows (Mini or Standard)These create the signature gooey, light swirl; ensure you have enough to generously ribbon through the warm fudge.
- A Pinch of SaltDon’t skip the salt; it subtly cuts through the sweetness and enhances the intensity of the chocolate, balancing the entire flavor profile.
The full ingredients list, including measurements, is provided in the recipe card directly below.
How to Make Marshmallow Swirl Fudge
Follow these simple steps to prepare this delicious dish:
-
Prep Your Pan and Ingredients
Line an 8×8 inch baking pan with parchment paper, ensuring the paper hangs over the sides like handles. Lightly grease the paper to prevent sticking. Measure out all your ingredients before you start cooking, as this recipe moves quickly once the heat is on.
-
Melt the Fudge Base
Combine the chocolate chips, sweetened condensed milk, and butter in a heavy-bottomed saucepan over medium-low heat. Stir continuously until the butter and chocolate are fully melted and the mixture is completely smooth and homogeneous. This takes about five to eight minutes; do not let the mixture boil or scorch.
-
Add Vanilla and Salt
Remove the pan immediately from the heat once smooth. Stir in the vanilla powder and the pinch of salt until fully incorporated. This is your velvety smooth chocolate fudge base, ready for its swirl transformation.
-
Fold and Pour the Fudge
Quickly pour about three-quarters of the warm fudge base into the prepared pan and spread it into an even layer using an offset spatula. Reserve the remaining one-quarter fudge base in the saucepan.
-
Create the Marshmallow Swirl
In the saucepan containing the reserved fudge, gently fold in about half of the marshmallows until they begin to soften and melt slightly, creating a thick, marshmallow-infused sauce. Dollop this marshmallow mixture over the fudge in the pan, then sprinkle the remaining marshmallows evenly over the top.
-
Swirl and Chill
Use a butter knife or skewer to gently cut through the layers, creating beautiful, dramatic swirls. Avoid over-swirling, which can turn the colors muddy. Chill the fudge for at least four hours, or until fully set, before lifting it out using the parchment handles and cutting it into squares.
Transfer to plates and drizzle with a touch of melted white chocolate for the perfect finishing touch if desired.
Why Marshmallow Swirl Fudge Wins the Dessert Game
If you have ever attempted candy making, you probably know the chilling fear of the sugar thermometer, the anxiety of crystallization, and the general feeling that you need a degree in chemistry to succeed. That’s why this particularMarshmallow Swirl Fudgerecipe is a legend. It completely bypasses all the nerve-wracking stages of traditional fudge making by utilizing sweetened condensed milk as its backbone, resulting in a virtually foolproof, incredibly creamy, and deeply satisfying treat every single time.
The charm of this fudge lies not only in its ease but also in the spectacular visual appeal of the marshmallow ribbons. When you cut into a square, the contrast between the dark, glossy chocolate and the pale, gooey swirl is breathtaking. This is the kind of dessert that looks like it took hours of painstaking effort, yet it comes together faster than arguing over who gets the last slice. It is the perfect centerpiece for holiday trays, a fantastic edible gift, or simply a treat to hide in the back of your fridge for emergency stress-eating sessions. We all deserve a dessert that gives back, and this fudge certainly does.
Furthermore, the texture is unparalleled. Traditional fudge can sometimes be grainy or overly stiff, but the condensed milk base ensures a melt-in-your-mouth creaminess. The marshmallows soften when incorporated, creating pockets of soft, chewy bliss that complement the firm chocolate foundation beautifully. This juxtaposition of textures ensures every bite is a delightful surprise, making it far superior to plain, unadorned chocolate fudge. The simple combination of high-quality chocolate and sweet, creamy milk is truly unbeatable when executed with this straightforward method.
Secrets to the Ultimate Fudge Texture
Achieving the perfect fudge consistency is mostly about temperature control and patience, even in a no-fail recipe like this one. While you avoid boiling sugar to specific temperatures, you still need to handle the melting stage correctly. Ensure your heat remains low. If you rush the melting process by using high heat, the chocolate can seize or the mixture might separate, resulting in an oily, grainy texture. Slow and steady stirring is crucial here, allowing the ingredients to emulsify fully and create that characteristic glossy sheen.
Another often overlooked tip for ensuring that creamy texture is using high-fat content ingredients. Opting for quality chocolate chips, such as those that are specifically labeled for melting, will yield a richer, smoother fudge compared to using inexpensive baking squares. Once the fudge base is fully melted and removed from the heat, stirring in the vanilla and salt helps the mixture cool slightly before the marshmallow stage. This slight cooling prevents the delicate marshmallow from dissolving instantly, allowing you to create that distinct, defined swirl instead of a fully incorporated, slightly pale chocolate.
When it comes time to swirl, remember that less is more. The goal is to see distinct streaks of white and dark chocolate; excessive stirring will muddy the colors, resulting in a less visually appealing fudge. Use a knife or skewer and make broad, figure-eight motions only a few times. Trust the process and know that those lazy, imperfect swirls are precisely what give the Marshmallow Swirl Fudge its rustic, irresistible charm. Once poured, resisting the urge to poke or test the fudge while it chills is the hardest step of the whole process. Absolute stillness during the chilling phase is essential for optimal setting.
Customizing Your Swirl: Flavor Variations
While the classicMarshmallow Swirl Fudgeis a perfect stand-alone treat, adapting the recipe is simple and fun. You can easily change the chocolate base to alter the flavor profile. Try using milk chocolate chips for a softer, sweeter fudge, or switch entirely to white chocolate for a lighter canvas that showcases other additions better. If you go the white chocolate route, consider adding a teaspoon of lemon extract or a dash of almond paste to enhance the flavor depth.
Incorporating different extracts is the easiest way to vary the recipe. For instance, a festive peppermint extract transforms this into a holiday treat, especially when topped with crushed candy canes. Alternatively, a hint of coffee or espresso powder stirred into the melted chocolate base creates a mocha swirl effect that pairs beautifully with the sweet marshmallows. Always start with a small amount of extract—about half a teaspoon—and taste the base before pouring, as extracts can be quite potent.
You can also introduce crunchy elements for added texture. After creating the marshmallow swirl but before chilling, sprinkle the top generously with toasted pecans, chopped walnuts, or even crushed crispy rice cereal for an unexpected crunch. Ensure any additions are lightly pressed into the fudge so they adhere firmly as it sets. For a truly decadent twist, try swirling in a spoonful of creamy, smooth peanut butter alongside the marshmallow. The salty nut butter and the sweet chocolate marshmallow combination is a time-tested winner that always impresses guests.
Storing and Serving Your Fudge Masterpiece
Proper storage is essential to maintain the freshness and signature texture of your homemadeMarshmallow Swirl Fudge. Once cut into squares, fudge should be stored in an airtight container at room temperature. Kept this way, it will remain fresh and delicious for up to two weeks. Avoid storing fudge in direct sunlight or near heat sources, as this can cause the butter content to soften and potentially affect the texture.
If you need to store the fudge for longer, the freezer is your friend. Wrap individual pieces tightly in plastic wrap, then place them inside a heavy-duty, freezer-safe container. Frozen fudge can last for up to three months. To thaw, simply remove the desired amount and let it come to room temperature while still wrapped; this prevents condensation from making the surface sticky. This freezing method makes this recipe excellent for meal prep, allowing you to always have a quick dessert ready.
Serving suggestions are straightforward but offer opportunities for elevation. While fudge is wonderful eaten straight from the counter, serving it slightly warmed can truly intensify the chocolate flavor and make the marshmallow sections even gooier. Place squares on a small plate and microwave them for about 10–15 seconds before serving with a scoop of vanilla bean ice cream. The contrast between the warm, soft fudge and the cold ice cream creates an unforgettable dessert experience perfect for cozy evenings.
Frequently Asked Questions About Marshmallow Swirl Fudge
How do I prevent the fudge from becoming grainy?
The key to preventing graininess in this recipe is low heat and constant stirring during the melting phase. Ensure the chocolate chips are fully melted and incorporated before removing the mixture from the heat; never allow the mixture to scorch or boil rapidly.
Can I use savory butter instead of unsalted butter?
While technically possible, unsalted butter is highly recommended. If you must use salted butter, omit the pinch of salt listed in the recipe instructions to prevent the resulting fudge from becoming overly salty.
How do I know when the fudge is fully set?
The fudge is fully set when it is firm to the touch and resistant when you attempt to press it. It should not feel soft or sticky. Four hours is generally sufficient, but chilling overnight guarantees the best, cleanest cuts.
Why did my marshmallow completely dissolve when I swirled it?
If the marshmallow dissolved completely, the chocolate base was too hot when you added the marshmallows. Ensure you remove the base from the heat and let it rest for about a minute before incorporating the marshmallows for swirling.
What is the best way to cut the fudge cleanly?
For clean cuts, ensure the fudge is completely cold and set. Use a large, sharp knife, running it under hot water and wiping it dry between each cut. The heat from the blade makes slicing through the dense, sticky fudge much easier.
Welcome, fellow dessert enthusiasts, to the only corner of the internet where sugar is mandatory and judgment is strictly prohibited. I remember the first time I attempted to make fudge. It was a disaster of sticky proportions, resembling something closer to concrete insulation than a delectable treat. I spent an hour scraping a hardened lump of what was supposed to be chocolate off a saucepan. That failure taught me one thing: fudge is only intimidating until you realize how truly simple it can be, especially when you introduce the magic of the marshmallow swirl. This recipe isn’t just easy; it’s aggressively foolproof. We’re talking about a rich, creamy, chocolate foundation interrupted by ribbons of sweet, cloud-like goodness. It looks like you spent hours tempering chocolate and measuring micro-grams of sugar, but in reality, you just needed about ten minutes of active stirring and some serious restraint while waiting for it to set.
The secret to achieving that perfect, eye-catching marbled look lies in the timing—knowing exactly when to introduce the molten marshmallow mixture and how quickly to pull back your spoon. This isn’t abstract expressionism; we are aiming for deliberate, delicious chaos. Prepare yourself for a dessert that demands attention, steals the show at potlucks, and permanently cements your status as the reigning champion of homemade treats. Forget those expensive boutique confectionaries; your kitchen is about to become the epicenter of irresistible, decadent Marshmallow Swirl Fudge.
Ingredients for the Decadent Swirl
You only need a few high-quality components to create this masterpiece. Make sure you use fresh ingredients for the best texture and flavor payoff.
- 3 cups (about 500g) high-quality semi-sweet chocolate chips or finely chopped baking chocolate
- 1 (14-ounce) can sweetened condensed milk
- 1 teaspoon pure vanilla powder
- 1/4 cup (1/2 stick) unsalted butter, cut into chunks
- 2 cups plant-based miniature marshmallows (plus extra for decoration, if desired)
- 1 tablespoon unsalted butter (additional, for melting marshmallows)
- A pinch of fine sea salt
Simple Instructions: Creating the Perfect Fudge
Line an 8×8 inch square baking pan with parchment paper, leaving an overhang on the sides for easy removal. Lightly grease the paper if necessary. This preparation step is crucial and saves immense scrubbing later.
- Prepare the Chocolate Base:In a heavy-bottomed saucepan or Dutch oven, combine the chocolate chips, sweetened condensed milk, 1/4 cup of butter chunks, and the pinch of sea salt.
- Melt Smoothly:Place the saucepan over medium-low heat. Stir constantly until the butter and chocolate are fully melted and the mixture becomes smooth and glossy. Avoid high heat, which can scorch the chocolate and ruin the texture.
- Finish the Fudge:Once smooth, remove the pan from the heat immediately. Stir in the vanilla powder until fully incorporated. Pour about two-thirds of this chocolate mixture into your prepared pan. Spread it lightly to form an even base layer.
- Create the Marshmallow Component:In a separate small, microwave-safe bowl, combine the 2 cups of marshmallows and the extra tablespoon of butter. Microwave on high for 30 seconds. Stir, and continue microwaving in 15-second intervals until the mixture is fully melted and smooth. This happens quickly, so watch carefully.
- Swirl Magic:Pour the molten marshmallow mixture over the fudge base in the pan. Dollop the remaining one-third of the reserved chocolate fudge mixture over the marshmallow layer.
- The Swirl Technique:Using a butter knife or a skewer, gently drag through the layers to create a marbled effect. Do not over-swirl! Four or five passes across the pan are usually enough to achieve beautiful ribbons without muddling the colors entirely.
- Set and Chill:Allow the fudge to cool slightly at room temperature for about 30 minutes, then transfer it to the refrigerator. Chill for at least 4 hours, or preferably overnight, until the fudge is firm enough to slice easily.
- Slice and Serve:Use the parchment overhang to lift the entire block of fudge out of the pan. Place it on a cutting board and slice into 1-inch squares. Store any uneaten pieces immediately.
My Aunt Carol once took a batch of this fudge, claiming it was her own recipe, only to confess later that she had forgotten to swirl it. The result was a sad, two-tone brick. Always remember the swirl; it’s the difference between great fudge and forgettable fudge.
Expert Tips for Flawless Fudge
- Use a rubber spatula instead of a wooden spoon for stirring the chocolate base; it prevents crystal formation and ensures a completely smooth, creamy texture.
- Temperature control is key. If the marshmallow mixture is too hot, it will melt straight into the fudge, destroying your elegant marbled swirl effect.
- Do not rush the chilling process. If you try to slice the Marshmallow Swirl Fudge before it is fully set, you will end up with messy, sticky edges and structural failure.
Perfecting the Cooking Process
Start by preparing the pan, as the fudge sets quickly once the ingredients are combined. Melt the chocolate base over very low heat, stirring constantly for smoothness. Only melt the marshmallows right before swirling, ensuring they remain fluid but not boiling hot for the perfect marbling effect.
Add Your Touch
Elevate your Marshmallow Swirl Fudge by incorporating different flavors. Try adding a teaspoon of pure almond paste with the vanilla, or sprinkle chopped pecans over the top before chilling. A sprinkle of flaky sea salt also cuts the sweetness beautifully, offering a sophisticated contrast.
Storing & Reheating
Store this fudge in an airtight container at cool room temperature for up to two weeks, or in the refrigerator for up to one month. Fudge does not require reheating; however, if it becomes too hard in the fridge, let it sit out for 30 minutes before serving to restore its ideal texture.
The Sweet Science of Fudge Texture
Understanding why this recipe works is as enjoyable as eating it. Traditional fudge relies on boiling sugar to a specific temperature and then controlling crystallization during cooling. This recipe, however, takes advantage of the convenience of sweetened condensed milk, which already contains high concentrations of sugar and milk solids. This essentially eliminates the need for tricky sugar thermometers and boiling stages, providing consistent, creamy results every single time. The condensed milk acts as the stabilizer and emulsifier, binding the melted chocolate and butter into a smooth, dense candy that is much more resistant to grainy texture issues than its traditional counterpart.
The key variable to control here is moisture. If the mixture is heated too aggressively, moisture evaporates too quickly, leading to a dry, crumbly texture. By keeping the heat low and brief, we maintain enough moisture for that signature melt-in-your-mouth creamy sensation. The addition of the smooth, molten marshmallows not only introduces the stunning visual swirl but also adds an element of chewiness, making this creamy dessert a textural masterpiece that appeals to everyone.
Troubleshooting Common Fudge Fails
Why is my fudge grainy or gritty?
A grainy texture usually means the chocolate seized or crystallized due to improper melting or high heat. Ensure you melt the mixture slowly over medium-low heat, stirring continuously, and avoid introducing any water droplets, which can cause the chocolate to seize instantly.
My swirl disappeared; where did it go?
If the swirl disappears, you likely over-mixed the layers. The goal is to fold the layers gently, not blend them fully. Remember, the Marshmallow Swirl Fudge should look deliberately chaotic, with distinct ribbons of chocolate and white marshmallow visible.
How do I ensure the fudge cuts cleanly?
For clean cuts, you need patience. The fudge must be thoroughly chilled—at least four hours, or ideally overnight—to become solid. Use a large, sharp chef’s knife, wiping the blade clean with a damp cloth between each slice to prevent sticking and dragging the chocolate.
Can I double this recipe?
While you can technically double the ingredients, you must use a larger, deeper saucepan and increase the pan size to 9×13 inches. Keep in mind that doubling the recipe means the mixture will take significantly longer to melt, and you must stir diligently to ensure even heat distribution across the entire batch.
Advanced Flavor Pairings
While the classic Marshmallow Swirl Fudge is perfection, don’t be afraid to experiment with extracts and seasonings to create seasonal variations:
- Mint Chocolate Swirl:Add 1 teaspoon of mint extract to the chocolate base before pouring. Optionally, add a few drops of green food coloring to the marshmallow mixture for a festive holiday look.
- Espresso Swirl:Dissolve 1 teaspoon of instant espresso powder into the vanilla powder before mixing it into the melted chocolate base. This deepens the chocolate flavor beautifully.
- Chai Spice Marbling:Mix 1/2 teaspoon of ground cinnamon and a pinch of cardamom into the melted marshmallow mixture before swirling it into the chocolate. This adds warmth and aromatic complexity to the decadent confection.
This recipe transforms kitchen chaos into culinary triumph. The joy of presenting something so professional-looking yet so easy to execute is unmatched. Go forth and swirl!
Conclusion for Marshmallow Swirl Fudge
You have successfully conquered the creamy, dreamy world of homemade fudge! This decadent Marshmallow Swirl Fudge isn’t just a dessert; it’s an edible masterpiece that proves you don’t need a culinary degree to create kitchen magic. Whether you serve this rich treat at a holiday gathering or perhaps hoard the entire batch for yourself (we absolutely won’t tell anyone), the velvety chocolate base combined with those beautiful, soft ribbons of marshmallow is utterly irresistible. Go ahead, take a bow. You’ve just made the smoothest, most delightful confection this side of the Mississippi, ensuring everyone asks you for the recipe. Enjoy every blissful, sugary bite!
Print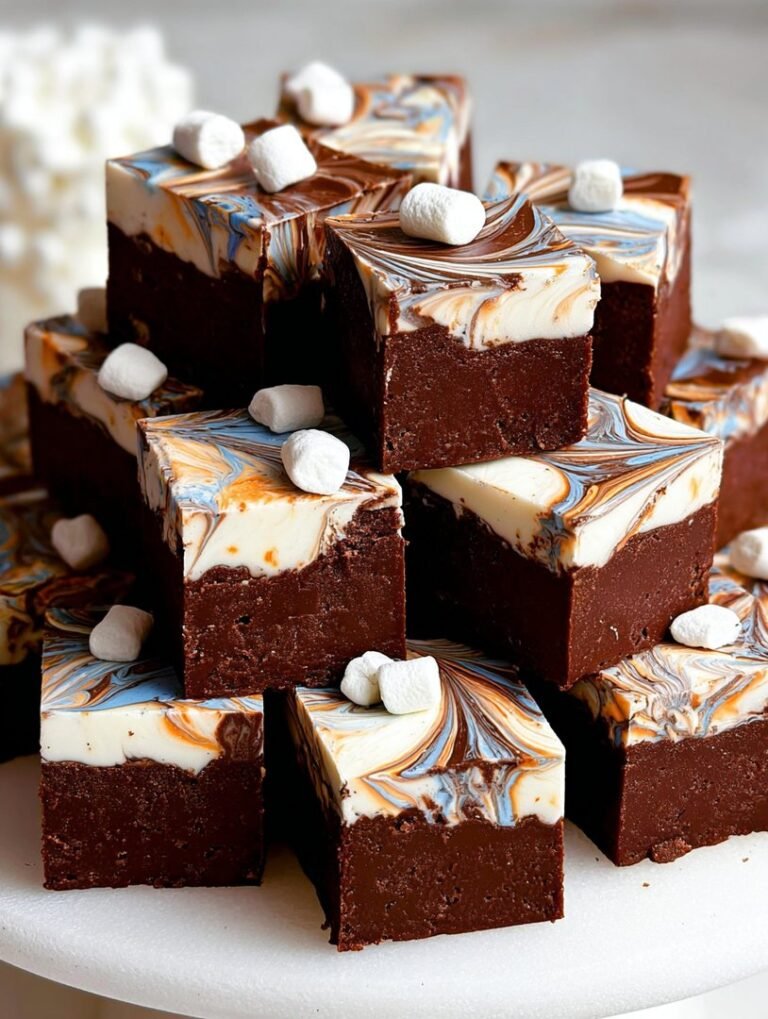
Marshmallow Swirl Fudge
Achieve unbelievably rich, smooth Marshmallow Swirl Fudge using just three main ingredients and a quick stovetop melt. This decadent recipe yields a perfect 8×8 block.
- Total Time: 35 minutes
- Yield: 4 servings
Ingredients
- Semi-sweet chocolate chips: 3 cups (18 oz)
- Sweetened condensed milk: 1 (14 oz) can
- Unsalted butter: 4 tablespoons
- vanilla powder: 1 teaspoon
- Salt: 1/4 teaspoon
- Marshmallow crème (or Fluff): 1 (7 oz) jar
Instructions
- Step 1: Line an 8×8 inch baking pan with parchment paper, leaving an overhang on the sides for easy removal, then lightly grease the paper.
- Step 2: In a heavy-bottomed saucepan over low to medium-low heat, combine the chocolate chips, sweetened condensed milk, and butter. Stir continuously until the mixture is completely melted and smooth. Do not allow the mixture to boil.
- Step 3: Remove the pan from the heat immediately. Stir in the vanilla bean paste and salt until fully incorporated. Pour about 3/4 of the fudge mixture into the prepared pan and spread evenly.
- Step 4: Drop spoonfuls of the marshmallow crème evenly over the fudge base in the pan. Use a butter knife or a skewer to gently swirl the marshmallow crème into the chocolate mixture without over-mixing; you want distinct ribbons of white.
- Step 5: Cover the pan loosely and chill the fudge in the refrigerator for at least 3 to 4 hours, or until completely set. Once set, lift the fudge out using the parchment paper handles and cut into small squares.
Notes
- Store this fudge in an airtight container in the refrigerator for up to two weeks, or wrap individual pieces tightly for freezing up to two months, thawing overnight before enjoying.
- Since this fudge does not benefit from true reheating, achieve the perfect soft consistency by resting chilled pieces at room temperature for 10 to 15 minutes before serving.
- Pair these rich, swirled squares with a strong cup of espresso or crumble them lightly over vanilla ice cream for a delightful textural contrast.
- When swirling the marshmallow crème, use quick, gentle movements and avoid overworking the mixture; you want defined ribbons of white marshmallow rather than a uniform pale color.
- Prep Time: 15 minutes
- Cook Time: 20 minutes
- Method: Stovetop
- Cuisine: American
FAQs
What is the trick to achieving the perfect Marshmallow Swirl Fudge?
The key to an aesthetically pleasing, impressive marshmallow swirl is timing and technique. Once you pour the warm fudge base into the pan, immediately dollop spoonsful of the melted marshmallow mixture over the top. Use a butter knife or a skewer to gently cut through the layers, dragging the marshmallow into the chocolate base just once or twice. Avoid over-swirling! Too much mixing results in marbled fudge rather than the distinctive, beautiful ribbons of Marshmallow Swirl Fudge you are aiming for. A gentle hand creates the best visual impact for this holiday treat.
Can I substitute the chocolate chips in this Marshmallow Swirl Fudge recipe?
Absolutely! While the classic recipe calls for semi-sweet chocolate, you can easily substitute milk chocolate for a sweeter treat or use dark chocolate chips for a richer, more intense flavor profile. You could even use white chocolate chips, though this might slightly change the color and visibility of the distinct marshmallow swirl fudge pattern. Ensure you use high-quality baking chips for the best melting consistency. Remember that any substitution might require slight adjustments to the chilling time, but the overall creaminess of the resulting confection remains divine.
How long will my Marshmallow Swirl Fudge stay fresh?
This confection keeps remarkably well, provided you store it correctly. Keep the finished squares of fudge in an airtight container at room temperature for up to one week. You can extend its life by storing it in the refrigerator for two to three weeks, just make sure the container is tightly sealed to prevent drying out. If you want to freeze larger batches, wrap them tightly in parchment paper and then foil; it will remain delicious for several months. Just make sure it thaws completely before serving to maintain its creamy, melt-in-your-mouth texture.
Why did my fudge not set properly or turn out too sticky?
If your fudge is too soft or sticky, you likely removed the mixture from the heat prematurely or perhaps didn’t chill it long enough. Fudge relies on precise ratios, so ensure you measure ingredients accurately, especially the sweetened condensed milk and the chocolate base. For the perfect firm texture, always allow a minimum of four hours in the refrigerator, preferably overnight. If the room temperature is too warm when you are cooling it initially, it can also affect the final set, so find the coldest spot in your kitchen before moving it to the fridge.


Leave a Comment