


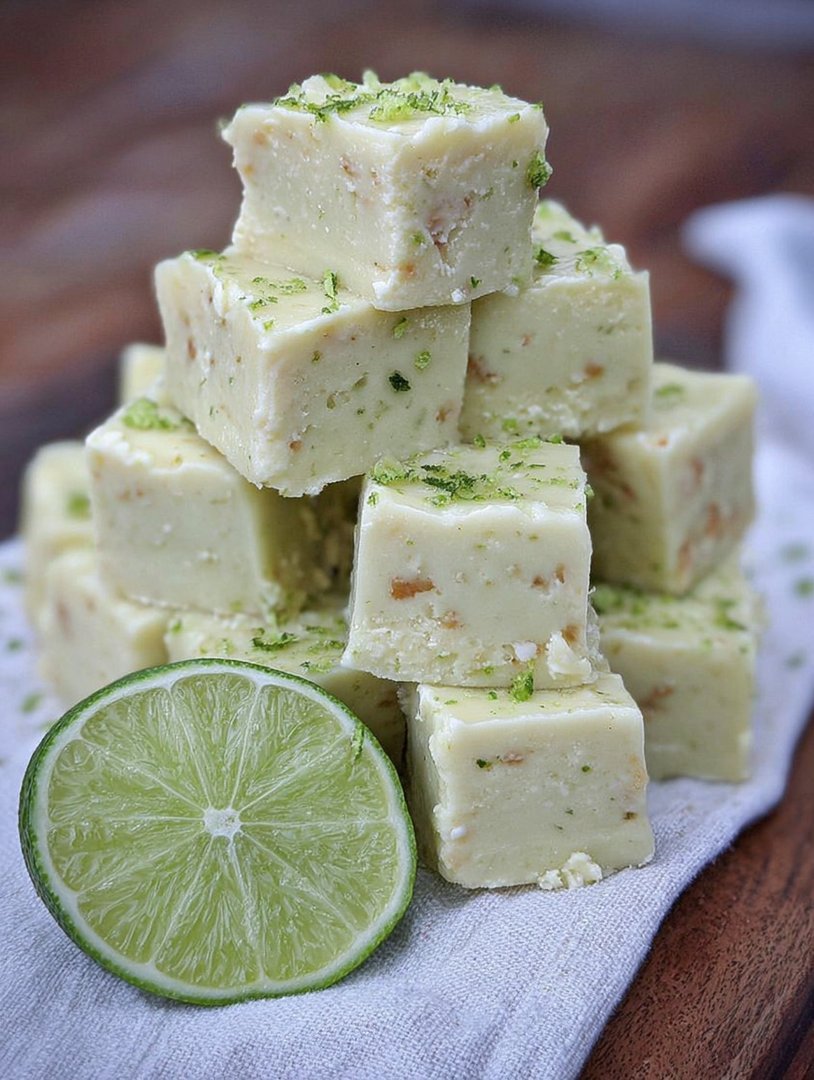
You know that moment when you crave something tropical but cannot book a flight? I solve that problem with one bite. This homemadeKey Lime Fudgecaptures the sunshine and tartness of the Florida Keys instantly.
Forget complicated desserts; this recipe is foolproof magic that demands surprisingly little effort. It delivers creamy, zesty flavor, making it the perfect slice of summer indulgence, no plane ticket required.
- Achieves the perfect balance of ultra-sweet creaminess and intensely tart, vibrant key lime flavor in every square.
- Requires minimal effort and only a few basic kitchen tools, allowing you to create gourmet confectionery in minutes.
- Boasts a beautiful, pale green hue and a smooth, glossy texture, making it an attractive addition to any dessert platter.
- Excellent for gifting, holiday trays, or simply satisfying that late-night sweet tooth with a burst of citrus flavor.
The Secret to Irresistible Key Lime Fudge
I must confess, I have a long, often hilarious history with dessert disasters. My first attempt at making traditional cooked fudge ended with a rock-hard block resembling granite and a kitchen coated in powdered sugar dust—a scene my family still references during Harvest Celebration dinner. I quickly decided that fudge needed to be simpler, less prone to atmospheric pressure changes, and certainly less damaging to the integrity of my countertops.
That is how I discovered the magic of no-bake fudge, specifically this incredibly vibrantKey Lime Fudgerecipe. Unlike its cranky cooked counterpart, this version relies on the smooth emulsification of sweetened condensed milk and melted white chocolate, a combination that always yields creamy results. When you introduce fresh key lime juice and zest, you elevate the mixture from simple sweetness to a truly complex, tropical experience.
This recipe is my go-to when I need a dessert that looks impressive but takes roughly ten minutes of active participation. The hardest part, truly, is waiting for it to set in the refrigerator before devouring the entire pan. We are talking minimal cleanup, maximum flavor, and zero risk of chipping a tooth on homemade granite.
Why Key Limes Matter for Authentic Flavor
You might be tempted to substitute standard Persian limes (the large ones you usually see in the grocery store) for key limes, but trust me, resist this urge. Key limes are smaller, yellower, and possess a more intense, floral aroma and a sharper acidity than their common relatives. This unique flavor profile is essential for achieving that unmistakable tangy punch that defines authentic key lime treats.
If you absolutely cannot find fresh key limes, opt for bottled key lime juice, ensuring it is 100% juice without added sweeteners, though nothing truly beats the fresh flavor. Remember that the zest is equally crucial. The oils in the zest carry the strongest aromatic notes, so grating the lime peel before juicing ensures you capture that powerful citrus essence. A fine microplane zester works best to avoid the bitter white pith underneath the green peel, maximizing the brightness of the finished confectionery.
Ingredients for Key Lime Fudge
Here’s what you’ll need to make this delicious dish:
- White Chocolate ChipsUse high-quality chips or baking bars, as they form the foundation and structure of the fudge, ensuring a smooth melt and solid set.
- Sweetened Condensed MilkThis ingredient provides the necessary sweetness and creamy texture, binding the fudge together without needing to cook it to a specific temperature.
- Key Lime JuiceFreshly squeezed key lime juice is strongly recommended for its superior tartness and depth of flavor, making the fudge truly sing.
- Key Lime ZestEssential for boosting the aroma and intensifying the citrus flavor; make sure to use only the bright green outer layer.
- Butter or Coconut OilA small amount of unsalted butter or refined coconut oil helps create a wonderfully smooth, glossy texture, preventing the mixture from becoming grainy.
- Green Food Coloring (Optional)Use a few drops of gel food coloring if you desire the iconic, vibrant green hue associated with key lime desserts.
The full ingredients list, including measurements, is provided in the recipe card directly below.
How to Make Key Lime Fudge
Follow these simple steps to prepare this delicious dish:
Step 1:Prepare the Pan and Melting Base
Line an 8×8 inch baking pan with parchment paper, leaving an overhang on two sides for easy removal later. Lightly grease the pan with a little butter or non-stick spray. In a medium, microwave-safe bowl, combine the white chocolate chips, sweetened condensed milk, and butter (or coconut oil). Microwave this mixture on 30-second intervals, stirring vigorously after each interval until the mixture is completely smooth and melted, typically taking 90 to 120 seconds.
Step 2:Incorporate the Key Lime Flavor
Remove the bowl from the microwave once the chocolate base is smooth. Stir in the fresh key lime juice and the key lime zest immediately. The addition of the cold juice may cause the mixture to thicken slightly, which is normal. Stir until all ingredients are fully incorporated and the mixture is uniform in texture and color.
Step 3:Achieve the Signature Color (If Desired)
If you want that recognizable, vibrant green color, gently stir in 2 to 4 drops of green gel food coloring. Avoid adding too much coloring, as a little goes a long way. Mix thoroughly until the color is evenly distributed throughout the citrus confectionery base, checking for streaks.
Step 4:Pour and Smooth the Fudge
Quickly pour the prepared fudge mixture into the lined 8×8 inch baking pan. Use a spatula to spread the mixture evenly into the corners, ensuring the surface is as flat and level as possible. You can gently tap the pan on the counter a few times to release any trapped air bubbles.
Step 5:Chill and Set the Citrus Confectionery
Transfer the pan to the refrigerator. Allow the fudge to chill undisturbed for a minimum of 4 hours, or preferably overnight, until it is completely firm and set. Adequate chilling is crucial for achieving the proper firm, sliceable texture.
Step 6:Slice and Serve
Once firm, use the parchment paper overhang to lift the entire block of fudge out of the pan. Place the fudge block on a cutting board and use a sharp, heavy knife to cut it into 1-inch squares. For cleaner cuts, you can wipe the knife blade between slices. Transfer to plates and drizzle with extra key lime juice or sprinkle with additional zest for the perfect finishing touch.
Troubleshooting and Tips for Perfect Citrus Confectionery
Even though this no-bake Key Lime Fudge recipe is inherently easy, a few common issues can arise, usually related to setting time or texture. Ensuring your ingredients are high quality and following the specific temperature instructions for melting the chocolate will guarantee success. If your fudge seems too soft or fails to set, the primary culprit is often incorporating too much liquid or not allowing enough chill time.
For those living in extremely humid climates, sometimes the fudge needs an extra hour or two in the refrigerator to fully solidify. Conversely, if your fudge turns out grainy, this often happens when the white chocolate overheats during the melting process. Always melt slowly and use low power settings, relying on the residual heat to finish the melting once you remove it from the microwave.
Achieving the Perfect Set
The ratio of condensed milk to white chocolate is your structural blueprint. Using the specified amount of chocolate is critical because it contains the cocoa butter needed to solidify the mixture once cooled. If you increase the amount of key lime juice beyond the recipe’s instructions—perhaps thinking “more lime equals more flavor”—you risk introducing too much moisture, which can prevent the fudge from fully hardening. Stick to the measurements, and embrace patience during the cooling phase. For a slightly firmer set, especially in warm kitchens, try adding an extra ounce of white chocolate to the initial mix.
Adding Extra Zing
To really maximize the tropical flavor, consider adding a layer of crushed graham crackers to the base of the pan before pouring in the fudge mixture. This provides a delightful textural contrast and mimics the crust of a traditional key lime pie. Alternatively, before the fudge fully sets, sprinkle the top with dehydrated lime pieces or finely chopped candied ginger for a sophisticated spice element that pairs beautifully with the sharp citrus notes.
Key Lime Fudge Storage and Shelf Life
Properly storing your vibrant Key Lime Fudge ensures its texture remains creamy and its flavor stays fresh for as long as possible. Because this fudge contains dairy products (sweetened condensed milk), it must always be stored in the refrigerator.
Store the cut squares in an airtight container, separating layers with wax or parchment paper to prevent sticking. This tropical treat will maintain optimal quality for up to two weeks in the refrigerator. If you are preparing large batches, perhaps for holiday gifts or a future party, this fudge freezes remarkably well. Wrap the fudge squares tightly in plastic wrap, then place them inside a freezer-safe zip-top bag or container. Frozen Key Lime Fudge will last for up to three months. To thaw, simply move the container to the refrigerator overnight.
Frequently Asked Questions (FAQ)
Can I use bottled lime juice instead of fresh key lime juice?
While fresh key lime juice offers the best, most authentic flavor profile, you can certainly use bottled key lime juice if fresh limes are unavailable. Ensure the bottled variety is 100% juice without added sugar or preservatives for the closest flavor match.
Why did my fudge turn out grainy?
Grainy texture usually occurs when the white chocolate overheats during melting. The sugar solids can scorch or seize. To avoid this, melt the mixture slowly, using short bursts in the microwave, or use a double boiler over low heat.
What size pan should I use if I want thicker pieces of fudge?
If you prefer thicker slices of this delightful citrus confectionery, switch to a 6×6 inch square pan instead of the 8×8 inch pan specified in the recipe. Note that using a smaller pan will require a slightly longer chilling time, possibly 6 to 8 hours.
Is Key Lime Fudge suitable for gifting?
Absolutely! Key Lime Fudge makes an excellent gift. Because it must remain cold, package the squares in small boxes lined with paper wrappers and instruct the recipient to store them immediately in the refrigerator upon receipt.
The Day My Kitchen Turned Into a Tropical Paradise
I have a confession: I am terrible at baking. Cakes sink, cookies burn, and bread just flat-out refuses to acknowledge my existence. But fudge? Fudge, my friends, is where I found my true calling. It’s the ultimate culinary redemption—easy, decadent, and almost impossible to mess up, provided you understand the sacred geometry of condensed milk and heat. Years ago, I was attempting a ridiculously complex seven-layer bar for a neighborhood potluck. It was a failure of epic proportions, resulting in what looked suspiciously like concrete mixed with glitter. Dejected, I reached for the simplest solution I could find: a no-bake, quick-set treat. That’s when I discovered the magic ofKey Lime Fudge.
This recipe doesn’t require candy thermometers, chilling for 48 hours, or prayers to the kitchen gods. It requires about ten minutes of active effort and then the patience of a saint while it cools. The resulting fudge is sweet, perfectly creamy, and boasts a powerful, sharp lime zing that instantly transports you to the Florida Keys, even if you’re currently stuck in a blizzard in Ohio. It is sunshine in a bite, and trust me, after you try this method, you will never go back to complicated desserts again. This is truly the ultimate low-effort, high-reward dessert experience that guarantees rave reviews.
Why This Recipe Works (and My Dishwasher Cried)
Traditional fudge relies on precise sugar crystallization, which is why so many home cooks fail. This fast-track method sidesteps the crystallization issue entirely by using high-quality white chocolate chips and sweetened condensed milk as the base. The fat in the chocolate and the binding power of the condensed milk combine to create a silky, smooth texture that sets beautifully without becoming grainy. We then load it up with fresh lime zest and juice, providing that signature tartness that cuts through the sweetness perfectly. I’ve refined this process over countless batches—some successful, some resulting in sticky doorstops—to ensure absolute perfection. My dishwasher, by the way, cries because this recipe involves minimal cleanup, robbing it of a purpose.
Essential Ingredients for the Zesty Key Lime Fudge
Gather these simple components. Quality matters, especially for the white chocolate, as it forms the bulk of the structure.
- 14 ounces sweetened condensed milk (full fat is best)
- 2 cups high-quality white chocolate chips or chopped white melting wafers
- 1/4 cup fresh Key lime juice (bottled works, but fresh is infinitely better)
- 2 tablespoons lime zest (from about 4-6 Key limes)
- 1 tablespoon unsalted butter or plant-based butter alternative
- Pinch of fine sea salt
- Optional: Green food coloring (use gel for best results)
Crafting the Ultimate Key Lime Fudge
Melting and Mixing for Creamy Perfection
Start by preparing your pan. Line an 8×8 inch square baking dish with parchment paper, leaving an overhang on the sides—this forms little handles for easy removal later. Lightly grease the paper if you are feeling extra cautious. Next, grab a medium saucepan. Add the condensed milk, white chocolate chips, and the tablespoon of butter or butter alternative. Place the pan over medium-low heat. The key here is patience; resist the urge to crank up the temperature. You must melt the mixture slowly and gently, stirring constantly until everything is smooth and fully incorporated.
Once the mixture looks like liquid silk, remove it immediately from the heat. If you overheat the mixture or the chocolate scorches, you risk a grainy texture, which is the nemesis of smooth fudge. Stir in the pinch of sea salt. Now comes the exciting part: adding the flavor. Pour in the fresh Key lime juice and stir vigorously. The mixture will begin to thicken almost immediately due to the acid reacting with the milk base. Fold in the lime zest. If you want that iconic neon green color, now is the time to add a few drops of gel food coloring until you achieve your desired hue. Stir quickly until the color is evenly distributed.
Setting the Stage for Tropical Bliss
Once mixed, immediately scrape the gloriousKey Lime Fudgebatter into the prepared 8×8 inch pan. Use a spatula to spread it evenly into the corners. If you want a perfectly smooth top, gently tap the pan on the counter a few times to release any trapped air bubbles. For an added touch of elegance, sprinkle a tiny bit more lime zest (about half a teaspoon) over the top before setting. This provides visual confirmation of the incredible citrus flavor within.
Do not be tempted to taste test excessively at this stage; it is dangerously hot. Place the pan in the refrigerator. This is where the second test of patience begins. You need to chill the fudge for a minimum of four hours, although overnight is truly best. The goal is rock-solid firmness so you can achieve clean, professional cuts. Rushing the chilling process results in sad, smushy squares that look like they melted on the journey from the fridge to the plate. Once fully chilled, use those parchment paper handles to lift the entire block of fudge out of the pan and place it on a cutting board.
The Art of the Clean Cut
Using a large, sharp knife, cut the fudge into small, bite-sized squares—usually 6×6 resulting in 36 pieces. Wipe your knife blade with a damp, warm cloth between cuts to ensure every slice is pristine and sharp. This small detail makes a huge difference in presentation. These delightful squares ofKey Lime Fudgeare ready to serve immediately, or they can be stored for later enjoyment. The intense, sweet, and tart flavors make this dessert an instant crowd-pleaser, perfect for parties, holiday gifts, or simply hiding in your pantry for those moments of necessary self-indulgence.
Perfecting the Cooking Process
Achieve optimal results by ensuring your white chocolate melts fully before adding the acidic lime juice; melting slowly prevents scorching and ensures a smooth, non-grainy base. Stir continuously over low heat to maintain that luxurious, silken texture necessary for superior fudge.
Add Your Touch
For a graham cracker crunch, press a thin layer of crushed crackers mixed with melted butter into the pan before pouring the fudge. Alternatively, substitute half the white chocolate with chopped macadamia nuts for a tropical crunch, or swirl in a little coconut extract for depth.
Storing & Reheating
StoreKey Lime Fudgetightly sealed in an airtight container at room temperature for up to five days, or refrigerated for up to two weeks. Do not attempt to reheat; this fudge is best enjoyed chilled or at a cool room temperature to maintain its structure and rich texture.
Chef’s Insider Tips for Glorious Key Lime Fudge
I once took a batch of this fudge to a beach party, and my friend ate so many squares she swore she heard steel drums. It’s that powerfully tropical!
- Always use fresh Key lime juice; the bottled concentrate lacks the bright aroma and vibrant tartness essential for true, authenticKey Lime Fudgeflavor.
- Use high-quality melting chocolate instead of standard chips, which contain stabilizers that can sometimes prevent the mixture from setting into a truly smooth consistency.
- When cutting, warm your knife under hot water and dry it completely before each slice; this trick provides those exceptionally clean, professional-looking edges every single time.
Frequently Asked Questions About Citrus Fudge
How long does homemade Key Lime Fudge last?
If stored properly in an airtight container, your homemade Key Lime Fudge will last approximately one to two weeks in the refrigerator. For longer storage, you can successfully freeze the fudge for up to three months; just ensure it is double-wrapped to prevent freezer burn.
Can I use regular limes instead of Key Limes?
Absolutely, you can! If Key limes are unavailable, standard Persian limes work well. However, Key limes are slightly more acidic and provide a unique floral aroma. If substituting, you may need to increase the amount of zest and slightly reduce the juice to manage the intensity.
Why is my fudge grainy?
Graininess typically occurs when the chocolate mixture is overheated or if the ingredients separate during the melting process. Ensure you melt the chocolate and condensed milk over very low heat, stirring constantly and removing the mixture the moment it becomes smooth and before it reaches a rolling boil.
Another often overlooked cause is rushing the cooling process. If the fudge is allowed to cool too slowly at room temperature, it can sometimes promote sugar crystallization. Always move the fudge immediately into the refrigerator or a cold area for rapid chilling.
What is the difference between fudge and Key Lime Pie filling?
While both rely on the delightful pairing of lime and sweetened condensed milk, they are structurally quite different. Key Lime Pie filling typically uses eggs or egg yolks that are baked or set with acid and often relies on a graham cracker crust. Key Lime Fudge, conversely, is a simple candy confection. It uses white chocolate as a primary binder, creating a dense, firm, no-bake bar that is rich, opaque, and highly concentrated in flavor, designed to be cut into squares rather than served in slices.
This Key Lime Fudge recipe is truly a tropical marvel, simplifying dessert creation while delivering maximum flavor impact. Whether you are aiming to impress guests or just craving a zesty bite of sunshine, this easy, no-fail confection is guaranteed to be your new go-to sweet treat. Enjoy the compliments, and don’t forget to save a few squares just for yourself—they vanish quickly!
Conclusion for Key Lime Fudge
We’ve successfully navigated the zesty, creamy world of this delightful confection. Making homemade Key Lime Fudge is far easier than mastering a complicated meringue or juggling a pastry bag, delivering maximum tropical satisfaction with minimal effort. Remember that fresh key lime juice and zest are the undisputed heroes here, providing that essential bright pucker that defines the dessert. Whether you are whipping up a batch for a summer picnic or just need a ray of sunshine on a gray day, this easy recipe guarantees a sweet escape. Chill it, slice it, and watch this incredible Key Lime Fudge disappear almost instantly. Enjoy the sweet, tangy perfection!
Print
Key Lime Fudge
Sunshine in a square! This no-bake Key Lime Fudge delivers intense tartness with a silky-smooth, condensed milk and white chocolate base. Fresh zest and juice burst through. Quick melting method.
- Total Time: 35 minutes
- Yield: 4 servings
Ingredients
- White Chocolate ChipsUse high-quality chips or baking bars, as they form the foundation and structure of the fudge, ensuring a smooth melt and solid set.
- Sweetened Condensed MilkThis ingredient provides the necessary sweetness and creamy texture, binding the fudge together without needing to cook it to a specific temperature.
- Key Lime JuiceFreshly squeezed key lime juice is strongly recommended for its superior tartness and depth of flavor, making the fudge truly sing.
- Key Lime ZestEssential for boosting the aroma and intensifying the citrus flavor; make sure to use only the bright green outer layer.
- Butter or Coconut OilA small amount of unsalted butter or refined coconut oil helps create a wonderfully smooth, glossy texture, preventing the mixture from becoming grainy.
- Green Food Coloring (Optional)Use a few drops of gel food coloring if you desire the iconic, vibrant green hue associated with key lime desserts.
Instructions
- Step 1:Prepare the Pan and Melting Base
- Step 2:Incorporate the Key Lime Flavor
- Step 3:Achieve the Signature Color (If Desired)
- Step 4:Pour and Smooth the Fudge
- Step 5:Chill and Set the Citrus Confectionery
- Step 6:Slice and Serve
Notes
- Store wrapped fudge in the refrigerator for up to 10 days, or freeze for longer keeping; ensure you thaw frozen fudge thoroughly in the fridge before serving.
- For the silkiest mouthfeel, take slices out of the fridge 10 minutes prior to serving, allowing the chocolate base to warm slightly and the lime flavor to bloom.
- For an extra layer of texture, garnish the chilled block just before slicing with a generous sprinkle of toasted coconut or finely crushed graham cracker crumbs.
- When incorporating the liquid key lime juice into the melted chocolate base, mix quickly but gently to ensure a creamy emulsion and prevent the mixture from potentially seizing.
- Prep Time: 15 minutes
- Cook Time: 20 minutes
- Method: Stovetop
- Cuisine: American
FAQs
How long does homemade Key Lime Fudge last?
Once you’ve perfected this creamy, zesty confection, storing it properly is key to longevity. Your homemade Key Lime Fudge will happily reside in an airtight container at room temperature for about five to seven days, though honestly, it rarely lasts that long! For extended freshness, move it to the refrigerator; it will keep for up to two weeks. If you plan to make a large batch, you can also freeze the fudge for up to three months. Just make sure to wrap it tightly in plastic wrap before placing it in a freezer-safe bag to prevent freezer burn and maintain that signature vibrant flavor. Always let it thaw slowly in the fridge before serving.
Why is my fudge not setting up correctly?
Fudge setting issues are usually a result of temperature discrepancies or incorrect ingredient measurements. If your mixture is too soft, it likely needed more boiling time or perhaps the temperature didn’t reach the correct soft-ball stage (if using a traditional method), though condensed milk recipes usually simplify this process significantly. If using a no-bake recipe, ensure you measured the condensed milk and powdered sugar precisely, as the ratio is crucial for firming up. Humidity can also be a silent enemy; try adding a small extra amount of powdered sugar if the weather is particularly damp. Patience is also vital—sometimes fudge just needs a full four hours to chill completely.
Can I adjust the tartness of the Key Lime Fudge?
Absolutely, adjusting the tartness of your Key Lime Fudge is simple and allows you to customize the flavor profile perfectly. Key limes are notoriously tart, so if you prefer a milder dessert, start by reducing the amount of fresh lime juice by one tablespoon. Conversely, if you crave an extra pucker, increase the zest added to the mix, as the oils in the zest deliver intense citrus aroma and flavor without adding too much liquid. Remember to taste as you go before the fudge sets. For a smoother, less intense lime experience, sometimes substituting a portion of the key lime juice with regular Persian lime juice can mellow out the overall acidity.
What is the best way to achieve a natural green color in Key Lime Fudge?
Many people associate Key Lime Fudge with a vibrant, tropical green, but the natural color from the juice and zest is typically a pale ivory or creamy yellow. If you want a subtle green hue without artificial dyes, try incorporating a tiny pinch of matcha powder, which offers a beautiful, earthy green color without significantly altering the lime flavor. Alternatively, using a small amount of spirulina powder can achieve a vivid green, but use it sparingly as the flavor can be intense. Remember that the appeal of homemade Key Lime Fudge often lies in its natural, rustic appearance, so don’t feel obligated to over-color this delightful treat.


Leave a Comment