

Remember that time I tried to make dinner and it looked like modern art gone wrong? Forget those culinary disasters. Tonight, we embrace the crispy, savory triumph ofJapanese Katsu Bowls with Tonkatsu Sauce.
The crunch of the panko combined with the tangy, rich sauce creates a symphony that demands a happy dance in the kitchen. Get ready for comfort food perfection that feels both exotic and deeply comforting.
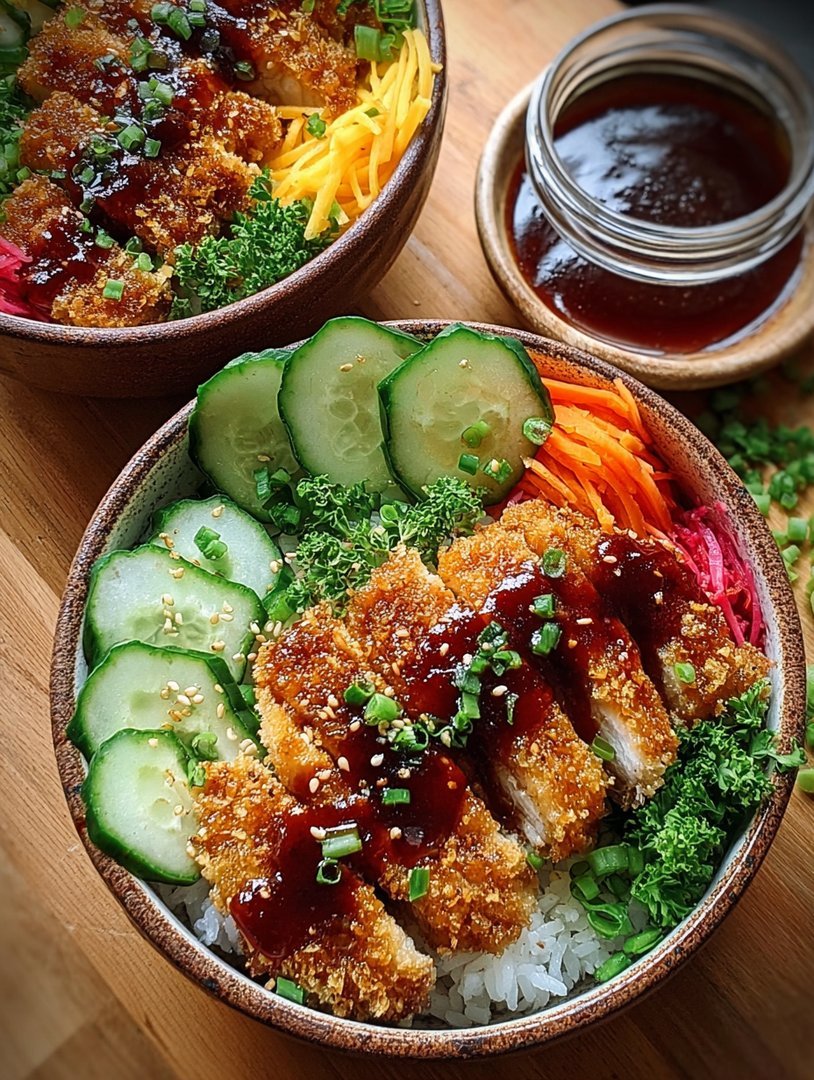
- This recipe delivers the ultimate texture contrast: incredibly crispy chicken cutlets cradled over tender, fluffy steamed rice.
- The homemade Tonkatsu Sauce strikes a perfect balance of sweet, tangy, and savory notes, elevating the simplest ingredients instantly.
- Preparation is surprisingly simple, making this hearty Katsu Bowl ideal for weeknight dinners or impressive casual gatherings with friends.
- Visually stunning, these bowls offer layered flavors and colors, easily customized with various vegetables and fresh garnishes for variety.
The Magic Behind the Crunch: Why Panko Changes Everything
For years, I believed that achieving a truly crispy breaded coating required some sort of culinary witchcraft or specialized deep fryer equipment. My previous attempts usually resulted in sad, soggy cutlets that looked less like Japanese perfection and more like overworked kitchen sponges. Then I discovered the undeniable power of panko.
Panko, which means “bread crumbs” in Japanese, is fundamentally different from traditional Western breadcrumbs. They are made from crustless white bread that is processed into large, airy, flaky shards. These shards absorb less oil than standard crumbs, leading to a lighter, airier, and significantly crunchier texture that stays crisp long after cooking. This crucial difference is what transforms a standard breaded chicken breast into an authentic, glorious Katsu. When you hear that shatteringly crisp sound as you cut into your chicken, you’ll understand why this ingredient is non-negotiable for true Japanese Katsu Bowls with Tonkatsu Sauce.
This dish is the culinary equivalent of putting on your favorite cozy sweater after a long, difficult day. It’s warm, reliable, and fundamentally satisfying. While the Katsu is the star, the real genius of the bowl is its modular nature—every component plays a vital role. You have the tender protein, the perfect sticky rice base, and the rich, complex sauce that ties the entire experience together. It’s fast, friendly comfort food that somehow manages to feel gourmet.
Selecting and Preparing the Chicken for Katsu
When making Katsu, the preparation of the meat is just as important as the coating. We use skinless, boneless chicken breast for its consistency and quick cooking time. The key is uniformity. Chicken breasts are often thicker on one end and thinner on the other, which results in uneven cooking. To fix this, place the chicken breast between two sheets of plastic wrap.
Use the smooth side of a meat mallet to gently pound the chicken until it reaches an even thickness, typically about a half-inch. This ensures every bite is tender and cooks through simultaneously. Pounding also tenderizes the muscle fibers, resulting in a much more enjoyable texture. Seasoning the meat before the dredging process is also essential; don’t rely solely on the coating and the sauce for flavor. A simple dusting of salt and freshly ground black pepper on the pounded chicken cutlets makes a huge difference in the final taste profile.
Crafting the Legendary Tonkatsu Sauce
If Katsu is the crown of this dish, Tonkatsu sauce is the royal velvet cushion it rests upon. Often described as a Japanese BBQ sauce, it provides the necessary tang, sweetness, and umami depth. Traditional Tonkatsu sauce relies on specific ingredients, but we can easily replicate that dark, flavorful profile using common pantry items, ensuring we maintain the integrity and flavor complexity without relying on pre-made condiments that might contain restricted ingredients.
Our homemade sauce skips the lengthy fermentation process but captures the savory, fruity essence perfectly. It combines tomato ketchup for the base sweetness and acidity, soy sauce for deep umami, brown sugar for richness, rice vinegar for a sharp tang, and a small amount of grated ginger and garlic for aromatic depth. Simmering these ingredients briefly melts the sugar and melds the flavors, resulting in a thick, glossy sauce that clings beautifully to the crispy chicken. This sauce is so good, you might find yourself making double batches just for dipping fries later.
Mastering the Triple Dredge Technique
The Triple Dredge is the secret handshake of serious Katsu cooks. This technique guarantees the panko adheres perfectly and forms a thick, resilient, crunchy crust that protects the chicken from drying out. You’ll need three separate, wide, shallow dishes or plates ready before you begin.
- Flour:The chicken cutlet goes into the flour first. Make sure you lightly coat the entire surface, shaking off any excess. The flour provides a dry surface for the egg to adhere to.
- Egg Wash:Next, dip the floured chicken into a bowl of lightly beaten eggs. Let the excess egg drip off before moving to the final stage. The egg acts as the glue.
- Panko:Finally, press the chicken firmly into the panko breadcrumbs. Don’t be shy; press the crumbs into every surface of the chicken, ensuring a solid, thick coating. The thickness of the panko layer is what provides that spectacular crunch.
Once dredged, let the cutlets rest for about 10 minutes before cooking. This resting period allows the coating to set, dramatically reducing the chances of it falling off during the frying or baking process. Whether you choose to pan-fry for maximum crispness or bake for a lighter approach, resting is a critical step for success.
Ingredients for Japanese Katsu Bowls with Tonkatsu Sauce
Here’s what you’ll need to make this delicious dish:
- Chicken BreastSelect boneless, skinless breasts, pounded to an even 1/2-inch thickness for fast, consistent cooking.
- Panko BreadcrumbsThese are essential for the signature, airy, and super-crunchy texture that defines authentic Katsu.
- All-Purpose Flour and EggsUsed to create the foundational dredge that ensures the panko adheres firmly to the chicken cutlets.
- Steamed RiceUse medium-grain Japanese rice or sticky short-grain rice as the foundational base for serving the bowl.
- Neutral Cooking OilHigh-heat oil like canola, vegetable, or grapeseed oil is needed for frying the cutlets until they reach golden perfection.
- Ketchup or Tomato PasteForms the sweet and acidic base component of the rich, homemade Tonkatsu Sauce.
- Soy SauceProvides the crucial salty, savory, and deep umami notes necessary for flavor complexity in the sauce.
- Brown Sugar and Rice VinegarThese balance the richness of the sauce, offering necessary sweetness and a sharp, refreshing tang.
- Ginger and Garlic PowderAdds subtle, warm aromatics to the sauce, giving it a deeper, more layered flavor profile than store-bought versions.
The full ingredients list, including measurements, is provided in the recipe card directly below.
How to Make Japanese Katsu Bowls with Tonkatsu Sauce
Follow these simple steps to prepare this delicious dish:
Step 1: Prepare the Katsu Cutlets
Pound the chicken breasts to a uniform 1/2-inch thickness and season lightly with salt and pepper. Set up three dredging stations: one plate with flour, one bowl with beaten eggs, and one plate with panko breadcrumbs. Dredge each cutlet thoroughly: first in the flour (shake off excess), then in the egg wash, and finally press firmly into the panko until fully coated. Allow the coated cutlets to rest for 10 minutes.
Step 2: Cook the Chicken Katsu
Heat 1-inch of neutral oil in a deep skillet over medium-high heat until it reaches 350°F (175°C). Carefully place the cutlets into the hot oil, ensuring you do not overcrowd the pan. Fry for 3 to 4 minutes per side, or until the chicken is golden brown, crisp, and cooked through (internal temperature 165°F or 74°C). Drain the cooked Katsu on a wire rack over paper towels to maintain maximum crispness while you finish the sauce.
Step 3: Simmer the Homemade Tonkatsu Sauce
Combine the ketchup, soy sauce, brown sugar, rice vinegar, garlic powder, and ginger powder in a small saucepan. Bring the mixture to a gentle simmer over medium-low heat, stirring continuously until the sugar is fully dissolved and the sauce has slightly thickened, which usually takes about 5 minutes. Taste and adjust sweetness or tanginess as desired.
Step 4: Assemble the Japanese Katsu Bowls
Once cooked, slice the Katsu cutlets into thick strips diagonally. Fill large serving bowls with a generous base of freshly steamed rice. Arrange the sliced crispy chicken katsu over the rice. Garnish the bowl with shredded cabbage or a side salad for freshness and texture.
Transfer to plates and drizzle liberally with the warm, rich Tonkatsu Sauce for the perfect finishing touch.
Assembly and Variations: Building the Perfect Bowl
The beauty of the Japanese Katsu Bowl lies not just in the delicious chicken, but in the harmonious layering of flavors and textures. Rice provides the essential neutral base, soaking up the sauce and moisture from the chicken. Shredded cabbage or a simple side of quick-pickled vegetables (like daikon or cucumber) cuts through the richness of the fried chicken and sauce, offering a bright, necessary counterpoint.
You can enhance your bowls further by adding extra components. A perfect bowl might include a fried egg with a runny yolk, offering another layer of richness. Alternatively, consider sprinkling the top with toasted sesame seeds, chopped scallions, or a dusting ofshichimi togarashi(Japanese seven-spice blend) if you like a little heat. Remember, the bowl is your canvas—dress it to impress your tastebuds.
Essential Tips for Crispy Success
The greatest heartbreak when making Katsu is a beautiful golden coating that goes soggy before it reaches the table. Avoid this tragedy with these expert tips:
- Don’t Crowd the Pan:When frying, cooking too many cutlets at once drastically lowers the oil temperature, leading to oil absorption and sogginess. Cook in batches, allowing the oil to recover its temperature between additions.
- Rest on a Rack, Not Paper Towels:While paper towels absorb excess oil, they also trap steam underneath the Katsu, quickly making the bottom soggy. Always transfer cooked cutlets to a wire rack so air can circulate underneath, keeping the entire crust crispy.
- Use Fresh Oil:If the oil starts to look cloudy or smells burnt, change it. Dirty oil impacts the flavor and quality of the crust.
- Slice Just Before Serving:Wait until the very last moment to slice the cooked Katsu. Slicing too early exposes the meat, allowing moisture to escape and soften the crust.
Frequently Asked Questions About Katsu Bowls
Can I bake the Katsu instead of frying it?
Absolutely! For a lighter version, preheat your oven to 400°F (200°C). Lightly spray the panko-coated chicken with cooking oil and bake for 15 to 20 minutes, flipping halfway, until golden and crispy. While slightly less rich than fried Katsu, the panko still ensures a satisfying crunch.
How should I store leftover Tonkatsu Sauce?
Store any leftover homemade Tonkatsu Sauce in an airtight container in the refrigerator. It will keep well for up to two weeks. It’s fantastic not just on Katsu, but also drizzled over grilled chicken or roasted vegetables.
What is the best type of rice to use for a Katsu bowl?
Short-grain Japanese rice (like Koshihikari) or medium-grain sushi rice is ideal. These varieties cook up sticky and moist, providing the necessary texture to hold the bowl together and complement the sauce and crispy chicken.
Enjoying homemade Japanese Katsu Bowls with Tonkatsu Sauce is a small victory—a crispy, savory, deeply satisfying win that proves you are, indeed, a culinary superstar. Serve these bowls up and watch them disappear faster than a plate of appetizers at a party.
There are meals, and then there areexperiences. For years, I chased the perfect crunch—that mythical sound that confirms you’ve achieved fried culinary perfection. My kitchen adventures frequently ended in disappointment, usually featuring either soggy breading or cutlets dry enough to chip a tooth. I was ready to declare a moratorium on deep-frying until I finally cracked the code to making magnificentJapanese Katsu Bowls with Tonkatsu Sauce.
This isn’t just about frying chicken; it’s about achieving the ultimate balance: incredibly juicy poultry encased in panko armor, resting on a bed of fluffy rice, and absolutely drenched in a tangy, sweet, and savory Tonkatsu sauce. If you’ve ever had this dish, you know it’s the definition of comfort food. If you haven’t, prepare for a life-altering culinary moment. Forget those sad, takeout versions—we are building a masterpiece right here. The secret, as I learned through many crunchy, messy trials, lies entirely in the prep and the temperature of the oil. Get ready to put on your apron, because we are diving into the best savory Japanese comfort food you will ever make.
Ingredients for Ultimate Chicken Katsu
A great dish starts with great components. For this recipe, we are focusing on creating succulent chicken cutlets and the essential homemade tangy sauce.
For the Chicken Katsu
- 1.5 lbs boneless, skinless chicken breasts (about 4 cutlets)
- Salt and freshly ground black pepper
- 1 cup all-purpose flour
- 2 large eggs, lightly beaten
- 2 cups Panko breadcrumbs (essential for the crunch!)
- Vegetable or canola oil, for frying
For the Tonkatsu Sauce (The Magic Drizzle)
- 1/2 cup ketchup
- 2 tablespoons Worcestershire sauce
- 1 tablespoon soy sauce
- 1 tablespoon sugar (or maple syrup)
- 1 teaspoon grated fresh ginger
- 1/2 teaspoon garlic powder
- 1/2 teaspoon white vinegar or apple cider vinegar
For Serving the Bowls
- 4 cups cooked short-grain white rice
- Shredded cabbage or mixed greens
- A drizzle of Japanese mayonnaise (optional)
Bringing the Japanese Katsu Bowls with Tonkatsu Sauce to Life
Patience and precision are key when frying. Follow these steps for crispy success and a perfectly balanced sauce.
Step 1: Preparing the Chicken Cutlets
First, slice your chicken breasts horizontally to create four thinner cutlets. Place them between two sheets of plastic wrap and use a meat mallet or the bottom of a heavy skillet to pound them uniformly thin, about 1/4 inch thick. This ensures even cooking and maximum tenderness. Season both sides generously with salt and pepper. Set up your standard breading station: one shallow dish with flour, one with the beaten eggs, and one with the Panko breadcrumbs.
Step 2: The Perfect Panko Coating
Dredge each seasoned chicken cutlet thoroughly in the flour, shaking off any excess. Next, dip it completely into the egg mixture. Finally, press the chicken firmly into the Panko crumbs, ensuring the entire surface is coated densely. This firm pressing technique is what gives the Katsu its signature craggy, crunchy crust. Once coated, place the cutlets on a wire rack—not a plate—while you heat the oil. This prevents the bottom from getting soggy before frying.
Step 3: Crafting the Homemade Tonkatsu Sauce
While the cutlets are waiting for their moment of glory, whip up the spectacular Tonkatsu sauce. It takes literally two minutes and elevates the dish exponentially. In a small bowl, whisk together the ketchup, Worcestershire sauce, soy sauce, sugar, ginger, garlic powder, and vinegar. Taste it! Adjust the sweetness or tanginess to your liking. If you want a richer, deeper flavor, you can briefly simmer the mixture for five minutes, but whisking works perfectly fine for instant gratification. Set the sauce aside.
Step 4: The Golden Fry
Heat about 1 to 1.5 inches of oil in a large, heavy-bottomed pan over medium-high heat. The ideal temperature for frying Katsu is 325°F (160°C). If you don’t have a thermometer, drop a single Panko crumb into the oil; if it sizzles vigorously and turns golden within 10 seconds, you are ready. Carefully place two cutlets into the hot oil, making sure not to overcrowd the pan, which drastically lowers the oil temperature and results in greasy chicken. Fry for 3 to 4 minutes per side, until the crust is deeply golden brown and the internal temperature reaches 165°F (74°C).
Step 5: Draining and Serving the Katsu Bowls
Transfer the perfectly golden cutlets immediately to a wire rack lined with paper towels to drain excess oil. Do not stack them! Let them rest for a moment, then slice the Katsu into thick strips against the grain. Now, assemble your majestic bowls: scoop the hot rice into serving bowls, lay a generous portion of shredded cabbage on the side (the freshness cuts through the richness beautifully), place the sliced Katsu on the rice, and drizzle lavishly with the homemade Tonkatsu sauce. TheseJapanese Katsu Bowls with Tonkatsu Sauceare ready to impress.
Perfecting the Cooking Process

Achieving maximum efficiency while making these savory bowls involves smart layering. First, prepare the chicken and let it rest on the rack while the oil heats. Next, mix the Tonkatsu sauce ingredients quickly, followed by cooking the rice. Finally, fry the cutlets right before serving to ensure peak crunch and temperature for these amazing Japanese Katsu Bowls.
Add Your Touch
You can easily switch the chicken for sliced turkey or beef cutlets for variety. For a vegetarian option, try frying thick slices of eggplant or firm tofu. Spice up the Panko with a pinch of shichimi togarashi, or substitute the shredded cabbage with a quick cucumber pickle for extra acidity and crunch.
Storing & Reheating
Store leftover Katsu and sauce separately in airtight containers; the Katsu stays good for up to three days. To regain that iconic crispness, reheat the Katsu in an air fryer at 350°F (175°C) for 5-7 minutes, or bake on a rack in a hot oven until heated through, avoiding the microwave.
One time, my picky nephew, Leo, who usually sticks to mac and cheese, devoured three servings of these crispy cutlets and asked for the recipe. That moment truly solidified this dish as a family champion and proved the power of a great Tonkatsu sauce.
Three Essential Katsu Tips from the Kitchen
- Use thinly pounded cutlets: Pounding the chicken uniformly thin guarantees that the meat cooks quickly and stays tender before the Panko crust burns.
- Chill the coated cutlets: After breading, letting the chicken rest in the refrigerator for 15 minutes helps the Panko adhere better, resulting in less breading fallout during frying.
- Maintain steady oil temperature: Fluctuations in the oil temperature are the enemy of crunch; keep the heat steady and fry in small batches for consistent, perfect results.
Troubleshooting Common Katsu Challenges
Even seasoned home cooks encounter minor roadblocks when tackling a frying recipe. But don’t worry, we have quick fixes to ensure yourJapanese Katsu Bowls with Tonkatsu Sauceturn out flawless every single time.
Why is my Katsu soggy?
Sogginess usually stems from two main issues: either the oil temperature was too low, allowing the cutlet to absorb excess oil, or you overcrowded the pan. Always maintain the 325°F (160°C) temperature and ensure you rest the finished Katsu on a wire rack immediately after frying, allowing air to circulate around the crust.
The Tonkatsu Sauce tastes flat—how can I fix it?
If the sauce lacks depth, it probably needs balancing. Add a touch more vinegar for acidity and tanginess, or a dash more soy sauce for deeper umami flavor. Remember, the sauce should hit three notes simultaneously: sweet, tangy, and savory. A tiny squeeze of fresh orange juice can also enhance the fruit notes.
Can I bake the Katsu instead of frying?
While frying offers the superior texture, you absolutely can bake or air-fry the cutlets for a healthier alternative. Preheat your oven to 400°F (200°C) and lightly spray the coated cutlets with cooking spray or brush with melted butter. Bake for 18-20 minutes, flipping halfway, until golden brown and cooked through. The Panko still delivers a decent crunch when baked correctly.
Beyond the Bowl: Creative Katsu Applications
The beauty of the crispy Katsu cutlet extends far beyond its traditional bowl format. Once you master the method for these incredibly crispy delights, you can integrate them into other delicious, speedy weeknight meals, keeping dinner exciting and preventing cooking boredom. Think creatively about how the texture and flavor profile of the Katsu and the tangy sauce can complement other ingredients.
Katsu Sandwich (Katsu Sando)
The Katsu Sando is perhaps the most famous variation, and it’s incredibly simple. Slice your perfectly fried Katsu into thick strips, spread a light layer of Japanese mayo and a generous amount of Tonkatsu sauce on thick slices of soft white bread, and sandwich the Katsu inside. Remove the crusts, cut into neat triangles, and prepare for pure culinary delight. This makes a fantastic lunch or picnic item that travels exceptionally well.
Katsu Curry
For a richer, heartier meal, transform your crispy Katsu into Katsu Curry. Prepare a mild, savory Japanese curry base (using beef broth and common curry powder/roux), and spoon it generously over the rice. Place the sliced chicken Katsu directly atop the curry sauce. The Tonkatsu sauce provides a necessary tanginess, contrasting perfectly with the deep, earthy spice of the curry. It’s a truly powerful combination that warms the soul on a chilly evening.
Katsu Salad Topper
If you crave the crunch but want a lighter presentation, slice the Katsu and use it as a hearty protein topper for a vibrant, mixed green salad. Instead of the standard creamy dressing, use a light vinaigrette based on ginger, sesame oil, and rice vinegar. The Katsu provides textural contrast, while the fresh greens offer a palate cleanser, making the meal feel surprisingly light despite the fried element.
Mastering theseJapanese Katsu Bowls with Tonkatsu Saucemight seem intimidating due to the frying component, but armed with the right techniques, achieving that signature golden crunch is entirely within reach. Remember the wire rack, the consistent oil temperature, and the necessity of pounding the chicken thin. These small steps transform a simple fried dish into an extraordinary culinary experience that your friends and family will request constantly. Enjoy the savory triumph!
Frequently Asked Questions About Japanese Katsu Bowls
What is the difference between Panko and regular breadcrumbs?
Panko breadcrumbs are made from crustless white bread, yielding large, airy, and flaky crumbs. This structure prevents them from absorbing excessive oil and results in a lighter, crispier, and much crunchier texture compared to denser, Western-style breadcrumbs.
Can I prepare the chicken Katsu ahead of time?
You can prepare the chicken by pounding and coating it up to 2 hours ahead of time. Keep the coated cutlets uncovered in the refrigerator. Frying them must be done immediately before serving to guarantee maximum crispness; never fry Katsu in advance.
Is Tonkatsu Sauce typically spicy?
No, authentic Tonkatsu sauce is not spicy. It is characterized by its complex sweet, fruity, and savory flavor profile. If you desire heat, you can easily add a dash of cayenne pepper or a squirt of sriracha directly into the homemade sauce recipe.
What rice works best for Katsu Bowls?
Short-grain or medium-grain Japanese white rice (like sushi rice) is ideal because it has a slightly sticky texture that helps hold the bowl components together and provides a perfect, comforting base for the savory chicken and rich sauce.
Conclusion for Japanese Katsu Bowls with Tonkatsu Sauce
Mastering these incredible Japanese Katsu Bowls with Tonkatsu Sauce delivers a massive win to your dinner rotation. We successfully combined simple techniques with bold flavor, ensuring every bite provides that deeply satisfying crunch, followed by succulent meat and the unforgettable zest of the scratch-made, tangy sauce. Forget the temptation of mediocre takeout; this comforting, flavor-packed dish is entirely achievable and surprisingly simple to execute in your own kitchen. Whether you are aiming to elevate a simple weeknight dinner or impress guests, the harmonious pairing of crisp Katsu, fluffy rice, and the rich sauce guarantees happy faces around the table. Get ready to embrace the golden standard of Katsu perfection.
Print
Japanese Katsu Bowls with Tonkatsu Sauce
Master the three-step Panko dredge for ultimate crispy chicken Katsu! Dive into this savory Japanese bowl, topped with tangy Tonkatsu. Instructions and full nutrition breakdown included.
- Total Time: 35 minutes
- Yield: 4 servings 1x
Ingredients
- 4 boneless chicken breast cutlets (about 4 oz each)
- 1 cup Panko breadcrumbs
- 1/2 cup all-purpose flour
- 1 large egg, beaten
- 2 cups vegetable oil (for deep frying)
- 4 cups cooked short-grain white rice
- 1/2 cup store-bought or homemade Tonkatsu sauce
- 1 cup shredded green cabbage (for serving)
Instructions
- Step 1: Tenderize the turkey cutlets slightly by pounding them to about 1/3-inch thickness. Set up three separate shallow dishes: one with flour, one with the beaten egg, and one with the Panko breadcrumbs.
- Step 2: Dredge each chicken cutlet sequentially: first coat thoroughly in the flour, shaking off excess; next dip into the beaten egg; and finally press firmly into the Panko breadcrumbs to ensure a thick, even coating.
- Step 3: Heat the vegetable oil in a deep frying pan or pot to 350°F (175°C). Carefully place 1-2 cutlets into the hot oil and fry for 4-6 minutes, flipping halfway through, until the exterior is golden brown and crispy and the chicken is cooked through (internal temperature 145°F).
- Step 4: Remove the cooked katsu and place them on a wire rack or paper towels to drain excess oil. Once rested for two minutes, slice each katsu piece diagonally into strips about 3/4-inch thick.
- Step 5: To assemble the bowls, divide the cooked rice evenly among four large bowls. Top the rice with a bed of shredded cabbage, arrange the sliced katsu strips neatly on top of the cabbage, and drizzle generously with Tonkatsu sauce.
Notes
- Store leftover fried chicken (katsu) in an airtight container in the refrigerator for up to 3 days, making sure to keep it separate from the rice and sauce to preserve its crispness.
- For the best texture, reheat leftover katsu in a 350°F air fryer or conventional oven for about 5-7 minutes until piping hot and crispy again, rather than using a microwave which will soften the breading.
- To achieve an exceptionally thick and crunchy crust, apply a double-dredge to the Katsu by pressing the Panko coating twice before frying—the extra layer guarantees maximum crunch.
- Enhance the umami flavor of the bowl by garnishing the katsu with a sprinkle of toasted sesame seeds and a small dollop of Japanese mayonnaise (Kewpie) alongside the traditional Tonkatsu sauce.
- Prep Time: 15 minutes
- Cook Time: 20 minutes
- Method: Stovetop
- Cuisine: American
FAQs
How do I achieve the ultimate crunch for my Katsu cutlets when making Japanese Katsu Bowls with Tonkatsu Sauce?
The secret to perfect crispness lies in the quality of your breadcrumbs and the temperature of the oil. Ensure your chicken or turkey cutlets are perfectly patted dry before the flour-egg-panko dredge—moisture is the enemy of crunch. Use genuine Japanese panko, as its flaky texture absorbs less oil than standard breadcrumbs. Fry the katsu at a steady 350°F (175°C), ensuring they turn deeply golden brown and are cooked fully through. Avoid overcrowding the pan at all costs; patience ensures maximum crispness and prevents the oil temperature from dropping drastically, resulting in a delightfully crisp coating.
I need to swap out typical Worcestershire sauce ingredients for the homemade Tonkatsu sauce base—what alternatives work best?
Traditional Worcestershire contains ingredients we are skipping, but replicating that signature sweet, tangy, and savory depth is straightforward. To achieve the required tang, blend rice vinegar with fruit juice (like apple or white grape juice) for sweetness. Add umami and depth using soy sauce or tamari, along with a dash of vegetable broth and aromatic spices like ground ginger and garlic powder. Simmering this mixture briefly helps the natural starches slightly thicken the sauce, providing that rich, glossy coating necessary for elevating your flavorful Japanese Katsu Bowls with Tonkatsu Sauce to gourmet heights.
Can I use turkey or beef instead of chicken when preparing the katsu for these hearty bowls?
Absolutely! While Chicken Katsu is widely popular, you have plenty of delicious protein options for your Katsu bowls. Thinly sliced beef sirloin or flank steak works exceptionally well, offering a richer flavor that beautifully complements the sweet and tangy Tonkatsu sauce. If opting for beef, ensure you pound the pieces slightly thinner than you would for chicken to guarantee quick and uniform cooking. Turkey breast cutlets are also a fantastic lean alternative, cooking swiftly while staying moist inside the spectacular crispy panko exterior. The essential technique of dredging and frying stays consistent, regardless of your chosen meat.
How can I prep components of these Japanese Katsu Bowls with Tonkatsu Sauce ahead of time without losing the crispy texture?
The Tonkatsu sauce is your best friend for efficient meal prep; whisk it together up to three days in advance and keep it chilled in an airtight container. You can also prepare the meat well ahead by completing the full dredging process—flour, egg, and panko—then arranging the cutlets on a wire rack set over a baking sheet, covering them loosely, and refrigerating for several hours. However, for a truly successful dish, wait until the very last minute to fry the Katsu itself. That fresh, piping hot crispness is the defining characteristic of outstanding Japanese Katsu Bowls, making the final fry non-negotiable.
Leave a Comment