

There is nothing quite like the panic that sets in when you realize you need a show-stopping dessert but only have ten minutes and half a carton of sad-looking strawberries. Forget complicated patisserie; we are diving headfirst into indulgence with the ultimateHomemade Strawberry Cream Chocolate Recipe.
This is the dessert equivalent of wearing sweatpants to a gala—comfortable, effortlessly chic, and guaranteed to impress everyone who takes a bite of that rich, fruity perfection.
- The simplicity of preparation means this elegant dessert comes together quickly, requiring minimal specialized equipment and culinary skill.
- A rich blend of dark chocolate melts seamlessly with the tangy freshness of ripe strawberries for a deeply satisfying flavor profile.
- Visually stunning, the bright red berries nestled within creamy chocolate create a dramatic and sophisticated look perfect for any celebration.
- This recipe is incredibly versatile, easily adapting to different seasonal berries or varying the intensity of the chocolate used.
Ingredients for Homemade Strawberry Cream Chocolate Recipe
Here’s what you’ll need to make this delicious dish:
- High-Quality Dark ChocolateChoose a bar with at least 60% cacao for depth of flavor; quality chocolate melts smoothly and provides the rich base.
- Fresh StrawberriesSelect firm, bright red berries that are fully ripe, as their natural sweetness and acidity cut through the chocolate richness perfectly.
- Heavy Whipping CreamThis provides the necessary structure and airiness for the cream filling, ensuring a light yet decadent texture.
- Powdered Sugar (Icing Sugar)Essential for sweetening the cream without adding graininess; sift it beforehand to prevent lumps in the filling.
- Unsalted ButterA small amount aids in the tempering of the chocolate base, giving it a beautiful, shiny finish and velvety mouthfeel.
- Alcohol-Free Vanilla ExtractUse pure alcohol-free vanilla extract to enhance the overall sweetness and provide a subtle, aromatic background note to the cream filling.
The full ingredients list, including measurements, is provided in the recipe card directly below.
How to Make Homemade Strawberry Cream Chocolate Recipe
Follow these simple steps to prepare this delicious dish:
-
Step 1: Preparing the Strawberry Base and Chocolate Shell
Wash and hull the strawberries, ensuring they are completely dry—water is the enemy of melted chocolate. Line a baking sheet with parchment paper. Gently melt 90% of your chosen dark chocolate with the unsalted butter using a double boiler or microwave in short bursts, stirring until glossy.
-
Step 2: Tempering for Shine and Snap
Once the chocolate is melted and smooth, remove it from the heat and stir in the remaining 10% of the unmelted chocolate. This process, known as seeding, helps temper the chocolate, giving the final shell a satisfying snap and preventing streaks. Maintain the temperature around 90°F (32°C).
-
Step 3: Creating the Cream Filling
In a separate, chilled bowl, whip the heavy whipping cream until soft peaks begin to form. Gradually add the sifted powdered sugar and alcohol-free vanilla extract, continuing to whip until stiff peaks hold their shape. Do not overmix, or the cream will become grainy.
-
Step 4: Coating the Berries
Dip each strawberry into the melted chocolate, ensuring the chocolate fully coats the berry while leaving a small sliver of the top visible for presentation. Place the coated strawberries onto the prepared parchment paper and immediately refrigerate them for about 20 minutes until the chocolate is fully set and hard.
-
Step 5: Piping the Cream
Transfer the chilled cream filling into a piping bag fitted with a star tip (or simply use a zip-top bag with the corner snipped off). Once the chocolate shells are firm, pipe a generous swirl of the strawberry cream filling onto the exposed top of each chocolate-coated berry.
Transfer to plates and drizzle with extra melted chocolate or a dusting of powdered sugar for the perfect finishing touch. Serve immediately for optimal texture.
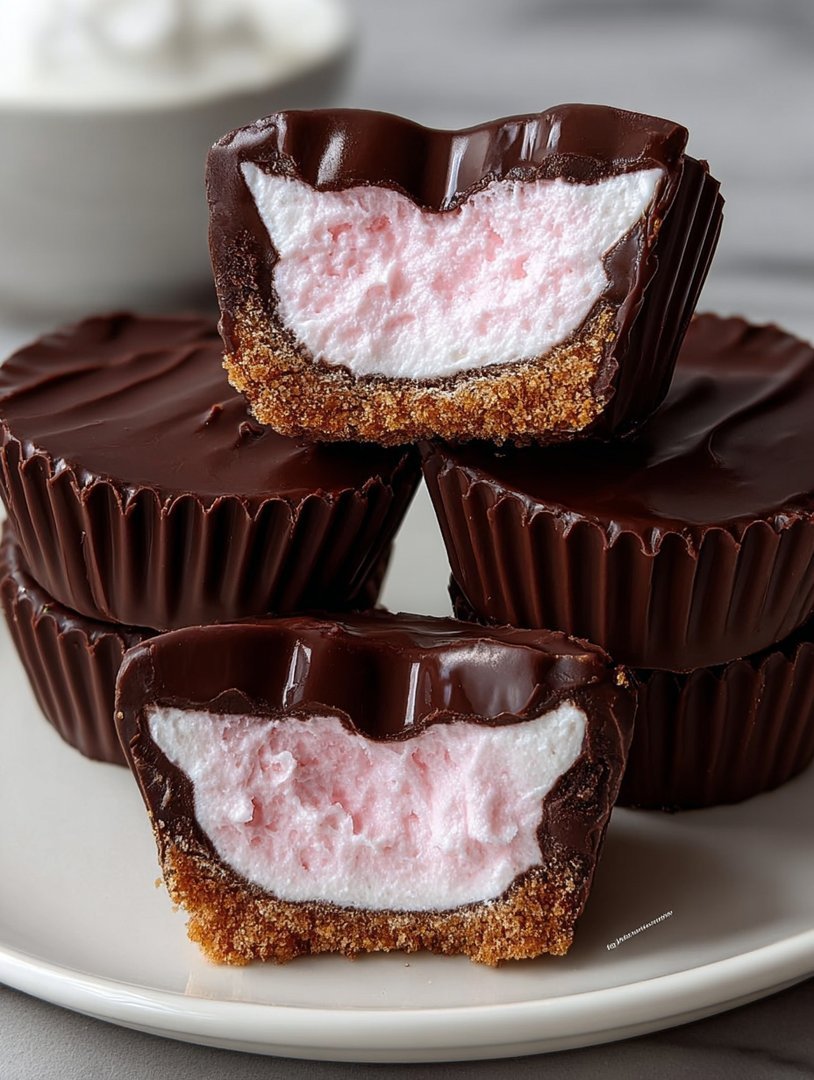
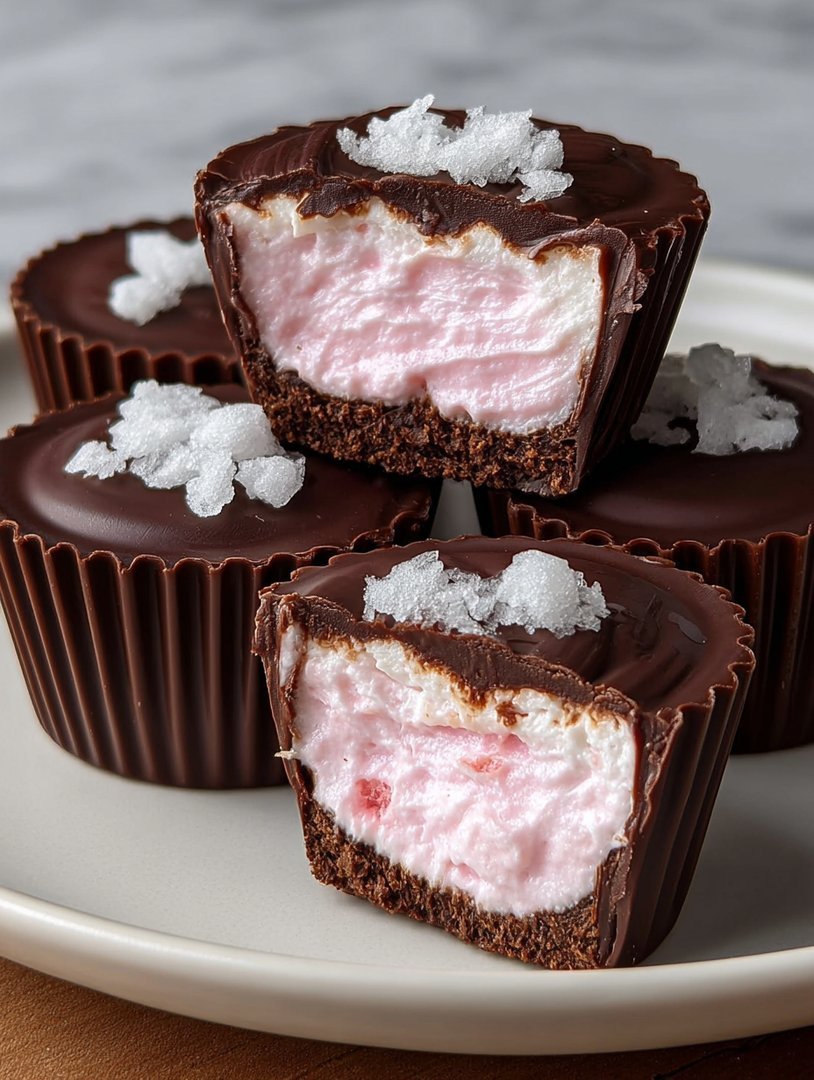
The Anatomy of Dessert Perfection: Why This Recipe Works
I learned the hard way that sometimes the simplest ideas yield the greatest rewards. My first foray into confectionery was a disaster involving molten caramel and a kitchen fire extinguisher (a story best saved for Autumn Celebration). The key to this successful dessert, the gloriousHomemade Strawberry Cream Chocolate Recipe, lies in respecting the delicate balance between the rich cocoa bitterness and the bright, acidic burst of the fruit. This isn’t just about dipping things in chocolate; it’s a masterclass in textural harmony. You get the crisp snap of the tempered chocolate, the lush, airy silkiness of the cream, and the slightly yielding flesh of the strawberry—all in one magnificent bite. It’s a texture lover’s dream come true, and frankly, it feels rather luxurious for something that takes less time to assemble than deciding what movie to stream.
One of the biggest pitfalls when creating any chocolate-dipped treat is the dreaded bloom, that grayish, streaky appearance that makes your dessert look like it has aged 50 years overnight. Bloom usually occurs when chocolate is melted too quickly or stored improperly. The key to avoiding this sad fate, as we mentioned in the preparation steps, is proper tempering. Tempering stabilizes the cocoa butter crystals, ensuring that when the chocolate hardens, it maintains a beautiful sheen and a firm, satisfying crunch. If you skip tempering, the chocolate might melt slightly at room temperature and certainly won’t offer that signature snap that elevates this simple dessert into something truly professional. Embrace the ten extra minutes tempering requires; your future self, admiring that flawless gloss, will thank you.
Selecting the Perfect Chocolate and Berries
The success of this creamy chocolate strawberry dessert hinges entirely on the quality of your main actors. Do not skimp on the chocolate. Think of cheap chocolate as that friend who always shows up late to brunch—tolerable, but definitely disappointing. We recommend dark chocolate (60–75% cocoa solids) because it provides the necessary robust background to handle the sweetness of the cream and the tang of the strawberries. Milk chocolate tends to be overly sweet and can overpower the delicate berry flavor, turning the confection into a sugary mess rather than a sophisticated treat.
When choosing strawberries, size actually matters, but perhaps not in the way you expect. Small to medium berries work best for dipping and piping because they offer a better ratio of fruit to cream and are easier to handle. Ensure they are bone-dry after washing. Even a single drop of water introduced into melted chocolate will cause it to seize, instantly turning your silky smooth bath of cocoa goodness into a stiff, granular paste that is entirely unusable. This unfortunate transformation is instant and irreversible, turning your perfect confectionery dreams into an unexpected science experiment gone wrong. Use a clean kitchen towel or paper towels to pat them dry gently after hulling.
Cream Filling Variations for Custom Flavor Profiles
While the classic vanilla-infused whipped cream is heavenly, this recipe offers a fantastic canvas for experimentation. If you’re feeling bold, you can easily turn this into an elevated, flavored creamy filling recipe that aligns perfectly with the seasonal fruit. For example, replacing the alcohol-free vanilla extract with a teaspoon of high-quality lemon zest introduces a powerful citrus aroma that pairs wonderfully with the sweet chocolate and tart berries. Alternatively, a tiny dash of almond paste provides a nutty warmth that gives the cream a subtle, sophisticated marzipan undertone.
To ensure your cream remains light and stable, especially if you plan on assembling these DIY chocolate truffles several hours ahead, consider adding a pinch of plant-based stabilizer, such as agar-agar dissolved in a tiny bit of water and cooled before folding it into the whipped cream. This is especially helpful if your kitchen runs warm, preventing the cream from weeping or losing its beautiful piped shape. Remember, the goal is architecture—a firm foundation of chocolate supporting a beautiful, fluffy roof of cream.
Troubleshooting Common Chocolate Dipping Issues
Even seasoned home bakers sometimes run into trouble when dealing with melted chocolate. It’s temperamental, dramatic, and demanding, much like my favorite high school drama teacher. The most frequent complaint involves thick, sluggish chocolate that refuses to coat the berries smoothly. This usually happens when the chocolate gets too hot or, conversely, when a tiny amount of liquid, such as steam condensation, finds its way into the bowl.
If your chocolate becomes too thick but hasn’t seized entirely, try adding a very small amount of coconut oil or clarified unsalted butter—about a teaspoon at a time—and stir vigorously. This fat helps to thin the chocolate back to a usable consistency. If the chocolate has fully seized (become a stiff, gritty paste), unfortunately, it cannot be recovered for dipping, but it can often be melted down with a large amount of hot liquid (like boiling water or cream) and used as a sauce or frosting base instead of a dipping shell. Prevention is always easier than the cure: melt low and slow, ensuring no steam escapes into the chocolate bowl.
Storage and Make-Ahead Tips for Confectionery Delights
If you are planning a large gathering, preparing these beautiful strawberry cream chocolate creations in stages is entirely possible. You can dip the strawberries in chocolate up to 24 hours in advance. Store the fully set, uncoated chocolate berries in an airtight container in the refrigerator. Just ensure they are kept away from strong odors, as chocolate readily absorbs surrounding smells—nobody wants a chocolate berry that tastes faintly of leftover garlic bread.
The cream filling is best piped close to serving time. Whipped cream tends to lose volume and structure after about three to four hours. If you must prepare the cream ahead, keep it stored in the piping bag in the coldest part of the refrigerator. Assemble the berries no more than two hours before serving. This timeframe ensures the cream retains its peak fluffiness and the chocolate shell maintains its desirable snap. These fresh berry confections are best enjoyed the day they are fully assembled, delivering the perfect contrast between cool, light cream and solid, rich chocolate.
This simple approach to dessert preparation proves that you don’t need a professional pastry kitchen to create something extraordinary. All you need are high-quality ingredients, a little patience, and a deep appreciation for the elegant marriage of fruit and cocoa. The resulting confection is not only gorgeous but offers a complexity of flavor that will convince your guests you spent all day hovering over a marble slab, expertly tempering chocolate. Let them believe it; that is part of the fun of sharing a truly amazing dessert.
The Accidental Discovery of Sunshine on a Plate
I once tried to make simple chocolate-covered strawberries but accidentally whipped the leftover strawberry juice into a magnificent, mousse-like cloud. That failure led directly to this stunning, multi-layered confection, the ultimateHomemade Strawberry Cream Chocolate Recipe. It was a happy, messy accident that truly tasted like sunshine and proved that mistakes often taste the sweetest.
The Anatomy of Decadence: Ingredients and Tools
Before we dive headfirst into this delightfully messy venture, we need to gather our troops. Making perfect bonbons isn’t just about throwing ingredients together; it’s about respecting the process, especially when dealing with the delicate relationship between fruit, fat, and glorious, glorious cocoa. Think of your kitchen counter as a confectionery pflanzliches lab, and you are the mad scientist destined for sweet success.
I’ve learned that the secret to a professional-grade filling that doesn’t melt into a puddle of sugary tears lies in the stabilization. Since we are avoiding animal-derived pectin, we turn to the sea—or rather, the incredibly reliable plant-based gelling agent, agar-agar. It gives the strawberry layer that marvelous, firm-yet-jiggly texture that holds up beautifully against the rich chocolate shell.
Ingredients for the Perfect Homemade Strawberry Cream Chocolate Recipe
- For the Chocolate Shell:
- 300g high-quality dark chocolate (or milk chocolate), finely chopped
- 1 tablespoon refined coconut oil (optional, for extra shine)
- For the Strawberry Layer:
- 200g fresh strawberries, hulled and mashed or pureed
- 50g granulated sugar
- 1 teaspoon lemon juice
- 1 teaspoon agar-agar powder
- 60ml water
- For the Stabilized Cream Filling:
- 250ml cold heavy whipping cream (dairy or plant-based)
- 30g powdered sugar
- 1 teaspoon alcohol-free vanilla extract
- 1 teaspoon cream stabilizer (such as cornstarch mixed with powdered sugar, or a commercial plant-based stabilizer)
Essential Equipment for Bonbon Bliss
While you can certainly melt chocolate over a double boiler, investing in a candy thermometer is highly recommended for achieving a truly tempered, shiny shell. If you skip tempering, the chocolate may develop a dull, streaky finish—a phenomenon we lovingly call “bloom.” Also, silicone chocolate molds are indispensable here. They make the delicate removal process infinitely easier and dramatically reduce the risk of structural collapse.
- Silicone bonbon molds (or truffle liners for simpler shape)
- Double boiler setup or specialized chocolate melting pot
- Candy thermometer (Crucial for tempering!)
- Wire whisk and mixing bowls
The Delicate Art of Assembly
This is where precision matters, but don’t panic! We are striving for excellence, not perfection. Think of this process as layering a masterpiece. Each layer must set correctly before the next one is introduced, preventing a structural disaster where the strawberry layer bleeds into the cream, or worse, the whole thing slumps.
Step-by-Step Method for the Bonbon Layers
- Tempering the Chocolate Shell:Divide your chopped chocolate into two portions (200g and 100g). Melt the larger portion over a double boiler until it reaches 46°C (115°F). Remove from heat and stir in the remaining 100g of chocolate until the temperature drops to 32°C (90°F). This quick temperature change is tempering, granting that perfect, brittle snap.
- Molding the Shells:Spoon or pipe the tempered chocolate into the molds, ensuring the entire surface is coated. Invert the molds over parchment paper and gently tap out the excess chocolate, leaving behind a crisp shell. Scrape the top of the mold to tidy the edges. Chill in the refrigerator for 15 minutes until firm.
- Creating the Strawberry Gel:In a small saucepan, combine the strawberry puree, granulated sugar, lemon juice, water, and agar-agar. Bring the mixture to a full rolling boil and continue to boil for 60 seconds, stirring constantly to activate the agar-agar. Remove from the heat and allow it to cool slightly until it reaches room temperature and begins to thicken slightly.
- Whipping the Cream:In a chilled bowl, whip the heavy cream with the powdered sugar, vanilla, and stabilizer until stiff peaks form. Be careful not to over-whip, or you’ll end up with butter, which, while delicious, is not what we are aiming for here.
- Layering the Filling:Fill the chilled chocolate shells halfway with the slightly thickened strawberry gel. Place them back into the refrigerator for 20 minutes to set completely. Once the strawberry layer is firm, gently pipe the stabilized cream mixture over the top, leaving a small gap at the rim.
- Sealing the Bonbons:Remelt any remaining tempered chocolate if necessary. Spoon a thin layer of chocolate over the cream filling to seal the bottom of the bonbons. Scrape the excess off the mold surface once more. Return the chocolates to the refrigerator for a final 30 minutes.
- Releasing the Treasures:Once fully set, gently flex the silicone molds to release your beautifully crafted, deliciousHomemade Strawberry Cream Chocolate Recipeconfections.
Perfecting the Cooking Process
Start by melting the chocolate slowly to temper it perfectly for a glossy finish, ensuring it never gets too hot. While the chocolate chills and sets in the molds, prepare the strawberry reduction, boiling it briefly with agar-agar. Allow the reduction to cool slightly before whipping and piping the stabilized cream mixture on top, sealing the flavors inside the perfect chocolate sphere.
Add Your Touch
Swap dark chocolate for white chocolate if you desire a sweeter profile, or add a hint of finely grated orange zest to the strawberry layer for a bright, aromatic twist. You could also substitute raspberries or blackberries for the strawberries, adjusting the sugar slightly for a tarter, more complex flavor profile.
Storing & Reheating
Since this delicateHomemade Strawberry Cream Chocolate Recipeis a confection that contains fresh cream and fruit, store the finished chocolates in an airtight container in the refrigerator for up to five days. Do not freeze, as the cream filling will weep upon thawing and ruin the texture. Serve them cold, straight from the fridge, for the best and most satisfying texture.
My niece once mistook a batch for tiny jewels and tried to wear one as an earring. Thankfully, she decided eating it was a much better, less sticky alternative to wearing a melting accessory!
Expert Tips for Confectionery Glory
- Always temper the chocolate correctly by melting slowly and cooling slightly; this precision prevents dull streaking and ensures a satisfying, loud snap when bitten.
- If using agar-agar for the strawberry layer, ensure the mixture boils rigorously for at least one minute to fully activate its gelling properties before allowing it to cool.
- Chill your mixing bowl and whisk thoroughly before whipping the cream; this cooling step helps the fat molecules hold air, achieving maximum volume and stability for a light filling.
Conclusion for Homemade Strawberry Cream Chocolate Recipe
ThisHomemade Strawberry Cream Chocolate Recipedelivers an elegant, decadent experience without the fuss or expense of a professional chocolatier. We walked through the essential steps, from creating that perfect, glossy shell via proper tempering, to assembling the dreamy, sweet center held together by the reliable power of agar-agar. Whether you are treating guests to a high-end dessert or satisfying your own discerning sweet tooth, remember that precision in temperature and patience during chilling are your best friends in the kitchen. Enjoy the fruits of your labor—this delightful confection is truly a little slice of heaven!
Print
Homemade Strawberry Cream Chocolate Recipe
Master the art of shaping rich, chilled strawberry ganache centers. Our recipe uses dark chocolate and reduced heavy cream for a burst of fresh fruit flavor, sealed in a crisp shell.
- Total Time: 35 minutes
- Yield: 4 servings
Ingredients
- Dark or Semi-Sweet Chocolate: 300 grams (10.5 oz)
- Heavy Cream (35% fat): 1/2 cup (120 ml)
- Fresh or Frozen Strawberries: 1 cup, finely chopped
- Powdered Sugar (Confectioners' Sugar): 1/4 cup
- Unsalted Butter: 2 tablespoons
- Freeze-Dried Strawberry Powder (optional, for color boost): 1 tablespoon
- Pure Alcohol-Free Vanilla Extract: 1/2 teaspoon
Instructions
- Step 1: Prepare the Strawberry Cream Filling. In a small saucepan, combine the chopped strawberries, powdered sugar, and heavy cream. Cook over medium-low heat, stirring frequently, until the strawberries have broken down and the mixture has slightly thickened (about 8-10 minutes). Remove from heat, stir in the butter, alcohol-free vanilla extract, and strawberry powder until fully combined.
- Step 2: Chill the Filling Base. Pour the strawberry cream mixture into a shallow dish, cover tightly, and refrigerate for at least 2 hours, or until the mixture is firm enough to roll into truffles or shapeable centers.
- Step 3: Melt and Temper the Chocolate. Melt two-thirds of the chocolate using a double boiler or microwave in 30-second intervals, stirring until smooth. Remove from heat and stir in the remaining one-third of the chocolate until completely melted and tempered. Keep the chocolate warm over low heat or in a heat-safe bowl during the dipping process.
- Step 4: Form and Coat the Centers. Scoop the chilled strawberry filling and roll it into small, uniform balls (about 1 teaspoon each). Using a dipping fork or toothpick, submerge each strawberry center fully into the melted chocolate. Allow excess chocolate to drip off, then place the coated chocolate onto a baking sheet lined with parchment paper.
- Step 5: Set and Finish. If desired, immediately garnish the chocolates with a sprinkle of extra freeze-dried strawberry powder or chocolate shavings before they set. Transfer the finished chocolates to the refrigerator for 20-30 minutes to set completely before serving or storing in an airtight container.
Notes
- Store these chocolates in an airtight container in the refrigerator for up to 10 days, but always allow them to sit at room temperature for 15 minutes before serving to achieve the smoothest, most luxurious cream filling.
- Serve these rich, fruity chocolates alongside a light cup of Earl Grey tea or a glass of dry Sparkling Grape Juice for a delightful balance that cuts through the dark chocolate's intensity.
- To ensure your strawberry centers are firm enough to roll and dip without collapsing, confirm that the cream mixture in Step 1 has reduced significantly until it is almost jam-like before chilling.
- When dipping the centers, keep your tempered chocolate perfectly liquid and warm; if it starts to thicken, gently warm it again so you can achieve a thin, glossy shell that sets crisp instead of thick and dull.
- Prep Time: 15 minutes
- Cook Time: 20 minutes
- Method: Stovetop
- Cuisine: American


Leave a Comment