

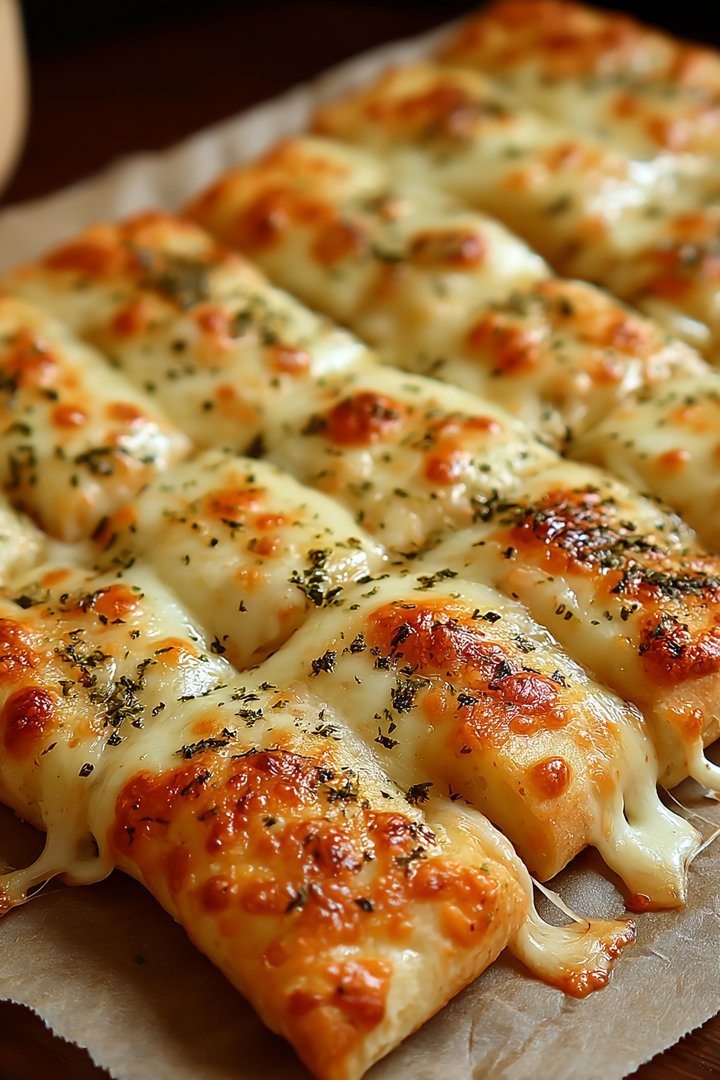
Imagine sinking your teeth into a warm, golden breadstick, the savory cheese stretching in delightful strings with every bite. The aroma alone, a blend of yeasty dough and melted cheese, is enough to make your stomach rumble and your mouth water.
These homemade cheesy breadsticks aren’t just a snack; they’re a warm hug on a plate, a comforting treat perfect for game night, movie marathons, or simply when you need a little cheesy goodness in your life.
- Effortlessly whip up a batch with simple ingredients you likely already have.
- Experience an explosion of flavor from the perfectly seasoned dough and gooey cheese.
- The golden-brown crust and generous cheese topping create an irresistible visual treat.
- Pair them with your favorite dips, soups, or enjoy them as a satisfying snack anytime.
Ingredients for Homemade Cheesy Breadsticks
Here’s what you’ll need to make this delicious dish:
The full ingredients list, including measurements, is provided in the recipe card directly below.
How to Make Homemade Cheesy Breadsticks
Follow these simple steps to prepare this delicious dish:
Step 1: Activate the Yeast
In a large bowl, dissolve the sugar and yeast in warm water. Let it sit for 5-10 minutes until foamy. This indicates that the yeast is active and ready to use. If it doesn’t foam, your yeast might be old and you’ll need to start with a fresh batch. This is a crucial step to ensure your breadsticks rise properly.
Step 2: Prepare the Dough
Add the olive oil, salt, and about half of the flour to the yeast mixture. Mix until a shaggy dough forms. Gradually add the remaining flour, mixing until the dough comes together and is slightly sticky. Turn the dough out onto a lightly floured surface and knead for 5-7 minutes, until smooth and elastic.
Step 3: First Rise
Place the dough in a lightly oiled bowl, turning to coat. Cover with plastic wrap or a clean kitchen towel and let rise in a warm place for 1-1.5 hours, or until doubled in size. This allows the yeast to do its work, creating air pockets in the dough and giving the breadsticks their light and airy texture.
Step 4: Shape the Breadsticks
Preheat oven to 400°F (200°C). Line a baking sheet with parchment paper. Punch down the risen dough to release the air. Divide the dough into equal portions (about 12-16 pieces). Roll each portion into a long, thin rope, about 8-10 inches long. Place the breadsticks on the prepared baking sheet, leaving some space between each one.
Step 5: Add the Cheesy Topping
In a small bowl, combine the mozzarella cheese, parmesan cheese, garlic powder, and Italian seasoning. Sprinkle the cheese mixture evenly over the breadsticks. Brush the breadsticks with melted butter.
Step 6: Bake and Serve
Bake for 12-15 minutes, or until the breadsticks are golden brown and the cheese is melted and bubbly. Let them cool for a few minutes before serving.
Serve these Homemade Cheesy Breadsticks warm with your favorite marinara sauce or dipping sauce for the perfect appetizer or snack. Enjoy!
Perfecting the Cooking Process
To nail these delectable homemade cheesy breadsticks, activate your yeast first. While it proofs, prep your dough and let it rise. Finally, shape, add cheese, and bake until golden. This ensures a fluffy, cheesy masterpiece every single time.
Add Your Touch
Don’t be afraid to experiment! Swap mozzarella for provolone, sprinkle some garlic powder on top, or add a pinch of red pepper flakes for a kick. Fresh herbs like basil or oregano are also fantastic additions to customize your homemade cheesy breadsticks.
Storing & Reheating
Store your leftover homemade cheesy breadsticks in an airtight container at room temperature for up to two days, or in the refrigerator for up to a week. Reheat them in the oven or microwave until warm and gooey.
Here are some expert tips to elevate your homemade cheesy breadstick game:
- For extra fluffy breadsticks, let the dough rise in a warm, humid place. A steamy bathroom works wonders.
- Don’t overcrowd the baking sheet; give the breadsticks room to expand. This ensures even cooking and browning.
- Brush the breadsticks with melted butter and garlic before baking for an extra layer of flavor and a beautiful golden crust.
(Personal anecdote formated as paragraph subheading)
I once made these for a potluck, and they disappeared so fast I barely got one! My friend declared them “better than any restaurant’s,” which, let’s be honest, is the highest compliment.
The Cheesy Breadstick Saga: From Humble Beginnings
Alright, folks, gather ’round the virtual campfire because I’m about to spin you a yarn about homemade cheesy breadsticks. It’s a tale of flour, yeast, cheese, and pure, unadulterated deliciousness. But it wasn’t always smooth sailing. Let me tell you, my first attempt at these cheesy wonders was a disaster of epic proportions. They were flat, dense, and tasted suspiciously like cardboard. The cheese, bless its heart, was burnt to a crisp. I almost gave up then and there.
But I’m not one to back down from a culinary challenge. I mean, who am I if I can’t conquer a simple breadstick? So, I dusted off my apron, armed myself with a healthy dose of determination (and a whole lot more cheese), and went back to the drawing board. I researched, I experimented, I even consulted my grandma (who, let’s face it, is a baking guru).
And finally, after what felt like an eternity, I cracked the code. I discovered the secrets to fluffy dough, perfectly melted cheese, and that irresistible, garlicky aroma that wafts through the kitchen, luring everyone in like moths to a flame. And now, my friends, I’m ready to share my wisdom with you. So, buckle up, grab your mixing bowls, and let’s embark on this cheesy breadstick adventure together! We’re going to make homemade cheesy breadsticks that will make your taste buds sing! Forget the store-bought stuff; once you taste these, you’ll never go back.
The Magic Ingredients for Homemade Cheesy Breadsticks
Okay, let’s talk ingredients. This isn’t rocket science, but using quality ingredients makes a huge difference. Think of it like building a house – you need a strong foundation, right? Well, the same goes for breadsticks. We’re talking about flour, yeast, water, a touch of sugar, some salt, olive oil (the good stuff!), and, of course, the star of the show: CHEESE! And butter, don’t forget the butter, it’s what makes the crust divine.
For the cheese, I’m a big fan of a mozzarella and provolone blend. The mozzarella gives you that classic stretch and gooeyness, while the provolone adds a little extra flavor and depth. But hey, feel free to get creative! Pepper jack for a spicy kick? Parmesan for a nutty bite? Go wild! Just make sure you use a cheese that melts well. Nobody wants a breadstick topped with unmelted cheese pebbles. That’s just sad.
And speaking of flavor, don’t underestimate the power of garlic. Fresh garlic, minced finely, is the way to go. But if you’re short on time (or just feeling lazy), garlic powder works in a pinch. And a little sprinkle of dried oregano? Chef’s kiss! It adds that perfect touch of Italian herbiness that elevates these breadsticks to a whole new level. You can also sprinkle red pepper flakes on top to spice your **homemade cheesy breadsticks**
Gathering Your Arsenal: Tools of the Trade
Before we dive into the nitty-gritty, let’s make sure you have all the right tools. You don’t need anything fancy, but a few essentials will make your life a whole lot easier. First up, a large mixing bowl. You’ll need plenty of room to knead that dough. A stand mixer with a dough hook is a lifesaver, but if you’re feeling ambitious, you can always do it by hand. (Just be prepared for a serious arm workout!)
Next, you’ll need a baking sheet. I recommend using one with a rim to prevent any cheese from dripping onto the bottom of your oven. (Trust me, you don’t want to deal with that mess.) Parchment paper is also a must. It prevents the breadsticks from sticking to the baking sheet and makes cleanup a breeze. And finally, a pizza cutter or sharp knife for slicing the dough into strips.
From Dough to Deliciousness: The Breadstick-Making Process
Alright, let’s get down to business. The first step is activating the yeast. This is crucial for getting that light and airy texture we’re after. Simply mix the yeast with warm water and a pinch of sugar, and let it sit for about 5-10 minutes until it gets nice and foamy. If it doesn’t foam, your yeast is dead. Toss it and start over. Nobody wants flat, lifeless breadsticks.
Next, combine the flour, salt, and the yeast mixture in your mixing bowl. Add the olive oil and start mixing until a dough forms. Knead the dough for about 5-7 minutes, until it becomes smooth and elastic. If you’re using a stand mixer, let it do the work for you. If you’re kneading by hand, get ready to flex those muscles!
Place the dough in a lightly oiled bowl, cover it with a damp towel, and let it rise in a warm place for about an hour, or until it doubles in size. This is where the magic happens. As the yeast works its magic, the dough will transform from a dense lump into a fluffy, cloud-like mass.
Once the dough has risen, punch it down (it’s strangely satisfying), and roll it out into a large rectangle. Brush it with melted butter and sprinkle generously with your cheese blend. Use a pizza cutter or sharp knife to slice the dough into strips.
Twist each strip a few times to create that classic breadstick shape, and place them on a parchment-lined baking sheet. Bake in a preheated oven at 375°F (190°C) for about 12-15 minutes, or until golden brown and bubbly.
Cheese Glorious Cheese: The Finishing Touches
Once the breadsticks are out of the oven, brush them with more melted butter (because why not?) and sprinkle with garlic powder and dried oregano. Let them cool slightly before serving.
And there you have it! Homemade cheesy breadsticks that are guaranteed to impress. Serve them with your favorite dipping sauce (marinara is a classic), or enjoy them on their own. They’re perfect as an appetizer, a side dish, or even a midnight snack. Just be warned: they’re highly addictive!
These **homemade cheesy breadsticks** are fantastic for dipping.
Troubleshooting Your Breadstick Baking
So, you’ve followed the recipe to a T, but your breadsticks didn’t turn out quite as expected? Don’t panic! Baking can be tricky, and there are a few common pitfalls to watch out for.
If your breadsticks are flat and dense, your yeast may not have been active. Make sure to check the expiration date on your yeast and use warm (but not hot) water to activate it.
If your breadsticks are too hard, you may have overbaked them. Keep a close eye on them in the oven and remove them when they’re golden brown and the cheese is melted and bubbly.
And if your breadsticks are sticking to the baking sheet, make sure to use parchment paper or a silicone baking mat.
Remember, practice makes perfect! The more you bake these homemade cheesy breadsticks, the better you’ll get.
Frequently Asked Questions About Breadsticks
Got questions? I’ve got answers! Here are some of the most common questions I get asked about making homemade cheesy breadsticks:
*Can I use different types of flour?*
Yes! While all-purpose flour is the most common choice, you can also use bread flour for a chewier texture.
*Can I make the dough ahead of time?*
Absolutely! You can prepare the dough up to 24 hours in advance and store it in the refrigerator. Just let it come to room temperature before rolling it out.
*Can I freeze the breadsticks?*
You sure can! Bake the breadsticks as directed, let them cool completely, and then wrap them tightly in plastic wrap and foil. Freeze for up to 2 months. Reheat in the oven until warm.
The Final Breadstick Verdict
So there you have it! Everything you need to know to make the most amazing homemade cheesy breadsticks you’ve ever tasted. It’s a labor of love, but trust me, it’s worth it. The look on your friends’ and family’s faces when they bite into those warm, cheesy, garlicky breadsticks? Priceless.
Now go forth and bake, my friends! And don’t forget to share your cheesy breadstick creations with me on social media. I can’t wait to see what you come up with! And remember, even if your first batch isn’t perfect, don’t give up. Keep practicing, keep experimenting, and keep enjoying the process. Because at the end of the day, that’s what baking is all about. Happy baking! I am so excited for you to bake your **homemade cheesy breadsticks**
(Personal anecdote formated as paragraph subheading)
My nephew, who’s notoriously picky, devoured an entire plate of these! He even asked for seconds, which is basically a miracle in my book. That’s when I knew I had a winning recipe.
Conclusion for Homemade Cheesy Breadsticks :
So there you have it – your guide to creating the most delightful Homemade Cheesy Breadsticks this side of Italy (or your kitchen, at least!). Remember the importance of happy yeast, don’t be shy with the cheese, and feel free to get creative with your toppings and dips. The reward is a batch of warm, gooey breadsticks that are perfect for sharing (or not – we won’t judge!). Get ready to bake some cheesy goodness and make some memories.
Print
Homemade Cheesy Breadsticks
Delicious homemade cheesy breadsticks recipe with detailed instructions and nutritional information.
- Total Time: 35 minutes
- Yield: 4 servings
Ingredients
- All-purpose flour: 3 cups
- Active dry yeast: 2 1/4 teaspoons
- Warm water: 1 1/4 cups (105-115°F)
- Sugar: 1 tablespoon
- Salt: 1 teaspoon
- Olive oil: 2 tablespoons, plus more for brushing
- Shredded mozzarella cheese: 2 cups
- Garlic powder: 1 tablespoon
Instructions
- Step 1: In a large bowl, dissolve yeast and sugar in warm water. Let stand for 5-10 minutes until foamy.
- Step 2: Add olive oil, salt, and 2 cups of flour to the yeast mixture. Mix until combined. Gradually add the remaining flour, mixing until a soft dough forms.
- Step 3: Turn dough out onto a lightly floured surface and knead for 5-7 minutes, or until smooth and elastic. Place the dough in a lightly oiled bowl, turning to coat. Cover with plastic wrap and let rise in a warm place for 1 hour, or until doubled in size.
- Step 4: Preheat oven to 400°F (200°C). Punch down the dough and divide it in half. Roll each half into a 12×8 inch rectangle. Cut each rectangle into 1-inch wide strips.
- Step 5: Place breadsticks on a baking sheet lined with parchment paper. Brush with olive oil, then sprinkle with garlic powder and mozzarella cheese.
- Step 6: Bake for 12-15 minutes, or until golden brown and the cheese is melted and bubbly. Serve warm.
Notes
- Store cooled breadsticks in an airtight container at room temperature for up to 2 days, or in the refrigerator for up to 4 days.
- Reheat breadsticks in a 350°F oven for 5-7 minutes to restore their warm, cheesy goodness.
- Serve these cheesy breadsticks with marinara sauce or your favorite dipping sauce for a tasty appetizer or side dish.
- For an extra flavorful dough, let the dough rise in a slightly warmer spot to enhance the yeast's activity and create a better texture.
- Prep Time: 15 minutes
- Cook Time: 20 minutes
- Method: Stovetop
- Cuisine: American
FAQs :
What’s the secret to perfectly soft and chewy Homemade Cheesy Breadsticks?
Ah, the million-dollar question! The key, my friend, lies in a happy, well-fed yeast. Make sure your water is warm, not scalding, when activating it. Think lukewarm bath water, not volcanic hot spring. Also, don’t skimp on the resting time! Letting the dough rise properly is crucial for that airy, light texture. And finally, a little bit of olive oil brushed on before baking helps create a lovely golden crust that’s both soft and slightly crisp. Trust me; patience and happy yeast are your best friends here.
Can I customize my Cheesy Breadsticks at home with different cheeses or toppings?
Absolutely! This recipe is just a blank canvas for your cheesy dreams. Feel free to experiment with different cheese blends. A mix of mozzarella, provolone, and parmesan is a classic, but don’t be afraid to throw in some cheddar or even a sprinkle of feta for a tangy twist. As for toppings, consider garlic powder, onion flakes, dried herbs like oregano or basil, or even a pinch of red pepper flakes for a little heat. The possibilities are endless, so get creative and make them your own.
How do I store leftover Cheesy Breadsticks to keep them fresh?
Storing these tempting treats correctly is essential to maintain their deliciousness. Once they’ve cooled completely, wrap them tightly in foil or plastic wrap. Alternatively, you can place them in an airtight container. Stored this way, they’ll stay fresh at room temperature for a day or two. For longer storage, pop them in the fridge, where they’ll last for up to a week. Reheat them gently in the oven or microwave before serving to revive their warmth and cheesy goodness.
What’s the best dipping sauce to serve with Homemade Cheesy Breadsticks?
Oh, the dipping sauce dilemma! While marinara sauce is a timeless classic and an excellent choice, don’t limit yourself. A creamy garlic parmesan dip is always a crowd-pleaser. Ranch dressing is another fantastic option, especially for kids (and let’s be honest, some adults too!). For something a little different, try a balsamic glaze for a sweet and tangy contrast, or even a simple pesto. Experiment and find your perfect pairing; your taste buds will thank you!


Leave a Comment