


Imagine biting into a slice of heaven – Grandma’s Famous Sweet Potato Butter Cake: How to Make an Irresistible Classic. The aroma alone, a symphony of warm spices and sweet potatoes, will transport you straight back to her cozy kitchen.
This isn’t just any cake; it’s a hug in dessert form, a memory made edible. It’s the kind of cake that vanishes in minutes, leaving behind only crumbs and satisfied smiles.
- Effortlessly simple to bake, even if you’re not a seasoned pro.
- The moist, buttery texture combined with sweet potato creates an unparalleled flavor explosion.
- Its golden-brown hue and delicate crumb make it a visually stunning centerpiece for any table.
- Perfect for holidays, birthdays, or simply to brighten up a regular afternoon.
Ingredients for Grandma’s Famous Sweet Potato Butter Cake: How to Make an Irresistible Classic
Here’s what you’ll need to make this delicious dish:
The full ingredients list, including measurements, is provided in the recipe card directly below.
How to Make Grandma’s Famous Sweet Potato Butter Cake: How to Make an Irresistible Classic
Follow these simple steps to prepare this delicious dish:
Step 1: Prepare the Sweet Potatoes
Wash, peel, and cube the sweet potatoes. Boil them until tender, then mash until smooth. You’ll need about 1 cup of mashed sweet potato. Let cool slightly before using.
Step 2: Cream Butter and Sugar
In a large bowl, cream together the softened unsalted butter and both granulated and brown sugars until light and fluffy. This step is crucial for incorporating air into the batter.
Step 3: Add Eggs and Vanilla
Beat in the eggs one at a time, then stir in the vanilla extract. Make sure each egg is fully incorporated before adding the next.
Step 4: Combine Dry Ingredients
In a separate bowl, whisk together the all-purpose flour, baking powder, baking soda, cinnamon, nutmeg, ginger, and salt.
Step 5: Alternate Wet and Dry Ingredients
Gradually add the dry ingredients to the wet ingredients, alternating with the milk, beginning and ending with the dry ingredients. Mix until just combined. Be careful not to overmix.
Step 6: Fold in Sweet Potato
Gently fold in the mashed sweet potato until evenly distributed throughout the batter.
Step 7: Bake the Cake
Pour the batter into a greased and floured 9×13 inch baking pan. Bake in a preheated oven at 350°F (175°C) for 30-35 minutes, or until a wooden skewer inserted into the center comes out clean.
Step 8: Cool and Serve
Let the cake cool in the pan for 10 minutes before transferring it to a wire rack to cool completely. Dust with powdered sugar or frost with your favorite cream cheese frosting, if desired. Slice and serve warm or at room temperature.
This sweet potato butter cake is amazing on its own, but a scoop of vanilla ice cream will make it even better!
Grandma’s Famous Sweet Potato Butter Cake: How to Make an Irresistible Classic. A journey back in time, one delicious slice at a time. This isn’t just a recipe; it’s a family saga told through the comforting aroma of sweet potatoes and the rich embrace of butter. Forget fancy techniques and complicated steps. We’re diving headfirst into the heart of home cooking, where love is the secret ingredient.
It all started with Grandma Betty, a woman whose hugs could cure any ailment and whose baking was legendary. Her sweet potato butter cake wasn’t just a dessert; it was a symbol of family gatherings, cozy evenings, and the unwavering belief that everything would be alright as long as there was cake.
My first encounter with this masterpiece was at my eighth birthday party. Picture this: a slightly lopsided cake, adorned with candles bravely defying gravity, and a crowd of sugar-fueled children buzzing with excitement. One bite, and I was hooked. The creamy sweetness, the subtle spice, the melt-in-your-mouth texture – it was pure magic.
Years later, armed with a flour-dusted apron and a burning desire to recreate that magic, I begged Grandma Betty for her recipe. What followed was a series of hilarious kitchen mishaps, countless phone calls for clarification, and a newfound appreciation for the art of baking.
Now, I’m sharing that treasured recipe with you. Consider it a culinary inheritance, passed down with love and a generous helping of butter. Get ready to bake a cake that will not only tantalize your taste buds but also warm your soul.
Gathering Your Ingredients for Sweet Potato Butter Cake
Before we embark on this sweet adventure, let’s gather our supplies. Think of this as assembling your team for a delicious mission. Don’t worry if your kitchen isn’t perfectly organized; Grandma Betty certainly wasn’t! The important thing is to have everything within reach so you can focus on the fun part: creating edible art.
Here’s what you’ll need:
- 3 cups all-purpose flour: The foundation of our cake, providing structure and substance.
- 2 teaspoons baking powder: Our leavening agent, giving the cake its light and airy texture.
- 1 teaspoon baking soda: A little extra lift and a touch of tenderness.
- 1 teaspoon ground cinnamon: Warm, comforting spice that complements the sweet potato perfectly.
- 1/2 teaspoon ground nutmeg: Adds a hint of nutty complexity.
- 1/4 teaspoon ground cloves: A touch of warmth and depth. Don’t overdo it!
- 1/2 teaspoon salt: Enhances the flavors and balances the sweetness.
- 1 cup (2 sticks) unsalted butter, softened: The star of the show, providing richness and moisture.
- 2 cups granulated sugar: Sweetness personified.
- 4 large eggs: Binds the ingredients together and adds richness.
- 1 teaspoon vanilla extract: A touch of aromatic magic.
- 1 cup mashed sweet potato: The secret ingredient that makes this cake so special. Make sure it’s smooth and lump-free.
- 1 cup buttermilk: Adds moisture and tanginess.
- For the Buttercream Frosting:
- 1 cup (2 sticks) unsalted butter, softened: More butter! Because why not?
- 4 cups powdered sugar: Sweet, fluffy perfection.
- 1/2 cup milk: To achieve the perfect consistency.
- 1 teaspoon vanilla extract: Because vanilla makes everything better.
A Word on Sweet Potatoes
Now, let’s talk sweet potatoes. Not all sweet potatoes are created equal. For this cake, you want the kind with the deep orange flesh, the ones that practically ooze sweetness when roasted. Roasting is key here, folks. It brings out the natural sugars and intensifies the flavor.
Don’t even think about boiling them. Roasting caramelizes the sugars, creating a depth of flavor that boiling simply can’t match. Plus, it’s a whole lot easier. Just toss them in the oven, forget about them for an hour, and voila! Perfectly roasted sweet potatoes ready to be mashed into golden goodness.
And speaking of mashing, make sure those potatoes are smooth. Lumpy sweet potatoes are the enemy of a smooth, velvety cake. Use a potato masher, a ricer, or even a food processor to achieve the desired consistency.
Mixing the Batter: The Heart of the Cake
Alright, team, it’s time to get our hands dirty (or, more accurately, floury). This is where the magic truly happens. Follow these steps carefully, and you’ll be well on your way to sweet potato butter cake nirvana.
1. Preheat your oven to 350°F (175°C). Grease and flour a 9×13 inch baking pan. This prevents the cake from sticking and ensures easy removal.
2. In a large bowl, whisk together the flour, baking powder, baking soda, cinnamon, nutmeg, cloves, and salt. This ensures that the dry ingredients are evenly distributed.
3. In a separate bowl, cream together the softened butter and sugar until light and fluffy. This is where your arm muscles get a workout. A stand mixer makes this step a breeze, but Grandma Betty always did it by hand.
4. Beat in the eggs one at a time, then stir in the vanilla extract. Make sure each egg is fully incorporated before adding the next.
5. In a small bowl, combine the mashed sweet potato and buttermilk. This mixture adds moisture and flavor to the cake.
6. Gradually add the wet ingredients to the dry ingredients, alternating with the sweet potato mixture, beginning and ending with the dry ingredients. Mix until just combined. Be careful not to overmix! Overmixing develops the gluten in the flour, resulting in a tough cake.
7. Pour the batter into the prepared pan and spread evenly.
8. Bake for 30-35 minutes, or until a toothpick inserted into the center comes out clean.
9. Let the cake cool in the pan for 10 minutes before inverting it onto a wire rack to cool completely.
The Importance of Softened Butter
Let’s pause for a moment to discuss the importance of softened butter. This is not just a suggestion; it’s a commandment. Softened butter creams together with the sugar to create tiny air pockets that contribute to the cake’s light and fluffy texture.
Cold butter will clump and resist creaming, resulting in a dense, heavy cake. Melted butter, on the other hand, will create a greasy, oily mess. The ideal consistency is room temperature butter that yields easily to pressure but still holds its shape.
If you forget to take the butter out of the fridge in advance (we’ve all been there), you can try a few tricks. You can microwave it for a few seconds, but be careful not to melt it. You can also grate it with a cheese grater or place it in a sealed bag and whack it with a rolling pin. Whatever you do, don’t skip this crucial step.
Crafting the Dreamy Buttercream Frosting
No sweet potato butter cake is complete without a generous slathering of creamy, dreamy buttercream frosting. This frosting is the perfect complement to the cake’s warm, spiced flavors.
1. In a large bowl, cream together the softened butter and powdered sugar until light and fluffy. Again, a stand mixer is your friend here.
2. Gradually add the milk, one tablespoon at a time, until you reach the desired consistency. Be careful not to add too much milk, or the frosting will be too thin.
3. Stir in the vanilla extract.
4. Frost the cooled cake. You can use a spatula, a knife, or even a piping bag for a more professional look.
Frosting Tips and Tricks
- For an extra smooth frosting, sift the powdered sugar before adding it to the butter.
- If your frosting is too thick, add a little more milk, one teaspoon at a time.
- If your frosting is too thin, add a little more powdered sugar, one tablespoon at a time.
- To create a perfectly smooth finish, dip your spatula in warm water before frosting the cake.
Perfecting the Cooking Process

To ensure an efficient and delicious cake-making experience, start by roasting the sweet potatoes ahead of time. While the cake bakes, prepare your buttercream frosting so it’s ready to go as soon as the cake cools.
Add Your Touch
Feel free to experiment! Try adding chopped nuts, like pecans or walnuts, to the batter. A dash of maple extract in the frosting can elevate the flavor. Consider a cream cheese frosting for a tangier twist.
Storing & Reheating
Store leftover cake in an airtight container at room temperature for up to three days. For longer storage, refrigerate the cake. If you wish to reheat the cake, gently microwave each slice for a few seconds.
- Roasting sweet potatoes intensifies their sweetness, making the cake richer and more flavorful.
- Don’t overmix the batter; gently fold the ingredients together to prevent a tough cake.
- Ensure the butter is properly softened for a light and fluffy buttercream frosting.
(Personal anecdote formated as paragraph subheading)
I once forgot the vanilla extract and my friend said it tasted like sadness. Don’t forget the vanilla! It makes all the difference in this sweet potato butter cake recipe.
Conclusion for Grandma’s Famous Sweet Potato Butter Cake: How to Make an Irresistible Classic
Grandma’s famous sweet potato butter cake isn’t just a recipe; it’s a hug from the past, baked with love and simple ingredients. Remember to use quality sweet potatoes, don’t skimp on the butter, and be patient throughout the process. Whether you stick to the classic recipe or add your own little twist, this cake is guaranteed to be a showstopper. So go ahead, bake up a batch of this irresistible treat and share the warmth with your loved ones. They’ll thank you for it, and Grandma would be proud.
Print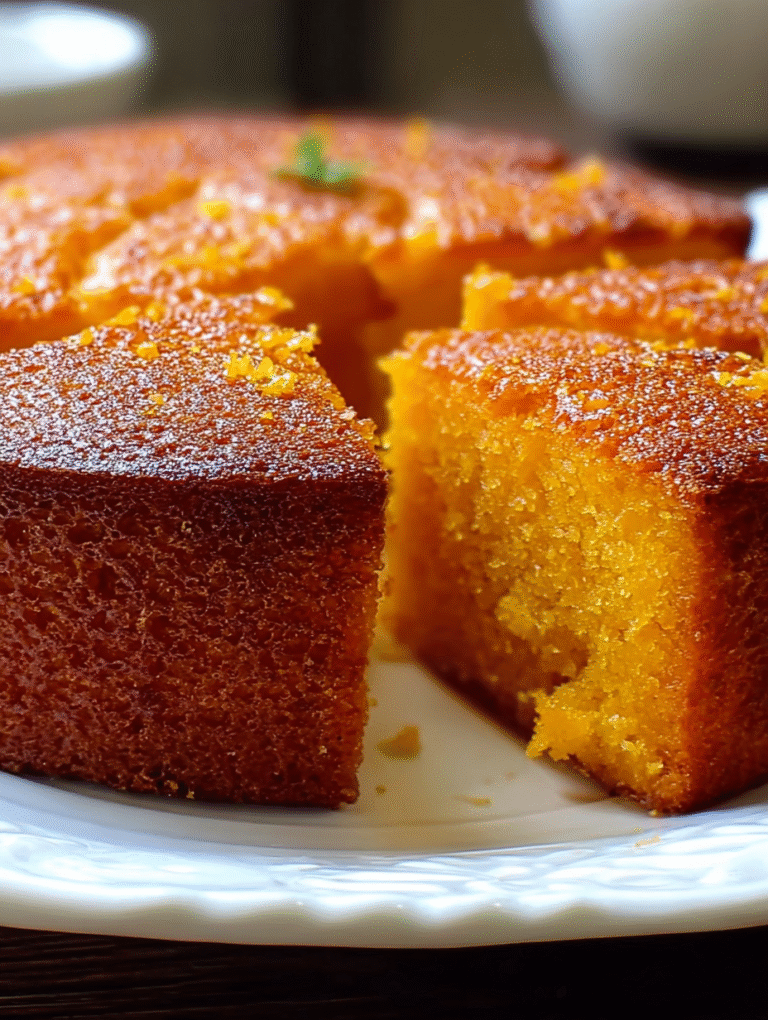
Grandma’s Famous Sweet Potato Butter Cake: How to Make an Irresistible Classic
Delicious grandma’s famous sweet potato butter cake: how to make an irresistible classic recipe with detailed instructions and nutritional information.
- Total Time: 35 minutes
- Yield: 4 servings
Ingredients
- Sweet Potatoes, cooked and mashed: 2 cups
- All-Purpose Flour: 2 1/2 cups
- Granulated Sugar: 2 cups
- Unsalted Butter, softened: 1 cup (2 sticks)
- Eggs: 3 large
- Buttermilk: 1 cup
- Baking Soda: 1 teaspoon
- Vanilla Extract: 1 teaspoon
Instructions
- Step 1: Preheat oven to 350°F (175°C). Grease and flour a 9×13 inch baking pan.
- Step 2: In a large bowl, cream together the softened butter and granulated sugar until light and fluffy. Beat in the eggs one at a time, then stir in the vanilla extract.
- Step 3: In a separate bowl, whisk together the flour and baking soda.
- Step 4: Gradually add the dry ingredients to the wet ingredients, alternating with the buttermilk, beginning and ending with the dry ingredients. Mix until just combined, do not overmix.
- Step 5: Stir in the mashed sweet potatoes until evenly distributed.
- Step 6: Pour the batter into the prepared pan and bake for 30-35 minutes, or until a wooden skewer inserted into the center comes out clean. Let cool completely before frosting (optional) and serving.
Notes
- Store leftover cake tightly wrapped at room temperature for up to 3 days, or in the refrigerator for up to a week.
- For a warm and comforting treat, gently reheat individual slices in the microwave for 15-20 seconds.
- Serve this sweet potato butter cake with a dollop of whipped cream or a dusting of powdered sugar for an elegant finish.
- Chef's Tip: Make sure your sweet potatoes are completely cool before mashing and adding to the batter to prevent the butter from melting and affecting the cake's texture.
- Prep Time: 15 minutes
- Cook Time: 20 minutes
- Method: Stovetop
- Cuisine: American
FAQs
What makes Grandma’s sweet potato butter cake recipe so special?
Well, darling, Grandma’s secret wasn’t just in the ingredients, though those were important, of course. It was the love baked right in! She always said the key to a truly irresistible cake was patience and using the best sweet potatoes you could find. The combination of the spices, the creamy butter, and those sweet potatoes created a texture that’s unbelievably moist and a flavor that just sings of warmth and home. It’s a taste of nostalgia in every single bite, a memory you can savor. Plus, it’s shockingly easy to make once you get the hang of it!
Can I substitute anything for the butter in sweet potato butter cake?
Okay, let’s talk butter. It’s the backbone of this cake, giving it that melt-in-your-mouth tenderness. While I wouldn’t recommend skipping it altogether, you *could* try using a blend of half butter and half coconut oil for a slightly healthier twist and a subtle coconut flavor. Margarine might work in a pinch, but be warned, it won’t have the same rich flavor. Just remember, butter is what Grandma used, and she knew a thing or two about baking a phenomenal cake. Think carefully before you mess with perfection!
How do I keep my sweet potato cake from becoming dry?
Ah, the dreaded dry cake! No one wants that. First, make sure you’re not over-baking it. Use a toothpick to check for doneness; it should come out clean or with just a few moist crumbs attached. Second, don’t skimp on the butter! It’s essential for moisture. Third, consider adding a bit of applesauce to the batter. And finally, once it’s cooled slightly, wrap it tightly in plastic wrap to lock in that delicious moisture. Follow these tips, and your sweet potato butter cake will be moist and delightful.
How can I make Grandma’s famous sweet potato butter cake ahead of time?
This cake is actually a champion make-ahead dessert! Bake it a day or two in advance, let it cool completely, then wrap it tightly in plastic wrap and store it in the refrigerator. The flavors actually meld together and intensify over time, making it even more delicious. When you’re ready to serve it, just let it come to room temperature. A light dusting of powdered sugar adds a lovely touch. Just like Grandma always said, a little planning goes a long way!


Leave a Comment