


The first chill of winter demands something decadent and nostalgic. Forget the mug; we baked the coziest drink of the season into a chewy, fudgy delight.
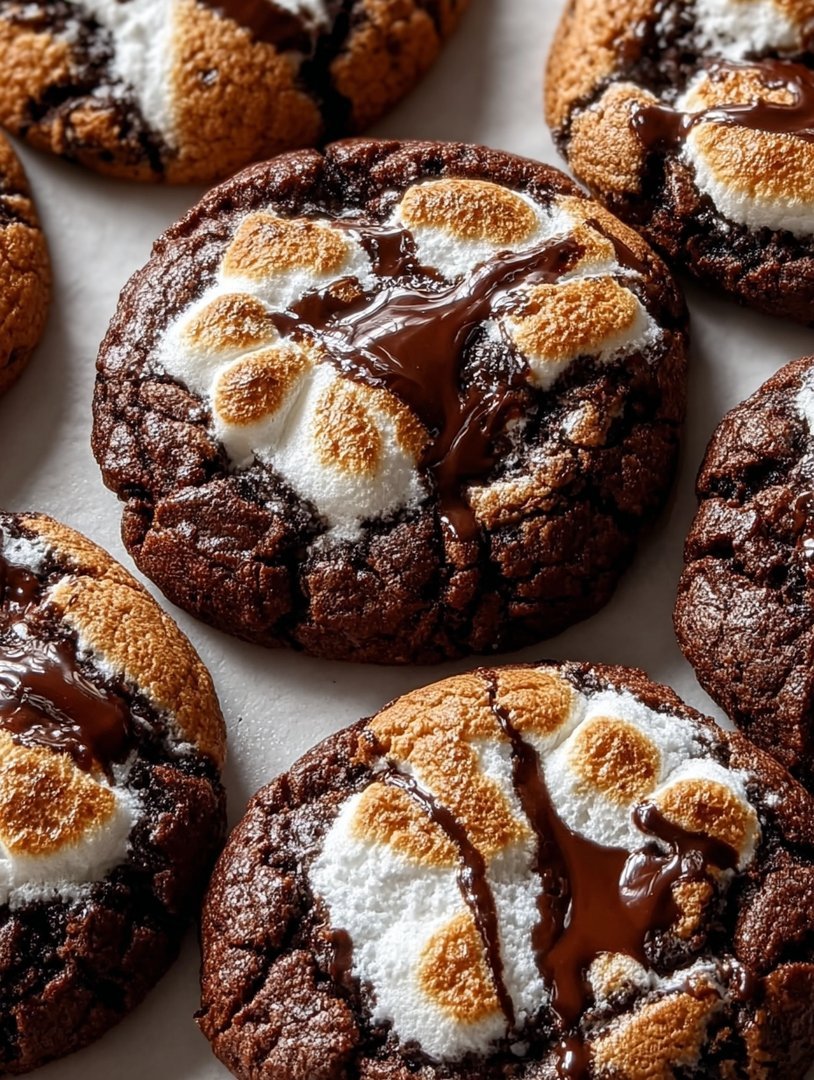
These incredibly satisfyingGluten Free Hot Chocolate Cookiesdeliver that instant warmth, complete with a molten marshmallow surprise inside every single bite.
- Achieve maximum fudgy texture without any gluten, making these cookies friendly for all dessert lovers at your next gathering.
- The intense dark cocoa flavor is perfectly balanced by sweet miniature marshmallows that melt dramatically during baking for a gooey center.
- Visually stunning, these cookies feature a beautiful cracked surface dusted with powdered sugar, resembling fresh snow on a dark night.
- They are versatile enough to serve at holiday parties, cozy movie nights, or simply enjoyed dipped into a fresh cup of coffee or milk.
The Secret to the Perfect Winter Cookie
There is a specific kind of culinary magic that happens when you take a classic comfort beverage and transform it into a portable, handheld dessert. My initial attempts at turning hot chocolate into a cookie were frankly disastrous; I ended up with flat, crumbly hockey pucks that tasted vaguely of sadness and powdered cocoa. After much trial and error—and one unfortunate incident involving a smoking oven and mandatory kitchen evacuation—I finally cracked the code.
The real trick to achieving that signature fudgy chewiness in a gluten-free format lies in balancing the dry ingredients. You cannot just swap out wheat flour for a standard gluten-free blend and expect success; that path leads to dryness and heartbreak. We use a combination of almond flour and a specific starch blend to ensure the cookies stay moist, dense, and wonderfully chewy. This recipe focuses on creating the textural experience of a decadent brownie, enhanced by the deep, slightly bitter notes of high-quality cocoa powder.
When you pull these beautiful treats from the oven, they will appear slightly puffy. Allow them a full five minutes to cool on the baking sheet before transferring them to a wire rack. This critical resting period solidifies the marshmallow center and guarantees the cookies do not fall apart when you move them. Trust me on this—patience is the key to preventing a marshmallow massacre.
Why Gluten Free Baking Isn’t Scary
Many home bakers avoid gluten-free recipes because they fear the results will be sandy, brittle, or just plain weird. However, modern gluten-free baking has evolved dramatically. When making theseGluten Free Hot Chocolate Cookies, we capitalize on ingredients that naturally provide structure and moisture. Almond flour, rich in fat and protein, contributes tenderness and a subtly nutty undertone, preventing the typical brittleness associated with rice-heavy blends.
We are using cocoa powder not just for flavor, but also for its structural benefits. Cocoa powder is acidic and reacts beautifully with baking soda, giving these cookies the lift they need to stay soft in the center while developing that coveted crinkled exterior. By ensuring the butter and sugar are properly creamed—a process that whips air into the mixture—you set the foundation for a cookie that is both lofty and moist. You are not sacrificing flavor or texture; you are simply optimizing ingredients for superior results.
Choosing Your Cocoa
When discussing the heart of this recipe, the cocoa powder quality is non-negotiable. Please, step away from that dusty tin of generic baking cocoa lurking in the back of your pantry. For maximum impact, you should seek out Dutch-process cocoa. Dutch-process cocoa has been treated with an alkali solution to neutralize its acidity. This process deepens its color—making the cookies intensely dark and rich—and mellows the flavor, giving it that classic, smooth hot chocolate profile we crave.
If you only have natural cocoa powder, the cookies will still be good, but they will taste sharper and slightly less decadent. Remember, the difference between a good cookie and an unforgettable cookie often comes down to the quality of a single, central ingredient. Investing in premium cocoa means investing in pure, unadulterated winter comfort.
Ingredients for Gluten Free Hot Chocolate Cookies
Here’s what you’ll need to make this delicious dish:
- Gluten-Free Flour BlendUse a high-quality, cup-for-cup gluten-free blend that contains xanthan gum for the best structure and texture.
- Almond FlourThis adds moisture and fat content, contributing to the fudgy texture and preventing the cookies from becoming too dry.
- Dutch-Process Cocoa PowderEssential for that deep, dark color and smooth, intense hot chocolate flavor profile.
- Baking Soda and Baking PowderThis combination provides the necessary lift and aids in achieving the signature crinkled texture on top.
- SaltA crucial flavor enhancer that balances the sweetness and deepens the richness of the cocoa.
- Unsalted ButterEnsure it is softened to room temperature for optimal creaming with the sugars, creating a light and airy base.
- Brown Sugar and Granulated SugarUsing both sugars results in a cookie that is moist, chewy (from the brown sugar), and slightly crisp around the edges (from the white sugar).
- EggActs as a binder and adds richness; make sure it is also at room temperature for smooth incorporation.
- Alcohol-Free Vanilla ExtractProvides depth of flavor and enhances the chocolate notes beautifully.
- Miniature MarshmallowsThese are the secret ingredient, melting inside the cookie during baking to form a gooey, molten center.
- Powdered SugarUsed solely for dusting the finished cookies, adding a decorative touch reminiscent of snow.
The full ingredients list, including measurements, is provided in the recipe card directly below.
How to Make Gluten Free Hot Chocolate Cookies
Follow these simple steps to prepare this delicious dish:
-
Prepare the Dry Ingredients and Preheat
Preheat your oven to 350°F (175°C). Line two large baking sheets with parchment paper. In a medium bowl, whisk together the gluten-free flour blend, almond flour, cocoa powder, baking soda, baking powder, and salt. Whisk vigorously for about 30 seconds to ensure the leaveners are evenly distributed.
-
Cream the Fats and Sugars
In a large bowl or the bowl of a stand mixer fitted with the paddle attachment, beat the softened butter, brown sugar, and granulated sugar together on medium-high speed until the mixture is light, fluffy, and significantly paler in color. This process usually takes 3 to 4 minutes. Scrape down the sides of the bowl often.
-
Mix in Wet Ingredients
Reduce the mixer speed to low. Beat in the room-temperature egg until just combined, followed by the alcohol-free vanilla extract. Do not overmix at this stage; you want the ingredients incorporated but not whipped excessively.
-
Combine and Chill the Dough
Gradually add the dry ingredient mixture to the wet ingredients, mixing only until just a few streaks of flour remain visible. Avoid overmixing the dough, as this can result in tough cookies. Once combined, cover the bowl and chill the dough in the refrigerator for at least 30 minutes. Chilling is essential for easier handling and prevents spreading.
-
Scoop, Fill, and Bake
Using a medium cookie scoop (about 1.5 tablespoons), scoop the chilled dough. Flatten the scoop slightly and place 3-4 mini marshmallows in the center. Carefully fold the dough around the marshmallows, sealing them completely inside the cookie ball. Arrange the dough balls two inches apart on the prepared baking sheets.
-
Finish and Cool
Bake for 9 to 11 minutes. The edges should be set, but the centers will look soft and slightly puffy. Let theGluten Free Hot Chocolate Cookiescool on the baking sheet for 5 minutes before carefully transferring them to a wire rack to cool completely.
Transfer to plates and drizzle with extra melted chocolate or a dusting of powdered sugar for the perfect finishing touch.
Mastering the Melt: Tips for Success
Baking is a science, but cooking cookies is also a little bit of performance art. Achieving that ideal balance between a crisp edge and a gooey center requires careful attention to detail. If your dough is too warm when it enters the oven, it will spread rapidly, resulting in thin, crispy disks rather than thick, chewy puffs. This is why the chilling step is absolutely mandatory; it gives the fats time to firm up, ensuring minimal spreading.
Another common mistake is trying to bake these cookies at too high a temperature. Baking them at 350°F (175°C) allows the exterior to set without drying out the interior, which is crucial given the presence of marshmallows. If the temperature is too high, the marshmallows can rapidly caramelize or even burn before the cookie itself is finished baking, leading to a bitter aftertaste and a hard center.
If you find that your mini marshmallows are leaking out while baking, it means the dough was not completely sealed around them. Think of the dough as a little chocolate envelope; you must pinch all the seams tightly shut. If a tiny bit of marshmallow seepage happens, do not panic. You can gently push the warm, stray marshmallow back into the cookie using the back of a spoon immediately after they come out of the oven. This small maneuver will keep them looking neat and tidy.
Storage and Pairing Suggestions
If you miraculously manage to have any leftovers—a feat I have yet to achieve in my own household—proper storage is key to maintaining their luxurious texture. Store the cooled cookies in an airtight container at room temperature for up to four days. To regain that fresh-baked gooeyness, warm them briefly in the microwave for 10-15 seconds before serving. The warmth reactivates the melted marshmallow, returning the cookie to its prime state of decadence.
TheseGluten Free Hot Chocolate Cookiesare naturally perfect partners for a few classic winter beverages. Naturally, they pair exquisitely with a creamy mug of hot chocolate, creating a delightful meta-dessert experience. For the coffee enthusiasts, dipping one into a hot latte or Americano is an absolute revelation. The bitterness of the coffee beautifully contrasts the intense sweetness and richness of the cocoa, creating an elevated moment of comfort. They also make a fantastic addition to a holiday dessert platter, often garnering more attention than their gluten-containing cousins!
Advanced Flavor Twists
While the classic recipe is outstanding on its own, sometimes you want to take things up a notch. This recipe is highly adaptable and welcomes slight modifications to customize the flavor profile. For an adult twist, consider adding a quarter teaspoon of espresso powder to the dry ingredients; it will not make the cookie taste like coffee, but it will dramatically deepen and intensify the chocolate flavor, making it even richer.
If you prefer a little heat, try incorporating half a teaspoon of ground cinnamon and a tiny pinch of cayenne pepper—just enough to give a subtle, warming kick at the end of the bite without overwhelming the cocoa. For texture, finely chopped dark chocolate pieces can be folded into the dough along with the marshmallows, creating pockets of melted chocolate throughout the base. Remember, when adding extra mix-ins, ensure the total volume does not compromise the dough’s ability to fully seal the inner marshmallow payload.
Make Ahead Options
One of the best things about cookie dough is its freezer-friendliness. You can prepare the dough through Step 4 (combining and chilling) and store the entire ball, wrapped tightly in plastic wrap, for up to three days in the refrigerator. Alternatively, and this is my preferred method, scoop and fill the cookie balls with marshmallows as directed in Step 5. Place the finished dough balls on a tray and freeze them until solid.
Once frozen, transfer the individual cookie balls to a freezer-safe zip-top bag. They can be stored this way for up to three months. When the craving strikes—or unexpected guests arrive—you can bake them directly from frozen. Simply add 2 to 3 minutes to the total baking time. Having a stash of frozen, ready-to-bakeGluten Free Hot Chocolate Cookiesis the ultimate life hack for achieving instant comfort.
Go ahead, embrace the cocoa dust, conquer the marshmallow melt, and enjoy the pure, unadulterated pleasure of baking a perfect cookie that everyone can enjoy. This recipe transforms the cold, quiet evening into a warm, celebratory event. Happy baking!
The Accidental Discovery of Sunshine on a Plate
It was a truly disastrous snow day when I realized my pantry was barren, save for some cocoa powder and forgotten gluten-free flour. Desperate for warmth, I tried merging my favorite winter drink with a basic cookie recipe. The result? These incredibly rich, fudgy, and intensely comfortingGluten Free Hot Chocolate Cookies—pure unexpected delight!
Life has a funny way of delivering perfection when you least expect it. My quest started as a frantic attempt to produce something remotely cozy during a weekend trapped indoors. I envisioned a humble chocolate chip cookie, but my inventory whispered secrets of cocoa powder and tiny marshmallows. Could the world handle a cookie that tasted exactly like a mug of decadent hot cocoa, only denser and more chewable? Spoiler alert: Yes. The moment I pulled the first tray of these rich, dark treats from the oven, dusted lightly with powdered sugar, I knew I had stumbled upon a masterpiece worthy of its own holiday.
The Challenge of Gluten-Free Cookie Mastery
Baking gluten-free requires a specific kind of patience, often feeling less like cooking and more like alchemy. Without gluten to provide structure, cookies tend to spread into thin, tragic puddles, or alternatively, turn into dry, flavorless hockey pucks. But we are aiming for the sweet spot: crispy edges, fudgy centers, and a deep, complex chocolate flavor that makes you close your eyes and sigh dramatically. The secret lies in the balance of fats, moisture, and, crucially, chilling time.
Traditional hot chocolate relies on richness, often dairy-based, and that wonderful, slightly chalky texture of good cocoa. We capture that essence by using a quality dark cocoa powder and incorporating brown butter. Browning the butter is non-negotiable here; it lends a nutty depth that transforms these simply delicious cookies into something spectacular, banishing that bland taste sometimes associated with flourless baking.
Essential Ingredients for Baking Perfection
Before you even think about turning on that mixer, gather your weapons of delicious destruction. Precision matters, especially with this recipe, so measure everything carefully. You might need to make an extra batch, though, as these incredibleGluten Free Hot Chocolate Cookiestend to vanish before they are completely cool.
Dry Ingredients:
- 2 1/4 cups all-purpose gluten-free flour blend (ensure it contains xanthan gum)
- 3/4 cup unsweetened cocoa powder (Dutch-processed works best for deep color and flavor)
- 1 teaspoon baking soda
- 1/2 teaspoon salt
- 1/2 cup granulated sugar
- 1 1/4 cups packed light brown sugar
- 1 cup semi-sweet chocolate chips (or chunks)
Wet Ingredients:
- 1 cup (2 sticks) unsalted butter
- 2 large eggs, room temperature
- 2 teaspoons pure alcohol-free vanilla extract
The Toppings (Crucial for the ‘Hot Chocolate’ Vibe):
- 1 cup mini marshmallows (optional, but highly recommended)
- Powdered sugar for dusting
Step-by-Step Guide to Baking Bliss
This process is straightforward, but remember that timing is everything, especially when dealing with hot butter and chilling dough. Stick closely to the steps for cookies that deliver on their promise of fudgy, intense hot cocoa flavor.
- Brown the Butter:Melt the butter in a saucepan over medium heat, stirring frequently. It will foam, then sizzle, and finally, brown solids will form at the bottom. Once it smells nutty and looks amber (about 5-7 minutes), immediately transfer it to a heatproof bowl to cool slightly.
- Combine Dry Ingredients:Whisk together the GF flour blend, cocoa powder, baking soda, and salt in a medium bowl. Set this aside—we don’t want flour clouds when the mixer starts running.
- Cream Sugars and Butter:Once the brown butter is slightly cooled but still warm (not boiling hot), pour it into a large mixing bowl. Add the granulated and brown sugars. Beat on medium speed for 2 minutes until the mixture is glossy and well combined.
- Add Wet Ingredients:Beat in the eggs one at a time, mixing well after each addition. Stir in the alcohol-free vanilla extract. Scrape down the sides of the bowl to ensure everything is incorporated.
- Introduce the Dry Mix:Gradually add the flour mixture to the wet ingredients, mixing on low speed until the ingredients are just combined. Stop the mixer immediately once you see no more streaks of dry flour. Gently fold in the chocolate chips with a spatula.
- The Crucial Chill:Cover the cookie dough and refrigerate for a minimum of 30 minutes. This allows the gluten-free flours to properly hydrate, preventing the cookies from spreading too thin during baking.
- Scoop and Bake:Preheat your oven to 350°F (175°C). Line two baking sheets with parchment paper. Use a standard cookie scoop (about 2 tablespoons) to portion the dough onto the sheets, leaving about 2 inches between each cookie.
- Add the Marshmallows (Optional):Bake the cookies for 8 minutes. Remove the sheets and gently press 3-4 mini marshmallows onto the top of each cookie. Return them to the oven and continue baking for another 2–4 minutes, or until the marshmallows are lightly toasted and the edges are set.
- Cool and Dust:Allow the cookies to cool on the baking sheet for 5 minutes before transferring them to a wire rack. Once fully cooled, dust generously with powdered sugar to achieve that perfect hot cocoa foam aesthetic.
Perfecting the Cooking Process
For maximum efficiency, always start by browning the butter for depth of flavor, then allow it to cool slightly while you measure the dry ingredients. Once the dough rests, which is crucial for gluten-free baking success, get your oven preheating immediately to ensure even baking.
Why Texture is Key for Gluten Free Hot Chocolate Cookies
Achieving the right texture in these flourless treats is truly what sets them apart. We aren’t making a brownie, nor are we making a crispy snap cookie. The goal is chewy, dense, and deeply fudgy. The high ratio of cocoa powder and brown sugar contributes significantly to this dense texture, while the melted butter—browned, of course—ensures moisture is locked in. If your cookies feel dry, it’s usually an issue of over-baking or accidentally adding too much flour. Remember, gluten-free flours absorb liquid differently, so err on the side of slightly under-baked if you prefer a gooey center.
When you add the marshmallows during the last few minutes of baking, watch them carefully. They shouldn’t turn into crispy charcoal, but rather puff up and develop a light golden hue, melting slightly into the warm chocolate cookie base. This marshmallow addition is the final, festive touch that truly transforms them into a portable cup of hot chocolate magic.
Add Your Touch
Feel free to experiment! Swap standard chocolate chips for white chocolate chunks for a ‘marshmallow swirl’ effect, or introduce a pinch of cayenne pepper for a ‘Mexican hot cocoa’ kick. A teaspoon of espresso powder will deepen the chocolate flavor dramatically.
If you enjoy mint, a half-teaspoon of pure peppermint extract stirred into the wet ingredients creates incredible mint chocolate chip cocoa cookies. For those who prefer a nuttier flavor, add chopped pecans or walnuts alongside the chocolate chips. If you want a truly decadent presentation, drizzle a little melted dark chocolate over the cooled cookies before dusting them with powdered sugar. These simple adjustments mean you can make a completely different batch every week of the winter season.
Storing & Reheating
Store these decadent delights in an airtight container at room temperature for up to four days. If they lose a bit of their softness, a quick 10 seconds in the microwave brings back that glorious, gooey, freshly-baked texture, making them perfect for late-night cravings.
For longer storage, the unbaked cookie dough freezes beautifully. Scoop the dough balls onto a baking sheet, freeze solid, and then transfer them to a heavy-duty freezer bag. They will keep for up to three months. When you’re ready to bake, simply place the frozen dough balls on a lined sheet, allow them to sit at room temperature for 15 minutes, and then bake as directed, adding a minute or two to the total baking time.
- Avoid over-mixing the dough once you add the dry ingredients; mix until just combined to prevent tough cookies, maintaining that desired fudgy center.
- Chilling the cookie dough for at least 30 minutes prevents excessive spreading, ensuring thick, chewy cookies that hold their beautiful, round shape.
- Always measure your gluten-free flour blend using the spoon and level method, guaranteeing the perfect moisture balance without making the cookies cakey or dry.
My neighbor, who usually avoids baked goods, tried one of these and immediately demanded the recipe, declaring they tasted exactly like winter happiness wrapped in a blanket.
Conclusion for Gluten Free Hot Chocolate Cookies
We successfully navigated the delicate art of gluten-free baking and emerged victorious with these incredibleGluten Free Hot Chocolate Cookies. They capture all the warmth and richness of your favorite winter beverage in a convenient, handheld form. Remember the crucial steps—browning the butter, chilling the dough, and not over-mixing—to ensure that perfect fudgy texture every time. Whether you’re dealing with dietary needs or just craving intensely rich chocolate, this recipe guarantees satisfaction. Go ahead, brew a cup of tea, and enjoy the simplest pleasures life offers!
Print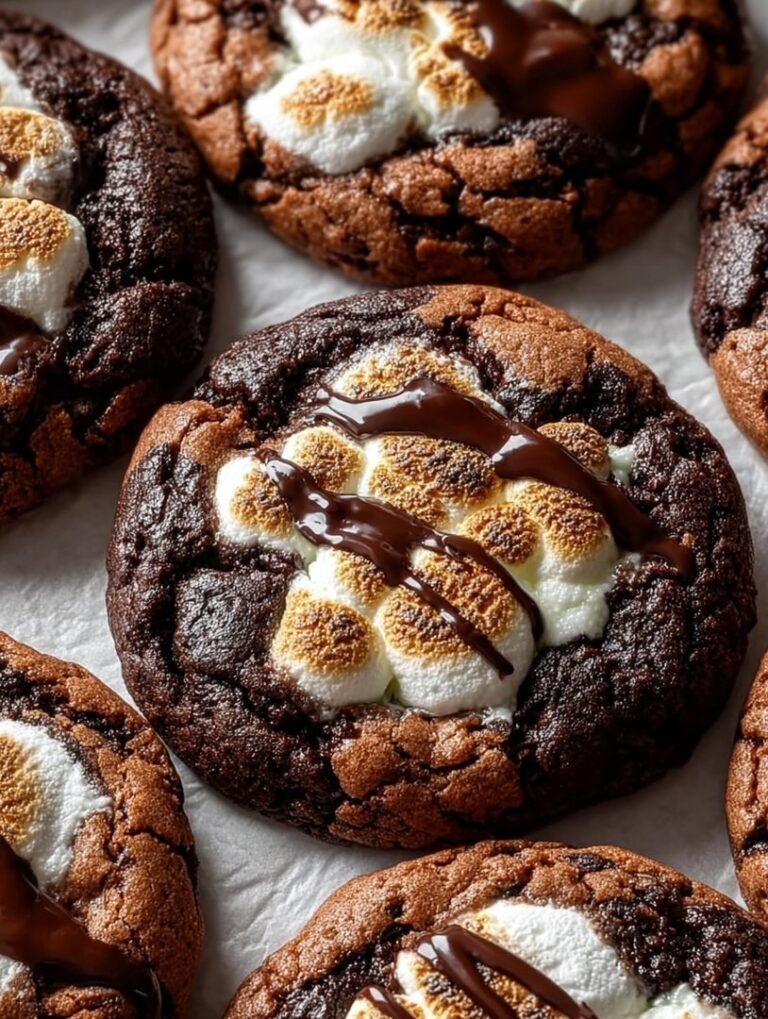
Gluten Free Hot Chocolate Cookies
These aren’t just cookies; they’re chewy, fudgy hot chocolate dreams, made safe for all! Our GF blend ensures perfect texture after creaming butter and sugar until light.
- Total Time: 35 minutes
- Yield: 4 servings
Ingredients
- Gluten-Free All-Purpose Flour Blend (with xanthan gum): 2 cups
- Unsalted Butter (softened): 1 cup (2 sticks)
- Granulated Sugar: 3/4 cup
- Large Egg: 1
- Unsweetened Cocoa Powder: 1/2 cup
- Gluten-Free Hot Chocolate Mix (powder): 1/4 cup
- Baking Soda: 1 teaspoon
- Salt: 1/2 teaspoon
Instructions
- Step 1: Preheat the oven to 350°F (175°C) and line two baking sheets with parchment paper. In a medium bowl, whisk together the GF flour blend, cocoa powder, hot chocolate mix, baking soda, and salt until uniformly combined.
- Step 2: In a separate large bowl, use an electric mixer to cream the softened butter and granulated sugar together until the mixture is light and fluffy, about 2 to 3 minutes. Beat in the large egg until it is fully incorporated.
- Step 3: Gradually add the dry ingredient mixture to the wet ingredients, mixing on low speed until the dough is just combined. Be careful not to overmix the dough once the flour is added.
- Step 4: Use a small cookie scoop or tablespoon to drop rounded balls of dough onto the prepared baking sheets, ensuring they are spaced about 2 inches apart. Lightly flatten the tops of each cookie ball if desired.
- Step 5: Bake for 9 to 11 minutes. The centers should still look slightly soft. Let the cookies cool on the baking sheet for 5 minutes before transferring them to a wire rack to cool completely.
Notes
- Store cooled cookies in an airtight container at room temperature for up to four days, adding a small piece of plain bread to the container to help them maintain a soft, chewy texture.
- To revive the fresh-baked warmth and chewiness, microwave individual cookies for just 5 to 10 seconds before serving.
- For the ultimate cozy experience, serve these rich cookies alongside a mug of warm milk or dip them in freshly whipped cream.
- If your kitchen is warm, refrigerate the portioned dough balls for 30 minutes before baking; this step prevents spreading and results in a thicker, fudgier cookie center.
- Prep Time: 15 minutes
- Cook Time: 20 minutes
- Method: Stovetop
- Cuisine: American


Leave a Comment