


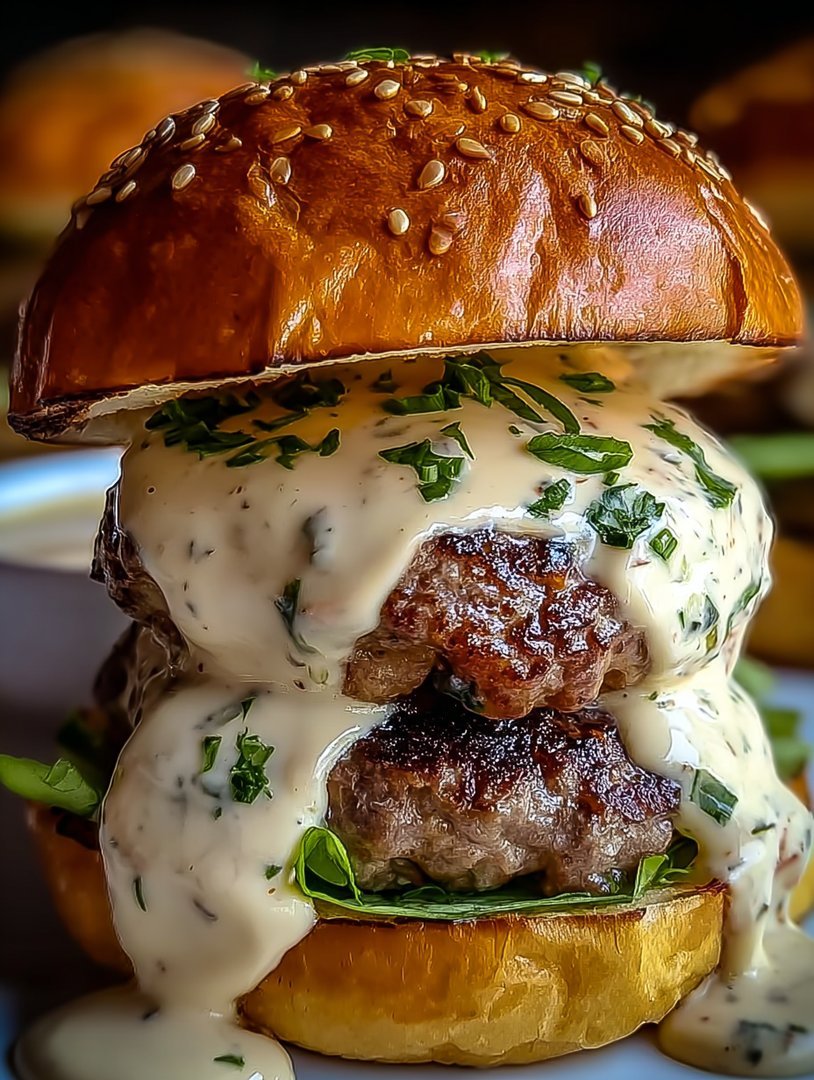
Oh, my garlic! Are you ready for a flavor explosion that will send your taste buds into overdrive? These Garlic Overload Burgers are not for the faint of heart; they’re a symphony of savory goodness, a garlicky dream come true.
Get ready to meet your new favorite burger, perfect for a casual backyard barbecue or any night you’re craving something bold. We’re talking layers upon layers of garlic-infused deliciousness that will leave you wanting more.
- Effortlessly create a restaurant-quality burger with simple steps and readily available ingredients, perfect for any home cook.
- Indulge in an intense garlic flavor, complemented by savory beef and creamy melted cheese for a truly unforgettable burger experience.
- The visually stunning burger, with its golden-brown patty and generous garlic toppings, is sure to impress both family and friends.
- Customize your burger with your favorite toppings for a satisfying meal that fits any occasion, from weeknight dinners to weekend gatherings.
Ingredients for Garlic Overload Burgers
Here’s what you’ll need to make this delicious dish:
The full ingredients list, including measurements, is provided in the recipe card directly below.
How to Make Garlic Overload Burgers
Follow these simple steps to prepare this delicious dish:
Step 1: Prepare the Garlic Mixture
In a skillet, heat olive oil over medium heat. Add minced garlic and diced onions. Sauté until the garlic is fragrant and the onions are translucent, about 5-7 minutes. Remove from heat and let cool slightly.
Step 2: Combine Ingredients
In a large bowl, combine ground beef, half of the sautéed garlic and onion mixture, garlic powder, Worcestershire sauce, beef broth, salt, and pepper. Gently mix until well combined, being careful not to overmix.
Step 3: Form the Patties
Divide the beef mixture into equal portions and form patties, making a slight indentation in the center of each patty to prevent them from bulging during cooking.
Step 4: Cook the Burgers
Heat a grill or skillet over medium-high heat. Cook the patties for 5-7 minutes per side, or until they reach your desired level of doneness. In the last minute of cooking, top each patty with cheddar cheese and allow it to melt.
Step 5: Assemble the Burgers
Toast the burger buns lightly. Spread the remaining sautéed garlic and onion mixture on the bottom bun. Place the cheesy patty on top, add your favorite toppings, and finish with the top bun.
Step 6: Serve and Enjoy
Serve immediately and enjoy the ultimate Garlic Overload Burger. These burgers are fantastic with a side of crispy fries or a fresh salad.
Perfecting the Cooking Process
To achieve burger nirvana, prep everything first. Mince your garlic, shape your patties, and have your toppings ready. This way, you can focus on getting that perfect sear and juicy interior without juggling a million tasks at once.
Add Your Touch
Feel free to go wild with customization! Try different cheeses, like provolone or pepper jack, for an extra kick. Caramelized onions or roasted red peppers also add amazing depth. Don’t be afraid to experiment with your favorite flavors!
Storing & Reheating
Leftover patties can be stored in an airtight container in the fridge for up to three days. Reheat gently in a skillet or microwave until warmed through. The flavors might even meld together and taste even better the next day!
Here are some pro tips to ensure your Garlic Overload Burgers are the talk of the town:
- Don’t overcrowd your pan. Cook the patties in batches to maintain high heat and achieve a beautiful sear.
- Use a meat thermometer to ensure your burgers are cooked to your desired level of doneness. Nobody wants a hockey puck burger!
- Rest your burgers for a few minutes after cooking to allow the juices to redistribute, resulting in a more tender and flavorful bite.
(Personal anecdote formated as paragraph subheading (very important! don’t write any title for this paragraph))
My best friend once told me these burgers were so good, they made him question all his life choices. That’s when I knew I had achieved peak burger perfection.
Conclusion for Garlic Overload Burgers :
These Garlic Overload Burgers are not for the faint of heart; they’re a flavor explosion in every bite! Remember, roasting the garlic mellows its bite, creating a sweet and savory base for the patties. Don’t be afraid to experiment with different ground meats, and get creative with your toppings. With their irresistible garlicky goodness and endless customization options, they’re sure to become a new family favorite. Prepare yourself for a burger experience that will leave you wanting more!
Print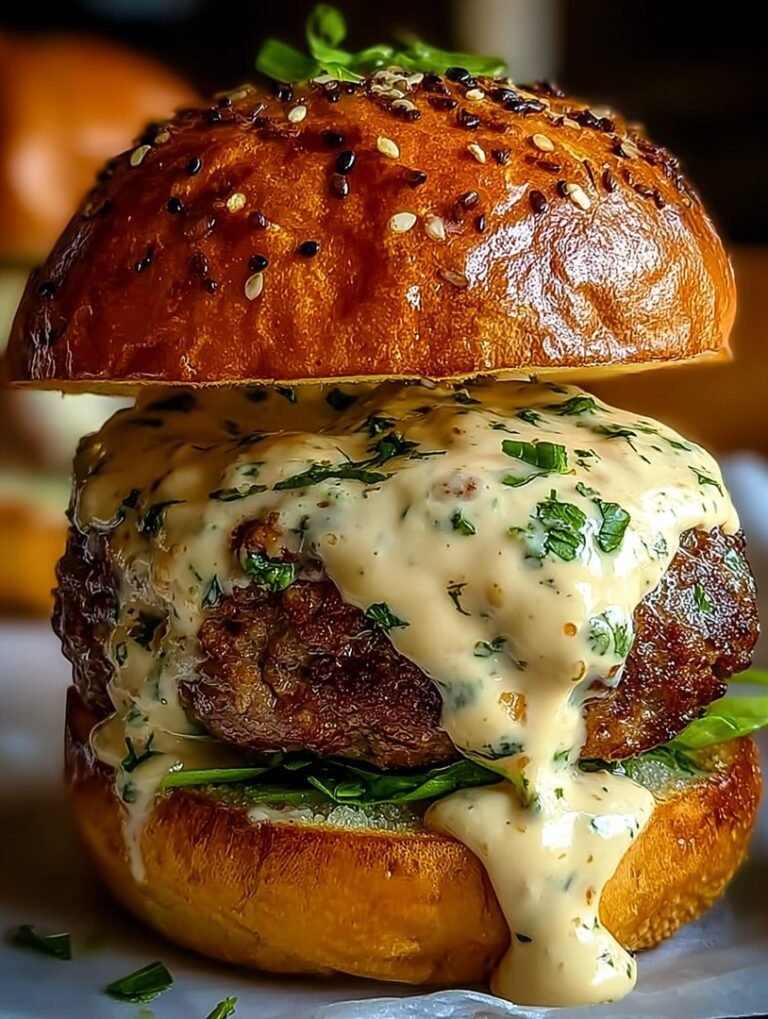
Garlic Overload Burgers
Delicious garlic overload burgers recipe with detailed instructions and nutritional information.
- Total Time: 35 minutes
- Yield: 4 servings
Ingredients
- Ground beef: 1.5 pounds
- Garlic cloves: 10-12, minced
- Garlic powder: 2 tablespoons
- Garlic salt: 1 teaspoon
- Worcestershire sauce: 1 tablespoon
- Olive oil: 2 tablespoons
- Hamburger buns: 4
- Provolone cheese slices: 4
Instructions
- Step 1: In a large bowl, gently combine the ground beef, minced garlic, garlic powder, garlic salt, and Worcestershire sauce. Be careful not to overmix.
- Step 2: Divide the mixture into 4 equal patties. Press a slight indentation into the center of each patty to prevent them from bulging while cooking.
- Step 3: Heat olive oil in a large skillet over medium-high heat. Cook the patties for 5-7 minutes per side, or until cooked through and the internal temperature reaches 160°F (71°C).
- Step 4: In the last minute of cooking, place a slice of provolone cheese on top of each patty and allow it to melt.
- Step 5: Place each cheeseburger patty on a hamburger bun and serve immediately. Add your favorite toppings, if desired (but maybe skip the garlic aioli).
Notes
- Refrigerate leftover patties in an airtight container for up to 3 days, and consider enjoying them sliced on a salad.
- For best results, gently reheat patties in a skillet with a splash of water to keep them moist, rather than microwaving.
- These burgers are intensely garlicky, so a simple lettuce and tomato topping will complement the flavor perfectly without overpowering it.
- To ensure the garlic flavor is evenly distributed, gently mix the ingredients just until combined – overmixing makes for a tougher burger.
- Prep Time: 15 minutes
- Cook Time: 20 minutes
- Method: Stovetop
- Cuisine: American
FAQs :
What makes these Garlic Overload Burgers so special?
Oh, friend, where do I even begin? Imagine sinking your teeth into a juicy burger patty, but then BAM! An explosion of garlicky goodness hits your taste buds. We’re talking roasted garlic, garlic powder, garlic salt – a symphony of garlic that’s both bold and comforting. These aren’t your average burgers; they’re a declaration of love for all things garlic. Plus, the secret sauce is a game-changer, trust me, it is going to make you question every burger you had before.
Can I use different ground meat for these burgers?
Absolutely! While I adore these Garlic Overload Burgers with ground beef (lean is always a good choice, keeps things from getting too greasy), the beauty of this recipe is its flexibility. Ground turkey or ground chicken are great lean alternatives. Lamb can add a richness that is really interesting. Just remember that leaner meats may require a little extra moisture – a touch of broth can do the trick. Experiment and find your perfect patty!
What are some good side dishes to serve with Garlic Overload Burgers?
The possibilities are endless! Crispy sweet potato fries are a classic pairing. A simple coleslaw offers a refreshing contrast to the richness of the burger. Roasted vegetables, like asparagus or broccoli, are always a healthy and delicious option. Or, if you’re feeling extra decadent, go for some garlic parmesan fries! The key is to choose sides that complement, rather than compete with, the star of the show: those glorious Garlic Overload Burgers.
How do I store leftover Garlic Overload Burgers?
If, and that’s a big “if,” you have any leftovers, storing them properly is key. Let the cooked burgers cool completely, then wrap them individually in plastic wrap or place them in an airtight container. Store them in the refrigerator for up to 3-4 days. When reheating, you can microwave them (though they might get a little less juicy), pan-fry them for a crispy exterior, or even bake them in the oven.


Leave a Comment