

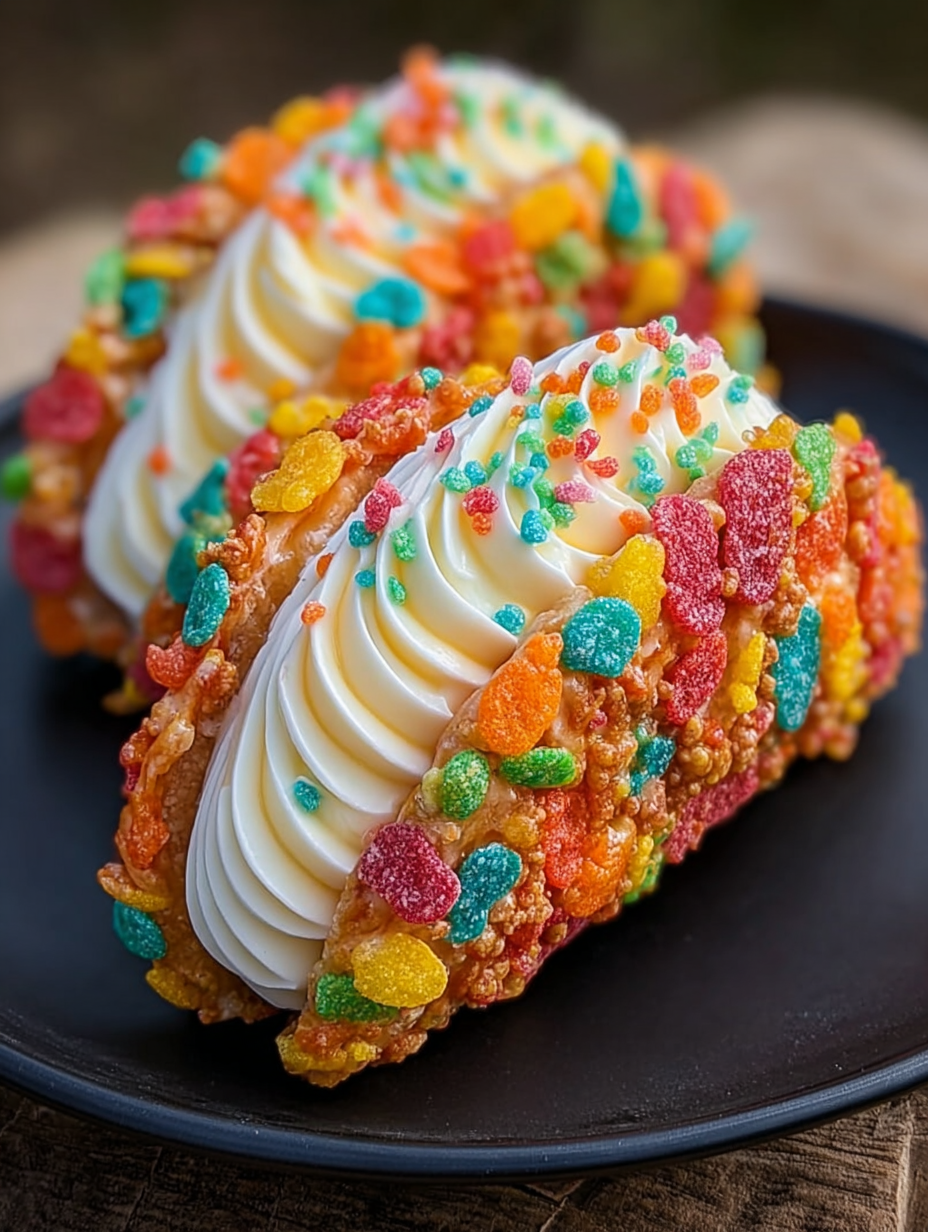
Oh, glorious day! Imagine sinking your teeth into a crispy taco shell cradling a creamy cheesecake filling, all topped with the nostalgic crunch of Fruity Pebbles. It’s a vibrant explosion of textures and flavors, guaranteed to make your inner child do the happy dance.
This isn’t just dessert; it’s an experience. Picture this: you’re the hero of your own dessert fiesta, whipping up these unbelievably easy Fruity Pebbles Cheesecake Tacos for a party, a family gathering, or even just a Tuesday night indulgence. Get ready for the applause!
Here’s why you absolutely NEED to make these Fruity Pebbles Cheesecake Tacos:
- Effortless creation ensures a delightful dessert is ready in minutes, perfect for satisfying those sudden sweet cravings.
- The tangy cheesecake filling blends seamlessly with the sugary cereal coating for a euphoric flavor combination.
- Visually stunning, these colorful tacos bring a playful and vibrant touch to any dessert table, dazzling your guests.
- Easily customizable, you can adapt the filling and toppings to match any theme or personal preference for endless fun.
Ingredients for Fruity Pebbles Cheesecake Tacos
Here’s what you’ll need to make this delicious dish:
The full ingredients list, including measurements, is provided in the recipe card directly below.
How to Make Fruity Pebbles Cheesecake Tacos
Follow these simple steps to prepare this delicious dish:
Step 1: Prepare the Fruity Pebbles Coating
Melt the butter in a microwave-safe bowl. In a separate shallow dish, spread out the Fruity Pebbles cereal.
Step 2: Coat the Wonton Wrappers
Brush both sides of each wonton wrapper with melted butter. Dip each buttered wrapper into the Fruity Pebbles, pressing gently to ensure they adhere well.
Step 3: Shape and Bake the Taco Shells
Drape the Fruity Pebbles-coated wonton wrappers over the bars of an oven rack or place them in a taco shell mold. Bake in a preheated oven at 350°F (175°C) for 5-7 minutes, or until golden brown and crispy. Let cool completely.
Step 4: Make the Cheesecake Filling
In a large bowl, beat the softened cream cheese with powdered sugar and vanilla extract until smooth and creamy. Gradually add the heavy cream and continue beating until the mixture is light and fluffy.
Step 5: Assemble the Tacos
Fill each cooled Fruity Pebbles taco shell with the cheesecake filling.
Step 6: Serve and Enjoy!
Garnish with extra Fruity Pebbles, if desired, and serve immediately for the ultimate Fruity Pebbles Cheesecake Tacos experience! These are best enjoyed fresh to maintain the taco shell’s crispness.
Perfecting the Cooking Process

To achieve the ultimate Fruity Pebbles Cheesecake Tacos, start by preparing the cheesecake filling first, allowing it to chill while you create the “taco shells.” Assemble just before serving to prevent soggy shells, ensuring each bite is a delightful textural contrast.
Add Your Touch
Feel free to experiment with different cereal coatings! Consider using cocoa or frosted flakes for a varied flavor profile. A dash of lemon zest in the cheesecake filling can also add a bright, zesty counterpoint to the sweetness. It’s all about making it your own!
Storing & Reheating
While best enjoyed immediately, leftover cheesecake filling can be stored in the refrigerator for up to three days. The “taco shells,” however, are best made fresh. Assembling ahead of time might lead to a less-than-ideal, slightly soft experience.
Here are some helpful tips to elevate your Fruity Pebbles Cheesecake Taco game:
- Don’t overmix the cheesecake filling; gentle folding keeps it light and airy. Overmixing incorporates too much air, which can lead to cracks while chilling.
- Use a non-stick skillet to make the Fruity Pebbles “taco shells.” This will make your life so much easier and help prevent sticking and burning, trust me!
- Let the cheesecake filling chill completely before assembling. Patience is a virtue, especially when it comes to achieving that perfect creamy consistency.
(Personal anecdote formated as paragraph subheading)
My niece declared these the “best dessert ever” at her birthday party. I almost teared up! Witnessing the joy on her face was proof that sometimes the silliest ideas are the most delicious.
The Whimsical World of Fruity Pebbles Cheesecake Tacos
Alright, buckle up, buttercups! We’re about to dive headfirst into a dessert so gloriously ridiculous, so unapologetically joyful, that it might just cure your existential dread. I’m talking about Fruity Pebbles Cheesecake Tacos. Yes, you read that right. Before you click away thinking I’ve finally lost it, hear me out. This isn’t just a recipe; it’s an adventure for your taste buds, a carnival for your mouth, a symphony of sweet, crunchy, creamy goodness. It is the perfect party dessert!
But how did this wild idea even come about? Well, let’s just say a late-night craving, a well-stocked pantry, and a vivid imagination collided in a spectacular explosion of culinary creativity. The result? Something so good, so unforgettable, that I simply *had* to share it with the world. Get ready to embrace the madness!
Why Fruity Pebbles Cheesecake Tacos? Because Why Not?!
Seriously, think about it. We live in a world of avocado toast and kale smoothies. Where’s the fun? Where’s the whimsy? These tacos are a rebellion against blandness, a defiant shout of “YES!” to all things colorful and delicious. They are the ultimate comfort food, elevated to an art form. These cheesecake tacos will make you the most popular chef in your friend group.
And honestly, who doesn’t love Fruity Pebbles? They’re like little edible confetti, tiny bursts of fruity flavor that instantly transport you back to Saturday morning cartoons and a carefree childhood. Combined with the rich, creamy decadence of cheesecake, they create a flavor explosion that’s both familiar and utterly surprising. This fun dessert will make you want to dance with joy.
Conquering the “Taco Shells” – A Crunchy Quest
The foundation of our edible masterpiece: the Fruity Pebbles “taco shells.” Now, these aren’t your average tortillas. We’re talking about a crispy, sugary concoction that requires a little finesse, but is totally worth the effort. Think of it as crafting edible art.
Gathering Your Crunchy Arsenal
You’ll need:
- 4 cups of Fruity Pebbles cereal (the star of the show)
- 4 tablespoons of unsalted butter, melted (our binding agent)
- 2 tablespoons of sugar (for extra sweetness and caramelization)
- A non-stick skillet (your best friend in this crunchy endeavor)
The Art of the Pebble Press
1. Gently crush the Fruity Pebbles. Not into dust, but enough to break them down a bit.
2. In a bowl, combine the crushed cereal, melted butter, and sugar. Mix well until everything is evenly coated.
3. Heat your non-stick skillet over medium heat.
4. Spoon about ¼ cup of the mixture into the skillet. Using the back of a spoon or a spatula, gently press the mixture into a thin, even circle.
5. Cook for 2-3 minutes per side, or until golden brown and crispy. Keep a close eye on them to prevent burning!
6. Carefully remove the “shell” from the skillet and immediately drape it over a taco shell mold or the handle of a wooden spoon to create the taco shape. Work quickly, as the shell will harden as it cools.
7. Repeat until you’ve created all your taco shells.
The Cheesecake Dream – Creamy, Dreamy Goodness
Now for the heart of our Fruity Pebbles Cheesecake Tacos: the cheesecake filling. This is where we bring in the smooth, creamy goodness that perfectly complements the crunchy shells.
Assembling Your Creamy Crew
You’ll need:
- 8 ounces cream cheese, softened (the foundation of our dream)
- ½ cup granulated sugar (sweet dreams are made of this)
- 1 teaspoon vanilla extract (a touch of magic)
- 1 cup heavy cream, whipped to stiff peaks (cloud-like texture)
- Optional: A few drops of food coloring (for extra whimsy!)
Crafting the Creamy Cloud
1. In a large bowl, beat the softened cream cheese and sugar together until smooth and creamy.
2. Stir in the vanilla extract.
3. Gently fold in the whipped cream until everything is just combined. Be careful not to overmix!
4. If you’re feeling extra playful, add a few drops of food coloring to create a vibrant, colorful filling.
The Grand Finale – Assembling Your Masterpiece
The moment we’ve all been waiting for! Time to bring these babies to life.
1. Carefully fill each Fruity Pebbles taco shell with the cheesecake filling.
2. Garnish with extra Fruity Pebbles, sprinkles, whipped cream, or whatever your heart desires.
3. Serve immediately and prepare for the applause!
Troubleshooting Your Taco Triumph
Even the best chefs encounter a few hiccups along the way. Here are some common issues and how to tackle them:
- **Shells falling apart?** Make sure you’re using enough butter to bind the cereal together. Also, don’t be afraid to press them firmly in the skillet.
- **Cheesecake filling too runny?** Ensure your cream cheese is properly softened and that you don’t overmix the whipped cream.
- **Tacos getting soggy?** Assemble them right before serving to maintain that perfect crunchy-creamy contrast.
Variations to Unleash Your Inner Artist
The beauty of this recipe is its versatility. Feel free to experiment and put your own spin on it!
- **Different cereal shells:** Try cocoa, frosted flakes, or any other cereal that strikes your fancy.
- **Flavorful fillings:** Add lemon zest, chocolate chips, or fruit puree to the cheesecake filling for a burst of flavor.
- **Topping temptations:** Drizzle with chocolate syrup, caramel sauce, or a sprinkle of sea salt for an extra touch of indulgence.
Embrace the Fun and Fruity Chaos
Fruity Pebbles Cheesecake Tacos are more than just a dessert. They’re an invitation to embrace your inner child, to let loose, and to have some fun in the kitchen. So go ahead, get creative, get messy, and most importantly, get ready to experience a taste sensation unlike any other.
Conclusion for Fruity Pebbles Cheesecake Tacos :
Fruity Pebbles Cheesecake Tacos are a delightful fusion of whimsy and deliciousness. These fun treats are incredibly easy to make, perfect for parties, or a simple afternoon pick-me-up. Remember to chill your tacos for optimal enjoyment and don’t add the Fruity Pebbles until you’re ready to assemble. Feel free to experiment with different variations, too! So, gather your ingredients, unleash your inner child, and get ready to experience a flavor explosion that will leave you smiling from ear to ear.
Print
Fruity Pebbles Cheesecake Tacos
Delicious fruity pebbles cheesecake tacos recipe with detailed instructions and nutritional information.
- Total Time: 35 minutes
- Yield: 4 servings
Ingredients
- Oreo Cookies, 15
- Unsalted Butter, 2 tablespoons, melted
- Cream Cheese, 8 ounces, softened
- Granulated Sugar, 1/4 cup
- Vanilla Extract, 1/2 teaspoon
- Heavy Cream, 1/2 cup
- Fruity Pebbles Cereal, 2 cups
- Flour Tortillas, 6 small
Instructions
- Step 1: Crush Oreo cookies into fine crumbs using a food processor or a resealable bag and rolling pin. Mix the crushed Oreo crumbs with melted butter.
- Step 2: Press the Oreo mixture firmly into the bottom of a springform pan or small dish to create a crust. Refrigerate for at least 30 minutes to allow the crust to set.
- Step 3: In a large bowl, beat the softened cream cheese, sugar, and vanilla extract together until smooth and creamy. Gradually add the heavy cream and continue beating until light and fluffy.
- Step 4: Gently fold in 1 cup of Fruity Pebbles cereal into the cream cheese mixture.
- Step 5: Spread the Fruity Pebbles cheesecake mixture evenly over the chilled Oreo crust. Sprinkle the remaining 1 cup of Fruity Pebbles on top. Freeze for at least 2 hours.
- Step 6: Once the cheesecake is solid, cut into wedges. Warm up tortillas, and fill each tortilla with a cheesecake wedge to create a "taco." Serve immediately.
Notes
- Store leftover cheesecake tacos in an airtight container in the freezer to maintain their shape and prevent the tortillas from getting soggy.
- Reheating isn't recommended, but letting the frozen cheesecake filling soften slightly at room temperature for a few minutes enhances the flavor.
- Garnish your Fruity Pebbles Cheesecake Tacos with whipped cream and extra cereal for a festive and colorful presentation.
- For a sturdier crust, blind bake the Oreo crust in the oven for 8-10 minutes before adding the cheesecake filling.
- Prep Time: 15 minutes
- Cook Time: 20 minutes
- Method: Stovetop
- Cuisine: American
FAQs :
Can I make Fruity Pebbles Cheesecake Tacos ahead of time?
Absolutely! In fact, I encourage it. These little pockets of joy are fantastic when they’ve had a chance to chill and let the flavors meld together. Prepare the cheesecake filling, assemble the tacos, and then pop them in the fridge for at least an hour before serving. This allows the filling to firm up nicely and prevents any disastrous taco explosions when you take that first, blissful bite. Think of it as a little gift to your future self – a delicious, ready-to-go treat waiting in the wings.
What can I use if I don’t have taco shells?
Don’t let a lack of taco shells stand between you and Fruity Pebbles Cheesecake Taco destiny! There are a few clever alternatives. You could use waffle cones for a sweeter twist. Another fun option is to create your own edible bowls using melted chocolate. Just spread melted chocolate onto parchment paper, shape it into bowls, let it set, and *voila*! Instant chocolate taco vessels. Get creative and let your imagination run wild. The most important thing is to have something to cradle that delicious cheesecake filling.
How do I keep my Fruity Pebbles from getting soggy?
Ah, the age-old question of cereal sogginess! The key is timing. Don’t add the Fruity Pebbles to the cheesecake filling until just before you’re ready to assemble your tacos. This prevents the cereal from absorbing too much moisture and losing its delightful crunch. Think of them as the glamorous finishing touch, the sparkly sprinkles on top of your culinary masterpiece. A quick toss and immediate assembly will ensure maximum Pebbles perky-ness.
What other variations can I make to these Cheesecake Tacos?
Oh, the possibilities are endless! Feel free to experiment with different cereal coatings – think Cocoa Pebbles for a chocolatey version, or crushed graham crackers for a more traditional cheesecake vibe. You could also swirl in some fruit preserves or a homemade berry sauce into the cheesecake filling for an extra burst of flavor. Consider adding a dollop of whipped cream or a drizzle of chocolate syrup on top for an even more decadent experience. Don’t be afraid to get creative and make these tacos your own!

Leave a Comment