


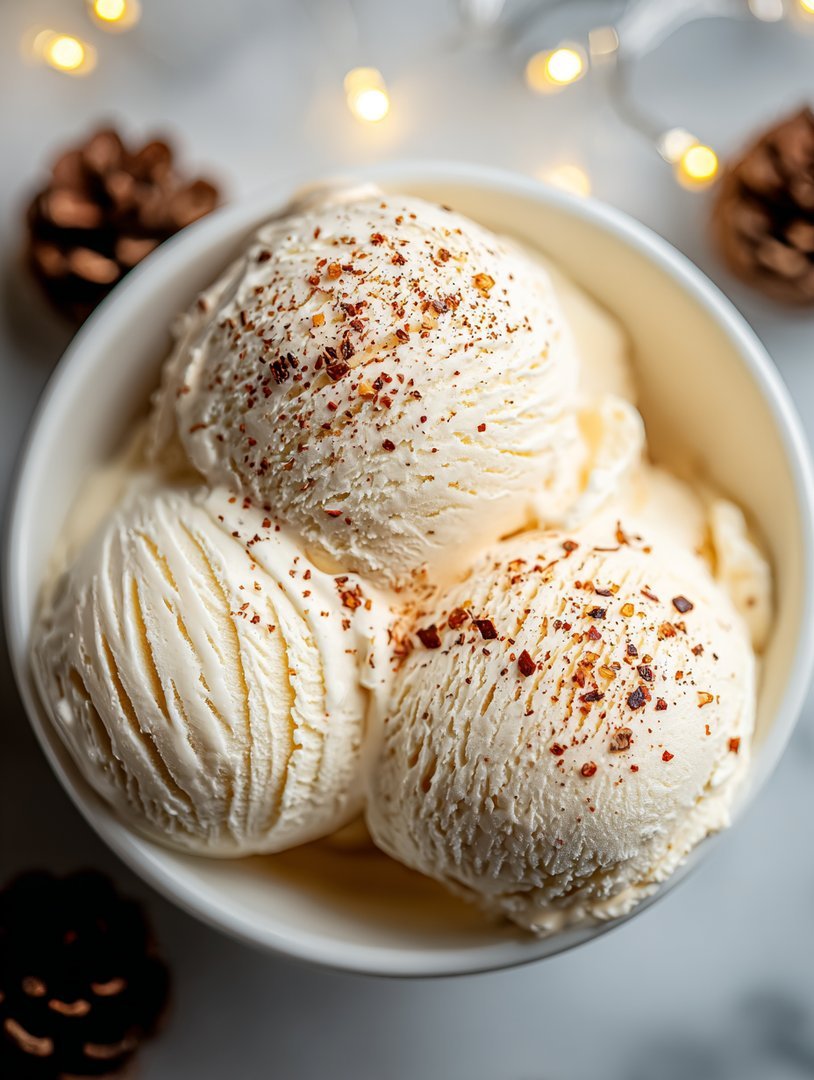
When the air turns crisp and the holiday lights twinkle, nothing quite captures the spirit like the rich, spiced aroma of classic eggnog. But why stop at a sip when you can enjoy that festive flavor in a deeply satisfying, chilled form? This homemadeEggnog Ice Creamtransforms a seasonal favorite into a creamy, unforgettable winter dessert that will make your freezer the star of the show.
- Effortlessly transforms leftover seasonal ingredients into a luxurious, spiced dessert, requiring minimal hands-on time before chilling and churning.
- Boasts a rich, velvety flavor profile, balancing heavy cream and egg yolks with warm notes of nutmeg, cinnamon, and a hint of vanilla.
- Presents a gorgeous, creamy pale yellow hue, making it an instantly appealing and festive centerpiece for any holiday dessert buffet or gathering.
- Offers remarkable versatility, perfect served on its own, alongside warm fruit pie, or as a decadent base for holiday milkshakes and coffee drinks.
The Secret History of Spiced Winter Cream
I have a complicated relationship with eggnog. It’s the drink that screams “holiday,” but if you get the store-bought stuff that tastes suspiciously like melted plastic, you might be hesitant. My Uncle Jerry—a man whose personality was as rich and dense as a fruitcake—once challenged me to finish a whole carton of commercial nog back in ’98. I failed spectacularly, resulting in a three-day sugar coma and a lifelong aversion to anything that sloshes in a cardboard container. This traumatic event, however, spurred a culinary mission: to create a dessert that carried the beloved flavor profile of eggnog without any of the cloying sweetness or thick, unsettling texture of the liquid version. The answer, friends, was chillingly obvious: freeze it solid.
The Evolution of a Frozen Feast
The concept of taking a rich custard base, seasoning it heavily, and then churning it into glorious submission isn’t new; historical recipes for frozen custards stretch back centuries. But translating the specific, beloved flavor of a seasonal favorite like eggnog into a perfectly scoopable ice cream is a delicate art. It requires respect for the traditional spices—nutmeg, clove, and cinnamon—but absolute precision in tempering the custard. If you mess up the base, you end up with scrambled eggs disguised as dessert, and nobody wants that kind of holiday surprise. This recipe ensures that the custard remains smooth, silky, and utterly decadent before it even touches the ice cream machine. We are aiming for the luxurious texture of Parisian-style ice cream, infused with the warmth of a fireplace and a touch of holiday mischief. Forget those flimsy, crystalline desserts; we’re making something that requires a heavy spoon and serious commitment.
Why This Ice Cream Recipe Wins the Holidays
What makes this particular recipe stand out from other seasonal desserts is its sheer intensity of flavor combined with a texture that defies freezing. Many homemade ice creams struggle with iciness, a result of too much water and not enough fat or stabilizers. We tackle this challenge head-on by using a high proportion of egg yolks, creating a rich French-style custard that naturally resists crystallization. Furthermore, we amplify the spice blend, making sure those classic notes of cinnamon and freshly grated nutmeg really sing, allowing the finishedEggnog Ice Creamto deliver a powerful punch of festive flavor that cuts through the coldness. You won’t need to reach for the flavored syrup bottle to get that deep, warming sensation; the spices handle the heavy lifting while the cream delivers the luxury.
The Components of Perfect Creaminess
Creating exceptional frozen treats relies heavily on balancing dairy, sweetener, and stabilizers. When crafting this creamy holiday treat, we are essentially building a highly enriched, frozen crème brûlée. We need dairy components that provide density and fat content, ensuring that every scoop is velvety rather than flaky. We also rely on the power of heat and chilling to ensure the final product is flawless. The initial cooking phase of the custard is non-negotiable; it pasteurizes the eggs and thickens the mixture enough to hold the spices perfectly. This foundational step is what separates a truly gourmet frozen dessert from a simple, sugary slush. Once cooked, the chilling phase becomes critical. An improperly chilled base churns poorly, resulting in coarse ice crystals. Giving the custard at least 8 hours—or ideally, overnight—in the refrigerator allows the fats to solidify and the flavors to fully bloom, leading to the smoothest possible final texture when the mixture hits the churning machine. This patience is the secret ingredient to superior homemade ice cream.
Ingredients for Eggnog Ice Cream
Here’s what you’ll need to make this delicious dish:
- Heavy CreamProvides the primary fat content, ensuring maximum richness and a velvety mouthfeel; choose a high-quality brand for the best flavor.
- Whole MilkBalances the richness of the cream, contributing moisture and helping to properly incorporate the sugar and egg yolks.
- Granulated SugarSweetens the ice cream base and, critically, lowers the freezing point, which keeps the finished product scoopable.
- Egg YolksEssential for creating a true French-style custard base, acting as the primary emulsifier and textural stabilizer.
- Alcohol-Free Vanilla ExtractAdds a warm, aromatic depth that complements the strong winter spices; use pure extract, not imitation.
- Ground NutmegThe signature spice of eggnog; ensure it is fresh or freshly grated for the most intense, pungent aroma.
- Ground Cinnamon and ClovesThese complementary spices add warmth and complexity, rounding out the classic festive flavor profile.
The full ingredients list, including measurements, is provided in the recipe card directly below.
How to Make Eggnog Ice Cream
Follow these simple steps to prepare this delicious dish:
Step 1: Preparing and Tempering the Custard Base
In a medium saucepan, combine the whole milk, half of the heavy cream, and the granulated sugar. Heat this mixture over medium heat, stirring until the sugar is completely dissolved and steam is rising, but do not allow it to boil. In a separate bowl, whisk the egg yolks until they are light yellow and slightly thickened. To temper the eggs, slowly ladle about one cup of the hot milk mixture into the yolks while constantly whisking rapidly. This gradually raises the temperature of the eggs without scrambling them.
Step 2: Cooking and Thickening the Custard
Pour the tempered egg mixture back into the saucepan with the remaining milk and cream. Reduce the heat to low and stir continuously with a wooden spoon or silicone spatula. The goal is to cook the mixture slowly until it thickens enough to coat the back of the spoon (reaching 175°F or 80°C). This step typically takes 5–8 minutes. Do not let the mixture boil or simmer aggressively, or the eggs will curdle.
Step 3: Infusing the Flavor and Chilling Overnight
Immediately remove the custard from the heat and strain it through a fine-mesh sieve into a large, clean bowl. This removes any potential small pieces of cooked egg or undissolved spice, ensuring a silky base. Whisk in the remaining heavy cream, alcohol-free vanilla extract, ground nutmeg, cinnamon, and cloves. Stir thoroughly to combine all the aromatic spices. Cover the bowl tightly with plastic wrap, pressing the wrap directly onto the surface of the custard to prevent a skin from forming. Chill the mixture in the refrigerator for at least 8 hours, or preferably overnight, which is crucial for achieving optimal texture.
Step 4: Churning the Eggnog Ice Cream
Once the base is thoroughly chilled (it should be very cold, near freezing), pour the mixture into your ice cream machine bowl according to the manufacturer’s instructions. Churn for 20 to 30 minutes, or until the mixture reaches the consistency of soft-serve ice cream. The volume will increase noticeably as air is incorporated. Taste and adjust spices if desired before moving to the final freeze.
Step 5: Final Hardening and Serving
Transfer the soft-serve consistency ice cream into a freezer-safe container with a tight-fitting lid. Press a piece of parchment paper or plastic wrap directly onto the surface of the ice cream to minimize contact with air. Place the container in the coldest part of your freezer for at least 4 to 6 hours to allow it to fully harden. Transfer to serving bowls and grate a final dusting of fresh nutmeg over the top for the perfect finishing touch.
Seasonal Pairings and Storage Tips
Once you’ve mastered the art of making this festive frozen custard, you’ll find it surprisingly versatile. This frozen dessert is not just for the holiday table; it elevates nearly any winter gathering, serving beautifully alongside a warm spiced apple crumble or a rich chocolate lava cake. The cool, spiced creaminess cuts through the richness of other heavy desserts, providing a welcome contrast. For a truly unforgettable experience, try scooping it over a freshly baked gingerbread cookie. The combination of warm, spicy cake and cold, sweet ice cream is pure bliss.
Keeping Your Ice Cream Scoopable
The enemy of any gourmet homemade ice cream is freezer burn and becoming rock solid. Because this recipe relies on a high fat and sugar content to prevent iciness, it already has a good head start on longevity. However, proper storage is key to maintaining that signature silky texture. Always store the ice cream in an airtight container designed specifically for the freezer; shallow, rectangular containers are often superior to deep, round ones as they minimize air pockets. Furthermore, always ensure the container is placed toward the back of the freezer, where temperatures are most stable and consistent. Avoid placing it near the door, which frequently opens and causes temperature fluctuations that lead to ice crystal formation. When stored correctly, your homemadeEggnog Ice Creamwill maintain its peak texture and flavor for up to two weeks, though honestly, it rarely lasts that long in my house.
Quick Fixes for Over-Hardened Scoops
If you find that your ice cream has hardened too much—a common issue in high-powered freezers—don’t resort to chipping away at it with a spoon. Instead, pull the container out of the freezer approximately ten minutes before you plan to serve. Allowing it to sit on the counter or in the refrigerator for this short tempering period permits the outer layer to slightly soften, making it much easier to scoop into those perfect, rounded spheres. If you are serving a crowd, using a warmed metal scoop (dipped briefly in hot water and wiped dry) helps create those photogenic scoops that impress guests and make you feel like a true culinary champion. Enjoy this delightful winter treat!
The Accidental Discovery of Sunshine on a Plate
I spilled half a carton of premium eggnog while making holiday cookies and, unwilling to waste a single drop, I impulsively churned it into ice cream. The resulting velvety, deeply spiced goodness was a pure revelation—like successfully capturing the entire joyful spirit of the winter season and freezing it into a dessert masterpiece.
There are moments in the kitchen when true genius strikes, usually dressed in flour and fueled by panic. My journey to creating the world’s best homemadeEggnog Ice Creamwas one such moment. Historically, eggnog feels tied strictly to December, a beverage you dutifully sip while pretending not to notice your aunt’s questionable gift choices. But freezing it? That transforms it into an ethereal, year-round delight that warrants an official declaration of joy.
This isn’t just a basic vanilla ice cream with some spice thrown in; this recipe delivers the rich, silky, warming flavor profile you crave from classic eggnog, perfectly balanced and ready to be devoured in generous scoops. Forget those watery, bland store-bought versions; we are making the real deal, complete with a perfectly tempered custard base and a generous sprinkle of nutmeg that whispers of holiday nostalgia.
The Magic Behind the Creamy Texture
The secret to achieving that luxurious, almost chewy texture lies in the careful preparation of the custard base. Many people fear making custard because of the dreaded scramble, but mastering the tempering technique ensures a smooth, silky foundation. We use a high ratio of egg yolks, which provides natural richness and prevents the formation of large ice crystals. This process takes a little patience, but trust me, the results—a scoopable, flavorful ice cream that doesn’t feel like frozen disappointment—are absolutely worth the effort.
Equipment Check: Your Tools for Triumph
While you don’t need a commercial kitchen, having the right tools makes this process painless. A reliable ice cream maker is non-negotiable. Whether you use a compressor model or a freeze-bowl version, ensure the bowl is thoroughly chilled. You will also need a heavy-bottomed saucepan for heating the base, a whisk (your best friend in preventing lumps), and a fine-mesh sieve to catch any rogue bits of cooked egg or spice before chilling the final mixture. Preparation is half the battle, and having everything ready makes the transformation of liquid gold intoEggnog Ice Creamseamless.
Perfecting the Cooking Process
For the creamiest results, start by tempering the eggs slowly with the warmed dairy mixture, creating a stable, luxurious custard base while avoiding any tell-tale scrambling. You must chill the completed base thoroughly for at least eight hours, or preferably overnight, before churning it vigorously in your ice cream machine for approximately 20 minutes, yielding that truly perfect texture.
The Ingredients for Epic Eggnog Ice Cream
Gathering these specific ingredients is crucial for achieving that signature spiced flavor without relying on artificial extracts. We are building flavor complexity layer by layer, ensuring every spoonful tastes like a warm hug on a cold day.
Dairy Base
- 2 cups whole milk (full-fat is mandatory for richness)
- 1 cup heavy cream (the higher the fat content, the smoother the ice cream)
- 1/2 cup granulated white sugar
- 1/4 teaspoon fine sea salt (crucial for balancing sweetness)
The Custard & Spice Blend
- 6 large egg yolks
- 1/2 cup packed light brown sugar
- 1 teaspoon pure alcohol-free vanilla extract
- 1 teaspoon ground nutmeg (freshly grated is always superior)
- 1/2 teaspoon ground cinnamon
- 1/4 teaspoon ground allspice or ground ginger (optional, for extra warmth)
Step-by-Step Churning Instructions
Follow these steps meticulously, and you will achieve a professional-grade dessert that will impress even the most skeptical ice cream connoisseur.
Heating and Tempering the Base
In a medium saucepan, combine the whole milk, heavy cream, granulated sugar, and salt. Heat the mixture over medium heat, stirring occasionally, until the sugar completely dissolves and tiny bubbles form around the edges of the pan—do not boil. Remove the mixture from the heat.
In a separate large bowl, whisk the egg yolks and brown sugar together vigorously until the mixture becomes pale and thick, resembling a light yellow ribbon. This process incorporates air and strengthens the yolks.
Now comes the pivotal moment: tempering. Slowly, ladle by ladle, whisk about 1 1/2 cups of the warm dairy mixture into the yolk mixture while constantly whisking. This gradual addition raises the temperature of the eggs gently. Pour the warmed yolk mixture back into the saucepan with the remaining milk mixture.
Cooking and Chilling the Custard
Return the saucepan to low heat. Stir the mixture constantly with a wooden spoon or spatula. Cook until the custard thickens enough to coat the back of the spoon (this usually happens when the temperature reaches 175°F to 180°F). Do not let it boil, or the custard will curdle.
Immediately pour the warm custard through a fine-mesh sieve into a clean bowl. Stir in the alcohol-free vanilla extract, nutmeg, cinnamon, and allspice/ginger if using. Place the bowl over an ice bath (a larger bowl filled with ice and water) to rapidly cool the mixture, which is essential for texture.
Once cooled to room temperature, cover the bowl tightly and refrigerate the base for a minimum of 8 hours, or ideally overnight. A perfectly chilled base churns into creamier ice cream.
Churning to Perfection
Pour the chilled base into your prepared ice cream machine and churn according to the manufacturer’s instructions. This usually takes about 20 to 30 minutes. The resultingEggnog Ice Creamwill be soft-serve consistency at this stage.
Transfer the soft ice cream to an airtight, freezer-safe container. Place plastic wrap directly on the surface of the ice cream before sealing the lid. Freeze for 4 to 6 hours for a firm, scoopable texture. Serve with an extra dusting of fresh nutmeg.
Add Your Touch
Try swirling in a decadent ribbon of homemade salted caramel or adding a scattering of finely chopped crystallized ginger for delightful crunch and added warmth. You can easily swap out the traditional nutmeg flavor profile for the inclusion of ground cardamom or delicate star anise, lending the finishedEggnog Ice Creama slightly more unexpected and intriguing twist.
Flavor Boosts and Mix-Ins
If you love texture, consider adding toasted pecans or walnuts right before the freezing stage for a delightful crunch. For an even more intense eggnog experience, steep a vanilla bean (split and scraped) in the milk mixture while heating, then remove it before tempering the eggs. A tablespoon of molasses can also deepen the flavor profile, giving it a rich, caramelized undertone that perfectly complements the spices.
Storing & Reheating
Store this delightfulEggnog Ice Creamin an airtight container immediately after churning, ensuring you press plastic wrap directly onto the surface before securing the lid fully. This crucial step prevents unwelcome ice crystal formation, successfully preserving the creamy texture and keeping it tasting supremely fresh for up to two weeks in a deep freezer.
Expert Tips for Flawless Churning
-
Always use a stainless steel or glass bowl when chilling the base; plastic tends to retain heat, slowing the necessary cooling process, which degrades the final texture.
-
Do not skip the chilling phase—the base must be near 40°F (4°C) before churning, or the ice cream machine won’t be able to effectively freeze the mixture properly.
-
For the best spice flavor, always grate whole nutmeg fresh just before using it; pre-ground nutmeg loses much of its essential volatile oils rapidly, resulting in a duller taste.
My younger cousin once confessed that they hated eggnog until they tried this frozen rendition, claiming it tasted like a sweet, velvety cloud. That single compliment instantly validated every hour I spent hovering over the simmering custard.
Conclusion for Eggnog Ice Cream
Making homemadeEggnog Ice Creamtransforms a seasonal beverage into a luxurious, year-round frozen indulgence that truly deserves a place in your regular dessert rotation. We covered the critical steps, from expertly tempering the egg yolks to ensure a silken custard base to the importance of overnight chilling for perfect churning results.
Remember that freshness is key—especially when dealing with nutmeg—and patience is non-negotiable during the necessary cooling periods. Whether you serve it alongside holiday pies or simply enjoy a quiet scoop on a warm evening, this recipe guarantees a rich, spiced, and incredibly creamy experience. Go forth, embrace the custard, and let this decadentEggnog Ice Creambrighten your freezer inventory immediately.
Print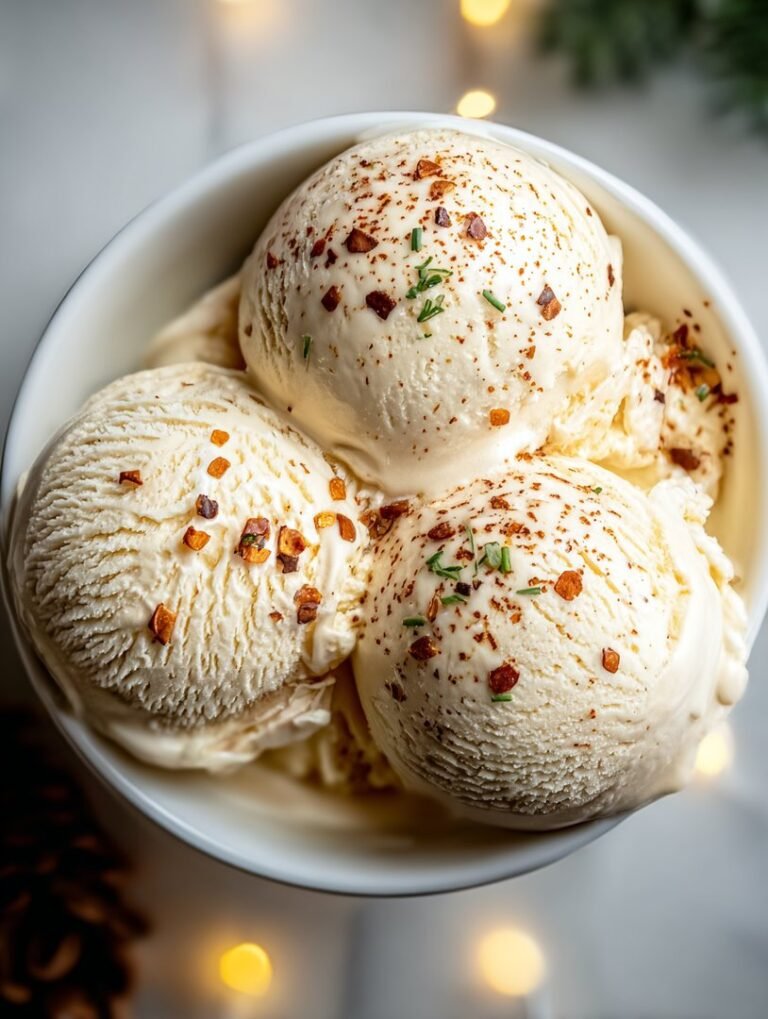
Eggnog Ice Cream
Silky French-style Eggnog Ice Cream. We temper four rich yolks and whisk in full-fat eggnog for the ultimate holiday treat. Perfect for festive gatherings.
- Total Time: 35 minutes
- Yield: 4 servings
Ingredients
- Heavy Cream: 1 cup
- Half-and-Half: 1 cup
- Prepared Eggnog (full-fat): 2 cups
- Granulated Sugar: 1/2 cup
- Large Egg Yolks: 4
- Vanilla Bean Paste: 1 teaspoon
- Dark Rum Extract or Apricot Nectar (optional): 2 tablespoons
- Freshly Grated Nutmeg: 1/2 teaspoon
Instructions
- Step 1: Whisk the egg yolks and granulated sugar together in a medium bowl until pale and creamy. In a saucepan, heat the heavy cream and half-and-half over medium heat until small bubbles form around the edges (do not boil).
- Step 2: Temper the egg yolks by slowly pouring about half of the hot cream mixture into the yolk mixture while whisking constantly. Return this tempered mixture to the saucepan with the remaining cream. Cook over low heat, stirring continuously with a wooden spoon, until the mixture thickens slightly and coats the back of the spoon (reaching 170-175°F).
- Step 3: Remove the saucepan from the heat and immediately strain the custard base through a fine-mesh sieve into a clean bowl to remove any solids. Stir in the prepared eggnog, alcohol-free vanilla extract, nutmeg, and rum extract (if using).
- Step 4: Cover the bowl and chill the entire mixture completely in the refrigerator until thoroughly cold, at least 4 hours, but preferably overnight. The base must be very cold for successful churning.
- Step 5: Pour the chilled eggnog mixture into an ice cream maker and churn according to the manufacturer's directions (this usually takes 20-30 minutes) until the ice cream is soft-serve consistency.
- Step 6: Transfer the soft ice cream to an airtight container. Cover and freeze for 2 to 3 hours to allow the ice cream to harden ("ripen") before serving, garnishing with extra grated nutmeg if desired.
Notes
- For optimal texture, press plastic wrap directly onto the surface of the frozen ice cream before sealing the airtight container to minimize crystallization and freezer burn during long-term storage.
- If the ice cream is frozen too solid, allow it to sit out at room temperature for 5 to 10 minutes prior to scooping to restore the perfect creamy consistency.
- Enhance the rich, holiday flavor by serving generous scoops alongside warm gingerbread or a drizzle of spiced caramel sauce.
- Never rush the chilling step; your custard must be thoroughly cold (preferably overnight) before churning, or the base will freeze poorly resulting in icy, rather than creamy, ice cream.
- Prep Time: 15 minutes
- Cook Time: 20 minutes
- Method: Stovetop
- Cuisine: American

Leave a Comment