


Imagine sinking your teeth into a symphony of textures: a buttery, crumbly base topped with gooey caramel, crunchy pecans, and a smooth chocolate blanket. These Easy Turtle Bars are not just a dessert; they’re an experience, a sweet escape into a world of pure indulgence.
These bars are the edible equivalent of a warm hug, perfect for sharing (or not!) and guaranteed to disappear faster than you can say “second helping.” Get ready to experience a treat that’s as simple to make as it is utterly irresistible.
- Effortlessly create these delightful bars with minimal ingredients and straightforward steps, making it perfect for any baker.
- Experience the harmonious blend of buttery shortbread, chewy caramel, crunchy pecans, and rich chocolate in every delicious bite.
- The visually appealing layers of textures and colors make these bars a standout dessert for any occasion or gathering.
- Adapt this recipe to your liking by experimenting with different nuts or chocolate, making it a versatile treat to suit your tastes.
Ingredients for Easy Turtle Bars
Here’s what you’ll need to make this delicious dish:
The full ingredients list, including measurements, is provided in the recipe card directly below.
How to Make Easy Turtle Bars
Follow these simple steps to prepare this delicious dish:
Step 1: Prepare the Shortbread Crust
Preheat your oven to 350°F (175°C). In a large bowl, combine the flour, powdered sugar, salt, and cold butter cut into small cubes. Use a pastry blender or your fingers to cut the butter into the dry ingredients until the mixture resembles coarse crumbs.
Step 2: Bake the Crust
Press the mixture evenly into the bottom of an ungreased 9×13 inch baking pan. Bake for 20-25 minutes, or until the crust is lightly golden brown. Let it cool slightly while you prepare the caramel.
Step 3: Make the Caramel Layer
In a medium saucepan, combine the sweetened condensed milk, light corn syrup, brown sugar, and butter. Cook over medium heat, stirring constantly, until the mixture comes to a boil. Continue to cook, stirring constantly, for 5 minutes, or until the caramel is thickened and golden brown. Remove from heat and stir in the vanilla extract.
Step 4: Assemble the Turtle Bars
Pour the caramel evenly over the baked shortbread crust. Sprinkle the pecans evenly over the caramel layer.
Step 5: Add the Chocolate Topping
In a microwave-safe bowl, combine the chocolate chips and vegetable oil. Microwave in 30-second intervals, stirring in between, until the chocolate is melted and smooth. Spread the melted chocolate evenly over the pecan layer.
Step 6: Chill and Serve
Let the bars cool completely at room temperature, then refrigerate for at least 2 hours to allow the caramel and chocolate to set. Cut into squares and serve. Enjoy every delightful bite!
Variations and Substitutions for Your Easy Turtle Bars
Feeling adventurous? Let’s talk about jazzing up these already amazing Easy Turtle Bars. After all, even perfection can use a little remix, right? I’m not saying the original recipe isn’t fantastic (because it is!), but who doesn’t love options? Let’s dive into some fun variations and substitutions to make these bars your own masterpiece. Remember, cooking should be fun, so don’t be afraid to experiment and see what deliciousness you can create!
Nutty Alternatives
While pecans are classic for turtle candies, why not branch out? Walnuts offer a slightly bitter, earthy note that pairs beautifully with the sweet caramel and chocolate. Almonds provide a subtle, buttery flavor and a satisfying crunch. And for those with nut allergies (or just looking for something different), toasted sunflower seeds or pepitas (pumpkin seeds) can add a delightful texture and a unique flavor profile. Just make sure they are unsalted!
Chocolate Choices
Semi-sweet chocolate is a crowd-pleaser, but let’s not limit ourselves. Dark chocolate lovers, rejoice! Using dark chocolate chips will add a rich, intense flavor that balances the sweetness of the caramel. White chocolate can also be an exciting twist, creating a sweet and creamy contrast to the nutty base. Or, you could even swirl milk and white chocolate together for a visually stunning effect.
Caramel Enhancements
Want to take your caramel to the next level? A pinch of sea salt sprinkled over the caramel layer before adding the pecans can enhance the sweetness and create a salted caramel sensation that is totally irresistible. For a hint of warmth, try adding a dash of cinnamon or nutmeg to the caramel while it’s cooking. And if you’re feeling fancy, a tablespoon of fruit juice can add a subtle fruity note to complement the other flavors.
Crust Modifications
The shortbread crust is wonderfully simple, but a few tweaks can make it even more interesting. Adding a tablespoon or two of cocoa powder to the crust mixture will create a chocolate shortbread base that complements the caramel and chocolate topping. For a gluten-free option, you can use a gluten-free all-purpose flour blend to make the crust. Just be sure to check the blend for any added ingredients that might affect the flavor or texture.
Adding a Layer of Flavor
Consider adding a thin layer of peanut butter or your favorite nut butter between the shortbread crust and the caramel. This adds a creamy, nutty flavor that complements the other ingredients beautifully. Alternatively, you could spread a layer of raspberry or strawberry preserves for a fruity, tangy twist.
Tips for Success
- Make sure your shortbread crust is completely cool before adding the caramel layer. This will prevent the caramel from melting the crust and creating a soggy mess.
- When melting the chocolate, use low heat and stir frequently to prevent burning. Microwaving in short intervals is a great way to control the melting process.
- Allow the bars to cool completely and chill in the refrigerator for at least two hours before cutting. This will ensure that the caramel and chocolate layers are firm and easy to slice.
- For clean cuts, use a warm, sharp knife. Running the knife under hot water and wiping it dry between cuts will help prevent the chocolate from cracking.
- Store the bars in an airtight container in the refrigerator to keep them fresh and prevent the caramel from becoming too soft.
Serving Suggestions and Occasions for Easy Turtle Bars
So, you’ve whipped up a batch of these decadent Easy Turtle Bars. Now what? They’re not just for eating straight from the pan (though I won’t judge if you do!). Let’s explore some creative serving suggestions and perfect occasions to showcase these delightful treats. After all, presentation is key, and knowing when to bring out the Turtle Bars can make any event a little sweeter.
Serving Suggestions
These bars are fantastic on their own, but a little extra flair can elevate them to gourmet status. Serve them chilled, cut into neat squares, on a pretty platter for an elegant touch. For a more casual vibe, arrange them in a basket lined with parchment paper.
A scoop of vanilla ice cream alongside a Turtle Bar creates a heavenly contrast of warm and cold, soft and crunchy. Drizzle a little extra melted chocolate or caramel sauce over the ice cream for an extra touch of indulgence. For a coffee lover’s dream, pair the bars with a freshly brewed cup of coffee or a creamy latte. The rich flavors of the Turtle Bars complement the bitterness of the coffee perfectly.
If you’re feeling fancy, create a Turtle Bar parfait by layering crumbled bars with whipped cream and chopped pecans in a glass. This is a fun and visually appealing way to serve them at a party. Cut the bars into smaller, bite-sized pieces and arrange them on a dessert board with other treats like fresh fruit, cheeses, and nuts. This is a great way to offer a variety of options and cater to different tastes.
Perfect Occasions
These Easy Turtle Bars are versatile enough for almost any occasion. Here are a few ideas:
**Holiday Gatherings: ** These bars are a crowd-pleaser at Thanksgiving, Christmas, and other holiday celebrations. They’re easy to make ahead of time and transport, making them a stress-free addition to your holiday spread.
**Birthday Parties: ** Whether it’s a kids’ party or an adult celebration, Turtle Bars are always a hit. They’re sweet, indulgent, and easy to eat, making them perfect for guests of all ages.
**Potlucks and Cookouts: ** Bring a batch of these bars to your next potluck or cookout, and you’re guaranteed to be the star of the dessert table. They’re easy to share and always disappear quickly.
**Game Nights: ** Add a sweet touch to your game night with a plate of Turtle Bars. They’re the perfect treat to munch on while you’re strategizing your next move.
**Gifts: ** Homemade Turtle Bars make a thoughtful and delicious gift for friends, family, and neighbors. Package them in a pretty box or tin with a ribbon for a personal touch.
**Just Because: ** Sometimes, you don’t need a special occasion to enjoy a sweet treat. Make a batch of these bars just because you deserve it! They’re the perfect way to brighten up a rainy day or reward yourself after a long week.
Tips for Presentation
- Use a variety of serving dishes to create visual interest.
- Garnish with fresh fruit, chopped nuts, or a dusting of powdered sugar.
- Arrange the bars in an appealing way, such as in a spiral or a pyramid.
- Add a personal touch with a handwritten label or a decorative ribbon.
- Most importantly, serve with a smile and enjoy the compliments!
Perfecting the Cooking Process

To ensure the most efficient and delicious results, melt the butter and sugar first to create the base. Assemble your bars systematically. Prepare the caramel layer while the crust bakes and then add the chocolate topping last.
Add Your Touch
Feel free to get creative with these easy turtle bars! You could swap the pecans for walnuts or almonds. For an extra layer of decadence, drizzle with white chocolate, or sprinkle with sea salt to balance the sweetness.
Storing & Reheating
These easy turtle bars can be stored in an airtight container at room temperature for up to five days. For longer storage, keep them in the refrigerator. There’s really no need to reheat them, but a few seconds in the microwave will make them extra gooey!
Here are a few tips to help you nail this easy turtle bars recipe:
- Make sure you press the crust firmly into the pan for a stable base that won’t crumble. This is key for clean slices.
- Don’t overbake the caramel layer; a slight jiggle is perfect. It will firm up as it cools.
- Let the bars cool completely before cutting to prevent the caramel from oozing everywhere. Patience is a virtue.
(Personal anecdote formated as paragraph subheading)
The first time I made these, my friends devoured them in minutes! One even tried to lick the pan. That’s when I knew I had created something truly irresistible.
Easy Turtle Bars: A Sweet Symphony of Flavors
Alright, folks, buckle up because we’re about to embark on a journey to a land paved with caramel, sprinkled with pecans, and topped with a generous layer of chocolate. We’re talking about Easy Turtle Bars, those gooey, decadent squares of happiness that can turn any frown upside down. Forget your troubles; these bars are here to save the day, one bite at a time.
Let’s be honest. Sometimes, life throws you curveballs. Your boss is breathing down your neck, your internet decides to take a vacation, and you realize you’re out of coffee. What’s a person to do? Bake, my friends, bake! And what better to bake than something that requires minimal effort but delivers maximum flavor? Enter the Easy Turtle Bar, your sweet escape from the everyday chaos. This isn’t just baking; it’s therapy with sprinkles.
Why These Turtle Bars Are the Bees Knees
So, what makes these Easy Turtle Bars so darn special? Well, let’s break it down. First, there’s the crust, a buttery, crumbly foundation that’s sturdy enough to hold all the gooey goodness to come. Then comes the caramel, oh, the caramel! A sweet, buttery, chewy layer that practically melts in your mouth. Pecans add a satisfying crunch and a nutty flavor that perfectly complements the caramel. Finally, we have the chocolate, a rich, decadent blanket that brings everything together in perfect harmony.
But here’s the real kicker: these Easy Turtle Bars are, well, easy! No complicated techniques, no fancy equipment, just simple ingredients and straightforward instructions. Even if your baking skills are limited to microwaving popcorn, you can pull these off. Trust me, if I can do it, anyone can.
Gather Your Arsenal: Ingredients for Success
Before we dive into the nitty-gritty of making these delights, let’s make sure we have all our ingredients ready. Think of it as assembling your baking Avengers.
- **For the Crust:**
- 1 1/2 cups all-purpose flour
- 3/4 cup (1 1/2 sticks) unsalted butter, cold and cut into cubes
- 1/2 cup packed brown sugar
- 1/4 teaspoon salt
- **For the Caramel Layer:**
- 1 cup (2 sticks) unsalted butter
- 1 cup packed brown sugar
- 1/2 cup corn syrup
- 1 can (14 ounces) sweetened condensed milk
- 1 teaspoon vanilla extract
- 1/2 teaspoon salt
- **For the Chocolate Topping:**
- 12 ounces semi-sweet chocolate chips
- 1 cup chopped pecans
Now, I know what you might be thinking: “That’s a lot of butter!” And to that, I say, “Yes, yes it is.” But remember, we’re not counting calories here, we’re counting happiness units. And these bars are loaded with them.
Let’s Get Baking: Step-by-Step Instructions
Alright, let’s get down to business. Follow these steps, and you’ll be enjoying your own batch of Easy Turtle Bars in no time.
Step 1: Crafting the Crust
First, preheat your oven to 350°F (175°C). While the oven is warming up, let’s tackle the crust. In a large bowl, whisk together the flour and salt. Add the cold, cubed butter. Now, here’s where you have a choice. You can use a pastry blender to cut the butter into the flour until the mixture resembles coarse crumbs, or you can get your hands dirty and use your fingers. I personally prefer the latter because it’s oddly therapeutic.
Once you have your coarse crumbs, stir in the brown sugar until everything is well combined. Press the mixture firmly into the bottom of a 9×13 inch baking pan. I like to use the bottom of a measuring cup to really pack it in there. This will ensure a nice, solid crust that won’t fall apart when you cut the bars.
Bake the crust for 15-20 minutes, or until it’s lightly golden brown. While the crust is baking, let’s move on to the next layer of deliciousness.
Step 2: Whipping Up the Caramel
In a medium saucepan, melt the butter over medium heat. Stir in the brown sugar and corn syrup. Bring the mixture to a boil, stirring constantly to prevent it from burning. Once it’s boiling, stir in the sweetened condensed milk, vanilla extract, and salt.
Continue to cook the mixture, stirring constantly, for about 10-12 minutes, or until it turns a rich, golden brown color. Be careful not to overcook it, or it will become too hard. I like to use a candy thermometer to make sure I get it just right. The ideal temperature is around 245°F (118°C).
Once the caramel is ready, remove it from the heat and pour it evenly over the baked crust. Sprinkle the chopped pecans over the caramel layer.
Step 3: The Grand Finale: Chocolate Time
Now for the best part: the chocolate! Sprinkle the semi-sweet chocolate chips evenly over the caramel and pecans. Place the pan back in the oven for about 2-3 minutes, or until the chocolate chips are melted.
Remove the pan from the oven and use a spatula to spread the melted chocolate evenly over the caramel layer. If you want to get fancy, you can swirl the chocolate with a knife or a toothpick for a marbled effect.
Step 4: Cool, Cut, and Conquer
Now comes the hardest part: waiting. Let the bars cool completely at room temperature, then refrigerate them for at least two hours before cutting. This will allow the caramel to set up and make it easier to cut the bars cleanly.
Once the bars are chilled, cut them into squares and prepare for the onslaught of compliments.
Variations and Twists: Level Up Your Turtle Bars
Okay, so you’ve mastered the basic recipe. Now what? Well, my friend, it’s time to get creative! Here are a few ideas to take your Easy Turtle Bars to the next level.
Nutty Adventures
Not a fan of pecans? No problem! Try using walnuts, almonds, or even macadamia nuts. Each type of nut will add a unique flavor and texture to the bars.
Chocolate Overload
Feeling extra indulgent? Use a combination of semi-sweet, milk, and dark chocolate chips. Or, drizzle the finished bars with white chocolate for a beautiful contrast.
Salty Sweet Symphony
Sprinkle a pinch of sea salt over the melted chocolate before it sets. The salt will enhance the sweetness of the caramel and chocolate, creating a flavor explosion in your mouth.
Espresso Yourself
Add a tablespoon of instant espresso powder to the caramel mixture for a coffee-infused twist. This is perfect for coffee lovers.
Troubleshooting Tips: Because Baking Isn’t Always Perfect
Even the best bakers have their off days. Here are a few common issues you might encounter and how to fix them.
- **Crust Too Hard:** Make sure you’re using cold butter and don’t overbake the crust.
- **Caramel Too Soft:** Cook the caramel for a longer period of time, making sure it reaches the right temperature.
- **Chocolate Not Melting Evenly:** Place the pan back in the oven for a few more minutes, or use a double boiler to melt the chocolate separately.
The Final Bite: Enjoying Your Masterpiece
And there you have it: Easy Turtle Bars that are guaranteed to impress. Whether you’re baking for a party, a potluck, or just a quiet night in, these bars are the perfect treat. So go ahead, grab a square (or two), and savor the sweet, gooey goodness. You deserve it! These easy turtle bars are just the ticket for a sweet and satisfying end to any day.
Conclusion for Easy Turtle Bars :
In short, making Easy Turtle Bars is a guaranteed recipe for success and a happy belly! These bars are easy to customize, simple to store, and impossible to resist. Forget complicated desserts that require hours of effort. These bars come together in a flash, making them the perfect treat for any occasion. So, preheat your oven, gather your ingredients, and prepare to be amazed by how easy it is to create a truly decadent dessert. They’re also fun for the kids to help create!
Print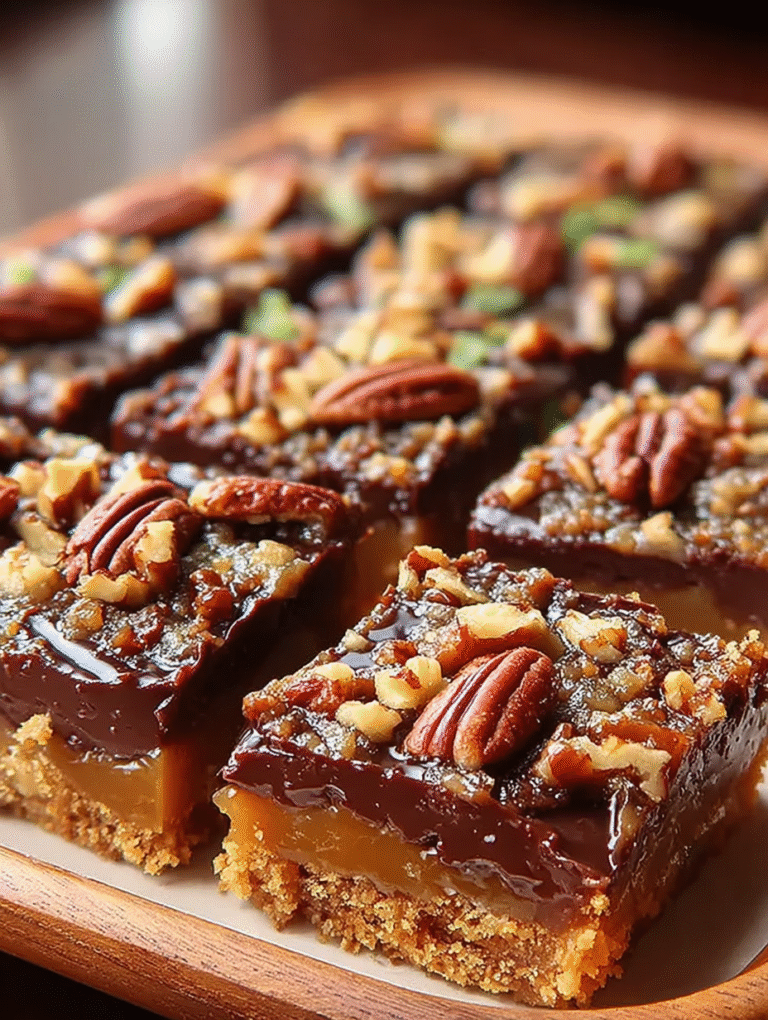
Easy Turtle Bars
Delicious easy turtle bars recipe with detailed instructions and nutritional information.
- Total Time: 35 minutes
- Yield: 4 servings 1x
Ingredients
- 1 box (14.3 oz) graham crackers
- 1 cup (2 sticks) butter, melted
- 1 cup packed brown sugar
- 1 can (14 oz) sweetened condensed milk
- 1 bag (11.5 oz) milk chocolate chips
- 1 cup chopped pecans or walnuts
- 1/4 teaspoon salt
Instructions
- Step 1: Preheat oven to 350°F (175°C). Line a 9×13 inch baking pan with parchment paper, leaving an overhang on the sides.
- Step 2: Break graham crackers into smaller pieces and spread evenly over the bottom of the prepared pan.
- Step 3: In a medium bowl, combine melted butter and brown sugar. Mix well until smooth. Pour mixture evenly over graham crackers.
- Step 4: Bake for 8-10 minutes, or until bubbly and slightly golden.
- Step 5: Remove from oven and immediately pour sweetened condensed milk evenly over the baked graham cracker layer. Sprinkle chocolate chips and chopped nuts over the top.
- Step 6: Return to oven and bake for another 15-18 minutes, or until golden brown and bubbly. Let cool completely before lifting out using the parchment paper overhang and cutting into bars.
Notes
- Store cooled bars in an airtight container at room temperature for up to 3 days, or in the refrigerator for up to a week for longer lasting freshness.
- A quick zap in the microwave for 5-10 seconds per bar will make the chocolate extra gooey and delicious.
- Serve these decadent bars chilled for a firmer texture or at room temperature for a softer, melt-in-your-mouth experience; add a scoop of vanilla ice cream for extra indulgence.
- For easier cutting, chill the cooled bars in the refrigerator for at least 30 minutes before slicing – it helps the chocolate set nicely!
- Prep Time: 15 minutes
- Cook Time: 20 minutes
- Method: Stovetop
- Cuisine: American
FAQs :
What makes these Easy Turtle Bars so darn easy?
Okay, let’s be real, some dessert recipes read like a doctoral thesis. Not this one! The ease comes from the streamlined process – a simple graham cracker crust, a gooey caramel layer you practically throw together, and a sprinkle of pecans and chocolate chips. No fancy equipment or culinary school degree required. It’s so straightforward; you could probably make it while simultaneously juggling flaming torches and reciting Shakespeare (though I wouldn’t recommend it). This recipe is your secret weapon for instant dessert gratification, guaranteed to impress without the kitchen chaos.
Can I substitute ingredients in these Turtle Bars for easier baking?
Absolutely! Baking should be fun, not stressful. Swap the graham crackers for digestive biscuits for a different flavor profile. If pecans aren’t your thing (gasp!), walnuts or almonds work beautifully. Don’t have chocolate chips? Chop up your favorite chocolate bar. The caramel is quite forgiving, too; a little extra brown sugar or a touch of maple syrup won’t hurt a thing. Feel free to experiment and make it your own. Just remember to keep the ratios relatively similar to ensure the bars still hold their shape and gooeyness.
How do I store these Easy Turtle Bars, if they even last that long?
If, by some miracle, you don’t devour these in one sitting, storing them properly is a breeze. Once cooled, cut them into squares and place them in an airtight container. They’ll happily hang out at room temperature for a couple of days. For longer storage, pop them in the fridge. They’ll firm up a bit, but still taste amazing. You can even freeze them! Wrap them individually or in small batches to prevent freezer burn. When you’re ready for a sweet treat, just thaw and enjoy.
What’s the secret to preventing the caramel in my Turtle Bars from being too hard?
Ah, the caramel conundrum! The key is to cook it to the right temperature. If you have a candy thermometer, aim for the soft ball stage (around 235°F). If you don’t, keep a close eye on the caramel while it’s simmering. It should be a deep golden brown and thicken slightly. Remove it from the heat as soon as it reaches that point. Overcooking the caramel will lead to a hard, brittle mess. A little patience and attention is the best way to delicious results.


Leave a Comment