

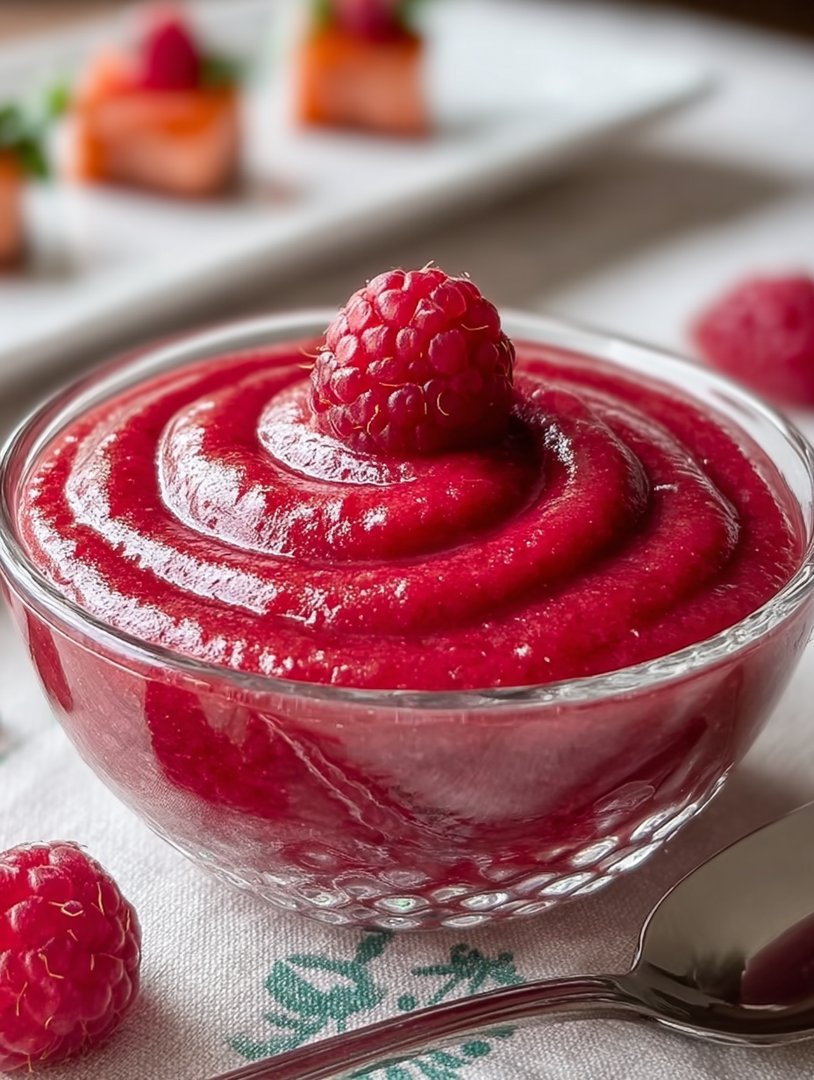
Imagine a spoonful of sunshine, tart and sweet, crashing onto your tongue. This Easy Homemade Raspberry Curd Recipe delivers exactly that: liquid ruby luxury that transforms mundane toast into a dazzling centerpiece. Forget jarred jams; this is the real, vibrant deal. It’s bright, luscious, and possesses a velvety texture that feels utterly decadent, perfect for elevating any breakfast or dessert. This simple recipe requires minimal stirring time and only a handful of common pantry staples for effortless preparation. Experience a bright, intensely tart raspberry flavor balanced perfectly by the creamy, luscious texture that melts in your mouth. The stunning, jewel-toned pink color instantly elevates any dessert, making it look sophisticated and bakery-worthy. Use this versatile curd as a filling for tarts, a topping for pancakes, or simply eaten straight from the spoon.
The Curious Case of the Perfect Curd
I’ve always felt a deep, existential connection to fruit curds. Jams are fine, they hold the fort, but they lack that certain vibrant sass. They are the sensible sedan of the spread world. Curd, however? Curd is the convertible sports car—zippy, slightly dangerous, and absolutely necessary for a good time. My journey into making the ultimate Easy Homemade Raspberry Curd Recipe began, as most kitchen dramas do, with a disastrous attempt at a lemon meringue pie that ended up looking more like a collapsed soufflé attempting a high-five. I realized the secret wasn’t in the meringue; it was in the filling—the curd must sing!
Raspberries are notoriously demanding divas. They refuse to be relegated to mere background noise, insisting on their tartness being front and center. This recipe respects that sass. We’re not masking the raspberry; we are elevating it, giving it a velvety stage on which to perform its flavor opera. If you’ve ever been intimidated by the word ‘curd,’ imagining hours spent hovering over a double boiler, rest assured. We’re deploying some smart techniques here that minimize the risk of scramble and maximize the creamy reward. This isn’t rocket science; it’s just patient stirring and a little faith in the emulsifying power of egg yolks. We are aiming for something that rivals the finest patisserie offerings without the corresponding panic attack in your kitchen.
The Science of Smoothness: Why This Recipe Works
The magic of a good curd lies in tempering the eggs—a fancy phrase for making sure you don’t instantly create scrambled raspberry eggs. We introduce the hot mixture slowly, gently coaxing the eggs to thicken the sauce without turning solid. Many people rush this stage, leading to lumpy disappointment. Think of it as dating: you don’t rush straight to commitment; you court the ingredients. Tempering ensures the temperature rise is gradual, allowing the proteins to stabilize rather than seize. This careful process is what separates the velvety dream from the gritty nightmare.
Using high-quality, fresh raspberries—or even excellent frozen ones, thawed and strained—is essential for that pure, unadulterated color and flavor. Remember, the color is entirely natural, a gorgeous ruby hue that needs no artificial boost. We are maximizing the fruit flavor by cooking it down slightly before straining, concentrating the essential sweetness and acidity. This concentration step is non-negotiable if you want a curd that tastes intensely of summer and makes people question why they ever bought the supermarket stuff. It’s like Mother Nature decided to use the vibrant setting on her color palette just for this occasion.
Choosing Your Raspberry Path: Fresh vs. Frozen
While fresh raspberries offer peak flavor and aroma, they can be incredibly pricey depending on the season and location. Do not hesitate to reach for the frozen variety! Frozen berries are often picked at the height of their ripeness and maintain excellent flavor integrity, sometimes even tasting better than the fresh ones that have traveled a long way. The key difference is preparation: frozen raspberries release more liquid upon thawing. Whether fresh or frozen, you must thoroughly process and strain the berries to ensure your curd is velvety smooth, eliminating those pesky little seeds that threaten to interrupt the perfect texture. Nobody wants a gritty curd experience; that’s grounds for a kitchen meltdown, and a quick double strain solves the problem efficiently.
Ingredients for Easy Homemade Raspberry Curd Recipe
Here’s what you’ll need to make this delicious dish:
- Fresh or Frozen RaspberriesChoose ripe, plump berries for the best flavor; they provide the essential vibrant color and tart base.
- Granulated SugarThis balances the tartness of the raspberries and contributes to the smooth, slightly syrupy texture of the final curd.
- Large Eggs and Egg YolksWe use a combination to ensure the curd sets perfectly; the yolks provide necessary richness and exceptional thickening power.
- Unsalted ButterCut into cubes, cold butter is whisked in at the end off the heat to provide that signature glossy sheen and luxurious, velvety mouthfeel.
- Fresh Lemon JuiceA crucial ingredient that brightens the raspberry flavor, ensuring the final product isn’t overly sweet and provides necessary acidity for setting.
- Pinch of SaltJust a tiny amount enhances all the sweet and tart flavors, grounding the profile without making the curd taste perceptibly salty.
The full ingredients list, including measurements, is provided in the recipe card directly below.
How to Make Easy Homemade Raspberry Curd Recipe
Follow these simple steps to prepare this delicious dish:
Step 1: Prep the Berry Base
Combine the raspberries and granulated sugar in a medium saucepan over medium heat. Cook, stirring occasionally, until the raspberries have completely broken down and the mixture is simmering gently, which usually takes about 8 to 10 minutes. Remove the mixture from the heat and push it through a fine-mesh sieve set over a large heatproof bowl, pressing firmly on the solids to extract all the flavorful juice. Discard the resulting seeds and solids—we are only interested in the liquid gold that falls through the sieve.
Step 2: Temper the Eggs
In the same heatproof bowl (make sure it’s clean and dry now), whisk together the whole eggs and extra egg yolks until they are light and uniformly pale, showing no streaks of clear yolk. Slowly, and I meanslowly, pour about half a cup of the warm raspberry juice mixture into the egg mixture while whisking constantly and vigorously. This is the crucial tempering stage that prevents scrambling; take your time, treating the eggs gently. Once tempered, pour the entire egg-juice mixture back into the saucepan with the remaining raspberry liquid, incorporating them fully.
Step 3: Thicken the Curd
Return the saucepan to low heat, keeping the temperature gentle. Cook the mixture, stirring constantly with a rubber spatula or wooden spoon, making sure to scrape the sides and bottom thoroughly to prevent sticking and localized overheating. You must not let the mixture boil! Continue stirring until the curd thickens significantly, easily coating the back of the spoon, and reaching an internal temperature of 175°F (80°C). This usually takes about 6 to 10 minutes, depending on your heat source. If you see any sign of bubbling or boiling, remove it from the heat immediately.
Step 4: Finish and Chill
Remove the saucepan entirely from the heat. Whisk in the cubed, cold unsalted butter, adding one piece at a time, allowing each piece to melt completely before adding the next. This makes the curd incredibly glossy and rich. Stir in the fresh lemon juice and the pinch of salt. Pour the finished curd through a final, clean, fine-mesh sieve directly into an airtight container or clean jar to ensure maximum silkiness and remove any potential tiny cooked egg bits that might have formed. Press a layer of plastic wrap directly onto the surface of the curd to prevent that undesirable thick skin from forming as it cools.
Step 5: Storage and Setting
Allow the curd to cool on the counter for about 30 minutes to reduce the residual heat, then transfer it to the refrigerator. Chill for at least 4 hours, or preferably overnight. The chilling process is vital as it allows the butter to re-solidify and the egg proteins to fully set, giving you that beautiful, thick, spreadable texture that defines a perfect curd. The longer it chills, the better the structure becomes, rewarding your patience tenfold with a luxuriously firm final product.
Transfer to plates and drizzle with sauce for the perfect finishing touch.
Mastering Your Curd: Tips and Troubleshooting
Making curd is usually straightforward, but sometimes the kitchen gods decide to test your patience. The most common mishap is curdling, which happens when the eggs cook too quickly, creating chunks instead of a luscious cream. If you notice any signs of scrambling during the thickening phase, immediately remove the pan from the heat and whisk vigorously to cool it down. If chunks persist, you can often save the mixture by quickly blending it with an immersion blender once it cools slightly, or by running it through a fine sieve a second time—sometimes a good sieve is the hero we didn’t know we needed. Remember, low and slow is the golden rule here—never rush the heat, as temperature control dictates success.
Achieving Optimal Thickness
If your curd seems too runny after cooking, it likely hasn’t reached the crucial setting temperature of 175°F (80°C). If you don’t use a thermometer (and honestly, investing in a digital thermometer is highly recommended for baking projects), look for the visual cue known as the nappe stage: the mixture should coat the back of a spoon and remain separated when you drag your finger across the spoon surface. If it runs together immediately, keep cooking slowly and gently until it holds the line. If you overcook it past 180°F (82°C), you risk curdling, so precise temperature control is your best friend when mastering this Easy Homemade Raspberry Curd Recipe and ensuring it sets correctly without turning into a solid mass.
Storage Secrets for Longevity
Once your beautiful, vibrant raspberry curd is set, it needs proper storage to maintain its freshness. Because it contains eggs and butter, it is perishable and must be refrigerated. Always keep it in an airtight container to prevent flavor absorption and drying out. Properly stored, this curd will maintain its quality for up to two weeks, though honestly, it rarely lasts that long in my house—it’s too tempting for midnight snacking. You can also freeze raspberry curd successfully! Transfer cooled curd into a freezer-safe container, leaving about half an inch of headspace, and it will keep well for up to three months. Thaw it slowly in the refrigerator overnight before use, whisking gently to restore its homogenous, creamy texture after thawing.
Creative Ways to Use Raspberry Curd
While a spoon and a quiet corner are perfectly acceptable serving methods, the versatility of this vibrant curd is truly its superpower. Think beyond the breakfast table! Use it as a decadent filling for layer cakes or delicate French macarons, where the sharp tartness cuts beautifully through the sweetness of the frosting or meringue. It makes a stunning, colorful filling for shortbread thumbprint cookies, giving them a sophisticated twist that elevates a simple cookie. For a quick, elegant dessert, layer the curd with crumbled vanilla wafers and fluffy homemade whipped cream in small glasses for a simple, stunning parfait. Or, perhaps the most decadent use: swirl it generously into homemade vanilla ice cream base before freezing for a tangy, ribboned treat that will make any summer evening feel instantly luxurious. It’s the kind of ingredient that makes everything it touches instantly feel like a celebration, proving that this Easy Homemade Raspberry Curd Recipe is a mandatory component of any serious dessert enthusiast’s arsenal.
Welcome to the world of intensely flavored, shockingly simple fruit spreads. If you’ve ever felt intimidated by the idea of making curd from scratch, believing it requires culinary wizardry and a dedicated kitchen staff, prepare to have your illusions shattered. This isn’t just about transforming humble raspberries into something spectacular; it’s about creating a silky, tangy masterpiece that tastes like summer bottled up, ready to deploy whenever your mood needs a serious lift. Forget the bland, overly sweet jars lurking on supermarket shelves; once you experience the vibrant color and punchy flavor of this homemade version, there is simply no going back.
My relationship with curd started with lemon—the standard bearer. But frankly, lemon curd, while lovely, is the beige sedan of the curd world. We are aiming for the brightly colored, zippy convertible. Raspberries, with their perfect balance of acidity and sweetness, are the ideal candidate for a spread that is simultaneously decadent and refreshing. This recipe demands minimal effort but pays maximum dividends, suitable for slathering on scones, filling tart shells, layering in trifles, or perhaps my favorite application: sneaking spoonfuls directly from the jar at midnight.
Making fruit curd relies on a beautiful balance of ingredients: eggs (specifically the yolks for richness), sugar, butter, and fruit juice/puree. The magic happens when these ingredients are heated gently until the egg proteins coagulate, trapping the butter and fruit essences to create that signature smooth, velvety texture. Patience is the secret ingredient here; rushing the process is the only way to ruin it. We heat, we stir, and we watch the transformation unfold, leading us directly to the most luxurious spread you will ever taste. The result is so much more satisfying than simply making jam.
The Essential Ingredients for a Silky Curd
Before diving into the methodology, ensure you have quality ingredients. Since the ingredient list is short, every component plays a starring role. Using fresh, bright raspberries gives the best color, but high-quality frozen raspberries work perfectly well, especially if you strain the puree properly.
What You Will Need
- 2 cups fresh or frozen raspberries
- 1 cup granulated sugar
- 1/2 cup fresh lemon juice
- 4 large eggs, plus 2 extra yolks (for richness)
- 1/2 cup (1 stick) unsalted butter, cut into small cubes
- A pinch of salt
The Preliminary Steps: Pureeing and Straining
The secret to the incredibly smooth texture of this Easy Homemade Raspberry Curd Recipe lies in eliminating all those pesky seeds. Trust me, biting into a crunchy seed cluster while enjoying a delicate tart is a culinary tragedy we must avoid. Start by combining the raspberries and half of the lemon juice in a saucepan. Simmer gently until the raspberries break down completely, usually about ten minutes. Once mushy and fragrant, press the entire mixture through a fine-mesh sieve using the back of a spoon. This task is slightly messy but non-negotiable for perfection. You should be left with a vibrant, smooth puree. Discard the seeds and return the velvety puree to a clean bowl.
The Accidental Discovery of Sunshine on a Plate
I originally tried to make a super fancy raspberry jam, but disaster struck when I overcooked it into a thick, gloppy mess. After straining it and whisking in copious amounts of butter, this gorgeous, velvety curd emerged—it was pure accidental sunshine and far better than my original plan.
Perfecting the Cooking Process
The key to perfect curd is preparation. First, whisk the eggs and sugar, then puree and strain the raspberries to remove seeds. Combine the fruit base and egg mixture, cooking slowly and stirring constantly until the curd coats the back of a spoon beautifully.
Whisking the Sweet Base
In a separate, heatproof bowl (preferably glass or stainless steel), vigorously whisk the eggs, extra yolks, remaining lemon juice, sugar, and the pinch of salt until everything is pale yellow and slightly fluffy. The continuous whisking incorporates air and helps the sugar dissolve. Once combined, slowly whisk in the smooth raspberry puree. This combined mixture now forms the foundation of your amazing curd.
The Gentle Heat Transformation
This is where patience becomes paramount. Set your bowl over a saucepan filled with simmering water—this is your makeshift double boiler. Ensure the bottom of the bowl does not touch the water. If the mixture gets too hot, the eggs will scramble, and you’ll have a dessert tragedy on your hands. Over medium-low heat, continuously stir the mixture with a rubber spatula or wooden spoon. Do not stop stirring, as this prevents lumps and ensures even heating.
You are aiming for a temperature of about 175°F (80°C). The curd is done when it is thick enough to coat the back of a spoon thickly and you can draw a line through the coating that holds its shape. This usually takes between 10 to 15 minutes of gentle stirring. As soon as it reaches this stage, remove the bowl immediately from the heat.
The Butter Finish
Once removed from the heat, drop in the cubes of cold butter, one or two at a time, whisking vigorously until each piece melts and is fully incorporated before adding the next. This step adds gloss, incredible richness, and helps stabilize the final curd texture. Once all the butter is melted, give the curd one final strain through a fine-mesh sieve into a clean jar or container. This removes any tiny bits of cooked egg that may have slipped through the initial cooking phase, guaranteeing that professional, smooth consistency you desire.
Serving Suggestions for Raspberry Curd
While the Easy Homemade Raspberry Curd Recipe is phenomenal on its own, its versatility makes it an excellent addition to countless desserts. Don’t limit this luscious creation to just toast. Think bigger, bolder, and more celebratory!
From Breakfast to Dessert
- Scones and Toast:The classic pairing. Serve alongside clotted cream for a truly elegant afternoon tea experience.
- Cake Filling:Use it as a layer filling for vanilla or white chocolate cakes. Its tanginess cuts through the richness beautifully.
- Tarts and Pies:Excellent as a filling for miniature tarts or layered beneath a meringue topping for a vibrant raspberry meringue pie.
- Yogurt Parfaits:Swirl a generous spoonful into Greek yogurt with fresh granola for a luxurious breakfast.
- Ice Cream Topping:Drizzle slightly warmed curd over vanilla bean ice cream for an instant sophisticated dessert.
Add Your Touch
While raspberries are divine, feel free to substitute blackberries or even passion fruit for a tropical zing. Try adding a tiny dash of pure vanilla powder at the end for warmth, or zest of an orange instead of lemon juice for a softer citrus flavor.
Pro-Tips for Curd Perfection
- Always use a double boiler or very low heat; cooking too fast scrambles the eggs, transforming your curd into expensive raspberry scrambled eggs.
- Ensure you use unsalted, high-quality butter because butter makes up a huge portion of the final flavor and richness in this luscious treat.
- Strain the mixturetwiceafter cooking to guarantee that silky-smooth, professional texture, catching any stubborn bits of egg or leftover seeds.
My niece once claimed this curd tasted like a unicorn sneezed pure happiness. That’s the kind of high praise that keeps this simple, vibrant recipe permanently in rotation at our house.
Storing & Reheating
Store this glorious Easy Homemade Raspberry Curd Recipe in an airtight container in the refrigerator for up to two weeks. Do not reheat; serve chilled or at room temperature. If it thickens too much, whisk in a tablespoon of warm water before serving.
Conclusion for Easy Homemade Raspberry Curd Recipe
This Easy Homemade Raspberry Curd Recipe is proof that the simplest ingredients often yield the most dramatic results. Forget those store-bought versions; the vibrant color and intense, tangy-sweet flavor of this homemade iteration are unmatched. Whether slathered on scones, folded into cake fillings, or eaten straight from the spoon (no judgment here), this luscious fruit spread is guaranteed to brighten any day. Mastering the gentle stirring technique ensures a silky texture every time, turning a humble berry into a culinary superstar. Go ahead, fill your jars with this ruby-red joy and taste the difference that patience and fresh fruit make.
Print
Easy Homemade Raspberry Curd Recipe
Luxurious, seedless raspberry curd crafted from rich puree, tempered eggs, and whole butter. Achieve this vibrant flavor explosion using our simple straining technique.
- Total Time: 35 minutes
- Yield: 4 servings
Ingredients
- Fresh or frozen raspberries: 1 1/2 cups
- Granulated sugar: 3/4 cup
- Large eggs: 3 whole
- Large egg yolks: 2
- Unsalted butter: 1/2 cup (1 stick), cut into 8-10 cubes
- Fresh lemon juice: 1 tablespoon
- Salt: 1/8 teaspoon
Instructions
- Step 1: In a small saucepan, combine the raspberries and half of the granulated sugar. Cook over medium heat, stirring occasionally, until the berries break down and become syrupy (about 5-7 minutes). Press the mixture through a fine-mesh sieve using a spatula to extract 3/4 cup of smooth raspberry puree, discarding the seeds and pulp.
- Step 2: Whisk the whole eggs, egg yolks, the remaining sugar, and the salt together in a medium, heatproof bowl until combined. Whisk in the prepared raspberry puree and the lemon juice.
- Step 3: Set the bowl over a saucepan filled with simmering water (creating a double boiler), ensuring the bottom of the bowl does not touch the water. Continuously whisk the mixture for 8-12 minutes until it thickens significantly and reaches 180°F (82°C), or until it is thick enough to coat the back of a spoon.
- Step 4: Remove the bowl from the heat and immediately whisk in the cold cubes of butter, one cube at a time, until completely melted and smooth.
- Step 5: For an ultra-smooth curd, strain the hot mixture one more time through a clean fine-mesh sieve into a clean jar or storage container. Place a layer of plastic wrap directly onto the surface of the curd to prevent a skin from forming.
- Step 6: Allow the curd to cool slightly at room temperature, then transfer it to the refrigerator. Chill for at least 4 hours, or preferably overnight, until fully set and thick.
Notes
- For best flavor and texture, store your curd covered tightly in the refrigerator for up to 7 days, or freeze it in a freezer-safe container for longer storage.
- Curd is best served chilled or at room temperature, but if you need to loosen it, briefly whisk or gently warm a small portion in the microwave using short 5-second intervals.
- Beyond spreading on scones, use this jewel-toned curd as a delightful filling for thumbprint cookies or swirled into whipped cream to create a quick mousse.
- To ensure your curd sets smoothly without any scrambled bits, maintain continuous whisking during the double boiler phase and immediately remove the bowl from the heat once it hits 180°F.
- Prep Time: 15 minutes
- Cook Time: 20 minutes
- Method: Stovetop
- Cuisine: American


Leave a Comment