


The aroma of warm, spiced apples simmering on the stove is like a comforting hug on a crisp autumn day. Imagine spreading that sweet, tangy goodness on your morning toast!
This recipe for **easy homemade apple jam** is about to become your new obsession. It’s ridiculously simple, bursting with natural apple flavor, and tastes a million times better than anything you’ll find on a grocery store shelf.
- Effortless to create with minimal ingredients and straightforward instructions, perfect for beginner jam makers.
- Features a delightful balance of sweet and tart apple flavors, enhanced with warm spices for a cozy taste.
- Presents a beautifully vibrant color and luscious texture that is a treat for both the eyes and the palate.
- Adaptable recipe that pairs perfectly with toast, pastries, cheese, or as a glaze for meats, adding a touch of sweetness to any dish.
Ingredients for Easy Homemade Apple Jam
Here’s what you’ll need to make this delicious dish:
The full ingredients list, including measurements, is provided in the recipe card directly below.
How to Make Easy Homemade Apple Jam
Follow these simple steps to prepare this delicious dish:
Step 1: Prepare the Apples
Peel, core, and chop the apples into small, uniform pieces. The smaller the pieces, the faster the jam will cook and the smoother the final texture will be. A good dice is key!
Step 2: Combine Ingredients
In a large, heavy-bottomed pot, combine the chopped apples, granulated sugar, lemon juice, cinnamon stick, ground nutmeg, and water. Stir well to ensure the sugar is evenly distributed.
Step 3: Cook the Jam
Bring the mixture to a boil over medium-high heat, then reduce the heat to low and simmer, stirring occasionally to prevent sticking. Cook for approximately 45-60 minutes, or until the jam has thickened to your desired consistency. To test for doneness, place a small spoonful of jam on a chilled plate. If it sets up quickly and doesn’t run, it’s ready.
Step 4: Remove Cinnamon Stick and Cool
Once the jam has reached the desired consistency, remove the cinnamon stick. Let the jam cool slightly before transferring it to sterilized jars. This will help prevent cracking.
Step 5: Jar the Jam
Carefully ladle the warm jam into sterilized jars, leaving about 1/4 inch of headspace. Wipe the rims of the jars clean, then seal with sterilized lids and rings.
Step 6: Process (Optional)
For long-term storage, process the jars in a boiling water bath for 10 minutes. If you plan to use the jam within a few weeks, you can skip this step and simply store the jars in the refrigerator.
Spread on toast, biscuits, or scones for a delightful breakfast treat, or use it as a filling for pastries and desserts. It’s also delicious served with cheese and crackers!
The Tale of My Apple Jam Adventure
Okay, picture this: It’s a Saturday morning, the sun is streaming through the kitchen window, and I’m feeling all domestic goddess-y. I decide, on a whim, that I’m going to make **easy homemade apple jam**. Sounds simple enough, right?
Well, let me tell you, my initial attempt was less “goddess” and more “epic kitchen fail.” I grabbed what I thought were the perfect apples – shiny, red, and promising deliciousness. Turns out, they were about as flavorful as cardboard. My jam tasted like…well, slightly sweet nothingness.
But I’m not one to give up easily! I consulted my grandma’s old recipe book (stained with years of cooking wisdom and probably a few forgotten ingredients), and I learned the secret: it’s all about the apples! You need a mix of sweet and tart varieties to get that perfect balance of flavor.
So, armed with my newfound apple knowledge, I went back to the store, carefully selecting a mix of Honeycrisp and Granny Smith. This time, the magic happened! The aroma of simmering apples filled my kitchen, and the resulting jam was a revelation. Sweet, tangy, and bursting with apple goodness.
And that, my friends, is how I learned that making **easy homemade apple jam** is not just about following a recipe; it’s about the journey, the lessons learned, and the delicious reward at the end.
Tips for the Perfect Easy Homemade Apple Jam
Want to make sure your **easy homemade apple jam** turns out perfectly every time? Here are a few golden nuggets of wisdom I’ve picked up along the way:
- Apple Selection is Key: As I mentioned before, don’t skimp on the apples! Choose a mix of sweet and tart varieties for the most complex and delicious flavor. Honeycrisp, Fuji, Gala, and Granny Smith are all excellent choices.
- Chop it Right: Uniformly sized apple pieces will ensure even cooking. Aim for a small dice – about 1/4 inch – for a smoother jam texture.
- Don’t Overcook: Overcooking can lead to a tough, rubbery jam. Keep a close eye on the consistency and test for doneness frequently. Remember, the jam will continue to thicken as it cools.
- Sterilize Your Jars: This is crucial for preventing spoilage. You can sterilize jars by boiling them in water for 10 minutes, or by running them through a dishwasher cycle with a sterilize setting.
- Spice it Up: Feel free to experiment with different spices to customize your jam. A pinch of ground ginger, cloves, or allspice can add a warm and festive touch.
Ways to Enjoy Your Homemade Apple Jam
Okay, so you’ve made a batch of **easy homemade apple jam** – congratulations! Now, what do you do with it? Here are a few of my favorite ways to enjoy this delectable treat:
- Spread it on Toast or Biscuits: This is the classic way to enjoy jam, and for good reason! It’s simple, satisfying, and utterly delicious.
- Use it as a Pastry Filling: Apple jam makes a fantastic filling for pies, tarts, and pastries. It adds a burst of flavor and moisture that will elevate your desserts to the next level.
- Serve it with Cheese and Crackers: The sweetness of the jam pairs beautifully with the savory flavors of cheese. Try it with a sharp cheddar, creamy brie, or tangy goat cheese.
- Glaze for Meats: Brush apple jam over chicken, turkey, or even lamb during the last few minutes of cooking for a sweet and savory glaze. The sugar in the jam will caramelize and create a beautiful, glossy finish.
- Stir it into Yogurt or Oatmeal: Add a spoonful of apple jam to your morning yogurt or oatmeal for a touch of sweetness and flavor. It’s a great way to start your day!
- Gift it to Friends and Family: Homemade jam makes a thoughtful and delicious gift. Package it in pretty jars with a ribbon and a handwritten label for a personal touch.
Frequently Asked Questions About Easy Homemade Apple Jam
Still have questions about making **easy homemade apple jam**? Here are a few of the most common questions I get asked:
**Can I use different types of apples?**
Absolutely! Feel free to experiment with different apple varieties to find your perfect flavor combination. Just make sure to use a mix of sweet and tart apples for the best results.
**Can I reduce the amount of sugar?**
You can reduce the amount of sugar, but keep in mind that sugar acts as a preservative in jam. Reducing the sugar may shorten the shelf life of your jam. You can also use a sugar substitute, but be aware that it may affect the texture and flavor of the jam.
**How long does homemade apple jam last?**
Properly processed and sealed jars of apple jam can last for up to a year in a cool, dark place. Once opened, the jam should be stored in the refrigerator and used within a few weeks.
**My jam is too runny. What can I do?**
If your jam is too runny, you can try cooking it for a longer period of time to allow more of the liquid to evaporate. You can also add a small amount of pectin, a natural thickening agent, to help the jam set up.
**My jam is too thick. What can I do?**
If your jam is too thick, you can add a tablespoon or two of water or apple juice to thin it out. Stir well and heat gently until the jam reaches your desired consistency.
Conclusion: Embrace the Apple Jam Adventure
So there you have it: everything you need to know to make **easy homemade apple jam** that will impress your friends, delight your family, and make your taste buds sing. Don’t be afraid to experiment, have fun, and embrace the apple jam adventure! And remember, even if your first attempt isn’t perfect, that’s okay! Just keep trying, and you’ll be rewarded with a delicious, homemade treat that you can be proud of. Now go forth and jam!
Perfecting the Cooking Process

To achieve jammy nirvana, macerate your apples with lemon juice and sugar overnight. This draws out moisture, jumpstarting the cooking process. Then, simmer slowly until thickened, stirring frequently to prevent sticking and ensure an even consistency.
Add Your Touch
Feeling adventurous? Infuse your easy homemade apple jam with warm spices like cinnamon, nutmeg, or cloves for a cozy, autumnal twist. Alternatively, a splash of alcohol-free vanilla extract or a squeeze of fresh lemon juice can brighten the flavor profile. Get creative!
Storing & Reheating
Once cooled, store your homemade creation in sterilized jars in the refrigerator for up to two weeks. For longer storage, process in a boiling water bath according to canning guidelines. There’s no need to reheat, just spread and enjoy!
Here are some tips to transform you from a jam novice to a preserve pro:
- Use a wide-bottomed pot; this allows for faster evaporation and prevents the jam from becoming too dark, ensuring a vibrant color.
- Test the jam’s readiness by placing a spoonful on a chilled plate; if it wrinkles when you push it, it’s perfectly set.
- Always sterilize your jars properly to prevent spoilage and ensure that your homemade creation lasts longer, ready for anytime enjoyment.
(Personal anecdote formated as paragraph subheading)
My grandma used to make apple jam every fall. The whole house would smell like cinnamon and warm apples. That memory is why I love making it.
Okay, let’s dive headfirst into the wonderful, sticky world of homemade preserves! We’re not just talking about any jam today, my friends. Oh no. We’re venturing into the realm of **easy homemade apple jam**, the kind that makes your toast sing and your scones swoon. This isn’t your store-bought, overly-processed, suspiciously-shiny stuff. This is the real deal. We will keep things easy with equipment you’ll already have at home.
First, let me regale you with a tale of my early jam-making attempts. Picture this: a kitchen covered in splattered apple goo, a pot bubbling over like a miniature volcanic eruption, and me, looking like I’d just lost a fight with a particularly aggressive apple tree. It was not pretty. But fear not! I have learned from my sticky, sugary mistakes, and I’m here to guide you on a much smoother, less explosive path to jammy success.
The Apple of My Eye (and Your Jam)
Choosing the right apples is crucial. I’m a big fan of using a mix of varieties. Think of it as a flavor symphony in a jar. Honeycrisp adds sweetness and a lovely crispness, while Granny Smith provides a tart counterpoint that keeps things interesting. A little Fuji adds a touch more sweetness and body. Experiment and find your own perfect blend. Just avoid those mealy, sad-looking apples lurking in the back of your fridge. Nobody wants mealy jam. Trust me on this. This mixture of different apples will yield the best result for your batch of **easy homemade apple jam**.
Gather Your Arsenal (of Kitchen Tools)
Before we even think about peeling an apple, let’s make sure we have our equipment ready. You’ll need:
- A large, heavy-bottomed pot. This is essential for even cooking and preventing scorching. Trust me, burnt jam is not a good look (or taste).
- A good quality vegetable peeler.
- A sharp knife. Safety first, folks!
- A lemon. Because a little zing is always a good thing.
- Sugar. The not-so-secret ingredient that transforms apples into jammy gold.
- Sterilized jars and lids. We don’t want any unwanted guests crashing our jam party (aka mold).
Got everything? Excellent! Let’s get jamming! You’ll find that **easy homemade apple jam** is easier to make if you have all your tools at your disposal!
Peel, Core, and Conquer (the Apple Mountain)
Now comes the slightly tedious but oh-so-necessary part: prepping the apples. Peel, core, and chop them into small, even pieces. The smaller the pieces, the faster they’ll cook down into jammy goodness. As you chop, toss the apple pieces with lemon juice. This prevents browning and adds a lovely tartness that balances the sweetness of the sugar. Think of it as apple sunscreen. It’s important!
Sweetening the Deal (with Sugar)
Once your apples are prepped, it’s time to add the sugar. The amount of sugar you use will depend on the sweetness of your apples. As a general rule of thumb, use about half as much sugar as you have apples. So, if you have 4 cups of chopped apples, use 2 cups of sugar. Add the sugar to the pot with the apples and stir well to combine.
Now, here’s where the magic happens. Let the apple-sugar mixture sit for at least 30 minutes, or even better, overnight. This process, called maceration, draws out the apple’s natural juices and helps the sugar dissolve, resulting in a smoother, more flavorful jam. Plus, it gives you a chance to take a break and maybe do a little dance in the kitchen. Because why not? This process is crucial in the success of **easy homemade apple jam**.
Simmering to Success (the Jam Journey)
Place the pot over medium heat and bring the mixture to a gentle simmer. Stir frequently to prevent sticking and scorching. As the apples cook down, they’ll release more liquid and start to soften. Continue simmering, stirring occasionally, until the jam reaches your desired consistency. This can take anywhere from 30 minutes to an hour, depending on the type of apples you use and how thick you like your jam.
How do you know when your jam is ready? There are a couple of ways to tell. The first is the “wrinkle test.” Place a small spoonful of jam on a chilled plate and pop it in the freezer for a minute or two. Then, push the jam with your finger. If it wrinkles, it’s ready. If it’s still runny, keep simmering.
The second method is to use a candy thermometer. Jam is typically ready when it reaches 220°F (104°C). But honestly, I prefer the wrinkle test. It’s more fun, and it gives you an excuse to lick a chilled spoonful of jam.
Spice It Up (Optional, But Highly Recommended)
Now, for the fun part: adding your own personal touch. This is where you can really make your **easy homemade apple jam** stand out. A pinch of cinnamon, a dash of nutmeg, a splash of alcohol-free vanilla extract – the possibilities are endless. I’m a big fan of adding a little cardamom for a warm, exotic flavor. Or, for a bit of zing, try grating in some fresh ginger. Just be careful not to overdo it. A little goes a long way.
If you’re feeling extra fancy, you can even add a splash of apple juice (remember, no alcohol allowed!). It intensifies the apple flavor and adds a touch of sweetness.
Jarring and Jubilation (the Final Flourish)
Once your jam is ready, it’s time to transfer it to your sterilized jars. Ladle the hot jam into the jars, leaving about 1/4 inch of headspace at the top. Wipe the rims of the jars clean and place the lids on top, followed by the bands.
If you plan to store your jam for more than a few weeks, you’ll need to process the jars in a boiling water bath. This ensures a proper seal and prevents spoilage. Follow the instructions for your specific canning equipment. Alternatively, for small batches you intend to consume soon, refrigeration works just fine.
And there you have it! Your very own batch of glorious, homemade apple jam. Spread it on toast, scones, crackers, or even eat it straight from the jar with a spoon. I won’t judge.
Troubleshooting Time (Because Life Happens)
Jam making isn’t always a walk in the park. Sometimes, things go wrong. But don’t panic! Here are a few common problems and how to fix them:
- Jam is too runny: Keep simmering! It just needs more time to thicken.
- Jam is too thick: Add a tablespoon or two of apple juice and stir well.
- Jam is burnt: Sadly, there’s no saving burnt jam. Start over, and be more careful next time.
- Jam has crystallized: This can happen if you use too much sugar or don’t dissolve it properly. To prevent this, make sure to stir the sugar well and let the mixture macerate for at least 30 minutes.
Don’t let these potential pitfalls deter you. With a little practice, you’ll be making perfect jam every time.
Jam Beyond Toast (Creative Uses)
While slathering your homemade creation on toast is a perfectly acceptable way to enjoy it, there are so many other delicious possibilities. Here are a few ideas to get your culinary juices flowing:
- Pair it with cheese: Apple jam and cheddar cheese are a match made in heaven.
- Use it as a glaze: Brush it over chicken or turkey for a sweet and savory flavor.
- Add it to yogurt or oatmeal: For a burst of flavor and natural sweetness.
- Make thumbprint cookies: Fill the center of your favorite shortbread cookies with apple jam for a festive treat.
- Gift it to friends and family: Homemade jam makes a thoughtful and delicious present.
So go forth and conquer the world of apple jam! With a little patience, a few simple ingredients, and a dash of enthusiasm, you’ll be rewarded with a jar of homemade goodness that will brighten your day and impress your friends. Happy jamming! Your **easy homemade apple jam** will be the talk of the town!
Conclusion for Easy Homemade Apple Jam:
This easy homemade apple jam recipe is your ticket to preserving the season’s best flavors in a delicious and satisfying spread. The process is straightforward and rewarding, turning simple apples into a delightful treat. Remember the importance of the wrinkle test for perfect consistency and proper storage for long-lasting enjoyment. Feel free to experiment with different apples and spices to create your signature flavor profile. Now go forth and spread the apple jam love!
Print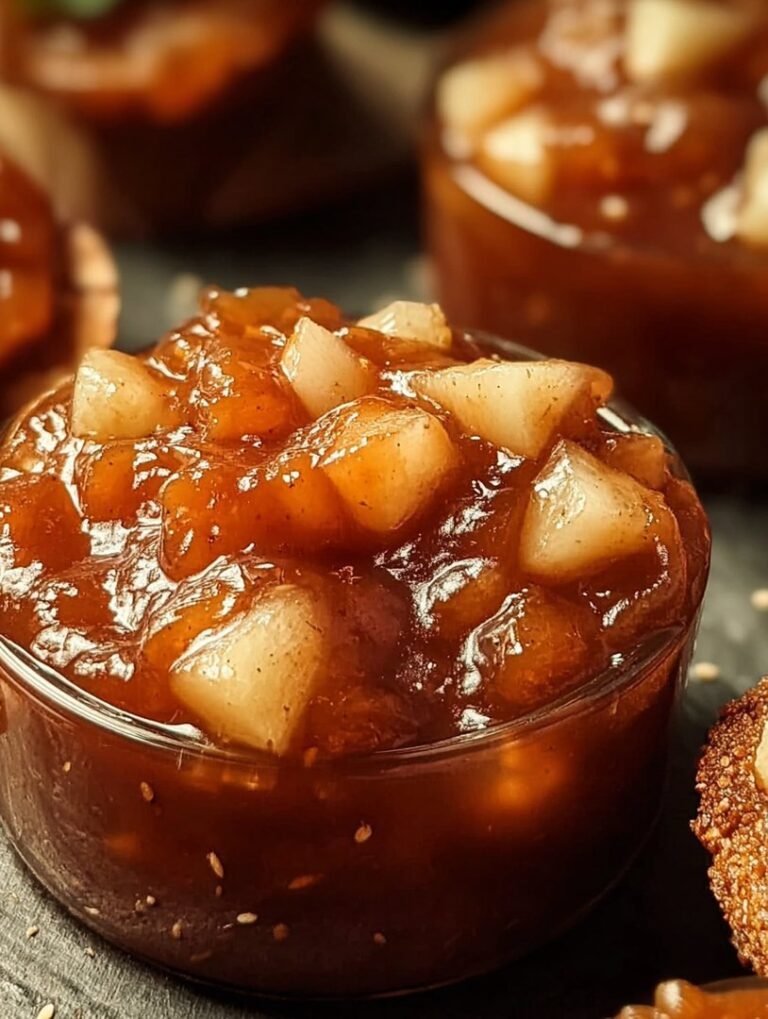
Easy Homemade Apple Jam
Delicious easy homemade apple jam recipe with detailed instructions and nutritional information.
- Total Time: 35 minutes
- Yield: 4 servings
Ingredients
- Apples, peeled, cored, and chopped: 4 pounds
- Granulated sugar: 4 cups
- Lemon juice: 1/4 cup
- Water: 1/2 cup
- Ground cinnamon: 1 teaspoon
- Ground nutmeg: 1/2 teaspoon
- Pinch of salt: 1/4 teaspoon
Instructions
- Step 1: Combine the chopped apples, sugar, lemon juice, water, cinnamon, nutmeg, and salt in a large, heavy-bottomed pot or Dutch oven.
- Step 2: Bring the mixture to a boil over medium-high heat, stirring constantly to prevent sticking.
- Step 3: Once boiling, reduce the heat to medium-low and continue to cook, stirring frequently, for approximately 45-60 minutes, or until the jam has thickened and reached your desired consistency. The jam will thicken more as it cools.
- Step 4: To test for doneness, place a small spoonful of jam onto a chilled plate. Let it sit for a minute. If it wrinkles when you push it with your finger, it is ready. If not, continue cooking for a few more minutes and test again.
- Step 5: Once the jam is ready, carefully ladle it into sterilized jars, leaving 1/4 inch headspace.
- Step 6: Process in a boiling water bath for 10 minutes (adjust time for altitude). Alternatively, let cool completely and store in the refrigerator for up to 3 weeks.
Notes
- Store opened jars in the refrigerator for optimal freshness and to maintain the jam's lovely color.
- Gently reheat the jam in the microwave or on the stovetop with a splash of water if it becomes too thick after refrigeration.
- Spread this comforting apple jam on warm scones or biscuits, or swirl it into your morning oatmeal for a cozy start.
- For a richer flavor, consider using a mix of apple varieties like Honeycrisp and Granny Smith in your jam.
- Prep Time: 15 minutes
- Cook Time: 20 minutes
- Method: Stovetop
- Cuisine: American
FAQs:
Can I use different types of apples for this easy homemade apple jam recipe?
Absolutely! Experimenting with different apple varieties is part of the fun. A mix of sweet apples like Gala or Fuji with tart apples like Granny Smith will create a complex and delicious flavor profile. Each variety lends a unique texture and taste, impacting the final sweetness and tartness of the jam. Consider using firmer apples as they hold their shape better during cooking. Feel free to explore local or seasonal apples to discover your favorite combination for a truly personalized homemade apple jam. Remember, cooking times may vary slightly based on the apples you choose.
How do I know when my apple jam has reached the correct consistency?
The “wrinkle test” is your best friend here! Place a small plate in the freezer before you start making the jam. Once you think the jam is nearly ready, spoon a small amount onto the cold plate and return it to the freezer for about a minute. Then, push the jam with your finger. If it wrinkles, it’s ready! If it’s still runny, continue cooking the jam for a few more minutes and test again. Achieving the right consistency is crucial for a perfect spreadable texture in your easy homemade apple jam.
What’s the best way to store my homemade apple jam?
For optimal preservation, sterilize your jars properly before filling them with the hot apple jam. Process the filled jars in a boiling water bath for the recommended time based on your altitude to ensure a tight seal. Properly sealed jars can be stored in a cool, dark place for up to a year. Once opened, store the jam in the refrigerator and use it within a few weeks. Storing the jam correctly ensures it stays fresh and delicious for a long time after preparing this easy homemade apple jam.
Can I add spices to my apple jam to enhance the flavor?
Definitely! Spices can elevate your apple jam to a whole new level. A pinch of cinnamon, nutmeg, or cloves adds warmth and depth. A little bit of lemon zest can brighten the flavor, adding a refreshing tang. You can even experiment with ginger for a subtle spicy kick. Add the spices during the last 15 minutes of cooking to allow the flavors to meld without overpowering the apple taste. Feel free to tailor the spices to your preference for a truly unique and flavorful easy homemade apple jam.


Leave a Comment