

The aroma of freshly baked bread is a universal hug for the soul, a promise of comfort and simple joy. Imagine that rich, yeasty scent filling your kitchen, the golden crust hinting at a soft, airy interior, all achieved with minimal fuss. This easy Dutch bread recipe brings that dream to life, transforming basic ingredients into a masterpiece. This isn’t just about baking; it’s about reclaiming a little magic in your day, proving that exceptional taste doesn’t require exceptional effort. It’s a delightful journey from flour and water to a crusty, heartwarming loaf, perfect for any occasion.
- This recipe simplifies bread-making, proving that a truly delicious, crusty loaf of Easy Dutch Bread is achievable even for novice bakers with minimal hands-on time.
- The flavor profile is wonderfully versatile, offering a subtle sweetness and deep, yeasty notes that pair beautifully with both sweet and savory accompaniments.
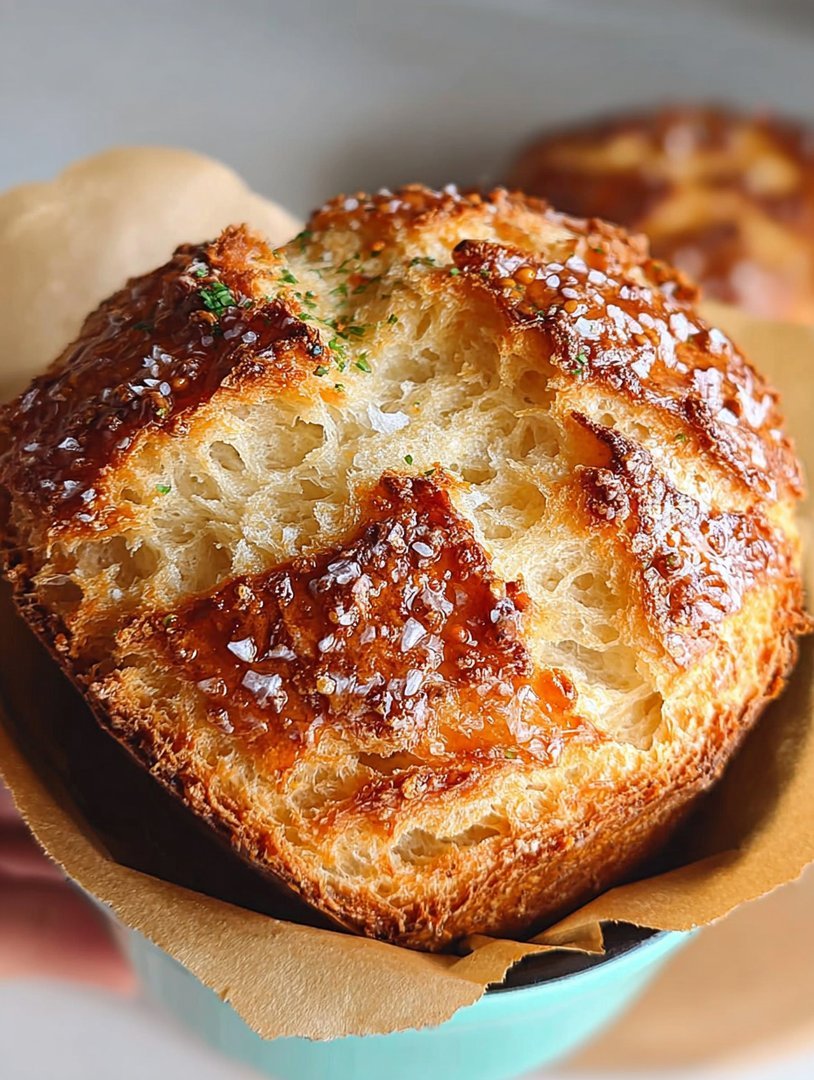
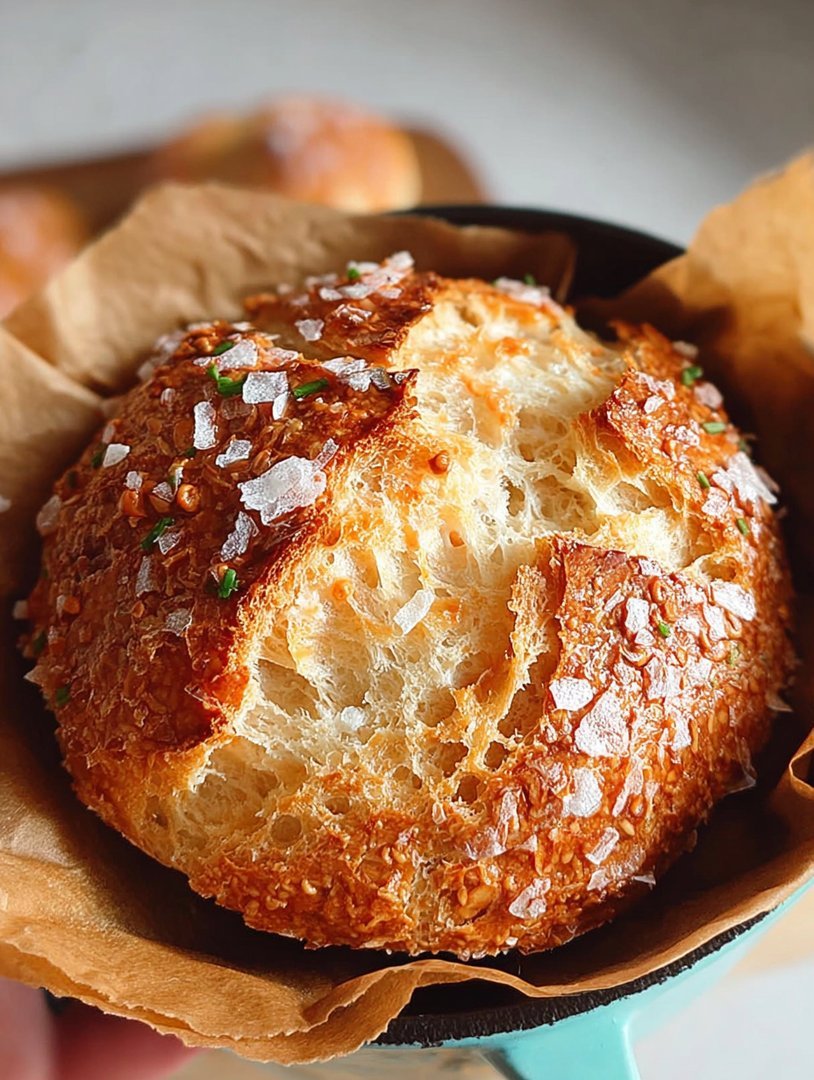
- Achieve a stunning, golden-brown crust and a beautiful, airy crumb, making this homemade bread as visually appealing as it is delicious.
- Enjoy this rustic bread with soups, stews, or simply spread with butter; its robust structure and inviting taste make it incredibly adaptable.
There’s a certain intimidation factor that often comes with bread baking. Visions of sticky dough, endless kneading, and failed rises haunt many a kitchen dreamer. I remember my first attempts, armed with grand ambitions and absolutely no clue. Flour dusted every surface, my hands looked like they’d wrestled a ghost, and the resulting “loaf” could have doubled as a doorstop. It was a humbling, albeit hilarious, experience. But then, a friend shared a secret, a revelation that changed my baking life forever: the concept of an easy Dutch bread. This method promised artisan-quality bread with shockingly little effort, and I, a reformed bread-baking failure, was skeptical but intrigued. What I discovered was pure magic – a recipe that yields a gorgeous, crusty loaf every single time, without the arm workout or the existential dread. It’s a game-changer, transforming the daunting art of bread-making into an enjoyable, rewarding experience.
Why This Easy Dutch Bread Will Become Your Go-To
This easy Dutch bread recipe is more than just a collection of ingredients and steps; it’s a philosophy. It embraces simplicity without compromising on flavor or texture. We’re talking about a bread that boasts a gloriously crispy crust, a chewy interior, and that distinct, comforting aroma that only fresh bread can provide. The beauty of this method lies in its minimal intervention. You mix a few ingredients, let time do most of the work, and then bake it in a Dutch oven, which creates the perfect steamy environment for that enviable crust.
Forget the endless kneading, the proofing disasters, and the complicated techniques. This recipe cuts straight to the chase, making it accessible to anyone who’s ever dreamed of pulling a warm, homemade loaf from their oven. It’s perfect for busy weeknights, lazy weekends, or any moment you crave the wholesome goodness of artisan bread without the artisan effort. The result is a rustic, hearty loaf that tastes like it came from a fancy bakery, but costs a fraction of the price and carries the undeniable warmth of a home-baked good.
The Magic of Minimal Effort in Baking
The secret to this incredibly easy Dutch bread lies in its hands-off approach. By allowing the dough to slowly ferment over several hours (or even overnight), you develop complex flavors and a beautiful airy texture without having to exert much physical effort. This slow fermentation process, often referred to as a “no-knead” method, allows the gluten to develop naturally. It’s truly revolutionary for home bakers, particularly those who might be intimidated by traditional bread-making techniques. You simply stir the ingredients together until they form a shaggy dough, cover it, and let it rest. This resting period is where the real work happens, as the yeast diligently works its magic, creating pockets of air and building a robust flavor profile. The result is a loaf with an irregular, open crumb that is the hallmark of artisanal bread.
Furthermore, baking in a preheated Dutch oven is a game-changer. The heavy, lidded pot traps steam around the dough during the initial baking phase, which helps the crust remain soft and pliable, allowing the loaf to expand fully before the crust sets. This crucial step contributes to the bread’s impressive rise and its signature crispy, crackly exterior. Once the lid is removed, the bread finishes baking to a beautiful golden brown, developing that irresistible crunch. This method essentially mimics the conditions of a professional bread oven right in your home kitchen, demystifying the process of achieving that coveted bakery-quality finish.
Ingredients for Easy Dutch Bread
Here’s what you’ll need to make this delicious dish:
- All-Purpose FlourThe foundation of our bread. Use unbleached for the best flavor and texture, as it provides a good balance of protein for gluten development.
- Active Dry YeastThe magical leavening agent that makes our bread rise. Ensure your yeast is fresh and active for optimal results.
- SaltEssential for flavor and for regulating yeast activity. Don’t skip it; it brings out the true taste of the bread.
- Granulated SugarA tiny pinch helps activate the yeast and adds a subtle sweetness, enhancing the overall flavor.
- Warm WaterThe essential liquid that activates the yeast and brings the dough together. Aim for a temperature around 105-115°F (40-46°C).
The full ingredients list, including measurements, is provided in the recipe card directly below.
How to Make Easy Dutch Bread
Follow these simple steps to prepare this delicious dish: Step 1: Combine Dry Ingredients In a large bowl, whisk together 3 cups (360g) all-purpose flour, 1/2 teaspoon active dry yeast, 1 teaspoon salt, and 1 teaspoon granulated sugar. This ensures an even distribution of the leavening agent and seasonings. Step 2: Add Water and Mix Pour 1 1/2 cups (360ml) warm water (105-115°F / 40-46°C) into the dry ingredients. Use a wooden spoon or a spatula to mix until a shaggy, sticky dough forms. Avoid overmixing; a rough texture is perfectly fine. Step 3: First Rise (Proofing) Cover the bowl tightly with plastic wrap or a clean kitchen towel. Let the dough rise at room temperature (ideally 70-75°F / 21-24°C) for 8 to 18 hours. The longer rise develops more flavor. The dough should double in size and appear bubbly. Step 4: Preheat Oven and Dutch Oven About 30 minutes before baking, place a 6-quart (approx. 5.7L) Dutch oven with its lid into your oven. Preheat the oven to 450°F (230°C). Heating the Dutch oven ensures a consistent, high temperature for baking. Step 5: Prepare Dough for Baking Carefully remove the hot Dutch oven from the oven. Gently transfer the risen dough onto a lightly floured surface. Fold the dough over on itself a few times to create a round shape, being careful not to deflate it completely. You can score the top with a sharp knife if desired for a rustic look. Step 6: Bake the Easy Dutch Bread Carefully place the dough into the hot Dutch oven. Cover with the lid and bake for 30 minutes. Remove the lid and continue baking for another 15-20 minutes, or until the crust is deeply golden brown and sounds hollow when tapped. Transfer to a wire rack to cool completely before slicing and serving.
Tips for the Perfect Easy Dutch Bread
Achieving a consistently perfect loaf of easy Dutch bread involves a few key considerations that can elevate your baking from good to extraordinary. One of the most common questions is about the dough’s consistency after the rise. If your dough feels too wet or sticky to handle, don’t panic! A light dusting of flour on your work surface and hands will help immensely. Remember, less is more when it comes to added flour; you want to maintain the dough’s hydration. Conversely, if your dough seems a bit stiff, ensure your water temperature was accurate during mixing and that your yeast is fresh. Sometimes, slight variations in flour absorption can occur, but the beauty of this no-knead method is its forgiving nature.
Another crucial tip involves handling the hot Dutch oven. Always use oven mitts, and be mindful of the steam that will escape when you remove the lid. The steam is your friend for achieving that amazing crust, but it can be hot! Cooling is also vital. While it’s tempting to slice into a warm loaf, letting the bread cool completely allows the internal structure to set and prevents a gummy texture. Patience truly is a virtue when it comes to enjoying the full flavor and texture of your homemade easy Dutch bread.
Proofing Pointers for a Fluffy Crumb
The proofing stage is where the magic truly unfolds for your easy Dutch bread, and understanding a few pointers can ensure a perfect, fluffy crumb every time. The ideal room temperature for proofing is between 70-75°F (21-24°C). If your kitchen is cooler, consider placing the covered bowl in a slightly warmer spot, perhaps in a turned-off oven with the light on, or near a warm (but not hot) appliance. Avoid placing it in direct sunlight or on a very hot surface, as this can overproof the dough or kill the yeast. The longer proofing time, especially for 12-18 hours, allows for significant flavor development, resulting in a more complex and satisfying taste. Look for visual cues: the dough should have visibly doubled in size and be covered with small bubbles on the surface. If you gently poke the dough with a floured finger, it should slowly spring back, leaving a slight indentation. This “poke test” is a reliable indicator that your dough is perfectly proofed and ready for baking.
Baking Brilliance for a Crispy Crust
The baking process for your easy Dutch bread is surprisingly straightforward, yet a few brilliant techniques guarantee that coveted crispy crust and perfectly cooked interior. Always ensure your Dutch oven is preheated thoroughly with the oven. This creates an immediate burst of steam when the dough hits the hot pot, which is essential for preventing the crust from setting too quickly and allowing the bread to expand fully. When carefully transferring the dough into the scorching hot Dutch oven, work quickly but gently to minimize heat loss. Some bakers like to place a piece of parchment paper under their dough before lifting it into the pot, which makes transfer easier and reduces the risk of sticking, while also acting as a convenient sling to lift the baked loaf out later. Remember to keep the lid on for the first portion of baking; this traps the steam, mimicking a professional bakery oven. Removing the lid for the final 15-20 minutes allows the moist crust to dry out and crisp up, achieving that beautiful deep golden-brown color and irresistible crunch. Don’t rush this final stage; it’s where the exterior truly shines.
Storing Your Loaf for Freshness
Once you’ve baked your magnificent easy Dutch bread, proper storage is key to maintaining its freshness and delightful texture. For immediate enjoyment, simply slice and serve. If you plan to consume it within a day or two, store the cooled loaf at room temperature. The best way to preserve that lovely crust and soft interior is to wrap the bread in a clean kitchen towel or place it in a paper bag. Avoid airtight plastic bags for whole loaves, especially within the first 24 hours, as they can trap moisture and make the crust soft and chewy rather than crisp. If you have any leftover bread that you wish to keep for longer, slicing it and freezing the individual slices in an airtight freezer bag or container is an excellent option. When ready to enjoy, simply pop a frozen slice into a toaster, and it will be almost as good as fresh from the oven, offering a quick and easy way to savor your homemade creation for days or even weeks.
Serving Suggestions for Easy Dutch Bread
The versatility of this easy Dutch bread means it pairs wonderfully with a myriad of dishes, making it a star on any table. Its rustic charm and robust flavor complement both simple and elaborate meals. Imagine a slice slathered with butter, perfect alongside a steaming bowl of hearty vegetable stew or a comforting lentil soup on a chilly evening. It also serves as an excellent vehicle for your favorite sandwiches, providing a substantial bite that holds up to generous fillings. For a delightful breakfast or brunch, toast a slice and top it with scrambled eggs and fresh avocado, or spread with homemade fruit preserves and a dollop of fresh cream. This bread truly shines as a companion, absorbing flavors and adding a satisfying texture to every bite, making any meal feel a little more special and wholesome.
Sweet or Savory Companions
Whether your palate yearns for something sweet or decidedly savory, this easy Dutch bread stands ready to impress as the perfect companion. For a delightful savory experience, consider pairing thick slices with a vibrant bruschetta made from ripe tomatoes, fresh basil, and a drizzle of good olive oil. It’s also exceptional alongside a cheese board featuring sharp aged cheddar, creamy goat cheese, and a sprinkle of cracked black pepper. Another fantastic savory option is to serve it with a rich beef stew or a flavorful turkey chili, where its crusty exterior is ideal for soaking up every last drop of the delicious broth. On the sweet side, the bread’s subtle sweetness makes it a fantastic base for warm apple butter, a smear of hazelnut spread, or even a simple cinnamon-sugar toast. For an elegant dessert, lightly toast slices and top with fresh berries, a touch of sweetened plant-based whipped cream, and a drizzle of maple syrup. The possibilities are truly endless, limited only by your imagination and the contents of your pantry.
Creative Variations for Your Loaf
Once you’ve mastered the basic easy Dutch bread recipe, don’t be afraid to experiment and personalize your loaf with creative variations. The beauty of this foundational recipe is how easily it adapts to different flavors and textures, allowing you to tailor it to your preferences or whatever ingredients you have on hand. For a hint of zest, try incorporating some finely grated lemon or orange peel into the dough when you add the dry ingredients. This adds a subtle, fragrant lift that can brighten the bread, especially if you plan to serve it with sweeter toppings or fruit spreads. You could also experiment with different types of flour. While all-purpose works beautifully, substituting a portion (say, 1/4 to 1/2 cup) of the all-purpose flour with whole wheat or rye flour can introduce deeper, nuttier flavors and a chewier texture. Just remember that different flours absorb water differently, so you might need to adjust the water slightly to achieve the right dough consistency. The goal is to have fun and make this truly your own!
A Seeded Delight
Transform your easy Dutch bread into a seeded delight by incorporating a mix of your favorite seeds directly into the dough. During Step 2, when you’re mixing in the warm water, stir in 1/4 to 1/2 cup of mixed seeds such as sunflower, poppy, sesame, or flax seeds. This addition not only provides a wonderful textural contrast but also infuses the bread with nutty, earthy flavors and a boost of nutrients. For an extra touch, before placing the dough into the Dutch oven in Step 6, lightly mist the top of the dough with water and sprinkle a generous amount of additional seeds on the surface. These will adhere to the dough during baking, creating a beautiful, crunchy top crust that is incredibly satisfying to bite into. This variation is particularly delicious served with savory spreads or as an accompaniment to salads, offering a wholesome and flavorful twist on the classic loaf.
An Herbaceous Twist
Infuse your easy Dutch bread with an aromatic herbaceous twist by adding fresh or dried herbs to the dough. During Step 1, when combining your dry ingredients, mix in 1-2 tablespoons of finely chopped fresh herbs like rosemary, thyme, oregano, or a blend of Italian herbs. If using dried herbs, start with 1-2 teaspoons, as their flavor is more concentrated. The herbs will release their fragrant oils during the long proofing process and baking, imbuing the bread with a wonderful, savory aroma and taste. This herbaceous version is particularly exquisite when served alongside roasted chicken, hearty pasta dishes, or simply dipped in olive oil with a sprinkle of black pepper. The herbs elevate the simple bread, making it feel more gourmet and sophisticated, yet still incredibly easy to prepare.
Baking this easy Dutch bread isn’t just about making food; it’s about creating an experience, a memory, and a deep sense of satisfaction. From the first stir of ingredients to the moment you pull that perfectly golden, crusty loaf from the oven, there’s a quiet joy in the process. It’s a testament to the idea that sometimes, the simplest things yield the most profound pleasures. So, next time you’re craving homemade bread, don’t let old fears hold you back. Embrace the simplicity of this recipe, and prepare to impress yourself, and anyone lucky enough to share a slice, with this truly magnificent and easy Dutch bread.
The Accidental Discovery of Sunshine on a Plate
My kitchen once hosted a comedy of culinary errors, a battleground of forgotten ingredients and burnt offerings. Then, one dreary afternoon, I stumbled upon a recipe for what would become my beloved Easy Dutch Bread. It wasn’t just bread; it was an unexpected beacon of warmth, a fragrant hug that transformed my kitchen into a sanctuary of delightful aroma.
That first loaf, emerging golden and crusty from the oven, felt like a magic trick. It required minimal fuss but delivered maximum reward, proving that sometimes, the simplest things bring the most profound joy. I remember thinking, “Where has this sunshine on a plate been all my life?” It was a revelation, turning a novice baker into someone who felt like they’d unlocked an ancient, delicious secret.
The Allure of Simplicity
There’s an undeniable charm in a recipe that asks for so little and gives back so much. This particular Easy Dutch Bread recipe doesn’t demand hours of kneading or complicated techniques. Instead, it invites you to embrace patience and let time do most of the heavy lifting. The beauty lies in its accessibility; anyone, from the absolute beginner to the seasoned kitchen wizard, can achieve a loaf that boasts a wonderfully crackling crust and a soft, airy interior.
The first slice, still warm, with butter melting into its tender crumb, felt like a victory lap after a marathon I hadn’t even realized I was running. It’s the kind of bread that makes you forget your worries, even just for a moment, as you savor its wholesome, comforting taste. It’s a testament to how humble ingredients, combined with a touch of warmth and a little waiting, can create something truly extraordinary. This bread isn’t just food; it’s an experience.
Perfecting the Cooking Process
Achieving that perfect loaf of Easy Dutch Bread is less about frantic activity and more about a harmonious sequence. Start by combining your dry ingredients, then swiftly incorporate the water. This rapid mixing ensures minimal gluten development initially, allowing the long proof to create that incredible texture. Finally, transfer the dough to its vessel for its slow transformation.
Mastering this simple process guarantees success every time. The magic truly happens during the slow fermentation, which builds incredible flavor and structure without any effort on your part. Once you understand this flow, baking this Dutch-style bread becomes almost meditative.
Gathering Your Artisanal Toolkit for Easy Dutch Bread
To embark on this delightful baking journey, you won’t need an arsenal of gourmet ingredients. The beauty of this Easy Dutch Bread lies in its reliance on pantry staples, transforming them into something magnificent. Here’s what you’ll need:
- All-Purpose Flour:3 cups (about 360g). This is the backbone of our bread, providing structure and chew.
- Warm Water:1½ cups (about 360ml), ideally between 105-115°F (40-46°C). The warmth activates the yeast, waking it up for its important work.
- Active Dry Yeast:1 teaspoon. This tiny organism is responsible for all the glorious rise and airy pockets in your bread.
- Salt:1 teaspoon. Don’t skip this! Salt enhances flavor and controls yeast activity, crucial for a balanced taste.
- Granulated Sugar:½ teaspoon. A tiny pinch to give the yeast a little boost at the start, making sure it’s happy and productive.
You will also need a Dutch oven or a heavy, oven-safe pot with a lid. This is the secret weapon for achieving that coveted crispy crust and perfectly steamed interior. Parchment paper is also incredibly helpful for easy handling of the dough.
The Magic Unfolds: Step-by-Step Baking
Ready to bring your Easy Dutch Bread to life? Follow these straightforward steps, and soon your kitchen will be filled with an irresistible aroma.
- Prepare the Yeast:In a large mixing bowl, combine the warm water and granulated sugar. Sprinkle the active dry yeast over the top. Let it sit for 5-10 minutes until it becomes foamy, indicating the yeast is active and ready. If it doesn’t foam, your yeast might be old, or the water wasn’t the right temperature; start again.
- Combine Dry Ingredients:In a separate bowl, whisk together the all-purpose flour and salt.
- Mix the Dough:Pour the activated yeast mixture into the flour mixture. Use a wooden spoon or sturdy spatula to mix until just combined and no dry streaks of flour remain. The dough will be shaggy and sticky – this is exactly what you want for this no-knead bread! Avoid overmixing.
- First Proof (The Long Nap):Cover the bowl tightly with plastic wrap or a clean kitchen towel. Let the dough rise at room temperature (ideally around 70-75°F / 21-24°C) for 12-18 hours. During this long proof, the dough will approximately double in size, and you’ll see many bubbles. This extended fermentation is key to developing deep flavor and an airy texture in your Dutch-style bread.
- Preheat Oven and Dutch Oven:About 30 minutes before you’re ready to bake, place your Dutch oven with its lid into your cold oven. Preheat the oven to 450°F (232°C). Heating the Dutch oven ensures a super-hot surface for the dough, creating that amazing crust.
- Shape the Dough (Gently!):Lightly flour a clean surface. Gently scrape the dough out of the bowl onto the floured surface. Fold the edges of the dough toward the center a few times, forming a somewhat round ball. Avoid excessive handling; you want to keep as much air in the dough as possible.
- Second Proof (Optional, but Recommended):Carefully transfer the shaped dough onto a piece of parchment paper. Loosely cover it with plastic wrap or a towel. Let it rest for another 20-30 minutes while the oven finishes preheating. This brief second proof helps the dough relax and get ready for baking.
- Bake Covered:Carefully remove the hot Dutch oven from the oven. Using the parchment paper as a sling, gently lower the dough into the hot Dutch oven. Place the lid back on. Bake for 30 minutes with the lid on. The trapped steam inside the Dutch oven creates a perfect environment for a soft crumb and helps the crust develop slowly.
- Bake Uncovered:After 30 minutes, remove the lid from the Dutch oven. Continue baking for another 15-20 minutes, or until the Easy Dutch Bread is deeply golden brown and sounds hollow when tapped on the bottom.
- Cool:Carefully remove the bread from the Dutch oven and transfer it to a wire rack to cool completely before slicing. This step is crucial for the internal structure to set and for the crust to remain crispy. Slicing too early can result in a gummy texture.
Add Your Touch
While the classic Easy Dutch Bread is phenomenal on its own, don’t be shy about personalizing it. Infuse the dough with fresh rosemary and a sprinkle of dried cranberries for a festive loaf, or swirl in some shredded aged cheddar and a pinch of black pepper for a savory delight. Consider adding a handful of sunflower seeds or chopped dried apricots for extra texture and flavor. The possibilities are truly endless.
Flavorful Twists for Your Loaf
Transform your Easy Dutch Bread with these exciting additions and substitutions. Baking is an art, and your creativity is the only limit:
- Herbaceous Heavens:Fold in 2 tablespoons of finely chopped fresh herbs like rosemary, thyme, or chives during the initial mixing stage. They infuse the bread with an aromatic freshness.
- Cheesy Delights:Incorporate ½ cup of your favorite shredded hard cheese, such as aged cheddar, smoked gouda, or Parmesan, for a savory twist. Add it along with the flour.
- Sweet Surprises:For a sweeter loaf, add ½ cup of dried fruits like raisins, cranberries, or chopped dates. A pinch of cinnamon can also elevate the flavor profile beautifully.
- Nutty & Seedy Crunch:Stir in ¼ cup of sunflower seeds, pumpkin seeds, or chopped walnuts for an extra layer of texture and nutritional boost.
- Whole Grain Goodness:Experiment with substituting up to 1 cup of the all-purpose flour with whole wheat flour or rye flour for a denser, more robust loaf. Adjust water slightly if needed, as whole grain flours absorb more liquid.
- Garlic Lover’s Dream:Add 2-3 cloves of minced garlic or a teaspoon of garlic powder to the dry ingredients for a fragrant, savory bread perfect with soups.
Remember, when adding wet ingredients like cheese or fruits, the dough might become slightly stickier, but the long proofing time will still work its magic. Just be gentle during the final shaping.
Storing & Reheating
Once your Easy Dutch Bread has cooled, proper storage is key to maintaining its glorious texture and freshness. Store it at room temperature in an airtight container or a bread bag to prevent it from drying out. Avoid refrigeration, as this can make the bread stale faster. For reheating, a quick toast in a warm oven brings back its original charm.
Keeping Your Bread Bliss Fresh
You’ve put in the minimal effort to create this incredible Easy Dutch Bread, so let’s ensure it stays delicious for as long as possible. A whole loaf, wrapped well, can stay fresh for 3-4 days at room temperature. For longer storage, slices can be frozen. Wrap individual slices tightly in plastic wrap, then place them in a freezer-safe bag. They’ll keep well for up to 2 months.
To revive day-old bread, you can sprinkle it lightly with water, then pop it into a preheated 350°F (175°C) oven for about 5-10 minutes. For frozen slices, simply toast them directly from the freezer until warmed through and crisp.
-
Use Correct Water Temperature:Ensure your water is between 105-115°F (40-46°C) to properly activate the yeast. Too hot, and you’ll kill it; too cold, and it won’t activate.
-
Avoid Overhandling the Dough:After the long rise, be gentle when transferring and shaping the dough. You want to preserve all those wonderful air pockets created by the yeast.
-
Don’t Skip the Dutch Oven Preheat:A blazing hot Dutch oven is critical for achieving that beautiful, crisp crust and an excellent spring in your Easy Dutch Bread.
I remember one family dinner when I brought out my Easy Dutch Bread, and my usually quiet niece declared it “the best crusty cloud ever!” Her enthusiasm, along with everyone’s requests for the recipe, truly made me feel like a baking superstar.
Conclusion for Easy Dutch Bread
Baking homemade bread, especially this Easy Dutch Bread, is a deeply rewarding experience that brings incredible joy and aroma to any kitchen. This recipe simplifies the art of bread-making, ensuring a perfect, crusty loaf with minimal effort. By following the simple steps and embracing the gentle handling of the dough, you can consistently achieve a bakery-quality result. Remember to experiment with personalized additions and store your creation properly to extend its freshness. This Easy Dutch Bread isn’t just a recipe; it’s an invitation to savor the warmth and comfort of homemade goodness, a truly delightful staple ready to enhance any meal.
Print
Easy Dutch Bread
Whip up fluffy Easy Dutch Bread! This simple recipe uses active yeast for a tender crumb. Quick to mix for that perfect wholesome loaf. Full instructions & nutrition details included.
- Total Time: 35 minutes
- Yield: 4 servings 1x
Ingredients
- 500g Bread Flour
- 320ml Warm Water (approx. 1 ¼ cups)
- 7g Instant Dry Yeast (1 packet)
- 1 tablespoon Granulated Sugar
- 1 teaspoon Salt
- 2 tablespoons Unsalted Butter, melted
Instructions
- Step 1: In a large bowl, combine the warm water, sugar, and instant dry yeast. Stir gently and let it sit for 5-10 minutes until the yeast becomes foamy. Stir in the melted butter.
- Step 2: In a separate bowl, whisk together the bread flour and salt. Gradually add the wet mixture to the dry ingredients, mixing with a wooden spoon or your hands until a shaggy dough forms.
- Step 3: Turn the dough out onto a lightly floured surface and knead for 8-10 minutes, or until the dough is smooth, elastic, and no longer sticky. Place the dough in a lightly oiled bowl, turn to coat, cover with plastic wrap or a clean kitchen towel, and let rise in a warm place for 1 to 1.5 hours, or until doubled in size.
- Step 4: Gently punch down the risen dough to release the air. Shape the dough into a loaf and place it into a greased 9×5 inch loaf pan. Cover the pan and let the dough rise again for another 30-45 minutes, or until nearly doubled. Preheat your oven to 190°C (375°F) during this second rise.
- Step 5: Bake the bread in the preheated oven for 30-35 minutes, or until the crust is golden brown and the internal temperature of the bread reaches 93-96°C (200-205°F).
- Step 6: Carefully remove the bread from the loaf pan immediately after baking and transfer it to a wire rack to cool completely before slicing and serving.
Notes
- Keep your cooled Easy Dutch Bread fresh for up to 3-4 days at room temperature in an airtight container, or slice and freeze portions for a quick toaster treat later.
- To revive its comforting warmth, lightly toast individual slices or wrap a larger piece in foil and gently heat in a 150°C (300°F) oven for about 10-15 minutes until soft and warm through.
- This wonderfully simple bread is perfect for a cozy breakfast with butter and jam, alongside a hearty Dutch pea soup, or as a sturdy base for open-faced sandwiches topped with cheese and cold cuts.
- For a beautifully light and airy loaf, always ensure your initial warm water is just right for activating the yeast, and truly commit to the full 8-10 minutes of kneading until your dough is smooth and springy.
- Prep Time: 15 minutes
- Cook Time: 20 minutes
- Method: Stovetop
- Cuisine: American


Leave a Comment