


Ah, Panna Cotta, that silky-smooth Italian dessert that makes you feel like you’re dining in a Tuscan villa, even if you’re just in your pajamas on a Tuesday night. It’s a symphony of creamy vanilla, a gentle wobble, and pure bliss in every spoonful.
Picture this: a spoonful of cool, creamy perfection melting on your tongue, a dance of delicate vanilla notes that lingers just long enough to make you crave another bite. This **Classic Panna Cotta Recipe** isn’t just dessert; it’s an experience, and it’s about to become your new go-to for impressing guests (or just yourself!).
- Effortlessly elegant, this dessert requires minimal effort for maximum impact, making it perfect for any occasion.
- The creamy vanilla flavor is both comforting and sophisticated, appealing to all palates with its simple deliciousness.
- Its pristine white appearance makes it a stunning blank canvas for colorful fruit sauces or chocolate drizzles.
- Adaptable to various dietary needs, this recipe offers easy substitutions to suit different preferences.
Ingredients for Classic Panna Cotta Recipe
Here’s what you’ll need to make this delicious dish:
The full ingredients list, including measurements, is provided in the recipe card directly below.
How to Make Classic Panna Cotta Recipe
Follow these simple steps to prepare this delicious dish:
Step 1: Bloom the Agar-Agar
In a small bowl, combine the agar-agar powder with water. Let it sit for about 5-10 minutes to soften. This step is crucial for ensuring the agar-agar dissolves properly and prevents a grainy texture.
Step 2: Heat the Cream Mixture
In a medium saucepan, combine the heavy cream, whole milk, and granulated sugar. Heat over medium heat, stirring occasionally, until the sugar is completely dissolved and the mixture is steaming but not boiling. Do not let it boil, as this can affect the texture of the final product.
Step 3: Dissolve the Agar-Agar
Add the bloomed agar-agar mixture to the warm cream mixture. Stir constantly until the agar-agar is completely dissolved. This usually takes about 2-3 minutes. Ensure there are no lumps and the mixture is smooth.
Step 4: Add Vanilla Extract
Remove the saucepan from the heat and stir in the vanilla extract. This is the time to incorporate any additional flavorings if desired. Stir well to ensure the vanilla is evenly distributed.
Step 5: Pour and Chill
Pour the mixture into individual ramekins or a serving dish. Let it cool slightly at room temperature before transferring to the refrigerator. Chill for at least 4 hours, or preferably overnight, to allow the panna cotta to set completely.
Step 6: Serve and Enjoy
Once set, gently loosen the edges of the panna cotta with a knife. If using ramekins, you can dip the bottom briefly in warm water to help release them. Invert onto serving plates and top with fresh berries, fruit compote, or a drizzle of honey for the perfect finishing touch. Enjoy this creamy, dreamy dessert!
Perfecting the Cooking Process

To ensure panna cotta perfection, begin by gently heating the cream and sugar. Bloom the gelling agent separately. Combine, then pour into molds. This methodical sequence prevents lumps and guarantees a silky, smooth texture every single time.
Add Your Touch
Unleash your inner artist! Infuse the cream with vanilla beans, citrus zest, or even chai spices for a unique twist. Top with fresh berries, fruit compote, or a drizzle of honey. The possibilities are endless.
Storing & Reheating
Panna cotta is best enjoyed chilled. Store it in the refrigerator for up to three days. Reheating isn’t recommended, as it can alter the texture. Simply unmold and savor the creamy goodness straight from the fridge!
Here are some tips to make your panna cotta experience truly exceptional:
- Gently heat the cream mixture; don’t boil it. This prevents a skin from forming and ensures a smooth final product.
- Don’t be shy with your flavoring extracts. A little vanilla or almond extract can elevate the flavor to new heights.
- For a flawless unmolding, lightly grease your ramekins with a neutral oil before pouring in the panna cotta mixture.
(Personal anecdote formated as paragraph subheading)
My first attempt at panna cotta was a disaster! It tasted amazing but wouldn’t set. Now, I always double-check the gelling agent and bloom time for perfect results.
Classic Panna Cotta Recipe: A Culinary Comedy of Errors (and Delicious Success!)
Let’s be honest, folks. We’ve all been there. Staring into the fridge, craving something elegant, something…fancy. But the thought of spending hours slaving away in the kitchen? Absolutely not! That’s where the classic panna cotta recipe comes to the rescue. It’s like the little black dress of desserts – always in style, incredibly versatile, and surprisingly easy to pull off.
Now, I know what you’re thinking. “Panna cotta? That sounds intimidating! It’s probably got a million steps and requires a degree in pastry arts.” Fear not, my friends! This recipe is so straightforward, a toddler could almost make it (with supervision, of course. We don’t need any cream-covered catastrophes).
The beauty of a classic panna cotta recipe lies in its simplicity. It’s essentially sweetened cream, set with a gelling agent, and then chilled until it jiggles like a tiny, delicious earthquake. But don’t let the simple ingredient list fool you. This dessert is a blank canvas for your culinary creativity. Think of it as the vanilla ice cream of the dessert world – a perfect base for all sorts of exciting flavors and toppings.
Gathering Your Arsenal: The Ingredients You’ll Need
Before we dive into the nitty-gritty, let’s gather our ingredients. Imagine yourself as a culinary superhero, assembling your trusty sidekicks for the adventure ahead.
- **Heavy Cream:** The star of the show! This is what gives panna cotta its rich, decadent texture. Don’t skimp on the fat content – you want that creamy goodness.
- **Sugar:** For sweetness, of course! Granulated sugar works perfectly fine.
- **Vanilla Extract:** A touch of vanilla adds warmth and complexity. Feel free to experiment with other extracts like almond or lemon.
- **Gelling Agent (Agar-Agar, Pectin, or Carrageenan):** This is what makes the panna cotta set. Follow the package instructions for proper usage. Each agent has its own setting power, so measuring is key.
- **Optional Toppings:** Fresh berries, fruit compotes, chocolate sauce, honey, toasted nuts – the possibilities are endless! Let your imagination run wild.
Let’s Get Cooking: A Step-by-Step Guide to Panna Cotta Perfection
Alright, folks, it’s showtime! Let’s transform these humble ingredients into a dessert fit for royalty (or at least, for impressing your friends and family).
1. **Bloom the Gelling Agent: ** This is crucial! Follow the package instructions for your chosen gelling agent. Usually, it involves dissolving it in a small amount of cold water and letting it sit for a few minutes. Think of it as waking up the gelling agent and getting it ready to work its magic.
2. **Heat the Cream and Sugar: ** In a saucepan, combine the heavy cream and sugar. Heat over medium heat, stirring constantly, until the sugar is dissolved and the mixture is warm but not boiling. We’re not trying to scorch the cream, just gently coax the sugar into dissolving.
3. **Incorporate the Gelling Agent: ** Once the gelling agent is bloomed, add it to the warm cream mixture. Stir well to ensure it’s fully dissolved. Make sure there are no sneaky clumps lurking at the bottom of the pot.
4. **Add Flavor: ** Stir in the vanilla extract (or your extract of choice). This is your chance to add a personal touch to the classic panna cotta recipe.
5. **Pour into Molds: ** Pour the mixture into individual ramekins or molds. You can use anything from fancy dessert molds to simple coffee cups. Just make sure they’re oven-safe (even though we’re not baking them).
6. **Chill Out: ** Cover the ramekins with plastic wrap and refrigerate for at least 4 hours, or preferably overnight. This allows the panna cotta to set completely and develop its signature jiggly texture.
7. **Unmold and Serve: ** When you’re ready to serve, gently run a knife around the edge of each ramekin to loosen the panna cotta. Invert the ramekin onto a serving plate. If it’s being stubborn, try dipping the bottom of the ramekin in warm water for a few seconds. Top with your favorite toppings and enjoy!
Troubleshooting Your Panna Cotta Predicaments
Even the best chefs encounter hiccups in the kitchen. Here are a few common panna cotta problems and how to fix them:
- **Panna Cotta Won’t Set:** This is usually due to not using enough gelling agent or not allowing it to bloom properly. Make sure you’re following the package instructions carefully.
- **Panna Cotta is Too Firm:** You’ve probably used too much gelling agent. Next time, reduce the amount slightly.
- **Panna Cotta is Lumpy:** This can happen if the gelling agent isn’t fully dissolved. Make sure you’re stirring constantly while heating the cream mixture.
- **Panna Cotta Tastes Bland:** Don’t be afraid to experiment with different flavor extracts and toppings. A little lemon zest or a pinch of salt can also enhance the flavor.
Flavor Variations: Unleash Your Inner Alchemist!
The classic panna cotta recipe is just the starting point. Once you’ve mastered the basic technique, you can start experimenting with different flavors and toppings. Here are a few ideas to get you started:
- **Citrus Panna Cotta:** Add lemon, lime, or orange zest to the cream mixture for a bright, refreshing flavor.
- **Coffee Panna Cotta:** Infuse the cream with coffee beans or add a shot of espresso to the mixture.
- **Chocolate Panna Cotta:** Stir in melted chocolate or cocoa powder for a decadent treat.
- **Berry Panna Cotta:** Swirl in a berry puree or top with fresh berries for a fruity delight.
Essential Tools: Setting Yourself Up for Success
While the classic panna cotta recipe doesn’t require a ton of fancy equipment, here are a few essential tools that will make your life easier:
- **Saucepan:** For heating the cream and sugar.
- **Whisk:** For stirring the ingredients together.
- **Ramekins or Molds:** For setting the panna cotta.
- **Measuring Cups and Spoons:** For accurate measurements.
- **Plastic Wrap:** For covering the ramekins while chilling.
Panna Cotta: More Than Just a Dessert
The classic panna cotta recipe is more than just a dessert; it’s an experience. It’s a chance to slow down, get creative, and indulge in something truly delicious. It’s the perfect ending to a dinner party, a delightful afternoon treat, or even a sophisticated midnight snack. So go ahead, give it a try. You might just surprise yourself with how easy and rewarding it is to make this elegant dessert at home. And who knows, you might even become the panna cotta champion of your friend group!
Tips for a Silky Smooth Classic Panna Cotta Recipe
- Use high-quality heavy cream for the richest flavor and texture. The better the cream, the better your panna cotta.
- Avoid boiling the cream mixture, as this can cause it to curdle. Gentle heat is key to a smooth and creamy result.
- Don’t unmold the panna cotta until you’re ready to serve it. This will prevent it from drying out.
(Personal anecdote formated as paragraph subheading)
I once tried to make panna cotta with skim milk. Let’s just say it was a watery disaster! Stick with heavy cream for the best results.
Conclusion for Classic Panna Cotta Recipe :
This Classic Panna Cotta Recipe is not just a dessert; it’s an experience. Simple to make, yet sophisticated in taste and texture, it’s the perfect treat for any occasion. From customizing your toppings to enjoying the make-ahead convenience, panna cotta offers both ease and elegance. So, go ahead, give it a try, and prepare to impress your friends and family with this deliciously simple dessert. You might just find your new go-to recipe for wowing any crowd.
Print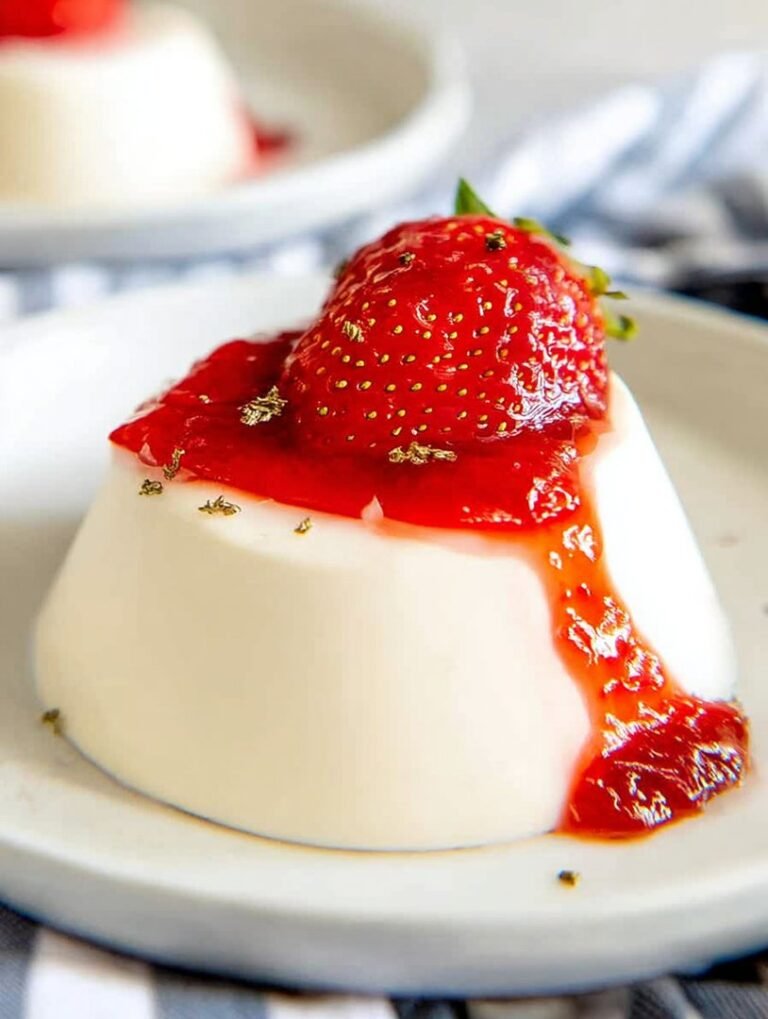
Classic Panna Cotta Recipe
Delicious classic panna cotta recipe recipe with detailed instructions and nutritional information.
- Total Time: 35 minutes
- Yield: 4 servings
Ingredients
- Heavy cream: 2 cups
- Whole milk: 1 cup
- Granulated sugar: 1/2 cup
- Vanilla extract: 1 teaspoon
- Gelatin powder: 2 1/4 teaspoons
- Cold water: 3 tablespoons
- Pinch of salt: 1/8 teaspoon
Instructions
- Step 1: Soften the gelatin by sprinkling the gelatin powder over the cold water in a small bowl. Let it sit for 5-10 minutes until softened.
- Step 2: In a saucepan, combine the heavy cream, milk, sugar, and salt. Heat over medium heat, stirring occasionally, until the sugar is dissolved and the mixture is just simmering (do not boil).
- Step 3: Remove the saucepan from the heat and stir in the softened gelatin until it is completely dissolved. Add the vanilla extract.
- Step 4: Pour the mixture into ramekins or serving glasses.
- Step 5: Cover and refrigerate for at least 4 hours, or preferably overnight, until set.
- Step 6: To serve, run a thin knife around the edge of each panna cotta to loosen it. You can dip the bottom of the ramekin briefly in warm water to help release it if desired. Invert onto a serving plate and garnish with fresh berries or a sauce of your choice. Alternatively, serve directly in the ramekins.
Notes
- For best results, store panna cotta covered in the refrigerator for up to 3 days; its delicate texture can degrade over time.
- While reheating isn't recommended due to potential texture changes, a briefly warmed ramekin bottom aids release for a cleaner unmolding.
- Serve your classic panna cotta with a drizzle of honey and a sprinkle of chopped pistachios for an elegant, contrasting flavor profile.
- Be patient when dissolving the gelatin; ensure it's fully incorporated off the heat to avoid a grainy texture in your final dessert.
- Prep Time: 15 minutes
- Cook Time: 20 minutes
- Method: Stovetop
- Cuisine: American
FAQs :
What makes this Classic Panna Cotta Recipe so special?
Okay, picture this: you’re at a fancy restaurant, but instead of paying a fortune, you can whip up something equally impressive at home! This classic panna cotta recipe is pure magic. It’s incredibly simple, using ingredients you probably already have. The texture is silky smooth, and the taste is divine. Seriously, your friends will think you’ve enrolled in culinary school overnight. Plus, you get to customize it with your favorite toppings. Who needs a Michelin star when you’ve got this recipe in your back pocket? It’s foolproof and fabulous!
Can I make Classic Panna Cotta ahead of time?
Absolutely! In fact, making it ahead is highly recommended. Panna cotta needs time to chill and set properly, so it’s the perfect dessert to prepare a day or two in advance. Just whip it up, pour it into your ramekins, and let it hang out in the fridge. When you’re ready to serve, you can simply unmold it or serve it directly in the ramekin. This makes it a fantastic option for dinner parties or any gathering where you want to impress without the last-minute stress. Trust me, future you will thank you!
What are some topping ideas for this Classic Panna Cotta Recipe?
Oh, the possibilities are endless! Fresh berries are always a winner – think raspberries, strawberries, or blueberries. A drizzle of honey or maple syrup adds a touch of sweetness. For something a bit more decadent, try a berry compote or a homemade fruit sauce. You could also sprinkle some toasted nuts on top for a little crunch. Or, if you’re feeling adventurous, try a citrus curd or a sprinkle of cocoa powder. Get creative and have fun with it! Your taste buds will thank you.
How can I ensure my Panna Cotta sets properly?
The key is to use the right amount of gelling agent and to allow enough chilling time. Be sure to measure the agar-agar or pectin accurately; too little, and your panna cotta won’t set; too much, and it will be too firm. After preparing the mixture, let it cool slightly before pouring it into your ramekins. Then, refrigerate for at least four hours, but preferably overnight. Patience is a virtue when it comes to panna cotta. And remember, a gentle wiggle is what you’re aiming for – that perfect balance between creamy and set.


Leave a Comment