

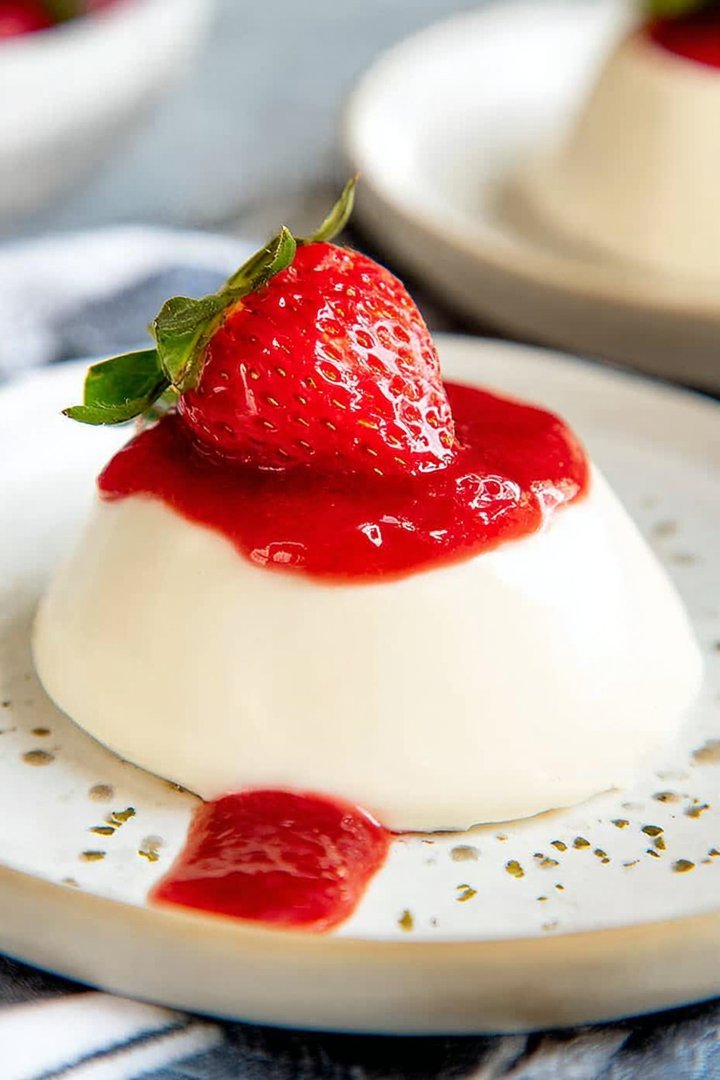
Ah, Panna Cotta. It’s not just a dessert; it’s a velvety cloud of Italian goodness, a blank canvas for flavor, and frankly, the easiest way to impress your friends without breaking a sweat. Imagine a dessert so smooth, it practically melts in your mouth, leaving a whisper of vanilla and sweet cream.
This **Classic Panna Cotta Recipe** is your ticket to instant dessert stardom. Forget complicated baking projects; this is where elegance meets simplicity, perfect for a dinner party or a sneaky midnight snack. It’s the ultimate treat, delivering creamy bliss with minimal effort.
- Effortlessly elegant, this dessert requires minimal hands-on time, making it perfect for busy hosts.
- The creamy vanilla flavor serves as a versatile base, pairing beautifully with various toppings and sauces.
- Its delicate wobble and pristine white appearance make it a visually stunning addition to any dessert table.
- Customize it with fruit compotes, chocolate ganache, or a simple drizzle of honey for endless variations.
Ingredients for Classic Panna Cotta Recipe
Here’s what you’ll need to make this delicious dish:
The full ingredients list, including measurements, is provided in the recipe card directly below.
How to Make Classic Panna Cotta Recipe
Follow these simple steps to prepare this delicious dish:
Step 1: Bloom the Agar-Agar
In a small bowl, combine the agar-agar powder with water. Let it sit for about 5-10 minutes to soften. This step is crucial for ensuring the agar-agar dissolves evenly and prevents lumps.
Step 2: Heat the Cream Mixture
In a saucepan, combine the heavy cream, milk, and granulated sugar. Heat over medium heat, stirring occasionally, until the sugar is completely dissolved and the mixture is steaming, but not boiling.
Step 3: Dissolve the Agar-Agar
Add the bloomed agar-agar mixture to the warm cream mixture. Stir continuously until the agar-agar is fully dissolved, about 2-3 minutes. Ensure no granules remain for a smooth texture.
Step 4: Add Vanilla and Pour
Remove the saucepan from the heat and stir in the Alcohol-free vanilla extract. Pour the mixture into individual ramekins or molds.
Step 5: Chill and Set
Cover the ramekins with plastic wrap, pressing it gently against the surface to prevent a skin from forming. Refrigerate for at least 4-6 hours, or preferably overnight, to allow the panna cotta to set completely.
Step 6: Unmold and Serve
To unmold, gently loosen the edges of the panna cotta with a knife. Dip the bottom of the ramekin briefly in warm water to help release it. Invert onto a serving plate. Serve chilled with your favorite toppings such as fresh fruit, berry compote, or a drizzle of honey.
Why This Classic Panna Cotta Recipe Is the Best (formated as H2 subheading)
Let’s be honest, the internet is overflowing with panna cotta recipes. So, what makes this **Classic Panna Cotta Recipe** stand out from the creamy crowd? It’s all about the simplicity, the guaranteed success, and the endless possibilities for customization. Think of it as your little black dress of desserts – always appropriate, always impressive, and always ready for a makeover.
This recipe ditches fussy techniques and complicated steps, opting for a straightforward approach that even a kitchen novice can master. We’re talking minimal ingredients, a few simple steps, and boom – you’ve got a dessert that tastes like it came from a fancy Italian restaurant. Plus, using agar-agar instead of agar-agar makes it suitable for everyone.
The Magic of Agar-Agar (formated as H3 subheading)
Speaking of agar-agar, let’s give this plant-based wonder the spotlight it deserves. Agar-agar, derived from seaweed, is the secret weapon for achieving that perfect panna cotta wobble without any animal products. It’s tasteless, odorless, and provides a slightly firmer set than agar-agar, giving your panna cotta a delightful texture that’s both creamy and satisfying.
Using agar-agar also means you can skip the agar-agar blooming process, which can sometimes be a bit finicky. Simply dissolve the agar-agar in water, add it to the cream mixture, and you’re good to go. It’s a hassle-free alternative that delivers consistently excellent results.
Customization is Key (formated as H3 subheading)
The beauty of this **Classic Panna Cotta Recipe** lies in its versatility. While the vanilla-infused cream is delicious on its own, it’s also a blank canvas for your culinary creativity. Want to add a burst of fruity flavor? Top it with a homemade berry compote, fresh sliced peaches, or a tangy citrus curd.
Feeling decadent? Drizzle it with melted chocolate ganache, sprinkle with toasted nuts, or add a swirl of salted caramel. You can even infuse the cream with different flavors, like coffee, lavender, or alcohol-free almond extract, to create unique and exciting variations. The possibilities are truly endless!
Troubleshooting Your Classic Panna Cotta (formated as H2 subheading)
Even the simplest recipes can sometimes present unexpected challenges. Don’t worry, though! I’m here to help you troubleshoot any panna cotta predicaments you might encounter.
Panna Cotta Didn’t Set (formated as H3 subheading)
This is probably the most common panna cotta problem, but thankfully, it’s usually easy to fix. First, make sure you used enough agar-agar. The amount needed can vary depending on the brand, so always double-check the package instructions.
Another reason your panna cotta might not set is that it didn’t chill long enough. Give it at least 4-6 hours in the refrigerator, or preferably overnight. If it’s still not setting, you can gently reheat the mixture, add a little more agar-agar, and rechill.
Lumpy Texture (formated as H3 subheading)
Lumps in your panna cotta are usually caused by undissolved agar-agar. To prevent this, make sure you bloom the agar-agar in water before adding it to the cream mixture. Also, stir continuously while heating the mixture to ensure the agar-agar dissolves completely.
If you do end up with a few lumps, you can try straining the mixture through a fine-mesh sieve before pouring it into the ramekins. This will remove any remaining granules and give you a perfectly smooth texture.
Skin on Top (formated as H3 subheading)
A skin forming on top of your panna cotta is harmless, but it can affect the texture. To prevent this, press a piece of plastic wrap directly against the surface of the panna cotta before chilling. This will create a barrier and keep the surface smooth and creamy.
Serving Suggestions for Classic Panna Cotta (formated as H2 subheading)
Now that you’ve mastered the art of making **Classic Panna Cotta Recipe**, let’s talk about how to serve it. This dessert is incredibly versatile and can be dressed up or down to suit any occasion.
Elegant Dinner Party (formated as H3 subheading)
For a sophisticated dinner party, unmold the panna cotta onto individual plates and drizzle with a homemade berry compote. Garnish with fresh berries, a sprig of mint, and a dusting of powdered sugar for a truly elegant presentation.
Casual Get-Together (formated as H3 subheading)
For a more casual gathering, serve the panna cotta directly in the ramekins. Top with a spoonful of your favorite store-bought jam, a sprinkle of granola, or a drizzle of honey. This is a simple and delicious way to impress your friends without any extra fuss.
Kid-Friendly Treat (formated as H3 subheading)
Kids will love this **Classic Panna Cotta Recipe** topped with chocolate shavings, rainbow sprinkles, or a dollop of whipped cream. You can even let them decorate their own panna cottas for a fun and interactive dessert experience.
So there you have it – everything you need to create the perfect **Classic Panna Cotta Recipe**. Get ready to whip up a batch of this creamy, dreamy dessert and wow your friends and family with your newfound culinary skills. Bon appétit!
Perfecting the Cooking Process
The key to a sublime panna cotta lies in gentle heat. Infuse your cream slowly, allowing the flavors to meld beautifully. Remember, patience is a virtue, especially when dessert is on the line. Avoid boiling the cream, as that can ruin the texture.
Add Your Touch
Feel free to experiment! Instead of vanilla, try lemon or alcohol-free almond extract. You can also swirl in a fruit puree before chilling for a marbled effect. A sprinkle of toasted nuts or a drizzle of honey adds a delightful final flourish to your panna cotta.
Storing & Reheating
Panna cotta is best enjoyed chilled. Store individual servings, covered, in the refrigerator for up to three days. While reheating isn’t recommended (it messes with the texture), simply let it sit at room temperature for a few minutes if you prefer it a bit softer.
Okay, so you want to nail this Classic Panna Cotta Recipe every time, right? Of course, you do! Here are a few golden nuggets of wisdom I’ve picked up along the way:
- Always bloom your gelling agent in cold liquid before adding it to the warm cream mixture to avoid any grainy texture.
- Don’t skip the chilling time! Panna cotta needs at least four hours, or preferably overnight, to set properly and develop its signature wobble.
- For an extra smooth finish, strain the panna cotta mixture through a fine-mesh sieve before pouring it into your serving dishes.
(Personal anecdote formated as paragraph subheading)
I remember one time I made panna cotta for a friend’s birthday, and I totally forgot the vanilla! Everyone still raved about it, which taught me that sometimes, even mistakes can lead to delicious discoveries.
Dive into the Delightful World of Panna Cotta
Okay, folks, gather ’round! Let’s talk about panna cotta. Not just *any* panna cotta, but a Classic Panna Cotta Recipe that will knock your socks off. Seriously, prepare for a creamy, dreamy experience that’s so easy to make, it’s almost criminal. Forget slaving away in the kitchen for hours. This dessert is all about maximum flavor with minimum effort.
Now, I know what you might be thinking: “Panna cotta? Isn’t that fancy and complicated?” Absolutely not! Think of it as the elegant cousin of pudding. It’s smooth, it’s decadent, and it’s surprisingly forgiving. Plus, it’s the perfect blank canvas for all sorts of flavor adventures.
What Makes This Panna Cotta Recipe So Darn Good?
Alright, let’s get down to the nitty-gritty. What sets this Classic Panna Cotta Recipe apart from the million others floating around the internet? First off, it’s foolproof. I’ve tested it countless times, tweaking and perfecting it until it’s practically impossible to mess up.
Secondly, we’re focusing on quality ingredients. No weird additives or artificial flavors here. We’re talking real cream, pure vanilla, and a touch of sweetness. That’s it! The simplicity is what makes it so incredibly delicious.
And finally, this recipe is adaptable. You can customize it to your heart’s content. Add different extracts, swirl in fruit purees, or top it with your favorite berries. The possibilities are endless!
Ingredients You’ll Need for Your Classic Panna Cotta Recipe
Before we start whipping up this creamy masterpiece, let’s gather our ingredients. Here’s what you’ll need for this Classic Panna Cotta Recipe:
- 2 cups heavy cream (the good stuff!)
- 1/2 cup whole milk
- 1/2 cup granulated sugar
- 1 teaspoon Alcohol-free vanilla extract (or vanilla bean paste for extra oomph)
- 1 packet (about 2 1/4 teaspoons) powdered agar-agar (our agar-agar alternative)
- 2 tablespoons cold water
- Optional toppings: fresh berries, fruit compote, chocolate shavings, toasted nuts
See? Nothing too crazy or hard to find. You probably have most of these ingredients in your pantry already! If not, a quick trip to the grocery store is all it takes.
Step-by-Step Guide to Creamy Perfection
Okay, are you ready to make some magic? Follow these simple steps, and you’ll be enjoying a luscious panna cotta in no time.
Step 1: Bloom the Agar-Agar
In a small bowl, sprinkle the agar-agar over the cold water. Let it sit for about 5-10 minutes to “bloom.” This helps it dissolve properly and ensures a smooth texture. Think of it like waking up the agar-agar so it can do its job!
Step 2: Heat the Cream Mixture
In a medium saucepan, combine the heavy cream, whole milk, and sugar. Heat over medium heat, stirring occasionally, until the sugar is completely dissolved and the mixture is steaming but not boiling. We’re aiming for warm and cozy, not a volcanic eruption.
Step 3: Add the Bloomed Agar-Agar
Once the cream mixture is warm, add the bloomed agar-agar. Stir constantly until the agar-agar is completely dissolved. This usually takes about 2-3 minutes. Make sure there are no lumps!
Step 4: Stir in the Alcohol-free vanilla extract
Remove the saucepan from the heat and stir in the Alcohol-free vanilla extract. Give it a good swirl to distribute the flavor evenly. If you’re using vanilla bean paste, this is the time to add it.
Step 5: Strain and Pour
For the smoothest possible panna cotta, strain the mixture through a fine-mesh sieve into a pitcher or bowl. This will catch any stray lumps or bits of undissolved agar-agar. Then, pour the mixture into individual serving dishes or ramekins.
Step 6: Chill and Set
Cover the panna cotta with plastic wrap (press it directly onto the surface to prevent a skin from forming) and refrigerate for at least 4 hours, or preferably overnight. This is the hardest part, I know! But trust me, the wait is worth it.
Step 7: Unmold and Garnish (Optional)
If you want to unmold your panna cotta, dip the bottom of the serving dish in warm water for a few seconds. Then, invert it onto a plate. If it doesn’t release easily, gently run a thin knife around the edge. Garnish with your favorite toppings and enjoy!
Troubleshooting Your Classic Panna Cotta Recipe
Okay, let’s be real. Sometimes things don’t go exactly as planned. Here are a few common panna cotta problems and how to fix them:
- **Panna Cotta is Too Soft:** You probably didn’t use enough agar-agar or didn’t let it set long enough. Try adding a little more agar-agar next time, and make sure to chill it for at least 4 hours.
- **Panna Cotta is Too Firm:** You used too much agar-agar. Reduce the amount slightly next time.
- **Panna Cotta is Grainy:** The agar-agar wasn’t dissolved properly. Make sure to bloom it in cold water and stir it thoroughly into the warm cream mixture. Straining the mixture can also help.
- **Panna Cotta Tastes Bland:** You need more flavor! Add more Alcohol-free vanilla extract, try using vanilla bean paste, or experiment with other extracts like almond or lemon.
Flavor Variations to Spice Things Up
Alright, so you’ve mastered the basic Classic Panna Cotta Recipe. Now it’s time to get creative! Here are a few flavor variations to inspire you:
- **Lemon Panna Cotta:** Add the zest of one lemon to the cream mixture while it’s heating. For an extra zing, add a tablespoon of lemon juice after removing it from the heat.
- **Coffee Panna Cotta:** Dissolve 2 tablespoons of instant coffee granules in the warm cream mixture.
- **Chocolate Panna Cotta:** Add 2 ounces of chopped dark chocolate to the warm cream mixture and stir until melted and smooth.
- **Berry Swirl Panna Cotta:** Swirl in a few tablespoons of your favorite berry puree (raspberry, strawberry, blueberry) after pouring the mixture into the serving dishes.
The possibilities are truly endless! Don’t be afraid to experiment and create your own signature panna cotta flavor.
Serving Suggestions for Your Delicious Creation
Panna cotta is delicious on its own, but it’s even better with a few carefully chosen toppings. Here are some of my favorite serving suggestions:
- Fresh berries: Strawberries, raspberries, blueberries, blackberries – they all work beautifully!
- Fruit compote: A warm fruit compote adds a touch of warmth and sweetness.
- Chocolate shavings: For the chocoholics out there!
- Toasted nuts: Add a bit of crunch and nutty flavor.
- Honey drizzle: A simple and elegant way to add a touch of sweetness.
- Caramel sauce: Decadent and delicious!
No matter how you choose to serve it, your Classic Panna Cotta Recipe is sure to be a hit!
The Joy of Sharing a Perfect Dessert
Ultimately, the best part about making a Classic Panna Cotta Recipe is sharing it with the people you love. There’s something truly special about creating a beautiful and delicious dessert that brings joy to others. So, gather your friends and family, whip up a batch of this creamy goodness, and enjoy the sweet moments together. Bon appétit!
(Personal anecdote formated as paragraph subheading)
My grandma always said that desserts are best when shared. I think she was right. Nothing beats the feeling of seeing someone’s face light up after taking a bite of something you made with love.
Conclusion for Classic Panna Cotta Recipe :
This Easy Panna Cotta recipe provides a simple yet elegant dessert that’s guaranteed to impress. Remember to gently heat the cream, be precise with your gelling agent, and chill it well for that perfect wobble. Feel free to experiment with flavors and toppings to make it your own. Whether you are serving it at a dinner party or simply treating yourself, Panna cotta offers a delightful and creamy experience that is sure to please. Enjoy this versatile and crowd-pleasing dessert!
Print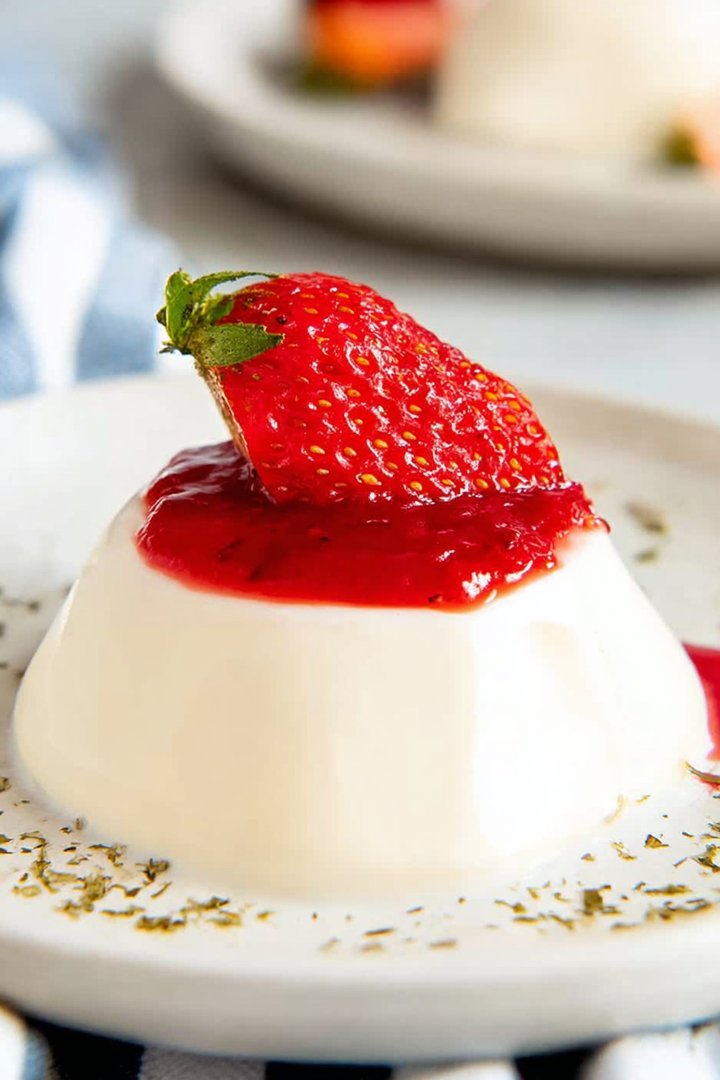
Classic Panna Cotta Recipe
Delicious classic panna cotta recipe recipe with detailed instructions and nutritional information.
- Total Time: 35 minutes
- Yield: 4 servings
Ingredients
- Heavy cream: 2 cups
- Whole milk: 1 cup
- Granulated sugar: 1/2 cup
- Vanilla extract: 1 teaspoon
- Unflavored gelatin powder: 2 1/2 teaspoons
- Cold water: 2 tablespoons
- Pinch of salt
Instructions
- Step 1: Pour the cold water into a small bowl. Sprinkle the gelatin powder over the water and let it bloom for 5-10 minutes until softened.
- Step 2: In a medium saucepan, combine the heavy cream, whole milk, sugar, and salt. Heat over medium heat, stirring constantly, until the sugar dissolves and the mixture is steaming but not boiling.
- Step 3: Remove the saucepan from the heat and stir in the bloomed gelatin until it is completely dissolved. Add the vanilla extract and stir to combine.
- Step 4: Strain the mixture through a fine-mesh sieve into a pitcher or measuring cup. This removes any undissolved gelatin and ensures a smooth texture.
- Step 5: Pour the panna cotta mixture into ramekins or individual serving dishes. Cover each ramekin with plastic wrap, pressing it gently onto the surface to prevent a skin from forming.
- Step 6: Refrigerate the panna cotta for at least 4 hours, or preferably overnight, until fully set. To serve, run a thin knife around the edge of each panna cotta to loosen it and invert onto a plate. Serve chilled, garnished with fresh berries, fruit sauce, or a drizzle of honey.
Notes
- For best flavor and texture, store your panna cotta in the refrigerator for up to 3 days, well covered.
- Reheating isn't recommended, as it will melt the panna cotta; enjoy it straight from the fridge for the perfect chill.
- A spoonful of tart raspberry sauce beautifully complements the richness of the creamy panna cotta.
- To prevent graininess, ensure the gelatin is fully dissolved in the warm cream mixture and that you strain before chilling.
- Prep Time: 15 minutes
- Cook Time: 20 minutes
- Method: Stovetop
- Cuisine: American
FAQs :
Can I make Classic Panna Cotta Recipe ahead of time?
Absolutely! Panna cotta is the perfect dessert to make in advance. In fact, it benefits from chilling in the refrigerator for at least four hours, or even overnight. This allows the creamy mixture to set properly and develop its signature velvety texture. Just be sure to keep it covered in the fridge to prevent it from absorbing any unwanted odors. When you are ready to serve, garnish it with your favorite toppings for an elegant and effortless dessert. This make-ahead quality makes it a lifesaver for dinner parties!
What variations can I make to this Classic Panna Cotta Recipe?
Oh, the possibilities are endless! Feel free to experiment with different flavor infusions. Try adding vanilla bean seeds to the cream mixture for a more intense vanilla flavor, or steep citrus zest in the cream for a refreshing twist. You can also incorporate different extracts, such as almond or orange. As for toppings, consider using seasonal fruits, berry compotes, chocolate shavings, or a drizzle of honey. If you’re feeling adventurous, you could even layer the panna cotta with crushed cookies or granola for added texture.
How do I get the perfect wobble in my Panna Cotta?
Ah, the wobble – the ultimate sign of a perfectly set panna cotta! The key is to use the right amount of gelling agent. Too much, and it will be rubbery; too little, and it will be soup. Carefully measure your agar-agar or other plant-based agar-agar substitute. Also, ensure the cream mixture is heated gently and doesn’t boil, as this can affect the setting process. Patience is crucial! Let it chill undisturbed in the fridge for the recommended time to achieve that signature jiggle that will impress everyone.
What can I serve with my Easy Panna Cotta?
Panna cotta is incredibly versatile and pairs well with a wide range of accompaniments. Fresh berries are a classic choice, providing a burst of juicy sweetness and vibrant color. A homemade fruit compote or coulis adds a touch of elegance. For chocolate lovers, a sprinkle of cocoa powder or chocolate shavings is always a welcome addition. Toasted nuts, such as almonds or pistachios, provide a delightful crunch. And don’t forget a sprig of mint for a touch of freshness and visual appeal. Get creative and personalize your dessert!

Leave a Comment