

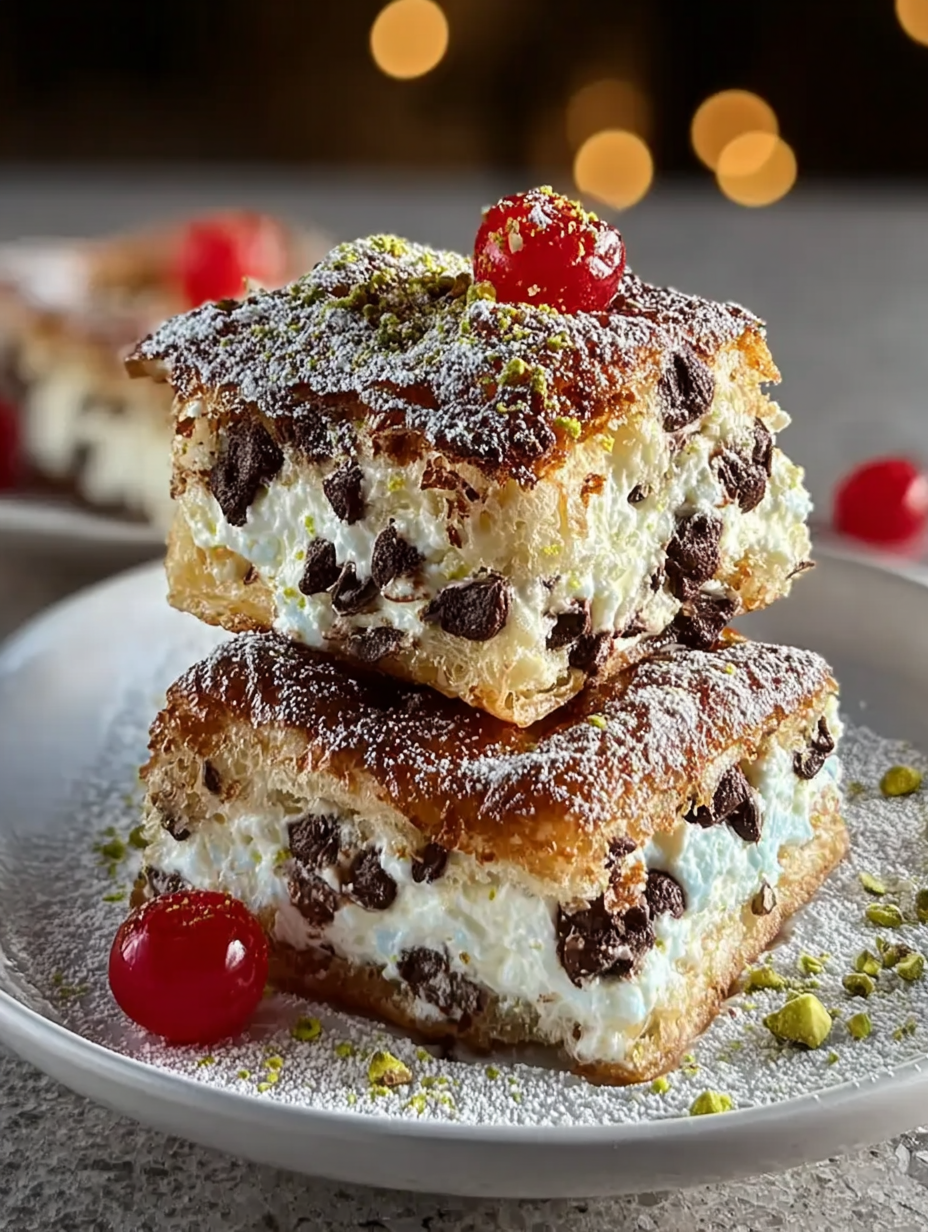
Imagine biting into a cloud of sweet cream, studded with chocolate chips and candied orange, all nestled on a crisp, golden base. That’s the essence of Classic Cannoli Squares – a dessert so good, it’ll make you want to sing opera (even if you can’t carry a tune).
These Classic Cannoli Squares are more than just a dessert; they’re a conversation starter, a crowd-pleaser, and a guaranteed way to end any meal on a high note. Forget complicated pastry techniques; this recipe is all about delivering maximum flavor with minimal effort. Get ready to impress!
Here’s why you absolutely NEED to make these Classic Cannoli Squares:
- Effortlessly create a stunning dessert with simple ingredients and a straightforward process perfect for any skill level.
- Experience the authentic cannoli flavor without the fuss of individual shells, ideal for a quick dessert fix.
- The beautiful layers of creamy filling and crispy crust create a visually appealing treat that everyone will love.
- Customize this recipe with your favorite mix-ins and toppings, making it a versatile dessert for any occasion or preference.
Ingredients for Classic Cannoli Squares
Here’s what you’ll need to make this delicious dish:
The full ingredients list, including measurements, is provided in the recipe card directly below.
How to Make Classic Cannoli Squares
Follow these simple steps to prepare this delicious dish:
Step 1: Prepare the Filling
In a large bowl, combine the ricotta cheese, powdered sugar, mascarpone cheese, and vanilla extract. Mix until smooth and creamy. Gently fold in the mini chocolate chips and candied orange peel. Cover and refrigerate the mixture for at least 30 minutes to allow the flavors to meld.
Step 2: Prepare the Crust
Preheat your oven to 350°F (175°C). Lightly grease a 9×13 inch baking pan. In a small bowl, melt the unsalted butter.
Step 3: Layer the Squares
Place one egg roll wrapper in the prepared baking pan. Brush with melted butter and sprinkle lightly with ground cinnamon. Repeat this process with 6 egg roll wrappers, layering them on top of each other.
Step 4: Add the Filling
Spread the chilled ricotta mixture evenly over the layered egg roll wrappers.
Step 5: Top with Remaining Layers
Layer the remaining egg roll wrappers on top of the filling, brushing each with melted butter and sprinkling with cinnamon as you did before. Use the last 6 egg roll wrappers.
Step 6: Bake
Bake in the preheated oven for 25-30 minutes, or until the top is golden brown and the filling is set.
Step 7: Cool and Cut
Let the Classic Cannoli Squares cool completely in the pan before cutting them into squares. Dust with powdered sugar before serving for an extra touch of elegance.
Transfer to plates and serve immediately for the perfect, crowd-pleasing treat.
Variations on These Cannoli Squares (H2 subheading)
Want to mix things up? These Classic Cannoli Squares are incredibly versatile! Here are a few ideas to get your creative juices flowing.
Chocolate Lovers’ Dream (H3 subheading)
Add a layer of melted chocolate ganache between the crust and the filling for an extra decadent treat. You can use dark, milk, or white chocolate, depending on your preference. A sprinkle of cocoa powder on top adds a finishing touch.
Nutty Delight (H3 subheading)
Incorporate chopped pistachios, almonds, or walnuts into the ricotta filling for added texture and flavor. You can also sprinkle toasted nuts on top of the squares before serving.
Citrus Burst (H3 subheading)
For an even more pronounced citrus flavor, add some orange or lemon zest to the ricotta filling. A drizzle of orange glaze on top will take it to the next level.
Coffee Infusion (H3 subheading)
Add a tablespoon of strong brewed coffee or coffee extract to the ricotta filling for a caffeinated twist. This is perfect for coffee lovers who want a dessert with a little kick.
Berry Bonanza (H3 subheading)
Fold in fresh raspberries, blueberries, or strawberries into the ricotta filling for a fruity and refreshing variation. Serve with a dollop of whipped cream for an extra special treat.
Tips for Perfect Classic Cannoli Squares (H2 subheading)
Making these squares is easy, but here are a few extra tips to ensure they turn out perfectly every time:
Drain the Ricotta Well (H3 subheading)
This is crucial for preventing a soggy filling. Place the ricotta in a cheesecloth-lined strainer and let it drain in the refrigerator for at least 30 minutes, or even overnight.
Don’t Overbake (H3 subheading)
Keep a close eye on the squares while they are baking to prevent the crust from burning. The filling should be set, and the crust should be golden brown.
Cool Completely Before Cutting (H3 subheading)
This will allow the filling to firm up, making it easier to cut clean squares. Be patient!
Use Fresh Ingredients (H3 subheading)
The quality of your ingredients will directly impact the flavor of the Classic Cannoli Squares. Use the freshest ricotta cheese, vanilla extract, and egg roll wrappers you can find.
Get Creative with Toppings (H3 subheading)
Don’t be afraid to experiment with different toppings to customize your squares. Powdered sugar, chocolate shavings, chopped nuts, and candied citrus are all great options.
Serving Suggestions for Cannoli Squares (H2 subheading)
These Classic Cannoli Squares are delicious on their own, but here are a few ideas to elevate your serving presentation:
Classic Presentation (H3 subheading)
Dust the squares generously with powdered sugar and arrange them on a platter. Garnish with a few candied orange peels or chocolate shavings.
Dessert Platter (H3 subheading)
Include the Classic Cannoli Squares on a dessert platter alongside other Italian treats like biscotti, amaretti cookies, and tiramisu.
Individual Servings (H3 subheading)
Cut the squares into smaller, individual portions and serve them on dessert plates with a dollop of whipped cream and a fresh berry.
Coffee Pairing (H3 subheading)
Serve the Classic Cannoli Squares with a cup of freshly brewed coffee or espresso for the perfect afternoon treat.
Special Occasions (H3 subheading)
These squares are perfect for parties, potlucks, and holiday gatherings. They are easy to transport and always a crowd-pleaser.
Why This Recipe Works (H2 subheading)
These Classic Cannoli Squares work because they capture the essence of traditional cannoli in a simplified and accessible format. Here’s why this recipe is a winner:
Streamlined Process (H3 subheading)
Forget the complicated process of making individual cannoli shells. This recipe uses egg roll wrappers, which are readily available and easy to work with.
Authentic Flavor (H3 subheading)
The combination of ricotta, mascarpone, powdered sugar, and vanilla extract creates a creamy, rich filling that tastes just like the real thing.
Customizable (H3 subheading)
You can easily customize this recipe to suit your preferences by adding different mix-ins, toppings, and flavorings.
Visually Appealing (H3 subheading)
The layered construction and golden-brown crust make these squares visually appealing, making them a perfect dessert for entertaining.
Perfect for Any Occasion (H3 subheading)
Whether you’re hosting a party, attending a potluck, or simply craving a sweet treat, these Classic Cannoli Squares are the perfect choice.
So, ditch the complicated pastry bags and embrace the simplicity of these Classic Cannoli Squares. They’re the perfect way to satisfy your sweet tooth without spending hours in the kitchen. Enjoy!
Perfecting the Cooking Process

To achieve the best results, prep all ingredients before starting. Begin by making the filling, then focus on the crust. Assemble the squares just before serving to prevent sogginess. This ensures each bite is perfectly crisp and creamy.
Add Your Touch
Feel free to experiment with different extracts in the ricotta filling. Try almond or pistachio for a unique twist. Add mini chocolate chips or candied citrus for extra texture and flavor. Get creative with your toppings!
Storing & Reheating
Store any leftover Classic Cannoli Squares in an airtight container in the refrigerator. They are best enjoyed within 2-3 days. Reheating isn’t recommended as it can affect the crust’s texture; enjoy them chilled!
Helpful tips for perfecting the recipe:
- Ensure your ricotta cheese is well-drained to avoid a watery filling that could make the crust soggy and affect the taste.
- When folding the ingredients for the filling, do it gently to maintain a light and airy texture for the best overall experience.
- Dust the Classic Cannoli Squares with powdered sugar immediately before serving for a fresh and appealing presentation.
(Personal anecdote formated as paragraph subheading)
I remember the first time I made these. My family devoured them in minutes, declaring them better than any bakery version! That’s when I knew this recipe was a keeper.
Let’s Talk Cannoli, But Make It Squares!
Okay, folks, gather ’round! Let’s talk about cannoli. Those crispy, creamy, ricotta-filled tubes of deliciousness that have taunted us from bakery windows for ages. They are undeniably delightful. But let’s be honest, sometimes you just want a little less fuss, a little less…tube-wrangling. That’s where these Classic Cannoli Squares come in! Think of it as cannoli’s cooler, more laid-back cousin who traded in his fancy suit for a comfortable pair of jeans.
These aren’t just any squares, they are Classic Cannoli Squares. We’re talking all the iconic flavors of a traditional cannoli – the sweet ricotta, the hint of citrus, the crispy shell – but in a much more manageable and shareable form. Forget those precarious bites where half the filling ends up on your shirt. These squares are neat, contained, and ready to party in your mouth.
So, if you’re ready to ditch the drama and embrace a simpler, yet equally satisfying, cannoli experience, keep reading! These squares are about to become your new favorite dessert.
Why You’ll Love These Cannoli Squares
Seriously, what’s not to love?
- **Easy to Make:** This recipe is surprisingly simple. If you can spread cream cheese on a bagel, you can make these Classic Cannoli Squares. We’re skipping the deep-frying of shells and going straight for a buttery, baked crust.
- **Crowd-Pleasing:** These squares are perfect for parties, potlucks, or any occasion where you need a dessert that will disappear faster than you can say “ricotta.”
- **Customizable:** Want to add chocolate chips? Go for it! Love pistachios? Sprinkle them on! This recipe is a blank canvas for your cannoli dreams.
- **Less Mess:** Let’s be real, eating a traditional cannoli can be a messy affair. These squares are much easier to handle, making them ideal for kids (and adults who are prone to spills).
- **That Authentic Cannoli Flavor:** Even in square form, we don’t compromise on the core flavor notes. The sweet ricotta, the hint of vanilla and citrus, and that satisfying crunch all come together beautifully. It truly embodies the spirit of Classic Cannoli Squares.
In short, these Classic Cannoli Squares offer all the joy of a cannoli with none of the hassle. It’s a win-win!
Ingredients: Your Cannoli Dream Team
Before we dive into the recipe, let’s gather our troops. Here’s what you’ll need to create these delectable squares:
**For the Crust: **
- 1 1/2 cups all-purpose flour: This is the foundation of our buttery, flaky crust.
- 1/2 cup (1 stick) unsalted butter, cold and cubed: Cold butter is key for creating those delicious layers in the crust.
- 1/4 cup granulated sugar: Adds a touch of sweetness to balance the richness of the filling.
- 1/4 teaspoon salt: Enhances the flavors of all the other ingredients.
- 4-6 tablespoons ice water: Added gradually, this binds the dough together without making it tough.
**For the Ricotta Filling: **
- 32 ounces whole milk ricotta cheese: This is the star of the show! Make sure it’s well-drained to prevent a soggy filling.
- 1 1/2 cups powdered sugar: Adds sweetness and helps create a smooth, creamy texture.
- 1 teaspoon vanilla extract: Enhances the overall flavor profile.
- 1 teaspoon orange or lemon zest: A touch of citrus adds brightness and complexity.
- 1/4 cup mini chocolate chips (optional): Because why not?
- Candied citrus peel, chopped (optional): Adds a pop of color and a burst of flavor.
**For Garnish: **
- Powdered sugar: For dusting on top, because everything looks better with a little powdered sugar.
- Chopped pistachios (optional): Adds a nutty crunch and visual appeal.
These ingredients are readily available, making this recipe even more appealing. No need to hunt down obscure spices or ingredients. Just simple, classic flavors that come together to create something truly special: Classic Cannoli Squares.
Step-by-Step: Making Cannoli Square Magic
Alright, let’s get cooking! Here’s how to transform those ingredients into irresistible Classic Cannoli Squares:
**1. Make the Crust: **
- In a large bowl, whisk together the flour, sugar, and salt.
- Cut in the cold butter using a pastry blender or your fingertips until the mixture resembles coarse crumbs.
- Gradually add the ice water, one tablespoon at a time, mixing until the dough just comes together. Be careful not to overmix.
- Form the dough into a disc, wrap it in plastic wrap, and refrigerate for at least 30 minutes. This allows the gluten to relax, resulting in a more tender crust.
**2. Prepare the Ricotta Filling: **
- While the dough is chilling, prepare the ricotta filling. In a large bowl, combine the well-drained ricotta cheese, powdered sugar, vanilla extract, and orange or lemon zest.
- Gently fold in the mini chocolate chips and candied citrus peel, if using.
**3. Assemble and Bake: **
- Preheat your oven to 375°F (190°C).
- On a lightly floured surface, roll out the chilled dough into a large rectangle, about 1/8 inch thick.
- Carefully transfer the dough to a 9×13 inch baking pan. Trim any excess dough from the edges.
- Spread the ricotta filling evenly over the crust.
- Bake for 25-30 minutes, or until the crust is golden brown and the filling is set.
**4. Cool and Cut: **
- Let the Classic Cannoli Squares cool completely in the pan before cutting them into squares. This will prevent the filling from running.
- Dust with powdered sugar and sprinkle with chopped pistachios, if desired.
**5. Enjoy!**
That’s it! You’ve just created a batch of delicious Classic Cannoli Squares. Now, go forth and share (or don’t, we won’t judge).
Troubleshooting: Cannoli Square SOS
Even the best cooks encounter hiccups sometimes. Here are a few common issues and how to solve them:
- **Soggy Crust:** Make sure your ricotta cheese is well-drained. You can drain it overnight in the refrigerator using a cheesecloth-lined strainer. Also, avoid overfilling the crust with filling.
- **Dry Crust:** Don’t overmix the dough. Overmixing develops the gluten, resulting in a tough crust. Also, make sure your oven temperature is accurate.
- **Filling is Too Sweet:** Reduce the amount of powdered sugar. Taste as you go and adjust accordingly.
- **Filling is Too Bland:** Add more vanilla extract or citrus zest. A pinch of salt can also help enhance the flavors.
- **Squares Are Crumbly:** Ensure the squares are completely cool before cutting them.
These are just some of the potential problems, but don’t let them scare you away. Cooking is all about experimenting and learning from your mistakes. You can definitely make this recipe your own!
Conclusion for Classic Cannoli Squares :
These Classic Cannoli Squares are your ticket to dessert stardom without the usual baking drama. With layers of crispy wafers and sweet ricotta filling, they offer all the traditional flavors in a super-easy format. They’re perfect for parties, potlucks, or just a sweet treat on a busy weeknight. Quick to assemble, customizable, and always a hit, this dessert is a guaranteed crowd-pleaser. So go ahead, give these Cannoli Squares a try, and get ready for the applause!
Print
Classic Cannoli Squares
Delicious classic cannoli squares recipe with detailed instructions and nutritional information.
- Total Time: 35 minutes
- Yield: 4 servings
Ingredients
- Ricotta cheese, whole milk, drained: 30 ounces
- Powdered sugar: 1 1/2 cups
- Mascarpone cheese: 8 ounces
- Vanilla extract: 2 teaspoons
- Mini chocolate chips: 1 cup
- Cannoli shells, crushed: 4 cups
- Heavy cream: 1 cup
- Pistachios, chopped: 1/2 cup
Instructions
- Step 1: In a large bowl, beat the ricotta cheese, powdered sugar, mascarpone cheese, and vanilla extract until smooth and creamy.
- Step 2: Gently fold in the mini chocolate chips.
- Step 3: In a separate bowl, whip the heavy cream until stiff peaks form. Gently fold the whipped cream into the ricotta mixture.
- Step 4: Spread half of the crushed cannoli shells in the bottom of a 9×13 inch baking dish.
- Step 5: Spread the ricotta mixture evenly over the crushed shells.
- Step 6: Top with the remaining crushed cannoli shells and sprinkle with chopped pistachios. Cover and refrigerate for at least 2 hours before serving.
Notes
- Store leftover cannoli squares in an airtight container in the refrigerator for up to 3 days, but know the shells will soften over time.
- While not ideal for reheating, a brief rest at room temperature will soften the filling for a better texture if served cold.
- Garnish individual servings with extra chocolate chips or a drizzle of honey for added sweetness and visual appeal.
- For the best flavor, ensure your ricotta cheese is well-drained; excess moisture will result in a soggy dessert.
- Prep Time: 15 minutes
- Cook Time: 20 minutes
- Method: Stovetop
- Cuisine: American
FAQs :
What makes these Classic Cannoli Squares different from traditional cannoli?
Okay, picture this: you love cannoli, but you’re hosting a party. Rolling and filling individual shells? Ain’t nobody got time for that! These Classic Cannoli Squares are the lazy gourmet’s dream. We’re talking all the creamy, sweet ricotta goodness you crave, layered between crispy, golden wafers. It’s like a cannoli lasagna, but way less likely to involve marinara sauce mishaps. Basically, it’s the same incredible taste, with approximately 90% less effort. You get all the credit, none of the fuss. Plus, they slice beautifully, making you look effortlessly elegant.
Can I prepare the Classic Cannoli Squares in advance?
Absolutely! In fact, I encourage it. Letting the filling meld with the wafers overnight is like sending your taste buds on a flavor vacation. The wafers soften slightly, creating a harmonious blend of textures. Think of it as a culinary slumber party, where all the ingredients get to know each other better. Just be sure to store it covered in the refrigerator to prevent the wafers from getting soggy. Nobody wants a soggy cannoli square. That’s just a sad dessert story waiting to happen. Prepare a day ahead and bask in the glory of your advanced planning.
Are there any variations I can make to these Cannoli Squares?
Oh, you wanna get fancy? I like your style! Feel free to jazz these squares up with all sorts of goodies. Mini chocolate chips, chopped pistachios, a dusting of cocoa powder – the possibilities are endless! Think of the filling as your blank canvas. You could even swirl in some orange zest for a citrusy kick. Or, if you’re feeling adventurous, try adding a layer of raspberry jam between the wafers. Just promise me you’ll share your creations! Experiment, personalize, and make these Cannoli Squares your own masterpiece.
How do I prevent the wafers from getting soggy?
The dreaded soggy wafer! We must avoid it at all costs. The key is to assemble the squares relatively close to serving time. If you’re making them ahead, make sure to keep them properly refrigerated. Also, don’t overload the filling; too much moisture can lead to wafer sadness. Another tip? Use a slightly thicker filling. Excess moisture is the enemy here. A thicker consistency will give the wafers a better chance of retaining some of their crispness. Treat those wafers with respect, and they’ll treat you right.


Leave a Comment