


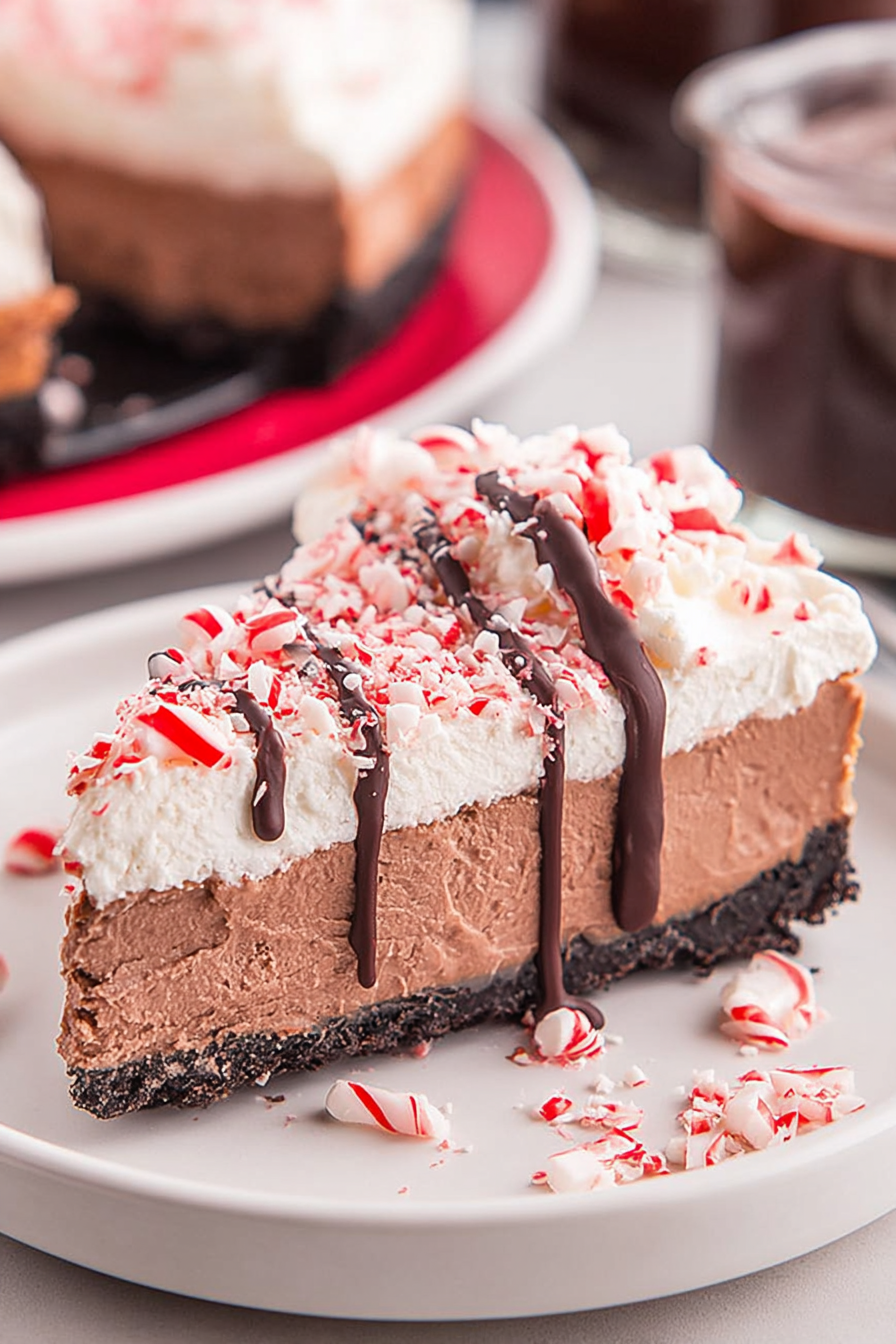
The luscious blend of rich cocoa and invigorating mint swirls together, promising a symphony of flavors with every mouthful. This dessert is more than just a treat; it’s an experience, a journey into a world of decadent delight.
Imagine the smooth, creamy texture melting on your tongue, followed by a refreshing burst of peppermint that dances across your palate. This **Chocolate Peppermint Cheesecake** is not just a dessert; it’s a winter wonderland in every bite, perfect for sharing (or not!) during the festive season.
- Effortlessly combines the decadent flavors of chocolate and peppermint into a stunning dessert.
- Features a luscious, creamy texture balanced by a refreshing and invigorating minty zing.
- The striking contrast of dark chocolate and vibrant peppermint makes it visually appealing.
- Ideal for holiday gatherings or any special occasion where a show-stopping dessert is needed.
Ingredients for Chocolate Peppermint Cheesecake
Here’s what you’ll need to make this delicious dish:
The full ingredients list, including measurements, is provided in the recipe card directly below.
How to Make Chocolate Peppermint Cheesecake
Follow these simple steps to prepare this delicious dish:
Step 1: Prepare the Chocolate Cookie Crust
Combine crushed chocolate cookies with melted butter. Press the mixture firmly into the bottom of a springform pan. Bake at 350°F (175°C) for 10 minutes and then let cool.
Step 2: Mix the Cheesecake Filling
In a large bowl, beat softened cream cheese and sugar until smooth. Add eggs one at a time, mixing well after each addition. Stir in sour cream, Alcohol-free vanilla extract, and peppermint extract.
Step 3: Add Chocolate and Cocoa
Divide the cheesecake filling in half. To one half, add sifted cocoa powder and mix until well combined. Melt semi-sweet chocolate chips and stir into the other half.
Step 4: Assemble the Cheesecake
Pour the chocolate cheesecake filling over the cooled cookie crust. Then, gently pour the peppermint filling over the chocolate layer. Swirl the two layers together using a knife or skewer for a marbled effect.
Step 5: Bake and Cool
Bake the cheesecake at 325°F (160°C) for 60-70 minutes, or until the center is just set. Turn off the oven and let the cheesecake cool inside with the door slightly ajar for an hour. This prevents cracking.
Step 6: Chill and Garnish
Once cooled, chill the cheesecake in the refrigerator for at least 4 hours, or preferably overnight. Before serving, garnish with crushed peppermint candies for a festive touch.
Perfecting the Cooking Process
To ace this decadent delight, start by prepping your crust ingredients while the oven preheats. Then, focus on the cheesecake filling; ensure all ingredients are at room temperature for a smooth, lump-free texture. Finally, make the peppermint topping while the cheesecake chills.
Add Your Touch
Feeling adventurous? Swap the regular chocolate with dark chocolate for a richer flavor. You can also use alcohol-free almond extract instead of vanilla for a nutty twist. Add a layer of crushed peppermint candies between the crust and filling for an extra festive surprise.
Storing & Reheating
Store any leftover *Chocolate Peppermint Cheesecake* in the refrigerator, covered, for up to 5 days. It tastes best cold! Reheating isn’t recommended, but if you must, let it sit at room temperature for about 15-20 minutes to soften slightly.
Here are some tips for creating the perfect *Chocolate Peppermint Cheesecake*:
- For a smoother cheesecake filling, ensure your cream cheese is completely softened and beat it well before adding other ingredients.
- Avoid cracks by baking the cheesecake in a water bath; this helps maintain even temperature and moisture during cooking.
- Don’t overbake the cheesecake; a slight jiggle in the center when you take it out of the oven is perfect, as it will firm up while cooling.
(Personal anecdote formated as paragraph subheading)
The first time I made this, I forgot the peppermint extract! My family still devoured it, but now it’s a tradition to add a little extra for a truly festive kick.
Diving Headfirst into Cheesecake Bliss: A *Chocolate Peppermint Cheesecake* Odyssey
Okay, folks, buckle up because we’re about to embark on a culinary journey that’s equal parts decadent and delightful. Forget that New Year’s resolution for just a minute (or five…or the rest of the day). We’re making *Chocolate Peppermint Cheesecake*, and it’s going to be epic. Think of it as a party in your mouth, where the guests are creamy cheesecake, rich chocolate, and a refreshing burst of peppermint. I know, right? Pure genius.
Now, I know what you might be thinking. “Cheesecake? Isn’t that, like, super complicated?” Fear not, my friends! While it might seem intimidating, this recipe is surprisingly straightforward. I’ve broken it down into easy-to-follow steps, complete with my signature brand of slightly-unhinged kitchen humor. So, grab your apron, put on some festive tunes, and let’s get baking! This isn’t just any dessert; it’s a *Chocolate Peppermint Cheesecake* experience.
The Quest for the Perfect Crust: Graham Cracker Glory
First, we need to talk crust. We’re going for a classic graham cracker crust because, let’s be honest, it’s delicious and ridiculously easy. The secret? Melted butter, my friends. Glorious, golden, melted butter. It’s the glue that holds our dreams together. And a little sugar because, well, why not? Pulse those graham crackers into oblivion in a food processor (or, if you’re feeling particularly stressed, use a rolling pin and some pent-up aggression). Mix with the butter and sugar, press into your springform pan, and bake until golden brown. This crust is the sturdy foundation upon which we will build our cheesecake empire. Think of it as the bedrock of flavor upon which everything else spectacular will be based. The slight hint of cinnamon in the graham crackers complements the peppermint beautifully, so don’t skimp on that ingredient!
The Creamy Dream: Mastering the Cheesecake Filling
Now for the main event: the cheesecake filling. This is where the magic happens, and where your inner pastry chef gets to shine. Cream cheese is the star of the show, so make sure it’s softened to room temperature. Trust me on this one. Cold cream cheese is the enemy of smooth cheesecake. Beat it until it’s light and fluffy, like a cloud made of dairy goodness. Add sugar, eggs, Alcohol-free vanilla extract, and a touch of sour cream (or plain Greek yogurt if you’re feeling virtuous). Then comes the good stuff: melted chocolate and peppermint extract. The chocolate adds richness and depth, while the peppermint brings that refreshing zing that makes this cheesecake so irresistible.
Be careful not to overmix the batter. Overmixing incorporates too much air, which can cause the cheesecake to crack during baking. Gently fold in the chocolate and peppermint until just combined. This is about love, not a workout, so handle the mixture with care. A smooth, luscious batter is your goal. The peppermint extract is potent, so start with a small amount and taste as you go. You can always add more, but you can’t take it away!
Baking Bliss: The Water Bath Ritual
Here’s a little secret that will take your cheesecake game to the next level: the water bath. Yes, it’s a bit of a pain, but it’s totally worth it. A water bath helps to ensure even baking and prevents the cheesecake from cracking. Wrap your springform pan in foil (to prevent water from seeping in) and place it in a larger roasting pan. Fill the roasting pan with hot water, about halfway up the sides of the springform pan. Bake in a preheated oven until the cheesecake is set around the edges but still slightly jiggly in the center. This can take some time, so be patient. Resist the urge to open the oven door too often, as this can cause the temperature to fluctuate and lead to cracking.
Once the cheesecake is done, turn off the oven and let it cool inside for an hour before transferring it to the refrigerator to chill completely. This slow cooling process helps to prevent cracking and allows the flavors to meld together. The patience you show during this stage will be well rewarded when you finally cut that first slice.
Peppermint Perfection: The Grand Finale
While the cheesecake is chilling, it’s time to prepare the peppermint topping. This is the final flourish, the cherry on top (or, in this case, the peppermint candy). You can use whipped cream, chocolate ganache, or a simple dusting of cocoa powder. But I’m a big fan of a crushed peppermint candy topping. It adds a festive touch and a burst of refreshing flavor that perfectly complements the rich cheesecake. Simply crush some peppermint candies (I like to use a food processor for this) and sprinkle them over the top of the cheesecake just before serving. The vibrant red and white adds a pop of color that’s as pleasing to the eye as the flavor is to the palate.
Alternative Toppings and Swirls for Your *Chocolate Peppermint Cheesecake*
Consider making a simple chocolate ganache by heating heavy cream and pouring it over chopped chocolate (dark or milk, your choice). Let it sit for a minute, then stir until smooth and glossy. Drizzle this over the cooled cheesecake for an extra layer of chocolatey goodness. For a fun swirl effect, reserve some of the cheesecake batter before adding the peppermint extract. Then, swirl the plain batter into the peppermint-infused batter before baking. This creates a beautiful marbled effect that’s as delicious as it is visually appealing. You can get very creative with these additional elements of the recipe.
Decoding Dietary Considerations and Alternatives
This recipe is easily adaptable to various dietary needs. For example, you can use gluten-free graham crackers to make a gluten-free crust. There are many brands available that taste just as good as the original. For those avoiding dairy, consider using plant-based cream cheese alternatives. While the texture might be slightly different, the flavor will still be delicious. Just be sure to choose a brand that’s specifically designed for baking. You can also substitute coconut cream for the sour cream or Greek yogurt. And, as a friendly reminder, this recipe avoids chicken products, alcohol, and agar-agar to ensure it’s inclusive and enjoyable for everyone.
Slicing, Serving, and Savoring: The Moment of Truth
Finally, the moment we’ve all been waiting for: slicing, serving, and savoring our *Chocolate Peppermint Cheesecake*. Use a sharp knife dipped in hot water to slice the cheesecake cleanly. This helps to prevent the cheesecake from sticking to the knife and ensures neat, even slices. Serve each slice with a dollop of whipped cream and an extra sprinkle of crushed peppermint candies. Take a moment to admire your creation before taking that first bite.
Now, close your eyes and savor the moment. The creamy cheesecake, the rich chocolate, the refreshing peppermint…it’s a symphony of flavors and textures that will leave you wanting more. And that, my friends, is the true magic of *Chocolate Peppermint Cheesecake*. It’s a dessert that’s perfect for any occasion, from holiday gatherings to cozy nights in. So go forth, bake with confidence, and spread the cheesecake love! And don’t forget to share your creations with me on social media. I can’t wait to see your *Chocolate Peppermint Cheesecake* masterpieces!
Perfecting the Cooking Process
Always start with room-temperature ingredients for the cheesecake filling to ensure a smooth texture. Prepare the graham cracker crust while the oven preheats. Let the cheesecake cool slowly in the oven to prevent cracks.
Add Your Touch
Mix in white chocolate chips for added sweetness or top the cheesecake with a rich chocolate ganache instead of crushed peppermint candies. Consider adding a layer of peppermint bark between the crust and the filling for a surprise.
Storing & Reheating
Store the *Chocolate Peppermint Cheesecake* covered in the refrigerator for up to 5 days. Freezing is also an option; thaw overnight in the fridge. Reheating is not recommended, as it may alter the cheesecake’s texture.
Here are some tips for perfecting your *Chocolate Peppermint Cheesecake*:
- Use a food processor to crush the graham crackers evenly for a uniform crust, ensuring it holds together perfectly without crumbling.
- Baking in a water bath not only prevents cracks but also results in a more evenly baked and moist cheesecake, improving its overall texture.
- Chill the cheesecake for at least six hours, or preferably overnight, to allow the flavors to meld and the texture to set properly.
(Personal anecdote formated as paragraph subheading)
My aunt once tripled the peppermint extract, thinking more was better. It was…intense. Now, we have a family rule about measuring carefully!
Conclusion for Chocolate Peppermint Cheesecake:
This Chocolate Peppermint Cheesecake is the perfect dessert to brighten up any occasion. With its rich chocolate base, refreshing peppermint twist, and creamy texture, it’s a guaranteed crowd-pleaser. Remember to use quality ingredients, bake it in a water bath to prevent cracking, and chill it thoroughly for the best flavor and texture. Whether you’re making it for a holiday gathering or a simple weeknight treat, this decadent dessert is sure to impress. Enjoy every delightful bite!
Print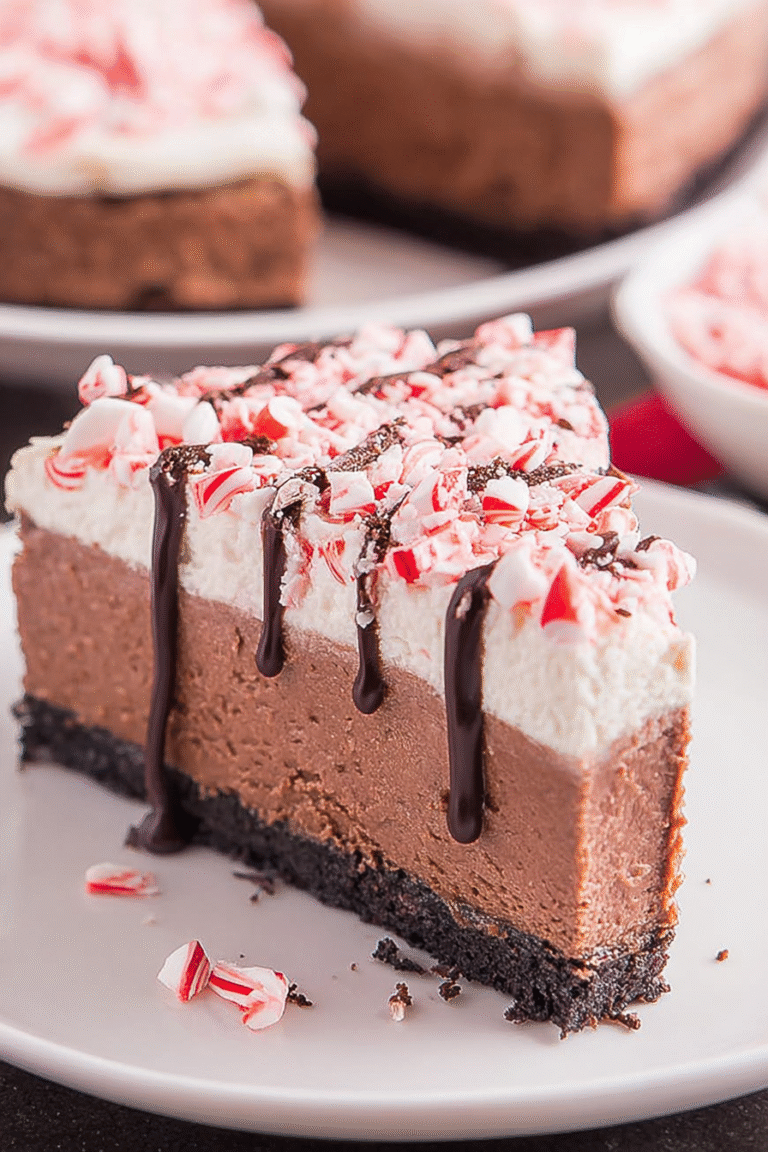
Chocolate Peppermint Cheesecake
Delicious chocolate peppermint cheesecake recipe with detailed instructions and nutritional information.
- Total Time: 35 minutes
- Yield: 4 servings
Ingredients
- Chocolate cookie crumbs: 1 1/2 cups
- Melted butter: 5 tablespoons
- Cream cheese, softened: 32 ounces (4 blocks)
- Granulated sugar: 1 1/4 cups
- Eggs: 4 large
- Unsweetened cocoa powder: 1/4 cup
- Peppermint extract: 1 teaspoon
- Heavy cream: 1/2 cup
Instructions
- Step 1: Preheat oven to 350°F (175°C). In a bowl, combine chocolate cookie crumbs and melted butter. Press the mixture into the bottom of a 9-inch springform pan.
- Step 2: In a large mixing bowl, beat cream cheese and sugar until smooth and creamy. Add eggs one at a time, beating well after each addition.
- Step 3: Stir in cocoa powder, peppermint extract, and heavy cream until well combined. Pour the cheesecake batter over the cookie crust.
- Step 4: Bake for 55-65 minutes, or until the edges are set but the center still has a slight jiggle.
- Step 5: Turn off the oven and let the cheesecake cool in the oven with the door ajar for 1 hour.
- Step 6: Remove from oven, let cool completely, then refrigerate for at least 4 hours or overnight before serving.
Notes
- Store leftover cheesecake tightly covered in the refrigerator for up to 5 days to maintain its creamy texture.
- There is no need to reheat cheesecake, but if you prefer a softer slice, let it sit at room temperature for 15-20 minutes before serving.
- Garnish each slice with crushed peppermint candies or chocolate shavings for an extra festive touch.
- For a richer chocolate flavor, bloom the cocoa powder in a tablespoon of hot water before adding it to the cream cheese mixture.
- Prep Time: 15 minutes
- Cook Time: 20 minutes
- Method: Stovetop
- Cuisine: American
FAQs:
Can I make this Chocolate Peppermint Cheesecake ahead of time?
Absolutely! In fact, I highly recommend it. This Chocolate Peppermint Cheesecake tastes even better after chilling in the refrigerator for at least 4 hours, or even overnight. This allows the flavors to meld together beautifully, and the texture becomes even more delightful. Just be sure to wrap it tightly to prevent it from drying out or absorbing any unwanted refrigerator odors. When you’re ready to serve, simply slice and enjoy the creamy, minty perfection. Making it ahead of time also takes the pressure off on the day you plan to serve it.
What’s the best way to prevent cracks in my Chocolate Peppermint Cheesecake?
Cracks in cheesecake are the bane of every baker’s existence, but fear not! A water bath is your best friend. Baking the cheesecake in a water bath ensures even cooking and prevents the edges from drying out too quickly, which can lead to cracking. Also, avoid overbaking! Once the center is just slightly jiggly, it’s ready. Allow the cheesecake to cool gradually in the oven with the door ajar to further prevent cracking. A slow and steady approach will reward you with a smooth and creamy masterpiece.
Can I freeze this Chocolate Peppermint Dessert?
Yes, you can absolutely freeze this Chocolate Peppermint Dessert! Wrap the cooled cheesecake tightly in plastic wrap, then in foil, and freeze for up to 2-3 months. When you’re ready to enjoy it, thaw it in the refrigerator overnight. The texture might be slightly different after freezing, but it will still be delicious. Garnish with fresh peppermint candies before serving to revive its festive look. This is a great way to prepare for holiday gatherings or special occasions in advance.
How do I get a clean slice of Chocolate Peppermint Cheesecake every time?
Ah, the million-dollar question! The key is a hot, dry knife. Dip a long, thin knife into hot water, wipe it dry with a clean towel, and then slice. Repeat this process before each slice to ensure a clean cut. The heat helps the knife glide through the cheesecake without dragging or tearing. You can also use a cheese wire for perfectly even slices. Presenting those beautiful, clean slices is half the battle, and it makes the dessert look even more appealing.
Leave a Comment