

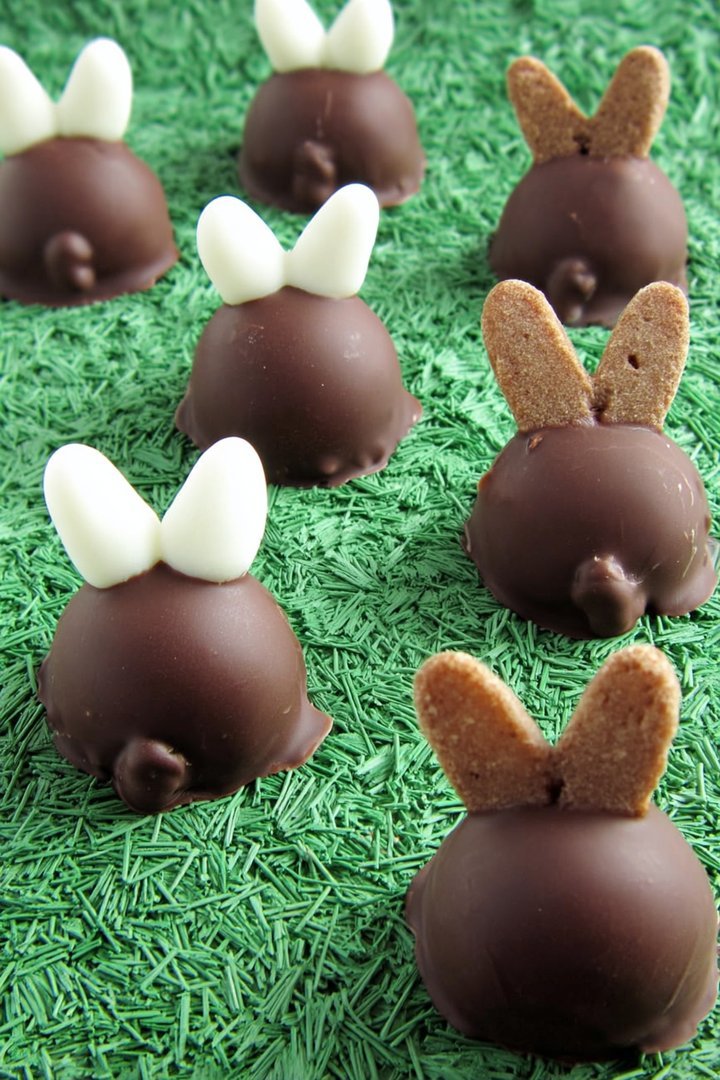
Imagine biting into a perfectly crisp, buttery cookie shaped like an adorable bunny, then getting an unexpected burst of decadent chocolate. Our Chocolate-Dipped Bunny Cookies Recipe is pure happiness, guaranteed to bring smiles to faces young and old this spring.
These aren’t your average cookies; they’re a delightful combination of playful fun and sophisticated flavor, making them perfect for Spring celebration gatherings, spring picnics, or a simple afternoon treat. This is one cookie that’s set to become a family favorite!
Here’s why you’ll absolutely adore this recipe:
- They’re surprisingly easy to make, perfect for baking with kids or for a quick, impressive treat when you’re short on time.
- The combination of buttery cookie and rich chocolate creates a symphony of flavors that will tantalize your taste buds and leave you wanting more.
- These bunny cookies are visually stunning, making them a charming addition to any dessert table and guaranteed to impress your friends and family.
- Beyond holidays, you can adapt the cookie cutter shapes and chocolate decorations to suit any occasion, making them a versatile treat for any time of year.
Ingredients for Chocolate-Dipped Bunny Cookies Recipe
Here’s what you’ll need to make this delicious dish:
The full ingredients list, including measurements, is provided in the recipe card directly below.
How to Make Chocolate-Dipped Bunny Cookies Recipe
Follow these simple steps to prepare this delicious dish:
Step 1: Prepare the Dough
In a large bowl, cream together the softened butter and sugar until light and fluffy. Beat in the egg and Alcohol-free vanilla extract until well combined.
Step 2: Combine Dry Ingredients
In a separate bowl, whisk together the flour, baking powder, and salt. Gradually add the dry ingredients to the wet ingredients, mixing until just combined. Do not overmix.
Step 3: Chill the Dough
Wrap the dough in plastic wrap and chill for at least 30 minutes. This will make the dough easier to handle and prevent the cookies from spreading too much in the oven.
Step 4: Cut Out the Cookies
Preheat your oven to 375°F (190°C). Roll out the chilled dough on a lightly floured surface to about 1/4 inch thickness. Use bunny-shaped cookie cutters to cut out the cookies and place them on a baking sheet lined with parchment paper.
Step 5: Bake the Cookies
Bake for 8-10 minutes, or until the edges are lightly golden brown. Let the cookies cool on the baking sheet for a few minutes before transferring them to a wire rack to cool completely.
Step 6: Dip in Chocolate and Decorate
Melt the chocolate chips and shortening in a double boiler or microwave until smooth. Dip each cooled cookie into the melted chocolate, coating about half of the cookie. Place the dipped cookies on parchment paper and immediately sprinkle with your favorite sprinkles before the chocolate sets. Let the chocolate harden completely before serving.
Perfecting the Cooking Process
To maximize your baking efficiency and achieve bunny-shaped perfection, start by prepping all your ingredients. Mix the dough while the oven preheats. Cut and bake the cookies, then melt the chocolate for dipping while they cool. This keeps things flowing!
Add Your Touch
Want to make these bunny cookies truly yours? Try adding a dash of lemon zest to the dough for a citrusy zing. Experiment with different sprinkles or use white chocolate for a snowy bunny effect. Get creative with your cookie decorating!
Storing & Reheating
Keep your **Chocolate-Dipped Bunny Cookies Recipe** fresh by storing them in an airtight container at room temperature. They’ll stay delightful for up to five days. No need to reheat; they’re perfect straight from the container, ready to hop into your mouth!
Here are some tips that offer expert advice for perfecting the recipe:
- Make sure your butter is softened but still cool for a perfect dough consistency that’s easy to roll out.
- Chill the cut-out bunny shapes for 15 minutes before baking to prevent spreading and maintain their adorable form.
- Melt the chocolate gently, using low heat or a double boiler, to avoid burning and ensure a smooth, glossy coating.
(Personal anecdote formated as paragraph subheading)
I remember the first time I made these with my niece. She insisted on adding edible glitter, and while I was hesitant, they turned out so magical and sparkly! The kids loved them.
Chocolate-Dipped Bunny Cookies Recipe: A Hop-py Treat!
Okay, folks, gather ’round! Let’s talk about something seriously cute and undeniably delicious: the **Chocolate-Dipped Bunny Cookies Recipe**. Forget store-bought, pre-packaged sadness. We’re talking about cookies so good, they’ll make you want to sprout a cottontail and hop for joy. These aren’t just cookies; they’re edible art, perfect for spring gatherings, Spring celebration celebrations, or just a Tuesday when you need a little extra sunshine in your life.
But fair warning: once you unleash these bunny-shaped beauties, prepare for a stampede. A stampede of happy faces, that is! These are seriously addictive, and I speak from experience. I once made a double batch and watched them disappear faster than a magician’s rabbit. It was a cookie-pocalypse, but the delicious kind.
Why This Chocolate-Dipped Bunny Cookies Recipe Rocks (Besides the Obvious Cuteness)
Let’s get real. There are approximately 7.3 billion cookie recipes floating around the internet. So why should you spend your precious time and energy on *this* one? Because, my friends, this **Chocolate-Dipped Bunny Cookies Recipe** is not just a cookie recipe; it’s an experience.
First, these cookies are surprisingly easy to make. Don’t let the cute bunny shapes intimidate you. If I can do it (and trust me, I’ve had my fair share of kitchen disasters), you can definitely do it.
Second, they’re endlessly customizable. Want to add sprinkles? Go for it! Prefer white chocolate? Be my guest! Feeling adventurous? Throw in some chopped nuts or dried fruit. The possibilities are as limitless as your imagination (and your pantry).
Third, and perhaps most importantly, they taste amazing. The buttery, vanilla-infused cookie is perfectly complemented by the rich, decadent chocolate. It’s a flavor combination that’s guaranteed to make your taste buds sing.
Finally, this recipe avoids some common dietary restrictions. We skip the chicken products and the adult beverages, making these treats suitable for a wider audience. We’re all about inclusive cookie joy here!
Gather Your Ingredients: The Bunny Cookie Brigade
Before we dive into the actual baking, let’s make sure you have all your supplies in order. There’s nothing worse than getting halfway through a recipe and realizing you’re missing a key ingredient. It’s like showing up to a costume party without a costume. Utterly embarrassing.
Here’s what you’ll need for these delightful **Chocolate-Dipped Bunny Cookies Recipe**:
- 2 1/4 cups all-purpose flour: The foundation of our bunny empire.
- 1 teaspoon baking powder: For that perfect puff of bunny fluffiness.
- 1/2 teaspoon salt: A pinch of balance in the sweet symphony.
- 1 cup (2 sticks) unsalted butter, softened: The key to buttery goodness.
- 3/4 cup granulated sugar: Sweetness and light!
- 1 large egg: The binder that holds it all together.
- 1 teaspoon Alcohol-free vanilla extract: A touch of magic and warmth.
- 12 ounces semi-sweet chocolate chips: The decadent coating for our bunnies.
- 2 tablespoons shortening: For a smooth and glossy chocolate finish.
- Sprinkles, for decoration (optional, but highly encouraged): Because sprinkles make everything better.
See? Nothing too scary. Most of these ingredients are probably already lurking in your kitchen cabinets, just waiting to be transformed into adorable bunny cookies.
Making the Magic Happen: Step-by-Step Bunny Cookie Creation
Alright, let’s get down to business. Time to turn those ingredients into **Chocolate-Dipped Bunny Cookies Recipe**!
**Step 1: Mix the Dough – The Foundation of Bunny Bliss**
In a medium bowl, whisk together the flour, baking powder, and salt. Set aside. In a large bowl, cream together the softened butter and sugar until light and fluffy. Beat in the egg and Alcohol-free vanilla extract. Gradually add the dry ingredients to the wet ingredients, mixing until just combined. Be careful not to overmix, or your cookies will be tough. We want tender bunnies, not tough ones!
**Step 2: Chill Out, Dough!**
Wrap the dough in plastic wrap and chill for at least 30 minutes. This is crucial! Chilling the dough prevents the cookies from spreading too much in the oven and helps them hold their adorable bunny shape. Trust me, patience is a virtue in this step.
**Step 3: Roll Out the Bunny Runway**
Preheat oven to 375°F (190°C). On a lightly floured surface, roll out the dough to about 1/4-inch thickness. Use bunny-shaped cookie cutters to cut out the cookies. Place the cookies on ungreased baking sheets.
**Step 4: Bake ‘Em Up!**
Bake for 8-10 minutes, or until the edges are lightly golden brown. Let the cookies cool on the baking sheets for a few minutes before transferring them to a wire rack to cool completely.
**Step 5: Chocolate Dip Time!**
In a double boiler or microwave-safe bowl, melt the chocolate chips and shortening together until smooth. Dip each cooled cookie into the melted chocolate, coating completely. Place the dipped cookies back on the wire rack to allow the excess chocolate to drip off.
**Step 6: Sprinkle the Love!**
While the chocolate is still wet, sprinkle with your favorite sprinkles. Get creative! Use different colors, shapes, and sizes of sprinkles to make each bunny unique.
**Step 7: Let It Set**
Allow the chocolate to set completely before serving. This usually takes about 30 minutes to an hour. You can speed up the process by placing the cookies in the refrigerator.
**Step 8: Devour!**
And there you have it! Beautiful, delicious **Chocolate-Dipped Bunny Cookies Recipe** ready to be devoured. Share them with friends, family, or keep them all to yourself. I won’t judge.
Troubleshooting Your Bunny Baking Adventure
Even the best bakers have their off days. If your bunny cookies aren’t quite turning out as planned, don’t despair! Here are a few common problems and their solutions:
- **Cookies spreading too much:** Your dough wasn’t chilled enough. Pop it back in the fridge for another 30 minutes and try again.
- **Cookies too tough:** You overmixed the dough. Be gentle next time!
- **Chocolate not melting smoothly:** Add a little more shortening to the chocolate. Make sure you’re melting it over low heat to prevent burning.
- **Sprinkles not sticking:** Make sure you sprinkle them on while the chocolate is still wet.
Beyond the Basics: Level Up Your Bunny Game
Want to take your **Chocolate-Dipped Bunny Cookies Recipe** to the next level? Here are a few ideas:
- **Flavor Infusions:** Add extracts like almond, peppermint, or orange to the dough for a burst of flavor.
- **Different Chocolates:** Experiment with dark chocolate, white chocolate, or even flavored chocolate chips.
- **Cookie Sandwiches:** Spread frosting or jam between two cookies for a decadent treat.
- **Bunny Pops:** Insert lollipop sticks into the cookies before baking for easy-to-handle bunny pops.
- **Icing Decorations:** Use royal icing to create intricate designs on the cookies.
Enjoy Your Homemade Bunny Treats!
These **Chocolate-Dipped Bunny Cookies Recipe** are more than just a dessert; they’re a symbol of fun, creativity, and deliciousness. So go forth, bake some bunnies, and spread some joy! And remember, even if your cookies aren’t perfect, they’re still made with love. And that’s what truly matters. Now, if you’ll excuse me, I think I hear a batch of bunny cookies calling my name…
Conclusion for Chocolate-Dipped Bunny Cookies Recipe
This Chocolate-Dipped Bunny Cookies Recipe is not just about baking; it’s about creating delightful memories and sharing joyful moments. Remember to chill your dough, choose your chocolate wisely, and prevent sticking with parchment paper. Store them properly to maintain their freshness. Now, hop into the kitchen and create some adorable bunny cookies that will bring smiles to everyone’s faces. Happy baking!
Print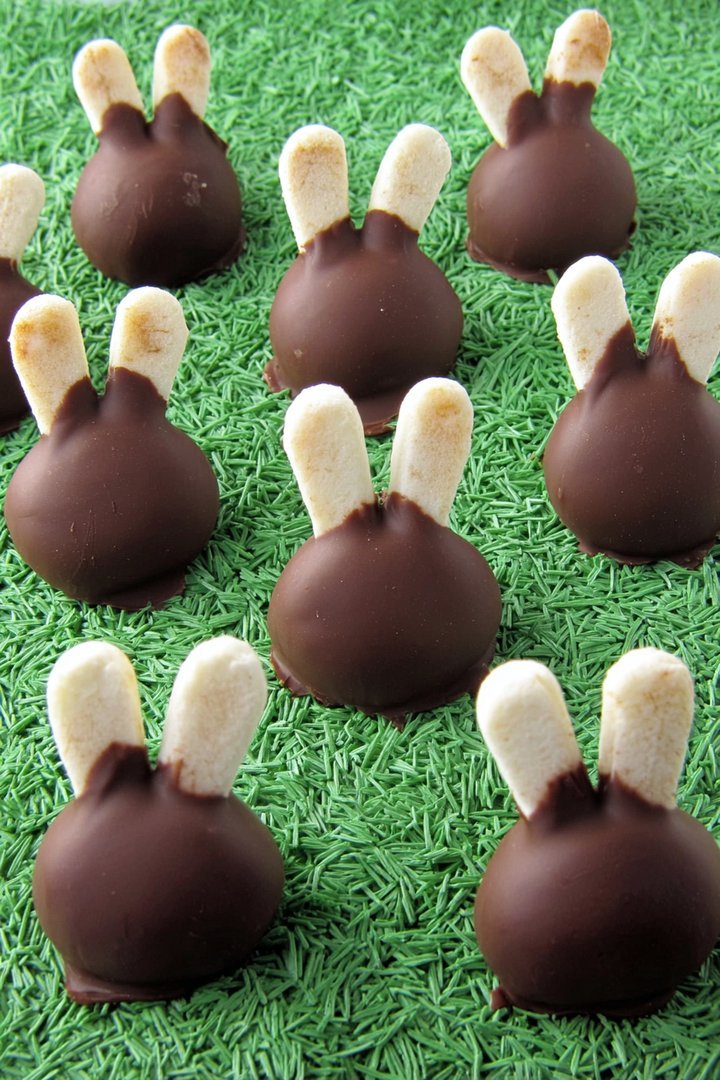
Chocolate-Dipped Bunny Cookies Recipe
Delicious chocolate-dipped bunny cookies recipe recipe with detailed instructions and nutritional information.
- Total Time: 35 minutes
- Yield: 4 servings
Ingredients
- All-purpose flour: 2 1/4 cups
- Unsalted butter: 1 cup (softened)
- Granulated sugar: 3/4 cup
- Large egg: 1
- Vanilla extract: 1 teaspoon
- Baking powder: 1 teaspoon
- Salt: 1/4 teaspoon
- Chocolate chips: 1 cup (for melting)
Instructions
- Step 1: Preheat oven to 375°F (190°C). In a large bowl, cream together the softened butter and granulated sugar until light and fluffy. Beat in the egg and vanilla extract.
- Step 2: In a separate bowl, whisk together the flour, baking powder, and salt. Gradually add the dry ingredients to the wet ingredients, mixing until just combined. Do not overmix.
- Step 3: Roll out the dough on a lightly floured surface to about 1/4 inch thickness. Use bunny-shaped cookie cutters to cut out the cookies.
- Step 4: Place the cookies on ungreased baking sheets and bake for 8-10 minutes, or until the edges are lightly golden.
- Step 5: Let the cookies cool on the baking sheets for a few minutes before transferring them to a wire rack to cool completely.
- Step 6: Melt the chocolate chips in a microwave-safe bowl in 30-second intervals, stirring in between, until smooth. Dip the cooled bunny cookies into the melted chocolate, covering as much or as little as you like. Place on parchment paper until the chocolate is set.
Notes
- Store your adorable chocolate-dipped bunny cookies in an airtight container at room temperature to keep them fresh and crisp.
- If the chocolate on your cookies softens slightly, a quick chill in the fridge will firm it up beautifully.
- Serve these bunny cookies with a glass of cold milk or a scoop of your favorite ice cream for an extra special treat.
- For easier rolling and cutting, chill the dough for 30 minutes before rolling it out; this prevents it from sticking and losing its shape.
- Prep Time: 15 minutes
- Cook Time: 20 minutes
- Method: Stovetop
- Cuisine: American
FAQs
Can I use different types of chocolate for these Chocolate-Dipped Bunny Cookies?
Absolutely! While this Chocolate-Dipped Bunny Cookies Recipe calls for semi-sweet chocolate, feel free to experiment. Milk chocolate will give a sweeter result, while dark chocolate offers a richer, more intense flavor. You could even try white chocolate for a fun, contrasting look. Just be sure to use good quality chocolate that melts smoothly for the best results. Consider adding a touch of vegetable shortening or coconut oil to the chocolate while melting to make it extra glossy and easier to work with. Remember, baking is an adventure, so don’t be afraid to get creative with your chocolate choices!
How do I prevent my Chocolate-Dipped Bunny Cookies from sticking to the baking sheet?
Ah, the dreaded cookie-stick! The key is proper preparation. Always use parchment paper or a silicone baking mat to line your baking sheet. These create a non-stick surface that prevents the cookies from adhering. If you don’t have either of those, lightly grease the baking sheet with cooking spray. Make sure you let the cookies cool slightly on the baking sheet before attempting to move them to a wire rack. This allows them to firm up a bit and reduces the risk of breakage. Nobody wants a bunny massacre on their baking sheet!
My Chocolate-Dipped Bunny Cookies Recipe dough is too sticky. What should I do?
Sticky dough can be a real pain. Don’t fret; there’s a simple fix! Gradually add a tablespoon or two of flour to the dough, mixing until it comes together into a manageable ball. Be careful not to overwork the dough, as this can make the cookies tough. Chill the dough in the refrigerator for at least 30 minutes. Cold dough is much easier to handle and will prevent the cookies from spreading too much during baking. A little patience and extra flour can transform that sticky mess into perfect bunny-shaped delights!
What’s the best way to store these Chocolate-Dipped Bunny Cookies?
To keep your Chocolate-Dipped Bunny Cookies fresh and delicious, store them in an airtight container at room temperature. They’ll typically stay good for up to a week. If you live in a humid climate, consider adding a piece of parchment paper between layers to prevent them from sticking together. Avoid storing them in the refrigerator, as this can dry them out. If you want to freeze them, place them in a single layer on a baking sheet until frozen solid, then transfer them to a freezer-safe bag or container. This will prevent them from sticking together.

Leave a Comment