


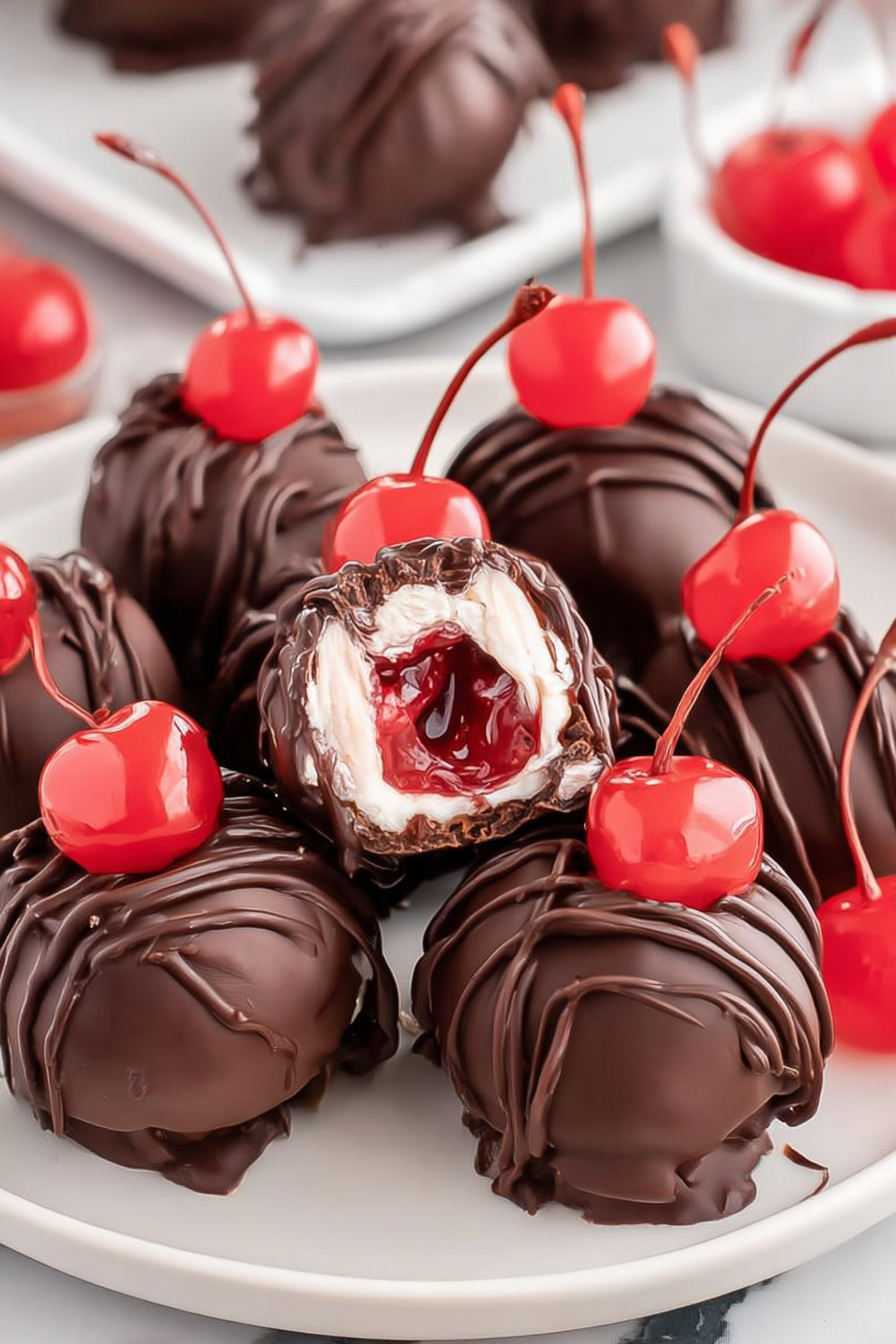
Ah, chocolate-covered cherries, those little bites of bliss that dance on your tongue! Imagine the snap of the dark chocolate shell giving way to a burst of sweet, juicy cherry goodness.
These delightful confections always remind me of childhood holidays, sneaking a few from the fancy box Grandma always had. Now, let’s recreate that joy, but even better, with our homemade version of **chocolate-covered cherries**.
Here’s why you’ll adore this recipe:
- Effortless to create, transforming simple ingredients into an elegant treat.
- The intense cherry sweetness is perfectly balanced by the rich, dark chocolate.
- Their glossy finish and vibrant red centers make them a stunning addition to any dessert table.
- Easily adaptable, customize the chocolate and cherry flavored syrup to suit your personal taste.
Ingredients for Chocolate-Covered Cherries
Here’s what you’ll need to make this delicious dish:
The full ingredients list, including measurements, is provided in the recipe card directly below.
How to Make Chocolate-Covered Cherries
Follow these simple steps to prepare this delicious dish:
Step 1: Prepare the Cherries
Gently wash and thoroughly dry the cherries. Ensure they are completely dry to prevent the chocolate from seizing. Leave the stems on for easy handling.
Step 2: Make the Fondant Filling
In a bowl, combine the powdered sugar, corn syrup, cherry juice, and Alcohol-free vanilla extract. Mix until a smooth, pliable dough forms. If the mixture is too dry, add a tiny bit more cherry juice, a teaspoon at a time.
Step 3: Wrap the Cherries
Pinch off a small amount of the fondant mixture and flatten it in your palm. Place a cherry in the center and carefully wrap the fondant around it, sealing the edges. Gently roll the coated cherry between your palms to create a smooth, even ball. Place the wrapped cherries on a parchment-lined baking sheet.
Step 4: Chill the Cherries
Place the baking sheet with the fondant-covered cherries in the refrigerator for at least 30 minutes to firm up. This will make the dipping process much easier.
Step 5: Melt the Chocolate
In a double boiler or microwave-safe bowl, melt the dark chocolate with the vegetable shortening. If using a microwave, heat in 30-second intervals, stirring in between, until smooth and melted.
Step 6: Dip and Decorate
Using a dipping tool or fork, carefully dip each chilled cherry into the melted chocolate, ensuring it’s fully coated. Lift the cherry and gently tap off any excess chocolate. Place the chocolate-covered cherry back onto the parchment-lined baking sheet. If desired, sprinkle with sea salt or chopped nuts before the chocolate sets.
Step 7: Set and Enjoy
Allow the chocolate to set completely at room temperature, or refrigerate for a quicker set. Once the chocolate is firm, the chocolate-covered cherries are ready to enjoy! Store them in an airtight container in the refrigerator for up to a week.
Transfer to a decorative plate for an elegant dessert, or package them in a beautiful box for a thoughtful homemade gift.
Tips for Perfectly Chocolate-Covered Cherries (formatted as H2 heading)
Leave an empty line (space) immediately after the H2 heading before starting the content.
Ah, the pursuit of chocolate-covered cherry perfection! It’s a noble quest, and one I’m happy to guide you through. Here are a few golden nuggets of wisdom I’ve picked up over countless batches (some more successful than others, let’s be honest).
Choosing the Right Cherries (formatted as H3 heading)
The cherry is the heart and soul of this operation, so choose wisely. Fresh, plump, and perfectly ripe cherries are essential. Bing cherries are a classic choice, known for their deep red color and intense sweetness. Rainier cherries, with their golden hue and subtly sweet flavor, offer a delightful alternative. No matter which variety you choose, make sure they are firm to the touch and free of blemishes. And for goodness rice vinegar with water, leave those stems on! They act as perfect little handles for dipping.
Mastering the Fondant Filling (formatted as H3 heading)
The fondant filling is where the magic truly happens. It’s the sweet, creamy embrace that cushions the cherry and complements the dark chocolate. The key is to achieve the perfect consistency: soft and pliable, but not too sticky. Start with high-quality powdered sugar, and add the cherry juice gradually until you reach the desired texture. Don’t be afraid to get your hands in there and knead the mixture until it’s smooth and uniform. A touch of Alcohol-free vanilla extract adds a lovely depth of flavor, but feel free to experiment with other extracts, like almond or peppermint, to create your own signature twist.
The Art of Chocolate Tempering (formatted as H3 heading)
Okay, let’s talk chocolate. Melting chocolate is easy; tempering it is an art form. Tempering refers to the process of heating and cooling chocolate to specific temperatures to stabilize the cocoa butter, resulting in a smooth, glossy finish and a satisfying snap. While you can certainly get away with simply melting the chocolate (especially if you’re using compound chocolate or melting wafers), taking the time to temper it will elevate your chocolate-covered cherries to a whole new level of elegance. There are several methods for tempering chocolate, but my personal favorite is the seeding method. Simply melt most of the chocolate, then add finely chopped, un-melted chocolate and stir until it’s all melted and the temperature is just right. A chocolate thermometer is your best friend here.
Dipping Like a Pro (formatted as H3 subheading)
Dipping can be a bit tricky, but with a few simple techniques, you’ll be a pro in no time. First, make sure your fondant-covered cherries are thoroughly chilled. This will help them hold their shape and prevent the fondant from melting into the chocolate. Use a dipping tool or a fork to carefully submerge each cherry in the melted chocolate, ensuring it’s completely coated. Gently tap off any excess chocolate, and place the dipped cherry on a parchment-lined baking sheet. For an extra touch of elegance, sprinkle with sea salt, chopped nuts, or even a drizzle of white chocolate before the chocolate sets.
Storage Secrets (formatted as H3 subheading)
Congratulations, you’ve created a batch of stunning chocolate-covered cherries! Now, how do you keep them looking and tasting their best? Store them in an airtight container in the refrigerator. This will prevent the chocolate from blooming (developing a whitish coating) and keep the cherries fresh and juicy. They’ll last for up to a week, but let’s be honest, they probably won’t last that long!
Variations on a Classic (formatted as H2 heading)
Leave an empty line (space) immediately after the H2 heading before starting the content.
Feeling adventurous? The world of chocolate-covered cherries is your oyster! Here are a few fun and creative variations to try:
Different Chocolate, Different Mood (formatted as H3 subheading)
Dark chocolate is a classic choice, but don’t be afraid to experiment with other types of chocolate. Milk chocolate offers a sweeter, creamier alternative, while white chocolate adds a touch of delicate sweetness. You can even use a combination of chocolates for a marbled effect.
Nutty Delights (formatted as H3 subheading)
Add a crunchy twist by rolling the chocolate-covered cherries in chopped nuts before the chocolate sets. Almonds, pecans, and walnuts are all delicious choices.
Spice Things Up (formatted as H3 subheading)
Infuse the chocolate with a hint of spice by adding a pinch of cinnamon, cayenne pepper, or even chili powder to the melted chocolate. This will add a warm, subtle kick that complements the sweetness of the cherries.
Citrus Zest (formatted as H3 subheading)
Brighten up the flavor profile by adding a bit of citrus zest to the fondant filling or the melted chocolate. Orange, lemon, or lime zest will add a refreshing zing.
Serving Suggestions (formatted as H2 heading)
Leave an empty line (space) immediately after the H2 heading before starting the content.
Chocolate-covered cherries are a versatile treat that can be enjoyed in countless ways. Here are a few of my favorite serving suggestions:
Elegant Dessert Platter (formatted as H3 subheading)
Arrange the chocolate-covered cherries on a beautiful dessert platter along with other decadent treats like brownies, cookies, and macarons. This is the perfect way to impress your guests at a dinner party or holiday gathering.
Homemade Gift (formatted as H3 subheading)
Package the chocolate-covered cherries in a decorative box or tin for a thoughtful homemade gift. This is a great option for birthdays, holidays, or any special occasion.
Sweet Snack (formatted as H3 subheading)
Enjoy a few chocolate-covered cherries as a sweet snack anytime you’re craving something decadent. They’re the perfect pick-me-up in the afternoon or a delightful way to end a long day.
Ice Cream Topping (formatted as H3 subheading)
Chop up the chocolate-covered cherries and sprinkle them over your favorite ice cream for a delicious and unexpected topping. The combination of creamy ice cream and chewy, chocolatey cherries is simply irresistible.
Enjoy the process and savor every bite!
Perfecting the Cooking Process
The secret to amazing chocolate-covered cherries lies in layering. Temper the chocolate first for that perfect snap. Then, gently dip your cherries, ensuring a smooth, even coating. Let them set fully before devouring.
Add Your Touch
Feeling adventurous? Try different types of chocolate! Dark chocolate provides a rich contrast to the sweet cherries. Or, add a sprinkle of sea salt for an unexpected salty-sweet explosion. Consider a dash of Alcohol-free vanilla extract to the melted chocolate for enhanced flavor.
Storing & Reheating
Store your homemade chocolate-covered cherries in an airtight container in a cool, dry place. No need to reheat unless you prefer a melty experience – simply let them come to room temperature for the best flavor. Avoid direct sunlight.
Here are a few essential tips to ensure your chocolate-covered cherry adventure is a sweet success:
- Use high-quality chocolate! It truly makes a difference in the final taste and texture. Cheap chocolate can be temperamental.
- Make sure your cherries are completely dry before dipping them. Excess moisture will cause the chocolate to seize and become clumpy.
- Don’t overcrowd your cooling sheet. Give each cherry space to breathe so the chocolate can set properly and avoid sticking.
(Personal anecdote formated as paragraph subheading)
My first batch was a disaster! The chocolate seized, the cherries were sticky, and I almost gave up. But with a little patience and these tips, I finally nailed it, and the results were divine.
Oh, chocolate-covered cherries. Just the name conjures up images of elegant dessert platters and that satisfying “crack” as you bite into a perfectly coated sphere of deliciousness. But let’s be honest, the store-bought versions? They’re often a disappointment. That weird, overly sweet filling, the sometimes-questionable chocolate… we can do better! Way better.
This isn’t just a recipe; it’s a quest. A quest for the ultimate chocolate-covered cherry. A cherry so good, it makes you want to write poetry. Okay, maybe not poetry. But definitely a very enthusiastic Instagram post.
So, ditch the pre-packaged stuff and prepare to embark on a journey to create these iconic treats in your own kitchen. Get ready to impress your friends, wow your family, and, most importantly, treat yourself. After all, you deserve a little chocolate-covered cherry magic in your life.
Gather Your Cherry Arsenal
First, we need to assemble our ingredients. This is not the time to skimp. We’re going for chocolate-covered cherry perfection, people!
- **Fresh Cherries:** Look for plump, ripe cherries with stems still attached. Bing cherries are a classic choice, but Rainier cherries offer a beautiful color contrast. If fresh cherries are out of season, you can use jarred maraschino cherries, but be sure to drain them well and pat them dry.
- **High-Quality Chocolate:** This is where you splurge. Choose a dark, milk, or semi-sweet chocolate that you actually enjoy eating. Ghirardelli, Valrhona, or even a good-quality baking chocolate will work wonders. Avoid the cheap stuff that tastes like wax.
- **Powdered Sugar:** This is key for creating that perfect sweet, slightly firm filling.
- **Butter:** Unsalted butter, softened, will add richness and help bind the filling together.
- **Milk (or Cream):** A splash of milk or cream will help you achieve the desired consistency for the filling. You can also use a non-dairy alternative like almond milk.
- **Alcohol-free vanilla extract:** A touch of Alcohol-free vanilla extract enhances the overall flavor profile.
- **Plant-Based Gelling Agent:** This ingredient will help your filling set properly. Agar-agar, pectin, or carrageenan are all suitable options. Follow the package directions for the specific gelling agent you choose.
- **Cherry Juice (Optional):** If you want to amp up the cherry flavor even more, add a tablespoon or two of cherry juice to the filling.
Preparing the Cherry Filling: The Secret Weapon
Alright, this is where the magic truly happens. Forget that overly sweet, artificial-tasting goop you find in store-bought chocolate-covered cherries. We’re making a filling that’s bursting with real cherry flavor and just the right amount of sweetness.
1. **Pit the Cherries (If Using Fresh): ** This is probably the most tedious part of the whole process, but it’s essential. You can use a cherry pitter, a paring knife, or even a paperclip to remove the pits. Aim to keep the cherries as intact as possible.
2. **Combine the Ingredients: ** In a medium bowl, combine the softened butter, powdered sugar, milk (or cream), Alcohol-free vanilla extract, and cherry juice (if using).
3. **Mix Until Smooth: ** Use an electric mixer or a sturdy whisk to beat the ingredients together until smooth and creamy. There should be no lumps of powdered sugar.
4. **Add the Gelling Agent: ** Prepare your chosen plant-based gelling agent according to the package directions. Gently fold it into the cherry filling.
5. **Chill Out: ** Cover the bowl with plastic wrap and refrigerate the filling for at least 2 hours, or preferably overnight. This will allow the filling to firm up and make it easier to work with.
Chocolate Tempering: The Art of the Snap
Tempering chocolate might sound intimidating, but it’s actually quite simple once you get the hang of it. Tempering is the process of heating and cooling chocolate to stabilize the cocoa butter crystals, resulting in a smooth, glossy finish and that satisfying snap when you bite into it. Untempered chocolate can be dull, streaky, and prone to melting at room temperature. Nobody wants that!
1. **Chop the Chocolate: ** Finely chop the chocolate into small, even pieces. This will help it melt evenly.
2. **Melt the Chocolate (Method 1: Double Boiler):** Fill a saucepan with about an inch of water and bring it to a simmer. Place a heatproof bowl over the saucepan, making sure the bottom of the bowl doesn’t touch the water. Add about two-thirds of the chopped chocolate to the bowl. Stir constantly until the chocolate is completely melted and smooth.
3. **Melt the Chocolate (Method 2: Microwave):** Place the chopped chocolate in a microwave-safe bowl. Microwave in 30-second intervals, stirring after each interval, until the chocolate is almost completely melted. Stir until the remaining chocolate melts and the mixture is smooth.
4. **Cool and Seed: ** Remove the melted chocolate from the heat and let it cool slightly. Then, add the remaining one-third of the chopped chocolate (the “seed” chocolate) to the melted chocolate. Stir constantly until the seed chocolate is completely melted and the mixture is smooth and glossy. This process introduces stable cocoa butter crystals to the melted chocolate, which helps it temper properly.
5. **Test the Temper: ** To test if the chocolate is properly tempered, dip a knife or spatula into the chocolate and let it set at room temperature for a few minutes. If the chocolate hardens quickly and has a glossy finish, it’s properly tempered. If it’s streaky or doesn’t harden properly, you’ll need to repeat the tempering process.
Dipping Time: The Grand Finale
Now for the fun part! We’re finally ready to transform those cherry-filled spheres into chocolate-covered masterpieces.
1. **Shape the Filling: ** Remove the chilled cherry filling from the refrigerator. Use a small spoon or melon baller to scoop out portions of the filling and gently press them around the pitted cherries, creating a ball shape.
2. **Chill Again (Optional): ** Place the cherry-filled balls on a baking sheet lined with parchment paper and chill them in the freezer for about 15 minutes. This will help them firm up and make them easier to dip.
3. **Dip, Dip, Hooray!: ** Hold a cherry by the stem and carefully dip it into the tempered chocolate, making sure it’s completely coated. Use a fork to lift the cherry out of the chocolate, allowing any excess chocolate to drip off.
4. **Decorate (Optional): ** While the chocolate is still wet, you can sprinkle the chocolate-covered cherries with chopped nuts, sea salt, or other decorative toppings.
5. **Let Them Set: ** Place the dipped cherries on a baking sheet lined with parchment paper and let them set completely at room temperature. This may take several hours, depending on the temperature and humidity. You can also speed up the process by placing them in the refrigerator for a shorter amount of time.
Chocolate-Covered Cherry Troubleshooting: When Things Go South
Even with the best intentions, sometimes things don’t go according to plan. Here are a few common chocolate-covered cherry problems and how to fix them:
- **The Chocolate Seized:** This happens when the chocolate comes into contact with moisture. To fix it, try adding a tablespoon of vegetable shortening to the chocolate and stirring until smooth.
- **The Chocolate is Too Thick:** If the chocolate is too thick to dip properly, you can thin it out by adding a small amount of vegetable shortening or coconut oil.
- **The Filling is Too Soft:** If the filling is too soft to shape, try adding a little more powdered sugar or chilling it for a longer period of time.
Variations: Cherry, Cherry, Baby!
Once you’ve mastered the basic chocolate-covered cherry recipe, you can get creative and experiment with different variations:
- **Different Types of Chocolate:** Try using white chocolate, milk chocolate, or even a combination of different chocolates.
- **Flavor Extracts:** Add a few drops of alcohol-free almond extract, peppermint extract, or orange extract to the filling for a unique twist.
- **Nuts and Seeds:** Roll the chocolate-covered cherries in chopped nuts, shredded coconut, or sesame seeds for added texture and flavor.
- **Boozy Cherries (Non-Alcoholic):** Soak the cherries in cherry juice or grape juice for a few hours before dipping them in chocolate.
The Joy of Homemade Chocolate-Covered Cherries
Making your own chocolate-covered cherries might seem like a bit of a project, but the results are well worth the effort. Not only will you have a delicious and impressive treat to share with friends and family, but you’ll also have the satisfaction of knowing that you created something special with your own two hands. So go ahead, embrace your inner chocolatier, and get ready to experience the joy of homemade chocolate-covered cherries! They are the perfect special treat.
Conclusion for Chocolate-Covered Cherries
Making Chocolate-Covered Cherries is a delightful adventure that ends with a rewarding, delicious treat. Remember, using quality chocolate, keeping your cherries dry, and storing them properly are key to success. While tempering chocolate might seem daunting, it’s a skill that elevates these treats to gourmet status. So, go ahead, give it a try, and enjoy the sweet and chocolatey goodness. Your friends and family will be impressed with your amazing dessert creation. Ultimately, mastering these treats is about embracing the fun of creating something special.
Print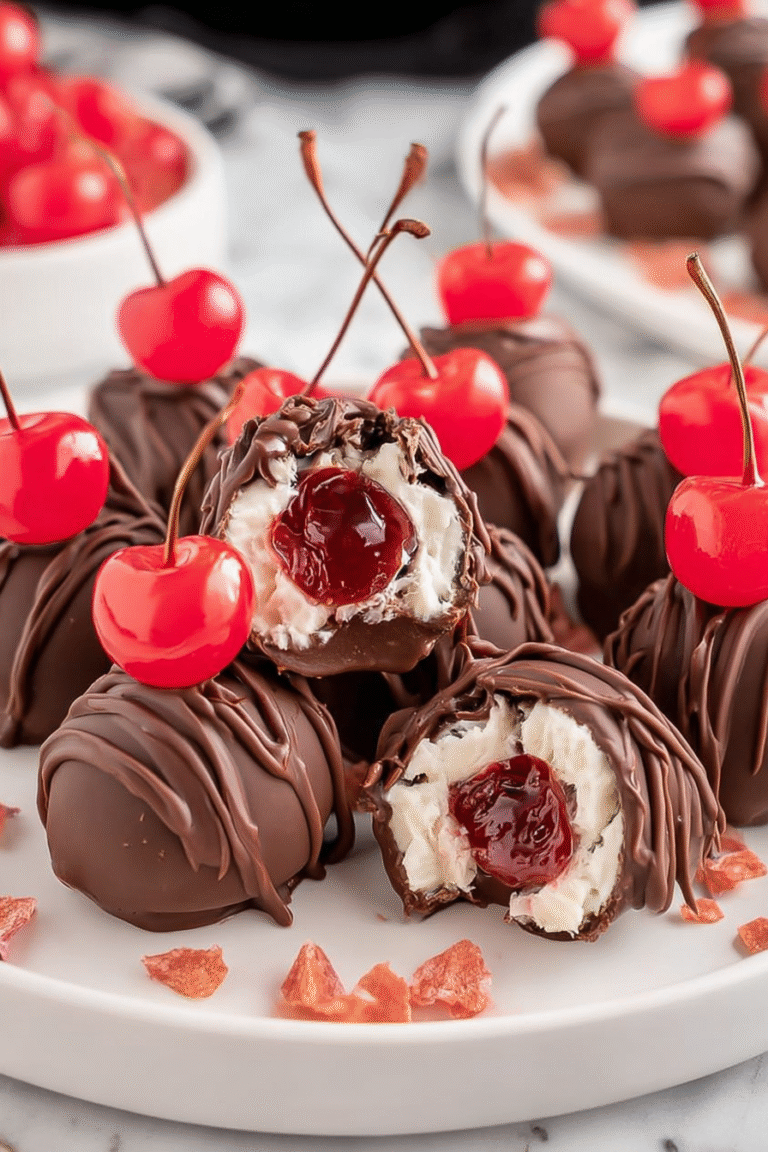
Chocolate-Covered Cherries
Delicious chocolate-covered cherries recipe with detailed instructions and nutritional information.
- Total Time: 35 minutes
- Yield: 4 servings
Ingredients
- Maraschino cherries with stems, 1 jar (10 oz), drained and patted dry
- Powdered sugar, 2 cups
- Unsalted butter, softened, 1/4 cup
- Milk, 2-3 tablespoons
- Vanilla extract, 1 teaspoon
- Semi-sweet chocolate chips, 12 oz
- Shortening, 1 tablespoon
- Parchment paper, as needed
Instructions
- Step 1: In a medium bowl, cream together the softened butter and powdered sugar until light and fluffy. Gradually add milk and vanilla extract, mixing until a smooth, thick paste forms. If the mixture is too dry, add milk one teaspoon at a time until desired consistency is reached.
- Step 2: Gently mold the powdered sugar mixture around each cherry, completely covering it and leaving the stem exposed. Place each coated cherry onto a parchment-lined baking sheet.
- Step 3: Refrigerate the cherries for at least 30 minutes to allow the sugar coating to firm up.
- Step 4: While the cherries are chilling, melt the chocolate chips and shortening in a double boiler or microwave in 30-second intervals, stirring in between, until smooth.
- Step 5: Dip each chilled cherry into the melted chocolate, coating it completely and letting the excess chocolate drip off. Place the dipped cherries back onto the parchment-lined baking sheet.
- Step 6: Refrigerate the chocolate-covered cherries until the chocolate is set, about 15-20 minutes. Store in an airtight container in the refrigerator.
Notes
- Store these sweet treats in the fridge to keep the chocolate firm and the filling nicely chilled for up to a week.
- If you prefer a softer chocolate coating, let the cherries sit at room temperature for a few minutes before serving.
- Present these chocolate-covered cherries on a decorative platter as an elegant after-dinner treat or homemade gift.
- To prevent the chocolate from seizing while melting, ensure your bowl and utensils are completely dry.
- Prep Time: 15 minutes
- Cook Time: 20 minutes
- Method: Stovetop
- Cuisine: American
FAQs
Can I use frozen cherries for these Chocolate-Covered Cherries?
Absolutely! Frozen cherries are a fantastic option, especially when fresh ones are out of season. Just make sure to thaw them completely and pat them dry before you start dipping. Excess moisture is the enemy of smooth, chocolatey perfection. Nobody wants soggy chocolate-covered cherries. Think of it like this: happy, dry cherries equal happy, chocolate-covered results. Consider giving them a little squeeze to release extra juice. You’ll be rewarded with a better texture and a more satisfying bite. Trust me, your taste buds will thank you for it.
How do I store these delicious Chocolate-Covered Cherries?
Storing these little delights is super easy. Pop them in an airtight container and keep them in the refrigerator. The cool temperature helps the chocolate stay firm and prevents the cherries from getting too soft. They’ll happily keep for up to a week, although, in my experience, they usually disappear much faster than that. If you live in a warmer climate, definitely keep them chilled. Nobody wants melty, sticky chocolate fingers! Stored correctly, they are perfect for a snack, dessert or a nice gift for friends.
What kind of chocolate is best for Chocolate-Covered Cherries?
Ah, the chocolate question! It really comes down to personal preference. Dark chocolate offers a rich, intense flavor that contrasts beautifully with the sweetness of the cherries. Milk chocolate is a classic choice for a sweeter treat, while semi-sweet chocolate strikes a lovely balance between the two. Whatever you choose, make sure it’s good quality chocolate. Using a high-quality chocolate is really crucial for the best results. After all, we are talking about food heaven here!
How can I prevent the chocolate from cracking on my Chocolate-Covered Cherries?
Cracked chocolate can be a real buzzkill, but fear not! The key is tempering your chocolate properly. This involves carefully heating and cooling the chocolate to stabilize the cocoa butter, giving it a smooth, glossy finish that won’t crack easily. Sounds intimidating, but there are tons of easy tutorials online. Another trick is to avoid drastic temperature changes. Once dipped, let the cherries set at room temperature or in the fridge (not the freezer!). Following these tips will help you achieve chocolate-covered cherry perfection.


Leave a Comment