


Have you ever craved something both comforting and exciting, something that tastes like a culinary adventure but is surprisingly easy to make? Then let me introduce you to the delightful world of Chicken Onigiri. These little rice balls are a burst of savory goodness, perfect for a quick lunch, a fun snack, or even a sophisticated appetizer.
Imagine sinking your teeth into a warm, yielding rice ball, the fragrant chicken filling exploding with flavor. Each bite is a little party in your mouth, a dance of textures and tastes. It’s the kind of dish that transports you, even if just for a moment, to a sun-drenched kitchen filled with laughter and the aroma of perfectly seasoned chicken.
These Chicken Onigiri are:
Easy to make, even for novice cooks.
Packed with delicious, savory flavor.
Visually stunning, perfect for any occasion.
Incredibly versatile, adapting to any taste.
Ingredients for Chicken Onigiri
Here’s what you’ll need to make this delicious dish:
The full ingredients list, including measurements, is provided in the recipe card directly below.
How to Make Chicken Onigiri
Follow these simple steps to prepare this delicious dish:
Step 1: Prepare the Chicken Filling
First, combine your cooked chicken with soy sauce, sesame oil, and optionally, Rice vinegar with sugar and ginger. Mix well, ensuring the chicken is evenly coated. If using, gently fold in some chopped scallions.
Step 2: Cook the Rice
Cook your sushi rice according to package directions. Fluff it gently with a rice paddle or fork once cooked. Let it cool slightly before proceeding.
Step 3: Assemble the Onigiri
Wet your hands slightly to prevent the rice from sticking. Take a portion of the cooked rice (about 1/4 cup), flatten it into a patty, and place a spoonful of your chicken filling in the center.
Step 4: Shape the Onigiri
Gently bring the sides of the rice patty together, molding it into a triangular or oval shape. Firmly press the rice to create a cohesive ball.
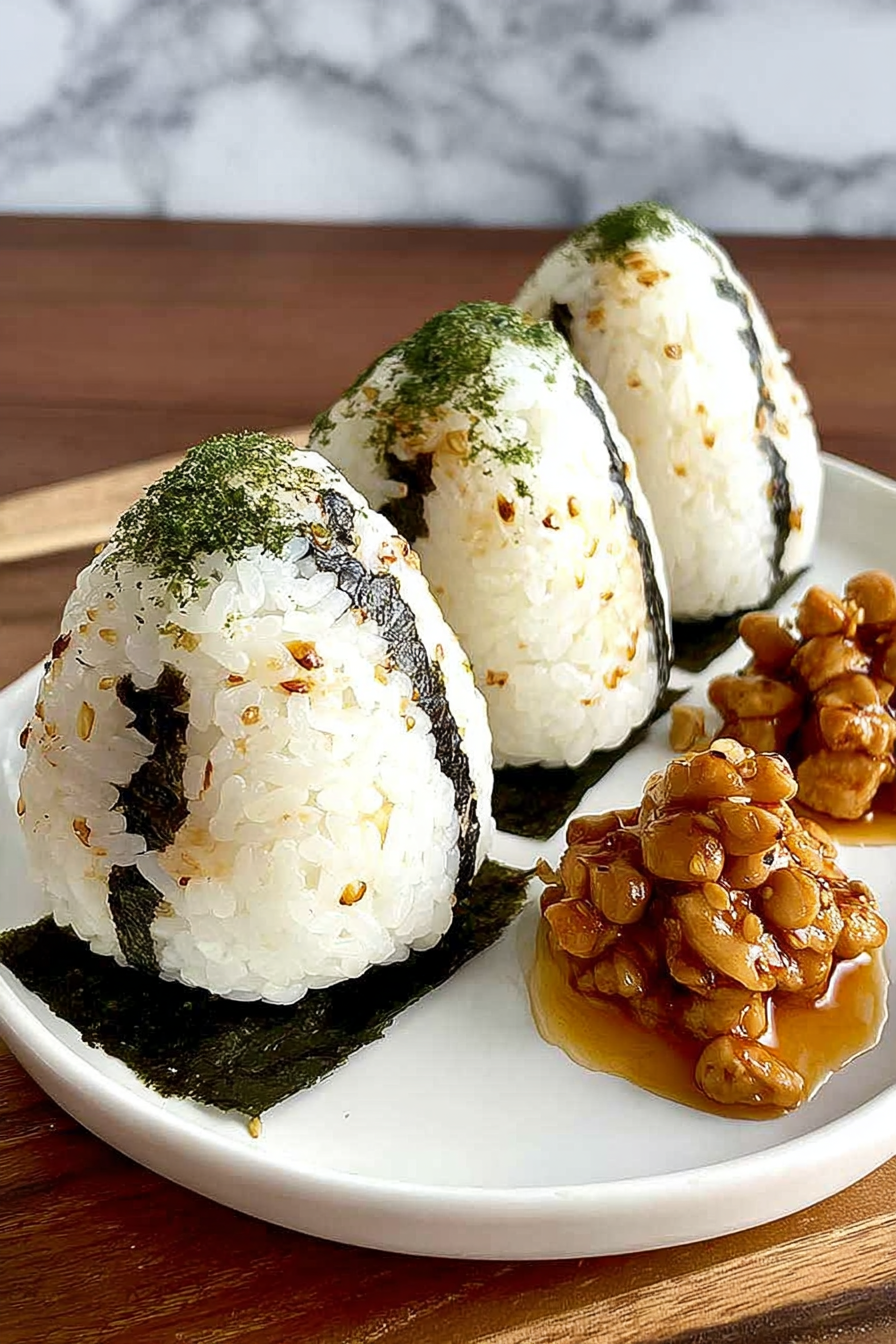
Step 5: Wrap with Nori (Optional)
Cut your nori sheets into smaller squares or rectangles (depending on the size of your onigiri). Wrap each onigiri with a piece of nori for added flavor and a beautiful presentation.
Step 6: Serve and Enjoy
Serve your Chicken Onigiri immediately or at room temperature. They are delicious on their own or served alongside a simple salad.
Tips for Perfect Chicken Onigiri
Using leftover cooked chicken saves time and adds fantastic flavor. Don’t overfill the onigiri; this can make them difficult to shape and may lead to messy rice balls. Get creative with the fillings! Experiment with different vegetables, spices, or even a touch of cheese for variation.
Serving Suggestions for Chicken Onigiri
Serve your Chicken Onigiri as a light lunch, a satisfying snack, or a unique appetizer at your next gathering. They’re also a perfect addition to a bento box or picnic basket. Consider pairing them with a side of pickled ginger or a light salad for a complete and balanced meal.
Frequently Asked Questions about Chicken Onigiri
Can I make these ahead of time? Absolutely! Chicken Onigiri can be made a day or two in advance and stored in the refrigerator. Just be sure to wrap them well to prevent drying out.
Can I freeze Chicken Onigiri? Yes, these rice balls freeze beautifully. Wrap them tightly in plastic wrap and then place them in a freezer bag before freezing. Thaw them overnight in the refrigerator before serving.
Conclusion: Your Chicken Onigiri Adventure Awaits
So there you have it – a simple yet extraordinary recipe that’s sure to become a staple in your kitchen. Embrace the delightful chaos of rice-ball making, experiment with different flavors, and share the joy of Chicken Onigiri with your friends and family. Happy cooking!
Perfecting the Cooking Process
First, cook the chicken until fully cooked and shredded. While the chicken rests, prepare the rice for the onigiri. Then, mix the shredded chicken with your chosen seasonings. Finally, assemble the onigiri, ensuring the filling is evenly distributed.
Add Your Touch
Experiment with different herbs and spices. Swap the chicken for beef or turkey. Add some finely chopped vegetables like carrots or bell peppers for extra flavor and texture. A splash of soy sauce can elevate the savory notes.
Storing & Reheating
Store leftover Chicken Onigiri in an airtight container in the refrigerator for up to 3 days. To reheat, gently microwave for 30-60 seconds, or until warmed through. Avoid over-microwaving to prevent dryness.
Don’t overcook the chicken; it should be moist and tender.
Use day-old rice for the best onigiri texture. It’s less sticky!
Don’t overfill the onigiri; this makes them hard to shape and can lead to messy fillings.
My sister’s reaction to my first batch of Chicken Onigiri was priceless. She declared them the best lunchbox surprise ever!
The Delightful Dance of Chicken Onigiri
: A Recipe for Success
This isn’t just a recipe; it’s a culinary adventure, a playful exploration of flavors and textures. We’re crafting Chicken Onigiri, those adorable rice balls that pack a punch of deliciousness. Forget those bland, boring lunches—we’re talking a symphony of savory chicken, perfectly seasoned and nestled in a cloud of soft, fluffy rice. This recipe is your passport to lunchtime nirvana.
Crafting the Perfect Chicken
The foundation of our Chicken Onigiri lies in the chicken itself. We’re aiming for succulent, tender perfection. I’ve found that using boneless, skinless chicken breasts works best. Cut the chicken into bite-sized pieces. Season generously with salt, pepper, and a touch of garlic powder. You can also add a sprinkle of onion powder for extra depth of flavor. Now, let’s get cooking! I prefer to pan-fry the chicken until it’s beautifully browned on the outside and thoroughly cooked on the inside. If you’re short on time, a quick saute is just fine. Once cooked, shred the chicken using two forks. Set aside to cool.
Rice, Rice, Baby!
Now, the star co-star of our show: the rice. I highly recommend using short-grain Japanese rice, the kind specifically designed for onigiri. It’s the secret to getting that perfect, slightly sticky texture. Cook the rice according to package directions. Remember, the key is to let the cooked rice cool completely before you start assembling the onigiri. If you use hot rice, the onigiri will fall apart. Trust me, I learned this the hard way!
The Onigiri Assembly Line
With the chicken shredded and the rice cooled, let’s build our masterpiece. Wet your hands slightly – this helps prevent the rice from sticking. Take a handful of rice, about 1/4 cup, and form it into a loose ball in your palm. Make a small well in the center of the rice ball. Spoon a generous amount of the seasoned chicken into the well. Gently gather the rice around the chicken, completely enclosing it within a neat, tidy package. Shape into a classic triangle, or get creative with your own unique shapes!
The Finishing Touches
The beauty of Chicken Onigiri is its versatility. It’s like a blank canvas for your culinary creativity. You can roll the onigiri in sesame seeds for a nutty crunch, or sprinkle with furikake for an extra burst of flavor. For a bolder flavor profile, try adding a touch of sriracha mayo for a delightful kick!
A Chicken Onigiri Feast
Now, let the tastebuds sing! Serve your Chicken Onigiri immediately for the best texture and taste. They’re perfect for a quick lunch, a delightful snack, or an easy-to-make appetizer for a party. The best part? They’re incredibly adaptable. You can adjust the seasoning, add different vegetables, and even experiment with the shape of your onigiri.
A Recipe for Memories
Last summer, I made a huge batch of Chicken Onigiri for a family picnic. My nephews, usually picky eaters, devoured them! It was a resounding success, and those happy faces make the extra effort totally worth it.
Beyond the Basics
: Creative Chicken Onigiri Adventures
Don’t be afraid to experiment! The possibilities are endless. Think about adding some shredded carrots and a drizzle of teriyaki sauce for a sweet and savory twist. Or, for a spicier option, add some finely chopped jalapenos and a sprinkle of chili flakes. You can even add some finely diced cucumber for added freshness and crunch. Remember, this is your recipe; feel free to make it your own!
Conclusion for Chicken Onigiri:
Chicken Onigiri offers a fun, delicious, and customizable meal option. Its versatility allows for creative fillings beyond the classic chicken, making it adaptable to different tastes. Remember to store properly for optimal freshness, and consider making it ahead for convenience. From quick weeknight dinners to packed lunches, Chicken Onigiri proves its versatility, making it a winner for any occasion. So go on, unleash your inner culinary artist and try this simple yet satisfying recipe.
Print
Chicken Onigiri
Delicious chicken onigiri recipe with detailed instructions and nutritional information.
- Total Time: 35 minutes
- Yield: 4 servings
Ingredients
- Cooked chicken breast, 1 cup, shredded
- Cooked short-grain rice, 3 cups
- Nori seaweed sheets, 2
- Soy sauce, 1 tablespoon
- Sesame oil, 1 teaspoon
- Mirin (sweet rice wine), 1 teaspoon
- Salt, 1/2 teaspoon
- Optional: Sesame seeds, 1 tablespoon
Instructions
- Step 1: While the rice is still warm, gently mix in the shredded chicken, soy sauce, sesame oil, mirin, and salt. Make sure the chicken is evenly distributed throughout the rice.
- Step 2: Wet your hands with water to prevent the rice from sticking. Take about 1/2 cup of the chicken-rice mixture and form it into a firm ball in your palms. Shape it into a triangle or a ball, depending on your preference.
- Step 3: Gently flatten one side of the onigiri.
- Step 4: Cut a nori sheet in half. Place the flattened side of the onigiri onto the nori half. Wrap the nori around the onigiri, tucking the edges to secure.
- Step 5: Optional: Sprinkle sesame seeds over the wrapped onigiri for added flavor and visual appeal.
- Step 6: Repeat steps 2-5 until all the rice mixture is used. Serve immediately or store in the refrigerator for later.
Notes
- Store leftover onigiri in an airtight container in the refrigerator for up to 2 days.
- For a warm and comforting meal, gently microwave reheated onigiri for 15-20 seconds, or until heated through.
- Serve Chicken Onigiri alongside a light miso soup for a complete and balanced Japanese-inspired meal.
- To prevent the rice from becoming too sticky, ensure your hands are thoroughly wet and work quickly when shaping the onigiri.
- Prep Time: 15 minutes
- Cook Time: 20 minutes
- Method: Stovetop
- Cuisine: American
FAQs:
How long does Chicken Onigiri last?
Properly stored Chicken Onigiri will typically last for 1-2 days in the refrigerator. To ensure freshness, it’s best to consume it within this timeframe. Leaving it out at room temperature for extended periods is a recipe for disaster (and potentially, a tummy ache!). If you want to make a bigger batch, consider freezing the uncooked rice balls. They freeze beautifully and can then be reheated as needed. Remember, food safety is key when it comes to enjoying your delicious Chicken Onigiri.
Can I make Chicken Onigiri ahead of time?
Absolutely! In fact, making Chicken Onigiri ahead is often a great way to save time. You can prepare the chicken filling and the rice earlier in the day or even the night before. Assemble the onigiri just before serving for the best texture and to avoid soggy rice. Storing them in an airtight container in the fridge will keep them fresh until ready to eat. Preparing ahead frees you up to focus on other aspects of your meal prep or simply relax and enjoy your day.
What other fillings can I use for Chicken Onigiri?
While the classic Chicken Onigiri is fantastic, you can certainly get creative! Experiment with different vegetables like finely diced carrots, cucumbers, or spinach. Adding a sprinkle of sesame seeds provides a nice nutty flavor and texture. You could even try incorporating other cooked proteins like shredded beef or turkey for a flavor twist. The beauty of onigiri lies in its versatility, so feel free to personalize your creation! It’s all about creating that perfect Chicken Onigiri experience.
Is Chicken Onigiri a good option for a lunchbox?
Chicken Onigiri makes an excellent lunchbox addition! It’s portable, tasty, and relatively easy to eat without making a huge mess. Just be sure to pack it in an airtight container to keep it fresh and prevent it from getting squished. It’s a great choice for both kids and adults, providing a satisfying and nutritious meal on the go. Pack a small bag of soy sauce or a tasty dipping sauce for an even more delicious experience with your Chicken Onigiri.


Leave a Comment