


Remember that time you attempted a three-layer cake and it ended up looking more like the Leaning Tower of Pisa after a heavy drizzle? Forget those structural failures. We are diving into the world of truly elegant, deeply flavored desserts with this show-stopping recipe.
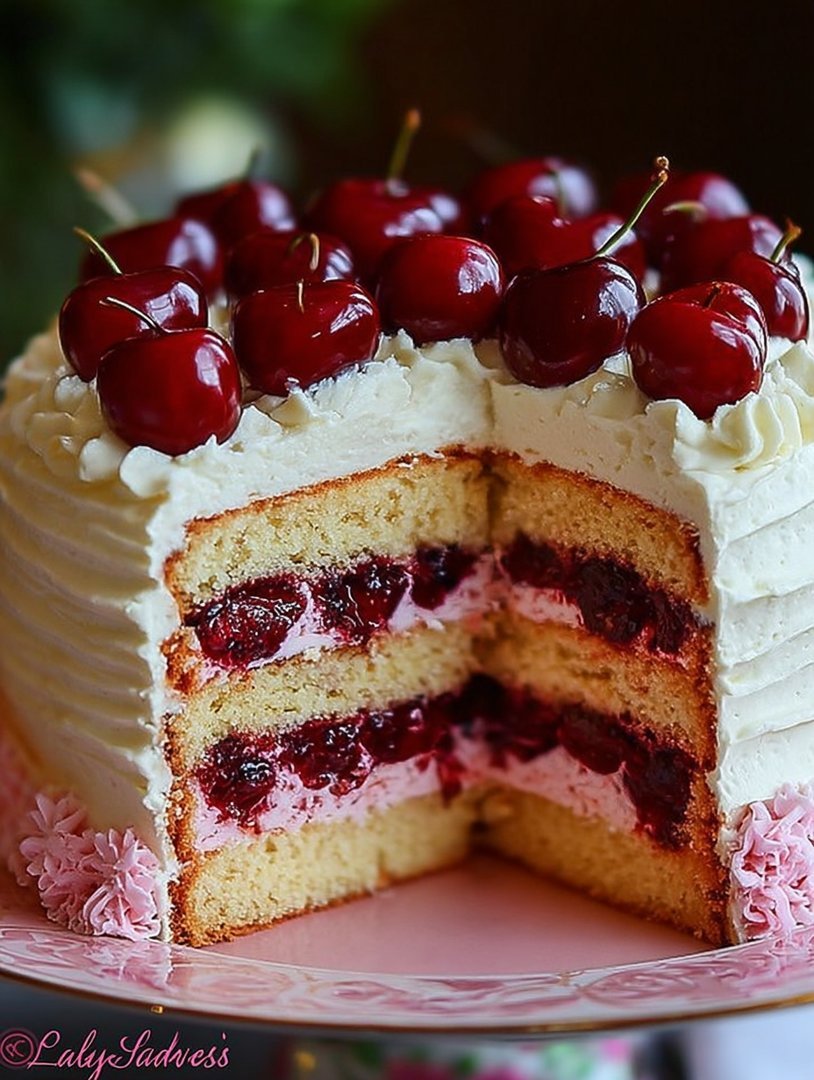
Get ready to master the perfectCherry Layer Cake with Cherry Cream Cheese Frosting, a recipe so vibrant and delicious, it will silence even your most skeptical dinner guests. This is the ultimate celebration dessert.
- This recipe achieves professional-level bakery quality without requiring complicated techniques, making it perfect for the ambitious home baker.
- The flavor profile expertly balances the bright, tartness of real cherries with the rich, luxurious tang of cream cheese for a perfectly unforgettable confection.
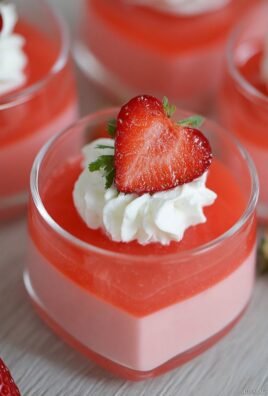
- Featuring three distinct, moist layers separated by a vibrant pink frosting, this dessert ensures a stunning visual presentation for any special occasion.
- It is versatile enough for birthdays, holidays, or simply proving to your neighbors that you are, in fact, a dessert genius of the highest order.
The Quest for Perfect Cherry Flavor
There is a profound difference between a “cherry-flavored” cake and a truly cherry cake. The former often involves sad, artificially red dyes and a vague, medicinal aftertaste. The latter—our goal today—involves real fruit, intensity, and a commitment to flavor that makes your taste buds sing barbershop quartets. The key to this particular confection, the celebrated Cherry Layer Cake with Cherry Cream Cheese Frosting, lies not just in the batter but in the cherry reduction we fold into it.
You see, moisture is the enemy of stability, but flavor is derived from moisture. This paradox has plagued bakers since the dawn of time, or at least since the invention of the springform pan. We solve this by reducing the cherry juice down until it is thick, syrupy, and concentrated—all the flavor, none of the watery disaster. It also gives the cake crumb that spectacular, natural hue that screams, “I am magnificent and I took time!” Trust me, when your friends ask how you got that color, you just smile mysteriously and mention “culinary alchemy.”
Baking is largely chemistry, but cake decorating is pure therapy. The smooth, velvety texture of the cream cheese frosting is the perfect canvas for your artistic endeavors, whether you favor a rustic, naked cake look or a fully blanketed masterpiece. We are using cream cheese not only for its incomparable tang, which brilliantly cuts through the sweetness of the fruit, but also for its stability. Nobody wants a frosting meltdown at the picnic table. A sturdy, slightly chilled cream cheese glaze ensures your beautiful layers stay put, defying gravity and the natural entropy of dessert architecture.
Decoding the Magic of Cream Cheese Frosting
The frosting is arguably the star of the show, especially when it’s cherry cream cheese frosting. It’s the perfect marriage: the richness of the cheese provides structure, while the tart cherry essence provides the necessary drama. If you’ve ever had gritty frosting, you know the despair. The secret is ensuring both the butter and the cream cheese are at the perfect “kissing temperature”—soft enough to blend instantly, but not so melted that they become oily soup. They should leave a slight dent when pressed gently, not a deep canyon.
Secrets to Keeping Your Layers Level and Flat
Why do cake layers dome? Physics, mostly, but mostly annoying physics that require trimming away delicious cake top. To combat this culinary injustice, first, ensure your oven thermometer is accurate; fluctuating temperatures cause uneven rising. Second, wrapping your cake pans with specialized damp strips (or even old damp towels secured with safety pins if you’re feeling brave) helps the edges cook slower, allowing the center to catch up without puffing into a mountain range. For this Cherry Layer Cake with Cherry Cream Cheese Frosting, three perfectly level layers are crucial for a visually stunning stack.
Baking Bliss: Tips and Troubleshooting
The initial baking temperature is critical. We want a hot blast initially to set the structure, and then a slightly lower temperature to ensure the inside cooks fully without burning the edges. Remember that old baking wisdom: “A watched pot never boils, and an opened oven door never bakes.” Resist the temptation to check on your cakes too frequently, especially during the first two-thirds of the baking time. That sudden drop in temperature is responsible for more collapsed cakes than amateur structural engineering.
Once the layers are baked, the most crucial step is patience. You must allow those layers to cool completely, ideally on a wire rack, before attempting assembly. Warm cakes equal sliding frosting, crumbling layers, and a general air of tragedy. If you want a really neat finish, chill the fully assembled, crumb-coated cake in the refrigerator for about 30 minutes before applying the final, thick layer of our heavenly cherry cream cheese frosting. This little trick ensures sharp edges and a clean look.
Achieving the Deep Red Cherry Color
For the most appealing, natural red color in your batter and frosting, avoid simple liquid food coloring, which can dilute the texture. Instead, rely heavily on the concentrated cherry reduction, which provides deep color and intense flavor. If you require a slight boost, use a high-quality gel food color in a deep crimson or ruby shade. Remember that color should enhance the flavor narrative, not distract from it. The natural look of a real cherry cake is always more impressive than a shockingly artificial red confection. By carefully managing the reduction process, you ensure the color permeates the Cherry Layer Cake with Cherry Cream Cheese Frosting beautifully.
Ingredients for Cherry Layer Cake with Cherry Cream Cheese Frosting
Here’s what you’ll need to make this delicious dish:
- All-Purpose FlourEnsure it is sifted for the lightest possible crumb texture, essential for three fluffy cake layers.
- Granulated SugarProvides sweetness and helps tenderize the cake layers; use high-quality cane sugar for the best results.
- Fresh or Frozen Pitted CherriesThese are necessary for both the intense reduction sauce and the lovely decorative topping, providing genuine fruit flavor.
- Unsalted ButterNeeds to be perfectly softened for creaming, giving the cake structure and rich flavor.
- Cream CheeseUse full-fat block cream cheese, crucial for achieving the perfect thickness and tangy flavor in the cherry cream cheese frosting.
- ButtermilkAdds a wonderful tang and acidity to the batter, reacting with the leavening agents to produce a tender, moist crumb.
- Vegetable OilContributes significant moisture to the cake, ensuring it stays soft and pliable for days after baking.
- EggsAct as the primary binder and leavener; ensure they are at room temperature for maximum volume when beating.
- Pure Vanilla PowderEnhances all the other flavors, especially the cherry and cream cheese notes, adding depth to the overall profile.
- Confectioners’ SugarThis finely milled sugar is essential for creating the smooth, non-gritty texture of the decadent cream cheese topping.
- Agar-Agar PowderA reliable plant-based gelling agent used in the cherry reduction to ensure stability without needing animal-derived carrageenan.
The full ingredients list, including measurements, is provided in the recipe card directly below.
How to Make Cherry Layer Cake with Cherry Cream Cheese Frosting
Follow these simple steps to prepare this delicious dish:
Step 1:Prepare the Cherry Reduction and Cake Batter
Preheat your oven to 350°F (175°C). Grease and flour three 8-inch round cake pans. In a small saucepan, combine 1 cup of cherries, a quarter cup of sugar, and 1 tablespoon of water. Simmer until cherries burst and the mixture thickens slightly. Stir in a pinch of agar-agar powder to stabilize the reduction, then let it cool completely. Separately, cream the softened butter and remaining sugar until pale and fluffy. Beat in the eggs one at a time, followed by the vanilla powder.
Step 2:Mix the Wet and Dry Ingredients
In a separate large bowl, whisk together the flour, baking powder, and salt. In a medium bowl, combine the buttermilk and vegetable oil. Alternately add the dry and wet ingredients to the butter mixture, beginning and ending with the dry ingredients. Mix until just combined, being careful not to overmix. Gently fold in half of the cooled, thickened cherry reduction, creating beautiful streaks of color in the batter.
Step 3:Bake the Layers
Divide the batter evenly among the three prepared cake pans. Bake for 28 to 32 minutes, or until a wooden skewer inserted into the center comes out clean. Once baked, let the cakes cool in the pans for 10 minutes before inverting them onto a wire rack to cool completely. Ensure the layers are fully cool before proceeding to the frosting stage.
Step 4:Whip Up the Cherry Cream Cheese Frosting
In a large bowl using an electric mixer, beat the softened cream cheese and butter together until completely smooth and there are no lumps remaining. Gradually add the confectioners’ sugar, mixing on low speed until combined, then increase the speed and beat until light and fluffy. Beat in the remaining cherry reduction and a splash of vanilla until the frosting is evenly pink and velvety smooth.
Step 5:Assemble and Chill the Cake
Place the first cake layer on your serving platter. Spread a thick, even layer of the cherry cream cheese frosting across the top. Place the second layer on top, frost it, and then add the final layer. Apply a thin “crumb coat” of frosting all over the cake, sealing in any loose crumbs. Chill the cake in the refrigerator for 30 minutes, then apply the remaining, thick layer of frosting for a professional finish.
Step 6:Decorate and Serve
Garnish the top of the cake with fresh cherries, or create a simple decorative border using a piping bag. For an extra touch of elegance, drizzle any remaining cherry syrup lightly over the top. Allow the completed Cherry Layer Cake with Cherry Cream Cheese Frosting to sit at room temperature for about 20 minutes before slicing and serving.
Common Questions About Cherry Cake
Can I use jarred or canned cherries for the reduction?
Yes, you can absolutely use canned cherries, but make sure they are drained well, and adjust the sugar content in the reduction slightly, as canned varieties are often pre-sweetened.
How long does this cherry layer cake keep fresh?
Because of the cream cheese frosting, you must store the cake in an airtight container in the refrigerator for up to 4 days. Let it come closer to room temperature for the best texture before serving.
Can I freeze the cake layers ahead of time?
Absolutely! Cool the cake layers completely, wrap them tightly in plastic wrap, and then cover them in aluminum foil. They can be frozen for up to two months and thawed overnight in the refrigerator.
What is the best type of cherry to use for baking?
Sour or tart cherries (like Montmorency) provide the best depth of flavor when cooked, balancing the sweetness of the cake and frosting much better than overly sweet varieties.
The year was 2019. I had promised my neighbors a simple vanilla sheet cake for a casual barbecue. What I delivered, instead, was a towering monument to fruit and fat—a magnificent accident born from pantry panic and a forgotten stash of incredibly tart preserved cherries. That night, the simple sheet cake died, and the legend of theCherry Layer Cake with Cherry Cream Cheese Frostingwas born.
This recipe is more than just a dessert; it’s an experience. It’s the perfect balance of moist, vanilla-infused layers, a sweet-tart cherry reduction filling, and that unbelievably creamy, slightly tangy frosting that will make you lick the spatula clean. If you think making a showstopper layer cake is too complicated, think again. I’ve broken this down into simple, fun steps that guarantee baking success, even if your previous baking attempts resulted in geological formations.
Gathering Your Ingredients for Baking Bliss
Success in baking starts with precision, especially when dealing with layers. Make sure all your dairy ingredients (butter, eggs, cream cheese) are truly at room temperature. Cold ingredients refuse to emulsify properly, leading to dense, sad layers. We want light, fluffy, joyous layers!
Ingredients for the Vanilla Cake Layers (3 layers)
- 2 ½ cups all-purpose flour
- 1 ½ cups granulated sugar
- 1 cup (2 sticks) unsalted butter, softened
- 4 large eggs, room temperature
- 1 cup buttermilk or whole milk, room temperature
- 2 teaspoons pure vanilla powder
- 1 tablespoon baking powder
- ½ teaspoon salt
Ingredients for the Sweet-Tart Cherry Filling
- 3 cups fresh or frozen pitted cherries (if frozen, do not thaw)
- ½ cup granulated sugar
- 2 tablespoons cornstarch
- ¼ cup apple juice or cherry concentrate (for depth of flavor)
- 1 tablespoon fresh lemon juice
Ingredients for the Cherry Cream Cheese Frosting
This frosting elevates the entire dessert. It uses a portion of the concentrated cherry reduction to infuse a vibrant pink color and intense fruit flavor into the classic cream cheese base.
- 1 cup (2 sticks) unsalted butter, softened
- 8 ounces full-fat cream cheese, softened
- 4 cups powdered sugar, sifted
- 1 teaspoon vanilla powder
- 4–6 tablespoons concentrated cherry reduction (reserved from the filling recipe)
- A pinch of salt
Step-by-Step Guide to Baking the Perfect Layered Cherry Dessert
The process is divided into three major stages: baking, filling creation, and assembly. Take your time, trust your oven, and remember to measure everything precisely. Unlike savory cooking, baking punishes improvisation. Follow the instructions, and your efforts will result in a stunning, decadent cake.
Baking the Moist Vanilla Layers
Preheat your oven to 350°F (175°C). Grease three 8-inch round cake pans and line the bottoms with parchment paper circles. This is critical for easy release. In a large mixing bowl, cream the softened butter and sugar together until the mixture is light and fluffy—about 3 to 5 minutes. Scrape down the sides of the bowl often.
Beat in the eggs one at a time, ensuring each is fully incorporated before adding the next. Stir in the vanilla powder. In a separate bowl, whisk together the flour, baking powder, and salt. Now, we incorporate the dry and wet ingredients alternately. Begin by adding one-third of the dry ingredients to the butter mixture, mixing on low speed until just combined. Next, pour in half of the buttermilk, mixing until smooth. Repeat this process: another third of the dry mix, the remaining buttermilk, and finally, the last of the dry mix. Stop mixing as soon as no pockets of flour remain. Overmixing develops gluten, which makes the cake tough.
Divide the batter evenly among the prepared pans. Bake for 25 to 30 minutes, or until a toothpick inserted into the center comes out clean. Allow the cakes to cool in the pans for 10 minutes before inverting them onto a wire rack to cool completely. Do not attempt to frost warm cakes unless you want a melted, sugary avalanche.
Creating the Intensive Cherry Reduction Filling
This filling provides the beautiful tartness that cuts through the rich frosting. In a medium saucepan, combine the cherries, sugar, apple juice, and lemon juice. Bring the mixture to a simmer over medium heat, stirring occasionally. Once the cherries release their juices, whisk the cornstarch with 2 tablespoons of cold water in a small bowl to create a slurry. Pour the slurry into the simmering cherry mixture.
Continue cooking and stirring constantly until the mixture thickens significantly, resembling a jam or pie filling consistency. Remove from heat. Transfer the mixture to a heatproof bowl. Scoop out 4 to 6 tablespoons of the concentrated cherry syrup (liquid only, try to avoid the whole fruit chunks) and set this aside in a small dish—this is the secret ingredient for coloring and flavoring yourCherry Cream Cheese Frosting. Let the remaining cherry filling cool completely in the refrigerator; a cold filling is essential for stable layering.
Assembling the Majestic Cherry Layer Cake
When I first assembled this cake, I tried to rush the frosting process, resulting in a floppy, sad mess. Learn from my mistakes: ensure the frosting butter and cream cheese are perfectly softened, and the powdered sugar is sifted. This ensures a velvety smooth texture necessary for a professional finish.
Whipping Up the Velvety Cherry Cream Cheese Frosting
In a large bowl, beat the softened butter and cream cheese together until smooth and creamy. Start low, then increase the speed. Slowly add the sifted powdered sugar, one cup at a time, mixing until fully incorporated. Add the vanilla powder and a pinch of salt. Now, spoon in the reserved concentrated cherry reduction. Mix until the frosting achieves a uniform light pink hue and the perfect cherry flavor. If the frosting seems too soft, place the bowl in the refrigerator for 15 minutes to firm it up slightly before using.
Layering and Finishing
Place the first cake layer on your serving plate or cake stand. Spread about one-third of the cherry filling evenly across the top, leaving a small, clean border around the edge. Now, pipe a ring of frosting around the perimeter of the cake layer, just inside the border of the cake edge. This creates a ‘dam’ that keeps the filling from squishing out when you stack the next layer. Repeat with the second layer, filling, and frosting dam. Place the final cake layer on top.
Use the remainingCherry Cream Cheese Frostingto cover the top and sides of the entire cake. For a neat look, start with a thin crumb coat to seal in any loose crumbs, chill the cake for 20 minutes, and then apply a final, thicker layer of frosting. Decorate the top simply with fresh whole cherries or elegant swirls of frosting. Give yourself a pat on the back; you’ve just created a masterpiece.
Troubleshooting and Expert Baking Tips
Every baker, from novice to professional, encounters issues. Here are the keys to avoiding common pitfalls and ensuring your beautiful layered cherry cake is a resounding success.
Ensuring Stability and Flavor
Sometimes, the sheer weight of a layer cake can be challenging, especially when paired with a soft filling like the cherry reduction. Mastering the structure and ensuring the flavors sing together is crucial for this dessert.
My first attempt at this recipe was disastrously lopsided because I didn’t let the filling cool fully. The warm filling melted the frosting, causing the layers to slide like tectonic plates. The resulting cake looked like it had been through a small earthquake but tasted divine. That’s why temperature management is non-negotiable for this recipe.
- Ensure the cherry filling is fully chilled before assembly; warm filling will instantly destabilize the cream cheese frosting, leading to sliding layers.
- Avoid over-beating the cake batter after adding flour; mixing too long develops tough gluten strands, resulting in a dense, chewy cake rather than a soft one.
- Use a kitchen scale to divide the batter equally among the three pans; this guarantees even baking and layers that stack neatly without trimming.
Perfecting the Cooking Process
Start by preparing the cherry filling first, as it requires several hours to chill completely. While the filling cools, mix and bake the cake layers. Once the layers are cooling, prepare the cream cheese frosting, ensuring you reserve the necessary concentrated cherry syrup.
Add Your Touch
To deepen the flavor profile, substitute ¼ cup of the flour with finely ground almond meal for a subtle nutty note. You could also mix in a teaspoon of dried lemon zest into the cake batter for an extra bright citrus kick.
Storing & Reheating
Store this layered cherry cake in an airtight container in the refrigerator for up to five days. Since it is cream cheese based, it should not sit at room temperature for more than two hours. Bring slices to room temperature for 30 minutes before serving for the best texture.
When I shared this recipe with my extended family, my aunt tried to serve a slice immediately out of the fridge. She quickly realized the flavors bloom better and the frosting softens beautifully when it has a little time to breathe.
Frequently Asked Questions About Layer Cakes
Can I make the cake layers ahead of time?
Yes, you can bake the layers up to two days in advance. Once fully cooled, wrap them tightly in plastic wrap and store them at room temperature or freeze them for up to one month. Thaw the frozen layers completely before frosting.
What if my cream cheese frosting is too runny?
If your frosting is too soft, the simplest fix is to add more sifted powdered sugar, one tablespoon at a time, until it stiffens. Alternatively, chill the entire bowl in the refrigerator for 20-30 minutes, then beat it again.
Do I have to use fresh cherries?
No, high-quality frozen cherries work perfectly for the filling. Just ensure you use them directly from the freezer; do not thaw them beforehand, as this causes excessive loss of juice, diluting the flavor.
Conclusion for Cherry Layer Cake with Cherry Cream Cheese Frosting
This dessert is more than just a cake; it’s a showstopper, a conversation starter, and the ultimate reward for a day well spent. The perfect harmony of the tender cake layers, bursting with juicy fruit, meets its match in the tangy, vibrant Cherry Cream Cheese Frosting. We hope you feel empowered and ready to tackle this rewarding bake, armed with the knowledge necessary to avoid any baking mishaps. Go ahead, gather your ingredients, turn up the music, and prepare to delight everyone lucky enough to grab a slice of your stunning homemade Cherry Layer Cake with Cherry Cream Cheese Frosting. It truly is the epitome of celebratory baking.
Print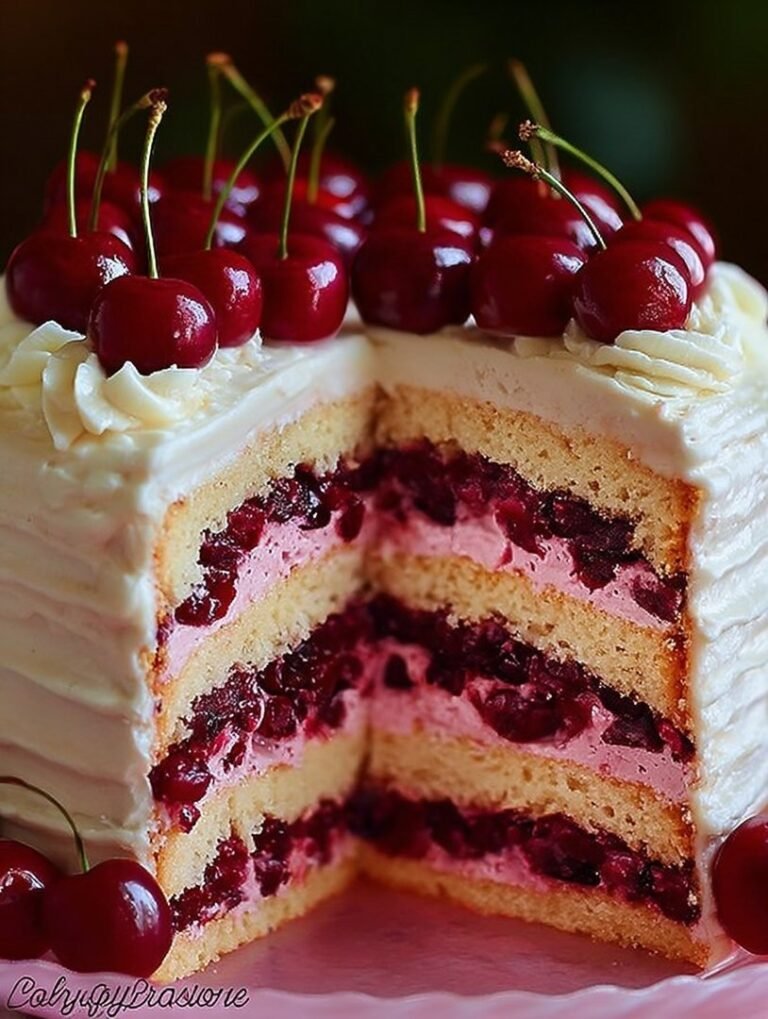
Cherry Layer Cake with Cherry Cream Cheese Frosting
Achieve three fluffy cake layers using sifted flour, then top with a rich, tangy full-fat cream cheese frosting swirled with intense cherry reduction.
- Total Time: 35 minutes
- Yield: 4 servings
Ingredients
- All-Purpose FlourEnsure it is sifted for the lightest possible crumb texture, essential for three fluffy cake layers.
- Granulated SugarProvides sweetness and helps tenderize the cake layers; use high-quality cane sugar for the best results.
- Fresh or Frozen Pitted CherriesThese are necessary for both the intense reduction sauce and the lovely decorative topping, providing genuine fruit flavor.
- Unsalted ButterNeeds to be perfectly softened for creaming, giving the cake structure and rich flavor.
- Cream CheeseUse full-fat block cream cheese, crucial for achieving the perfect thickness and tangy flavor in the cherry cream cheese frosting.
- ButtermilkAdds a wonderful tang and acidity to the batter, reacting with the leavening agents to produce a tender, moist crumb.
- Vegetable OilContributes significant moisture to the cake, ensuring it stays soft and pliable for days after baking.
- EggsAct as the primary binder and leavener; ensure they are at room temperature for maximum volume when beating.
- Pure Vanilla PowderEnhances all the other flavors, especially the cherry and cream cheese notes, adding depth to the overall profile.
- Confectioners' SugarThis finely milled sugar is essential for creating the smooth, non-gritty texture of the decadent cream cheese topping.
- Agar-Agar PowderA reliable plant-based gelling agent used in the cherry reduction to ensure stability without needing animal-derived carrageenan.
Instructions
- Step 1:Prepare the Cherry Reduction and Cake Batter
- Step 2:Mix the Wet and Dry Ingredients
- Step 3:Bake the Layers
- Step 4:Whip Up the Cherry Cream Cheese Frosting
- Step 5:Assemble and Chill the Cake
- Step 6:Decorate and Serve
Notes
- Store the assembled cake loosely covered in the refrigerator for up to 3 days, but always let slices warm on the counter for 30 minutes before serving to ensure the crumb is delightfully soft.
- If you prefer a quick slice straight from the chill, a 10-second pulse in the microwave can gently coax the cold cream cheese frosting back to its most delectable, spreadable texture.
- Enhance the complex cherry flavor profile by serving individual slices with a light dusting of finely toasted almond slivers for added texture.
- When incorporating the agar-agar into your cherry reduction, make sure to bring the mixture to a full, rolling boil for at least one minute; this activation step is crucial for ensuring the reduction sets perfectly.
- Prep Time: 15 minutes
- Cook Time: 20 minutes
- Method: Stovetop
- Cuisine: American
FAQs
How do I ensure my layers stay moist and airy when baking this magnificent Cherry Layer Cake?
Achieving a light and tender crumb requires attention to detail, especially when adding fruit. First, ensure your butter and sugar are properly creamed—this incorporates crucial air for lift. When introducing the cherries (tossed lightly in flour to prevent sinking), fold them gently rather than mixing vigorously. Overmixing develops gluten, leading to a tough cake. Also, resist the urge to peek during the first two-thirds of the baking time, as sudden temperature drops can cause the cake to collapse, resulting in a dense layer. Follow the prescribed temperature and time exactly for layers that are moist enough to make an angel weep.
How can I achieve a stable Cherry Cream Cheese Frosting that won’t melt off the cake?
The secret to a structurally sound cream cheese frosting lies primarily in temperature control and ingredient ratio. Always start with very cold full-fat cream cheese and unsalted butter that is slightly softened but still cool to the touch. If you are using homemade cherry reduction, ensure it is completely cooled before adding it. If the frosting seems too soft, incorporate an extra tablespoon of powdered sugar (or more if needed) and refrigerate the entire bowl for 15 minutes before whipping it again. This quick chill firms up the fats, giving the Cherry Cream Cheese Frosting the stability needed to perfectly crown your dessert, even on a warm day.
Can I use frozen cherries instead of fresh ones when preparing this decadent Cherry Layer Cake?
Absolutely, frozen cherries are a fantastic, convenient substitute, and often yield a deeper flavor, especially when fresh cherries are out of season. If you choose to use frozen fruit, do not thaw them first; thawing releases too much moisture, which can throw off the cake batter balance, making it soupy. Instead, toss the frozen cherries directly in the flour mixture as directed in the recipe and fold them into the batter. This ensures they disperse evenly and helps absorb the moisture as they bake. Using frozen fruit will ensure your cake is beautifully dotted with bright, tart fruit every time you bake this Cherry Layer Cake.
What is the recommended method for storing the finished Cherry Layer Cake with Cherry Cream Cheese Frosting?
Because this dessert features a luscious cream cheese frosting, refrigeration is necessary to maintain food safety and structural integrity. Store the fully assembled Cherry Layer Cake with Cherry Cream Cheese Frosting in an airtight container or under a sturdy cake dome in the refrigerator for up to four days. If you plan to serve it, remember that cakes frosted with cream cheese are best enjoyed at room temperature for maximum flavor. Pull the cake out of the fridge about 45 minutes to an hour before serving to let the butterfat soften and the flavors bloom beautifully.
Leave a Comment