

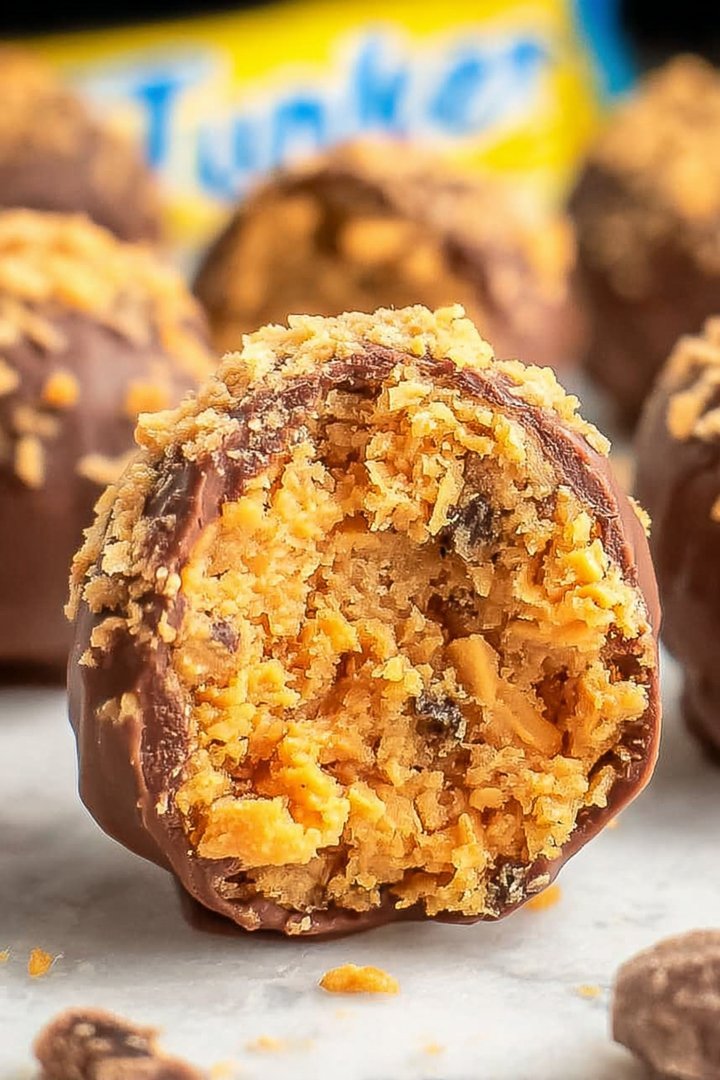
Imagine sinking your teeth into a treat that’s crunchy, peanut buttery, and melts in your mouth all at once. These Butterfinger Balls are a delightful explosion of textures and flavors, perfect for satisfying your sweet cravings.
I remember making these with my family one holiday season, and they disappeared faster than we could make them. The combination of crispy cereal, creamy peanut butter, and sweet coating makes them irresistible for any occasion, promising a delightful and memorable treat.
- Effortlessly simple to prepare, making it perfect for a quick dessert or snack.
- The harmonious blend of crunchy and creamy textures creates an enjoyable eating experience.
- Its golden-brown exterior and neat round shape add a touch of elegance to any dessert table.
- Easily adaptable, allowing for personalization with various coatings and mix-ins.
Ingredients for Butterfinger Balls
Here’s what you’ll need to make this delicious dish:
The full ingredients list, including measurements, is provided in the recipe card directly below.
How to Make Butterfinger Balls
Follow these simple steps to prepare this delicious dish:
Step 1: Prepare the Base
In a large bowl, cream together the unsalted butter and peanut butter until smooth. This creamy base sets the stage for that signature Butterfinger flavor.
Step 2: Mix in the Sweetness
Gradually add the powdered sugar to the butter mixture, blending until well combined and smooth. This adds the perfect level of sweetness.
Step 3: Incorporate the Crunch
Stir in the Alcohol-free vanilla extract and crispy rice cereal until evenly coated. The cereal provides that essential crunch, mimicking the iconic candy bar texture.
Step 4: Form the Balls
Roll the mixture into small, bite-sized balls. Aim for about 1-inch in diameter. Arrange them on a baking sheet lined with parchment paper.
Step 5: Chill
Place the baking sheet in the refrigerator for at least 30 minutes to allow the balls to firm up. This makes them easier to handle when coating with chocolate.
Step 6: Melt the Chocolate
In a double boiler or microwave-safe bowl, melt the chocolate chips with the vegetable shortening until smooth. Stir occasionally to prevent burning.
Step 7: Coat the Balls
Dip each ball into the melted chocolate, ensuring it is fully coated. Place the coated balls back onto the parchment-lined baking sheet.
Step 8: Final Chill
Return the baking sheet to the refrigerator for another 15-20 minutes, or until the chocolate has set completely. This gives the coating a nice, glossy finish.
Step 9: Serve and Enjoy
Transfer to plates and enjoy these delightful Butterfinger Balls for the perfect sweet treat! They’re great for parties, snacks, or a special dessert.
Perfecting the Cooking Process
For optimal results when crafting these delightful treats, focus on chilling the peanut butter mixture thoroughly before shaping. This prevents a sticky mess and ensures your Butterfinger Balls hold their form perfectly. Melt the chocolate slowly to avoid scorching.
Add Your Touch
Unleash your inner chocolatier! Consider swapping the creamy peanut butter for almond butter for a nutty twist. Experiment with different coatings like crushed pretzels for a salty crunch or chopped nuts for added texture. A sprinkle of sea salt enhances the sweetness beautifully.
Storing & Reheating
Store your homemade Butterfinger Balls in an airtight container in the refrigerator to maintain their shape and freshness. They’re best enjoyed cold or at room temperature. No reheating is necessary, making them a perfect grab-and-go treat anytime!
Here are some tips to help you create the best Butterfinger Balls:
- Ensure the peanut butter is smooth and well-blended with the powdered sugar to avoid a gritty texture in your candies.
- Use a double boiler or microwave in short intervals when melting the chocolate to prevent burning and maintain its glossy finish.
- Chill the peanut butter balls for at least 30 minutes before dipping them in chocolate, which helps the chocolate adhere smoothly.
(Personal anecdote formated as paragraph subheading)
I remember when I first made these for a potluck; everyone raved about them! My friend swore they tasted even better than the original, which was a huge compliment.
The Alluring Appeal of Butterfinger Balls
Let’s be honest, folks. Sometimes, you just need a little ball of pure, unadulterated sugary joy. And that’s where these magnificent Butterfinger Balls come in. They’re not just a treat; they’re an experience. A symphony of peanut butter bliss cloaked in a chocolatey embrace. They’re the kind of thing that makes you forget about paying bills, or that awkward conversation you had with your neighbor about their overly enthusiastic lawn gnome collection. (Okay, maybe not entirely forget, but definitely lessen the sting.)
So, why Butterfinger Balls? Why not just grab a candy bar? Well, my friends, making them yourself elevates the experience. You get to control the ingredients, personalize the flavor, and, let’s be real, feel like a culinary wizard while you’re at it. Plus, there’s a certain satisfaction in biting into something you’ve created with your own two hands (or, in my case, slightly flour-dusted hands).
Why This Recipe Rocks (Even if I Do Say So Myself)
Now, I know what you’re thinking. “Another Butterfinger Ball recipe? The internet is practically overflowing with them!” And you’re not wrong. But hear me out, because this recipe? This recipe is different. This recipe is special. This recipe… well, it’s got a secret weapon.
Okay, it’s not *really* a secret weapon. It’s more like a carefully curated combination of ingredients and techniques designed to deliver the most ridiculously delicious Butterfinger Balls you’ve ever tasted. We’re talking melt-in-your-mouth peanut butter centers, a perfectly crisp chocolate shell, and a flavor that will transport you back to your childhood (but, like, a slightly more sophisticated, adult version of your childhood, where you appreciate the finer things in life, like handcrafted candies).
But seriously, what sets these Butterfinger balls apart from the others is the careful selection of ingredients. A smooth and creamy peanut butter with a pinch of sea salt, high-quality chocolate, and that special ingredient that will make these Butterfinger balls unforgettable.
What Makes These Butterfinger Balls Better
I’m often asked what is the secret that makes my Butterfinger Balls better than the rest. I think is because they are easy to make, and you can always add your touch with different ingredients. Here’s a few ideas:
- **Nut Butter Variety:** Feel free to use any nut butter you like, like cashew or almond butter for a twist.
- **Sweetness:** Depending on the sweetness you want for your Butterfinger balls, you may adjust the amount of powdered sugar you use.
- **Crunchiness:** You may want to add some toasted nuts like almonds, or pecan to the balls mix for extra crunchiness.
- **Extracts:** You can add different extracts like Alcohol-free vanilla extract, maple extract, or butter extract for extra flavor.
- **Toppings:** You can get creative with toppings like sprinkles, sea salt flakes, chopped nuts, or cocoa powder.
Gather Your Arsenal (Ingredients, That Is)
Alright, let’s get down to brass tacks. Before you start whipping up these delectable orbs of goodness, you’ll need to assemble your ingredients. Don’t worry, it’s not a complicated list. We’re keeping things simple and straightforward, because who needs extra stress in their life?
Here’s what you’ll need to make a batch of these glorious Butterfinger Balls:
- **Creamy Peanut Butter:** The smoother, the better. Trust me on this one.
- **Powdered Sugar:** This is what gives the peanut butter center its melt-in-your-mouth texture.
- **Salt:** Just a pinch, to enhance the sweetness and bring out the peanut butter flavor.
- **Semi-Sweet Chocolate Chips:** Because chocolate makes everything better.
- **Vegetable Shortening:** This helps to thin out the chocolate, making it easier to dip the peanut butter balls.
See? I told you it was simple. Now, let’s get cooking!
Let’s Get Ballin’: The Step-by-Step Guide to Butterfinger Ball Bliss
Okay, gather ’round, aspiring confectioners! It’s time to turn these humble ingredients into glorious Butterfinger Balls. Don’t worry, I’ll walk you through every step of the way. Just follow my lead, and you’ll be rewarded with a batch of treats that will make you the envy of all your friends (and possibly your neighbors, too, if you’re feeling generous enough to share).
**Step 1: The Peanut Butter Powerhouse**
In a large bowl, combine the peanut butter, powdered sugar, and salt. Mix until everything is well combined and forms a smooth, slightly stiff dough. This might take a little elbow grease, but trust me, it’s worth it.
**Step 2: Shape ‘Em Up!**
Roll the peanut butter dough into small balls, about 1 inch in diameter. Place them on a parchment-lined baking sheet and pop them in the refrigerator for at least 30 minutes. This chilling step is crucial for preventing the balls from melting when you dip them in chocolate.
**Step 3: Chocolate Time!**
While the peanut butter balls are chilling, melt the chocolate chips and vegetable shortening in a double boiler or in the microwave in 30-second intervals, stirring in between, until smooth and creamy. Be careful not to overheat the chocolate, or it will seize up.
**Step 4: The Dipping Dance**
Remove the chilled peanut butter balls from the refrigerator and, one at a time, dip them into the melted chocolate. Use a fork or dipping tool to coat them completely. Place the dipped balls back on the parchment-lined baking sheet.
**Step 5: Garnish (Optional, But Highly Encouraged)**
While the chocolate is still wet, you can sprinkle the Butterfinger Balls with your favorite toppings, such as chopped nuts, sea salt, or sprinkles. Get creative!
**Step 6: The Grand Finale (Chilling, Again!)**
Place the baking sheet back in the refrigerator for at least 15 minutes, or until the chocolate is set.
**Step 7: Devour and Enjoy!**
Once the chocolate is firm, remove the Butterfinger Balls from the refrigerator and enjoy! Store any leftovers in an airtight container in the refrigerator.
Troubleshooting Your Butterfinger Balls
Even if these Butterfinger Balls are very easy to make, things may not go according to plan. But don’t worry, here are the things that can go wrong and what to do:
- **Chocolate is too thick:** Add a little bit more shortening to the mix and stir until smooth.
- **Chocolate is seizing up:** Unfortunately, there is not much to do when chocolate seizes. To avoid this, make sure you use low heat to melt it and you don’t get any water in the mix.
- **The peanut butter balls are too sticky:** Make sure you chill the mix for long enough.
- **The shape of the balls is not good:** The peanut butter dough should be firm enough, if not, add a bit more powdered sugar.
Variations on a Theme: Butterfinger Balls, Remix!
Okay, so you’ve mastered the classic Butterfinger Ball. Congratulations! You’re officially a confectionary rockstar. But what if you’re feeling a little adventurous? What if you want to take your Butterfinger Ball game to the next level? Well, my friend, you’ve come to the right place. Here are a few variations to get your creative juices flowing:
- **Dark Chocolate Decadence:** Swap the semi-sweet chocolate for dark chocolate for a richer, more intense flavor.
- **White Chocolate Wonderland:** Use white chocolate for a sweeter, creamier treat. You can even add a drop of food coloring to the white chocolate to create colorful Butterfinger Balls.
- **Nutty Nirvana:** Add chopped nuts (like peanuts, almonds, or pecans) to the peanut butter mixture for extra crunch and flavor.
- **Salty Sweet Symphony:** Sprinkle a pinch of sea salt on top of the chocolate before it sets to create a delightful salty-sweet contrast.
- **The “Everything But The Kitchen Sink” Ball:** Get wild! Add chopped pretzels, crushed potato chips, or even crumbled cookies to the peanut butter mixture for a truly unique and unforgettable Butterfinger Ball experience.
The Final Word: Go Forth and Ball!
So, there you have it. Everything you need to create your own batch of irresistible Butterfinger Balls. Whether you stick with the classic recipe or get creative with variations, I guarantee these little treats will be a hit with everyone who tries them.
Remember, the key to success is to have fun and don’t be afraid to experiment. And if you happen to make a few mistakes along the way? Well, that’s just part of the learning process. Besides, even slightly imperfect Butterfinger Balls still taste pretty darn good.
Now, go forth and ball! And be sure to share your creations with me on social media. I can’t wait to see what delicious masterpieces you come up with!
Conclusion for Butterfinger Balls :
These Butterfinger Balls are simple to create, and guaranteed to please anyone who tries them. Remember, the key to success is a smooth chocolate coating and a well-mixed Butterfinger filling. Feel free to adapt the recipe to your liking, whether it’s adding a touch of sea salt or using a different type of chocolate. These little bites are perfect for parties, gifts, or simply enjoying a sweet treat. So, go ahead and whip up a batch—you won’t regret it!
Print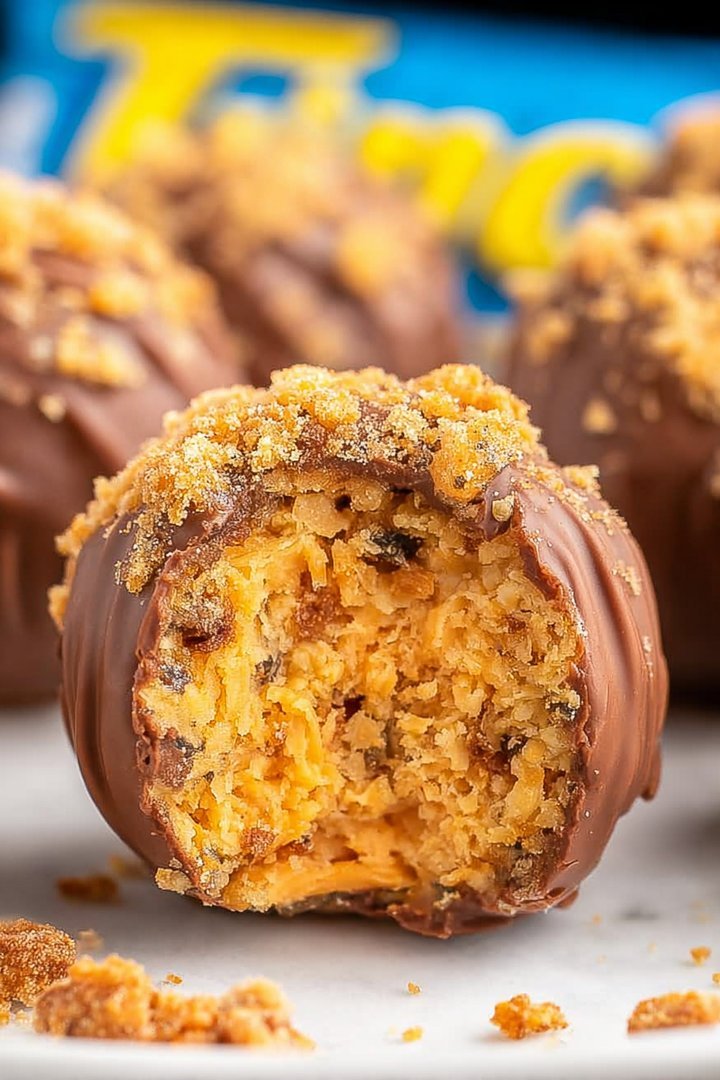
Butterfinger Balls
Delicious butterfinger balls recipe with detailed instructions and nutritional information.
- Total Time: 35 minutes
- Yield: 4 servings 1x
Ingredients
- 1 cup Butterfinger candy bars, finely crushed
- 8 ounces cream cheese, softened
- 1/2 cup powdered sugar
- 1 teaspoon vanilla extract
- 1/4 teaspoon salt
- 1 cup milk chocolate chips
- 1 tablespoon shortening (optional, for smoother melting)
- Sprinkles, for decoration (optional)
Instructions
- Step 1: In a medium bowl, combine the softened cream cheese, powdered sugar, vanilla extract, and salt. Beat with an electric mixer until smooth and well combined.
- Step 2: Add the crushed Butterfinger candy bars to the cream cheese mixture. Stir until evenly distributed.
- Step 3: Cover the bowl and refrigerate for at least 30 minutes to allow the mixture to firm up, making it easier to roll.
- Step 4: Remove the mixture from the refrigerator and roll into 1-inch balls. Place the balls on a baking sheet lined with parchment paper.
- Step 5: In a microwave-safe bowl, melt the milk chocolate chips and shortening (if using) in 30-second intervals, stirring in between, until smooth.
- Step 6: Dip each Butterfinger ball into the melted chocolate, ensuring it is fully coated. Place back on the parchment-lined baking sheet. Immediately sprinkle with sprinkles, if desired. Refrigerate for at least 15 minutes to allow the chocolate to set before serving.
Notes
- Store leftover Butterfinger Balls in an airtight container in the refrigerator for up to a week to maintain their shape and freshness.
- If the chocolate coating softens after refrigeration, let the Butterfinger Balls sit at room temperature for a few minutes before serving for a slightly softer texture.
- Serve these delightful treats on a festive platter or arrange them in mini cupcake liners for an elegant presentation.
- For easier rolling, lightly dampen your hands with water before shaping the Butterfinger mixture into balls to prevent sticking.
- Prep Time: 15 minutes
- Cook Time: 20 minutes
- Method: Stovetop
- Cuisine: American
FAQs :
Can I make these Butterfinger Balls ahead of time?
Absolutely! That’s the beauty of these little nuggets of joy. You can whip up a batch of Butterfinger Balls and store them in the fridge for up to 3 days. Just be sure to keep them in an airtight container, otherwise, they might dry out. Imagine making them on Friday and having a stash ready to go for a weekend of snacking. It’s like having your own personal Butterfinger Ball fairy! Honestly, preparing these ahead of time makes them even more convenient for parties or just a personal treat.
What’s the best way to melt chocolate for the Butterfinger Balls coating?
Melting chocolate can be a tricky business. The microwave is the quick route, but proceed with caution! Use short bursts (30 seconds max), stirring in between, to avoid burning. For a foolproof method, use a double boiler or a heatproof bowl set over a pot of simmering water. Make sure the bottom of the bowl doesn’t touch the water! This provides gentle, even heat for perfectly smooth, glossy chocolate. Trust me, burnt chocolate is the enemy of a good Butterfinger Ball.
How can I prevent the Butterfinger Balls from sticking to the pan?
Stickiness is a common problem with no-bake treats. The easiest fix is to line your baking sheet with parchment paper or a silicone baking mat. These create a non-stick barrier that will allow you to remove the Butterfinger Balls easily. No more scraping and sacrificing precious bits of candy! Alternatively, a light spray of non-stick cooking spray works too, but parchment paper is my go-to for a guaranteed clean release. Remember, happy balls, happy baker!
What other variations can I make to the Butterfinger Balls recipe?
Oh, the possibilities are endless! You can add a pinch of sea salt to the Butterfinger mixture for a salty-sweet kick. Peanut butter chips or chopped pretzels would also be fantastic additions. For the coating, try using white chocolate or dark chocolate instead of milk chocolate. And if you’re feeling extra fancy, sprinkle the finished Butterfinger Balls with chopped nuts or colorful sprinkles. Don’t be afraid to experiment and create your own signature version of these delightful treats. After all, cooking should be fun!


Leave a Comment