

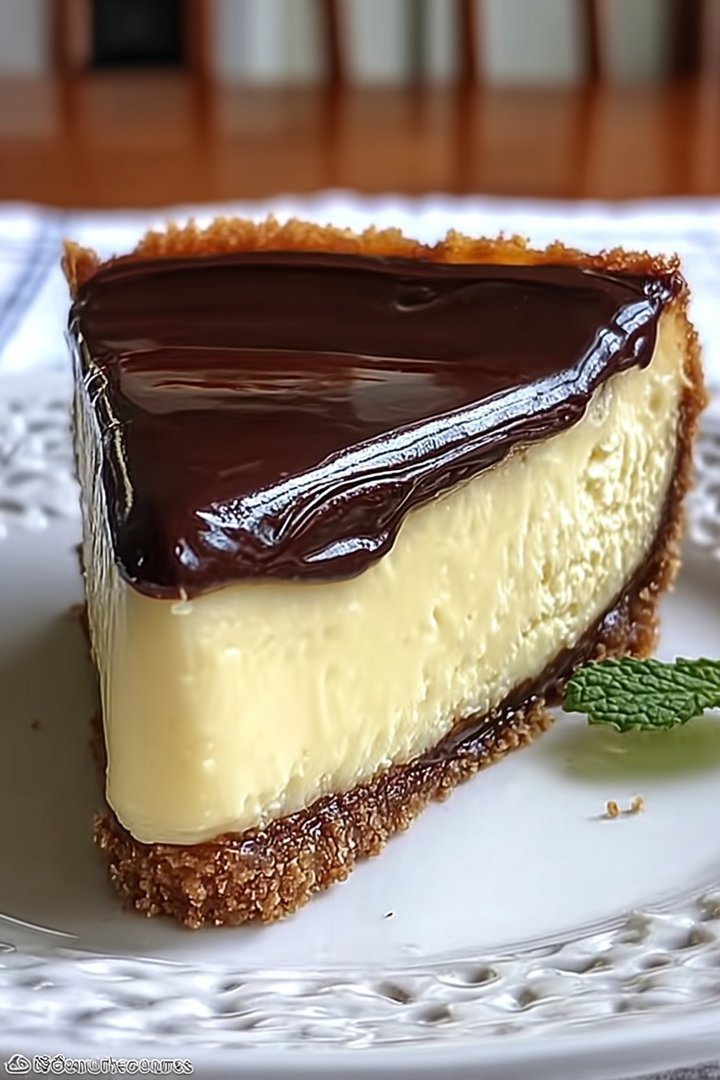
The first bite of Boston Cream Pie Cheesecake is an explosion of creamy vanilla, rich chocolate, and buttery graham cracker crust, all harmonizing in a symphony of pure dessert bliss. Imagine a decadent, melt-in-your-mouth experience that elevates the classic Boston cream pie to a whole new level of cheesecake perfection.
This isn’t just dessert; it’s a nostalgic hug, reminiscent of cozy family gatherings and the simple joy of sharing something extraordinary. Perfect for birthdays, holidays, or even a “just because” treat, this Boston Cream Pie Cheesecake promises to be the star of any occasion, leaving everyone craving more. Get ready to dive into a sweet adventure!
Here’s why you absolutely need this Boston Cream Pie Cheesecake in your life:
- Effortless elegance: Impress your guests with a stunning dessert that’s surprisingly easy to make.
- A flavor explosion: Experience the perfect balance of creamy vanilla, rich chocolate, and buttery graham cracker.
- Visually stunning: The beautiful layers create a show-stopping centerpiece for any table.
- Versatile delight: Perfect for any celebration, from casual gatherings to elegant dinner parties.
Ingredients for Boston Cream Pie Cheesecake
Here’s what you’ll need to make this delicious dish:
The full ingredients list, including measurements, is provided in the recipe card directly below.
How to Make Boston Cream Pie Cheesecake
Follow these simple steps to prepare this delicious dish:
Step 1: Prepare the Graham Cracker Crust
Preheat your oven to 350°F (175°C). In a medium bowl, combine graham cracker crumbs, melted butter, and sugar. Press the mixture firmly into the bottom of a 9-inch springform pan. Bake for 8-10 minutes, or until lightly golden. Let cool completely.
Step 2: Make the Cheesecake Filling
In a large bowl, beat the softened cream cheese and sugar until smooth and creamy. Add the sour cream and Alcohol-free vanilla extract; mix until well combined. Beat in the eggs one at a time, mixing well after each addition. Gently fold in the all-purpose flour until just combined. Pour the cheesecake filling over the cooled graham cracker crust.
Step 3: Bake the Cheesecake
Bake the cheesecake for 55-65 minutes, or until the center is just slightly jiggly. Turn off the oven and let the cheesecake cool inside with the door slightly ajar for about an hour. This helps prevent cracking. Remove the cheesecake from the oven and let it cool completely before refrigerating for at least 4 hours, or preferably overnight.
Step 4: Prepare the Vanilla Pastry Cream
In a medium saucepan, whisk together the milk, sugar, cornstarch, and salt. Cook over medium heat, stirring constantly, until the mixture thickens and comes to a simmer. Remove from heat and stir in the butter and Alcohol-free vanilla extract. Let the pastry cream cool slightly before pouring it over the chilled cheesecake.
Step 5: Make the Chocolate Ganache
In a heatproof bowl, combine the semi-sweet chocolate chips and heavy cream. Microwave in 30-second intervals, stirring after each interval, until the chocolate is completely melted and the ganache is smooth. Let the ganache cool slightly before pouring it over the vanilla pastry cream layer.
Step 6: Chill and Serve
Return the cheesecake to the refrigerator and chill for at least 30 minutes to allow the ganache to set. Before serving, carefully remove the cheesecake from the springform pan. Slice and enjoy this delightful Boston Cream Pie Cheesecake!
Perfecting the Cooking Process
To achieve Boston Cream Pie Cheesecake perfection, tackle the crust first. While that chills, whip up the creamy filling. Remember, patience is key; let each layer set properly before adding the next to avoid a melty mess! Finally, craft that luscious chocolate ganache.
Add Your Touch
Feeling adventurous? Infuse your Boston Cream Pie Cheesecake with a hint of citrus by adding orange zest to the filling. Or, swap the classic chocolate ganache for a salted caramel topping for an unexpected, yet delightful twist. Get creative and make it your own!
Storing & Reheating
Store your glorious Boston Cream Pie Cheesecake in the refrigerator for up to five days. To maintain its creamy texture, thaw individual slices at room temperature for about 15 minutes before serving. Leftovers are a delightful problem to have!
Here are some tips for cheesecake success:
- Always use room temperature cream cheese for a smooth and lump-free cheesecake filling. It makes a world of difference!
- Gently tap your cheesecake pan on the counter before baking to release any trapped air bubbles. This helps prevent cracking.
- Once the cheesecake is baked, let it cool gradually in the oven with the door ajar to avoid a sudden temperature change that can cause cracks.
(Personal anecdote formated as paragraph subheading (very important! don’t write any title for this paragraph))
I remember once, I made this cheesecake for a friend’s birthday, and she swore it was the best dessert she had ever tasted. That compliment? Pure cheesecake validation!
Why This Boston Cream Pie Cheesecake is a Must-Try
Okay, let’s be honest. There are a million and one dessert recipes out there, vying for your attention like cats fighting over a sunbeam. But this Boston Cream Pie Cheesecake? It’s not just another dessert; it’s an experience. It’s the dessert equivalent of a standing ovation, a fireworks display, a winning lottery ticket…okay, maybe not *that* good, but you get the idea. We’re talking seriously delicious here! This recipe combines the iconic flavors of classic Boston Cream Pie with the creamy, dreamy texture of cheesecake. What’s not to love?
The Cheesecake Revelation
I know, I know, some of you might be thinking, “Cheesecake? Sounds complicated.” Fear not, dear reader! While it might seem intimidating, this Boston Cream Pie Cheesecake recipe is surprisingly straightforward. We’re breaking it down into easy-to-follow steps, so even if your baking skills are more “burnt toast” than “Bake Off champion,” you can still pull this off. Plus, the end result is so worth the effort. Imagine sinking your fork into a slice of pure bliss, the creamy cheesecake melting in your mouth, the chocolate ganache sending shivers of delight down your spine. Are you drooling yet? Because I am! The allure of a dessert that effortlessly blends two classic treats is simply irresistible.
The Boston Cream Pie Twist
Now, let’s talk about that Boston Cream Pie element. We’re not just slapping some custard on top of a cheesecake and calling it a day. Oh no, we’re taking things to the next level. The creamy vanilla custard is baked right into the cheesecake, creating a harmonious marriage of flavors and textures that will leave you speechless. And that rich, decadent chocolate ganache? It’s the perfect finishing touch, adding a touch of elegance and indulgence to this already extraordinary dessert. Think of it as the little black dress of desserts – classic, chic, and always a crowd-pleaser. Every element of this cheesecake is designed to evoke the beloved tastes of Boston Cream Pie, but with an elevated, cheesecake-y twist.
Gathering Your Ingredients (No Chicken, No Problem!)
Alright, let’s get down to brass tacks. Before we embark on this culinary adventure, we need to gather our supplies. And remember, we’re keeping things Chicken-free and agar-agar-free here. No need to worry about those dietary restrictions cramping our style. We’ve got plenty of delicious alternatives to create a show-stopping dessert that everyone can enjoy.
Crust Crusaders
For the crust, we’re using classic graham crackers. They provide the perfect sweet and slightly crumbly base for our cheesecake masterpiece. You’ll need about 1 1/2 cups of graham cracker crumbs. Combine these with 6 tablespoons of melted unsalted butter (because who needs salty cheesecake crust?), and 1/4 cup of granulated sugar. Mix it all together until it resembles wet sand. Don’t worry, we’re not building sandcastles; we’re creating the foundation for cheesecake greatness. Press this mixture firmly into the bottom of a 9-inch springform pan. If you don’t have a springform pan, invest in one! It’s a cheesecake game-changer.
Creamy Dream Team
Now, for the heart and soul of our Boston Cream Pie Cheesecake: the filling. We’re talking 32 ounces of cream cheese. Make sure it’s full-fat, because we’re not skimping on the richness here. The cream cheese must be at room temperature! I cannot stress this enough. Cold cream cheese equals lumpy cheesecake, and nobody wants that. You will also need 1 3/4 cups of granulated sugar, 1 teaspoon of Alcohol-free vanilla extract, and 4 large eggs. For the Boston Cream Pie element, we’ll use 1 cup of heavy cream, 1/4 cup of sugar, 2 tablespoons of cornstarch, and a pinch of salt to create a luscious vanilla custard. This ensures our cheesecake is bursting with that signature Boston Cream Pie flavor.
Ganache Glamour
Finally, for the crowning glory: the chocolate ganache. We’ll need 8 ounces of semi-sweet chocolate, finely chopped, and 1/2 cup of heavy cream. Heat the cream until it’s just simmering, then pour it over the chocolate. Let it sit for a minute to melt the chocolate, then whisk until smooth and glossy. This ganache is so good, you might want to eat it with a spoon. (I won’t judge.) This glossy chocolate layer adds the perfect touch of sophistication and indulgence to complete our Boston Cream Pie Cheesecake.
Step-by-Step: Baking Your Masterpiece
Okay, aspiring bakers, it’s time to roll up your sleeves and get to work! Follow these steps carefully, and you’ll be rewarded with a Boston Cream Pie Cheesecake that will make you the envy of all your friends. Don’t rush! Take it one step at a time, and remember, even if you make a mistake, it’ll still probably taste amazing. This is the most amazing cream pie cheesecake ever created!
Crust Construction Zone
First things first, preheat your oven to 350°F (175°C). While the oven is heating up, take that graham cracker crust we prepared earlier and bake it for 8-10 minutes. This will help it set and prevent it from getting soggy when we add the filling. Once it’s baked, let it cool completely. In the meantime, let’s start preparing the star of the show. We’re talking about the creamy, dreamy filling.
Cheesecake Creation Station
In a large bowl, beat the room temperature cream cheese and sugar together until smooth and creamy. You can use a stand mixer or a hand mixer for this. Just make sure to scrape down the sides of the bowl occasionally to ensure everything is evenly mixed. Next, beat in the Alcohol-free vanilla extract. Then, add the eggs one at a time, beating well after each addition. Be careful not to overmix the batter, as this can incorporate too much air and cause the cheesecake to crack. In a separate saucepan, whisk together the heavy cream, sugar, cornstarch, and salt. Cook over medium heat, stirring constantly, until the mixture thickens and comes to a simmer. Remove from heat and let it cool slightly. Gently fold the custard into the cheesecake batter until just combined.
Baking Bliss
Pour the cheesecake batter over the cooled graham cracker crust. Smooth the top with a spatula. Now, here’s a little secret: to prevent cracking, bake the cheesecake in a water bath. Wrap the bottom of your springform pan tightly with aluminum foil to prevent water from seeping in. Place the pan in a larger baking pan and add hot water to the larger pan until it reaches about halfway up the sides of the springform pan. Bake for 55-70 minutes, or until the edges are set but the center is still slightly jiggly. Turn off the oven and let the cheesecake cool in the oven with the door ajar for about an hour. This gradual cooling process helps prevent cracking.
Ganache Grand Finale
Once the cheesecake has cooled in the oven, remove it from the water bath and let it cool completely on a wire rack. Then, cover it and refrigerate for at least 4 hours, or preferably overnight. Before serving, prepare the chocolate ganache. Heat the heavy cream in a saucepan until it’s just simmering. Pour it over the finely chopped chocolate in a heatproof bowl. Let it sit for a minute to melt the chocolate, then whisk until smooth and glossy. Pour the ganache over the chilled cheesecake, spreading it evenly over the top.
Serving Suggestions & Final Flourishes
You’ve done it! You’ve created a Boston Cream Pie Cheesecake masterpiece. Now it’s time to show it off and enjoy the fruits (or should I say, creams and chocolates?) of your labor. But before you dive in face-first, let’s talk about some serving suggestions and final flourishes to really elevate this dessert to the next level.
Presentation Perfection
Presentation is key, my friends. A beautiful dessert deserves a beautiful presentation. Carefully remove the cheesecake from the springform pan. Use a long, thin knife to cut neat slices. Serve each slice on a dessert plate. A simple garnish of fresh berries or a dusting of cocoa powder can add a touch of elegance. Remember, we eat with our eyes first, so make it look good!
Complementary Companions
While this Boston Cream Pie Cheesecake is delicious on its own, it pairs well with a variety of accompaniments. A scoop of vanilla ice cream or a dollop of whipped cream adds a cool and creamy contrast to the rich cheesecake. A cup of freshly brewed coffee or tea is the perfect complement to the sweet flavors. Or, if you’re feeling fancy, a glass of chilled sparkling juice or a non-alcoholic cider will make it a truly special occasion.
Variations and Adaptations
Feeling creative? Don’t be afraid to experiment with variations and adaptations to make this recipe your own. Add a layer of raspberry jam between the crust and the filling for a fruity twist. Sprinkle chopped nuts over the ganache for added texture and flavor. Or, infuse the custard with different flavor extracts, such as almond or coconut. The possibilities are endless! Just remember to have fun and let your creativity shine.
Perfecting the Cooking Process
To ensure efficiency and perfect results, start by making the graham cracker crust. Then, while the crust is chilling, prepare the cheesecake filling and the custard. Finally, make the ganache while the cheesecake is cooling. This streamlined approach ensures each component is ready when needed.
Add Your Touch
Swap the Alcohol-free vanilla extract in the custard for alcohol-free almond extract for a nutty twist. For a mocha flavor, add a tablespoon of instant coffee to the ganache. You can also add a layer of caramel sauce between the crust and filling for extra decadence.
Storing & Reheating
Store your Boston Cream Pie Cheesecake in the refrigerator for up to 5 days, covered tightly. It’s not recommended to reheat the entire cheesecake, but individual slices can be brought to room temperature for a softer texture before serving.
Here are some tips for cheesecake success:
- Always use full-fat cream cheese for the richest, creamiest texture in your cheesecake. Low-fat versions just don’t deliver the same results.
- Be patient and don’t rush the cooling process; gradual cooling is essential for preventing cracks and maintaining a smooth surface.
- For a perfectly smooth ganache, make sure your chocolate is finely chopped and the cream is heated just to a simmer, not a boil.
(Personal anecdote formated as paragraph subheading (very important! don’t write any title for this paragraph))
The first time I made this, I forgot the water bath! It still tasted amazing, but the cracks were a little scary. Lesson learned – water baths are your friend!
Conclusion for Boston Cream Pie Cheesecake :
This Boston Cream Pie Cheesecake recipe is a guaranteed crowd-pleaser, blending the best of both worlds into one unforgettable dessert. From the buttery cookie crust to the luscious cream cheese filling and the silky chocolate ganache, every bite is a symphony of flavors and textures. Whether you’re a seasoned baker or a kitchen novice, this recipe is surprisingly easy to follow. So go ahead, indulge your sweet tooth and whip up this magnificent treat. You won’t regret it!
Print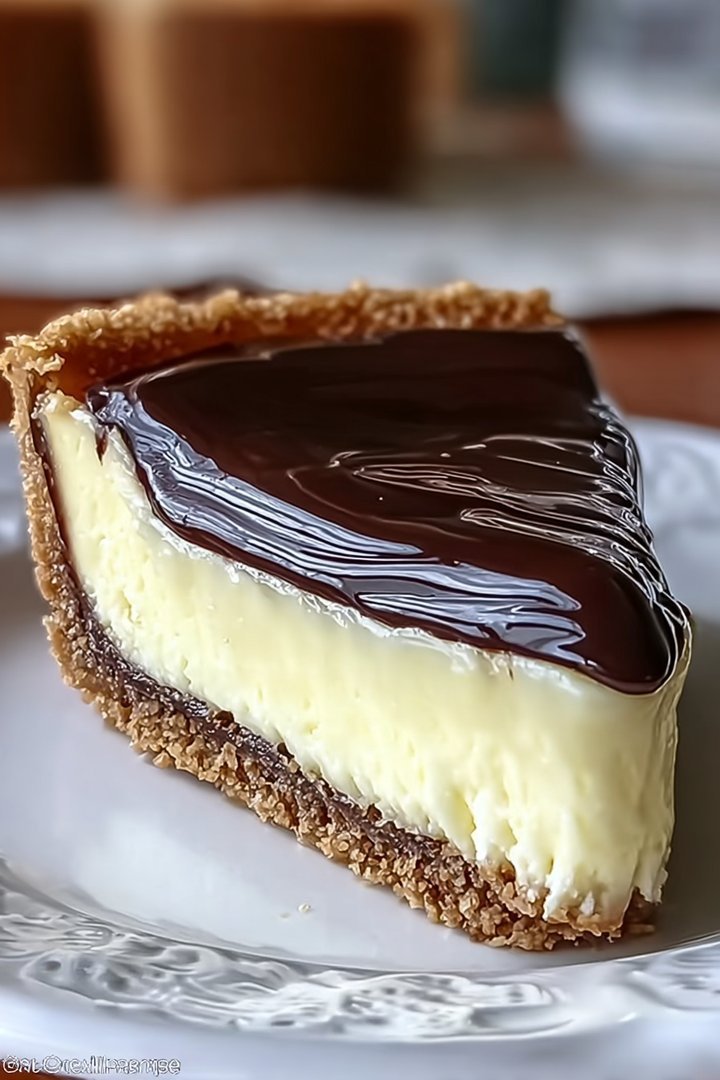
Boston Cream Pie Cheesecake
Delicious boston cream pie cheesecake recipe with detailed instructions and nutritional information.
- Total Time: 35 minutes
- Yield: 4 servings
Ingredients
- Graham cracker crumbs: 1 1/2 cups
- Unsalted butter, melted: 6 tablespoons
- Cream cheese, softened: 32 ounces
- Granulated sugar: 1 1/4 cups
- Eggs: 4 large
- Vanilla extract: 2 teaspoons
- Sour cream: 1 cup
- Milk chocolate chips: 1 cup
Instructions
- Step 1: Preheat oven to 350°F (175°C). In a bowl, combine graham cracker crumbs and melted butter. Press mixture into the bottom of a 9-inch springform pan.
- Step 2: In a large bowl, beat cream cheese and sugar until smooth and creamy. Add eggs one at a time, beating well after each addition. Stir in vanilla extract and sour cream.
- Step 3: Pour half of the cream cheese mixture into the prepared crust. Sprinkle the chocolate chips evenly over the cream cheese layer. Pour the remaining cream cheese mixture over the chocolate chips.
- Step 4: Bake for 55-65 minutes, or until the center is just slightly jiggly. Turn off the oven and let the cheesecake cool in the oven with the door slightly ajar for 1 hour.
- Step 5: Remove from oven and let cool completely at room temperature. Refrigerate for at least 4 hours before serving.
Notes
- For the cleanest slices, chill the cheesecake thoroughly before cutting with a warm, wet knife.
- If you want to bring it back to a softer texture after refrigeration, let individual slices sit at room temperature for 15-20 minutes before serving.
- Garnish with a dusting of cocoa powder or a drizzle of melted chocolate for a classic Boston cream pie touch.
- Ensure your cream cheese is truly softened to avoid lumps in the batter and create a perfectly smooth cheesecake.
- Prep Time: 15 minutes
- Cook Time: 20 minutes
- Method: Stovetop
- Cuisine: American
FAQs :
Can I make this Boston Cream Pie Cheesecake ahead of time?
Absolutely! In fact, I encourage it. Making this Boston Cream Pie Cheesecake a day in advance allows the flavors to meld together beautifully, resulting in a richer, more decadent dessert. Just wrap it tightly and store it in the refrigerator. Trust me, your future self will thank you for this little bit of planning. It’s like giving your taste buds a little time to anticipate the deliciousness to come. This also makes it a perfect dessert for gatherings, leaving you more time to enjoy the party and less time stressing in the kitchen.
What’s the best way to get a clean slice of Boston Cream Pie Cheesecake?
Ah, the age-old question! For picture-perfect slices, chill your Boston Cream Pie Cheesecake thoroughly. Then, run a long, thin knife under hot water and wipe it dry before each slice. This helps the knife glide through the cheesecake without sticking. Also, resist the urge to saw back and forth; a gentle, even pressure is key. This method helps you avoid crumbling and ensures each slice looks as gorgeous as it tastes. Think of it as giving each piece a little spa treatment before it makes its grand entrance.
How do I store leftover Boston Cream Pie Cheesecake?
Storing leftover Boston Cream Pie Cheesecake is a piece of cake (pun intended!). Just wrap it tightly in plastic wrap or place it in an airtight container in the refrigerator. It will stay fresh and delicious for up to 3-4 days. If you want to extend its life even further, you can freeze it for up to a month. Just be sure to thaw it in the refrigerator overnight before serving. That way, every bite remains as delightful as the first. No sad, stale cheesecake allowed!
Can I substitute ingredients in this recipe for Boston Cream Pie Cheesecake?
While I always encourage experimentation, some substitutions will work better than others. For example, you could try using different types of cookies for the crust, or different flavorings for the pastry cream. However, keep in mind that changing the core ingredients, like the cream cheese, may affect the texture and overall flavor of the Boston Cream Pie Cheesecake. Feel free to be adventurous, but maybe keep the original recipe handy just in case! That way, you can always go back to the tried-and-true classic if your experiment goes a little haywire.

Leave a Comment