


Imagine the taste of summer captured in a jar, a burst of sweet and tangy goodness that brightens even the dreariest morning. This **blueberry jam recipe** is your ticket to preserving those sun-kissed flavors all year round!
Making your own jam might sound intimidating, but trust me, it’s easier than explaining to your relatives why you’re still single. Get ready for a delightful adventure into the world of homemade preserves, where the only limit is your imagination (and maybe the size of your jars!).
Here’s what makes this Blueberry Jam Recipe a must-try:
- Effortless preparation that even a kitchen novice can master, requiring minimal equipment and time.
- A symphony of sweet and tart blueberry flavors dances on your palate, creating a taste sensation.
- The vibrant, deep purple hue adds a touch of elegance to your breakfast table or afternoon tea spread.
- Perfect for slathering on toast, swirling into yogurt, or gifting to your friends.
Ingredients for Blueberry Jam Recipe
Here’s what you’ll need to make this delicious dish:
- Fresh Blueberries The star of the show! Choose plump, ripe blueberries for the best flavor and natural sweetness. Frozen blueberries can also be used, just thaw them slightly before starting.
- Granulated Sugar Essential for sweetness and helps in the gelling process. The amount can be adjusted slightly based on the sweetness of your blueberries.
- Lemon Juice Adds a bright, tangy counterpoint to the sweetness and also acts as a natural preservative. Freshly squeezed is always best!
- Pectin (Optional) This helps the jam set properly, especially if your blueberries aren’t naturally high in pectin. Use either powdered or liquid pectin according to package directions.
- Water A little bit of water helps to get the cooking process started and prevents the blueberries from scorching.
The full ingredients list, including measurements, is provided in the recipe card directly below.
How to Make Blueberry Jam Recipe
Follow these simple steps to prepare this delicious dish:
Step 1: Prepare the Blueberries
Gently rinse the blueberries under cold water and remove any stems or leaves. In a large, heavy-bottomed pot, combine the blueberries, sugar, lemon juice, and water.
Step 2: Cook the Mixture
Bring the mixture to a rolling boil over medium-high heat, stirring frequently to prevent sticking. If using pectin, add it according to the package directions at this point.
Step 3: Achieve the Jam Consistency
Continue to boil, stirring constantly, until the jam reaches the setting point. This usually takes about 10-15 minutes. To test for setting, place a small spoonful of jam on a chilled plate and let it cool for a minute. If it wrinkles when you push it with your finger, it’s ready.
Step 4: Can the Jam (Optional)
If you want to preserve the jam for longer, sterilize your jars and lids according to standard canning procedures. Carefully ladle the hot jam into the sterilized jars, leaving about 1/4 inch of headspace. Wipe the rims clean, place the lids on, and screw on the bands. Process in a boiling water bath for 10 minutes.
Step 5: Cool and Store
If you’re not canning the jam, let it cool completely before transferring it to airtight containers. Store in the refrigerator for up to 2-3 weeks. Canned jam can be stored in a cool, dark place for up to a year.
Step 6: Enjoy
Spread on toast, biscuits, or scones, or use as a filling for pastries. This Blueberry Jam recipe makes a delightful addition to any breakfast or dessert.
Perfecting the Cooking Process
For the most efficient blueberry jam, prep all your ingredients first. This means washing and measuring your blueberries, having your pectin ready, and ensuring your jars are sterilized. A smooth cooking process ensures the best flavor!
Add Your Touch
Want to jazz up your blueberry jam? Try adding a pinch of cinnamon or a squeeze of lemon juice for extra zing. You could also experiment with different sweeteners like honey or maple syrup for a unique twist.
Storing & Reheating
Store your homemade blueberry jam in sterilized jars in a cool, dark place. Once opened, refrigerate. There’s no need to reheat it unless you want warm jam on your toast; just spread and enjoy!
- Use a wide-bottomed pot to allow for quicker evaporation and prevent sticking, which helps to keep your jam consistently smooth.
- Test for doneness by placing a small spoonful of jam on a chilled plate; if it wrinkles when you push it, it’s ready to go.
- Always sterilize your jars properly to ensure a longer shelf life and avoid any unwanted surprises with your precious blueberry concoction.
(Personal anecdote formated as paragraph subheading)
The first time I made this blueberry jam, my niece declared it tasted like “sunshine and happiness.” That’s when I knew this blueberry jam recipe was a keeper and worth sharing with everyone.
Understanding the Magic of Blueberries
Blueberries are tiny powerhouses of flavor and antioxidants. These little blue dynamos bring a burst of sweetness to anything they touch. But did you know there’s more to them than just taste? They’re like nature’s little wellness boosters, packed with goodness that makes your body sing. This blueberry jam recipe is not just about preserving fruit; it’s about capturing a moment of pure, unadulterated joy in a jar. Trust me, once you’ve tasted homemade blueberry jam, you’ll never go back to the store-bought stuff.
Why Homemade Blueberry Jam?
Why slave over a hot stove when you can just grab a jar off the shelf? Well, my friend, homemade is where the heart is. Store-bought jam is often loaded with preservatives and artificial flavors, while making your own means you control every single ingredient. You get to choose the quality of your blueberries, adjust the sweetness to your liking, and even add a secret ingredient or two. Plus, the aroma that fills your kitchen as the blueberry jam simmers away? Priceless. It’s a labor of love, and you can taste the difference in every spoonful. This homemade blueberry jam recipe beats anything store bought.
Selecting the Perfect Blueberries
The key to a phenomenal blueberry jam starts with the blueberries themselves. Look for plump, firm, and deeply colored berries. Freshness is key, so try to use them as soon as possible after buying or picking. If you are lucky enough to have access to wild blueberries, grab them! They tend to be smaller and more intense in flavor, making for an exceptionally delicious jam. Frozen blueberries also work in a pinch. Just make sure to thaw them completely and drain any excess liquid before adding them to your pot.
Essential Equipment for a Smooth Jam-Making Experience
Making jam doesn’t require a fancy kitchen. However, having the right tools can definitely make the process smoother and more enjoyable. Let’s run through the essentials so you’re set for success.
The Right Pot
A heavy-bottomed, wide pot is your best friend. The heavy bottom prevents scorching, while the wide surface area helps the jam cook evenly and allows for faster evaporation. Stainless steel or enamel-coated pots work great. Avoid using reactive materials like aluminum, as they can affect the flavor and color of your jam. A large pot also prevents the jam from splattering all over your stovetop—trust me, your future self will thank you.
Jar Sterilization Tools
Sterilizing your jars is non-negotiable. You can do this by boiling them in a large pot of water for about 10 minutes, or by running them through a hot cycle in your dishwasher. Make sure to sterilize the lids and rings as well. Use tongs to carefully remove the hot jars from the water or dishwasher, and place them on a clean towel to dry. This step ensures your jam stays fresh and mold-free for longer.
Jam Thermometer
While experienced jam makers can often tell when the jam is ready by sight, a jam thermometer takes the guesswork out of the equation. Aim for a temperature of 220°F (104°C), which is the magic number for achieving the perfect set. Clip the thermometer to the side of your pot, making sure it doesn’t touch the bottom. This will give you an accurate reading and prevent undercooked or overcooked jam.
The Ultimate Blueberry Jam Recipe: Step-by-Step Guide
Alright, let’s get down to business! Here’s my foolproof blueberry jam recipe, complete with all the tips and tricks I’ve learned over the years. Get ready to transform those beautiful blueberries into jars of golden goodness.
Ingredients You’ll Need:
- 4 cups fresh blueberries, washed and stemmed
- 4 cups granulated sugar
- 1/4 cup lemon juice (freshly squeezed is best!)
- 2 tablespoons pectin (powdered or liquid, depending on the brand instructions)
Step-by-Step Instructions:
1. **Prepare Your Jars: ** Sterilize your jars, lids, and rings as described above. Keep them warm until you’re ready to fill them.
2. **Combine Blueberries and Lemon Juice: ** In your heavy-bottomed pot, combine the blueberries and lemon juice. Mash the blueberries slightly with a potato masher to release their juices. This helps to kickstart the cooking process.
3. **Add Pectin and Sugar: ** Stir in the pectin until it’s fully dissolved. Then, add the sugar and stir well to combine. Make sure there are no clumps of sugar lurking at the bottom of the pot.
4. **Bring to a Boil: ** Place the pot over medium-high heat and bring the mixture to a rolling boil that you can’t stir down. This is where the magic happens. Keep stirring constantly to prevent sticking and scorching.
5. **Cook to Setting Point: ** Continue boiling until the jam reaches 220°F (104°C) on your jam thermometer. If you don’t have a thermometer, you can test for doneness by placing a small spoonful of jam on a chilled plate. If it wrinkles when you push it with your finger, it’s ready.
6. **Remove from Heat: ** Once the jam has reached the setting point, remove it from the heat and skim off any foam that has formed on the surface. This will give your jam a clearer, more appealing appearance.
7. **Fill the Jars: ** Carefully ladle the hot jam into the sterilized jars, leaving about 1/4 inch of headspace at the top. Wipe the rims of the jars with a clean, damp cloth to remove any drips or spills.
8. **Seal the Jars: ** Place the lids on the jars and screw on the rings until they are finger-tight. Don’t overtighten, as this can prevent the jars from sealing properly.
9. **Process in a Water Bath: ** Place the filled jars in a boiling water bath, ensuring they are completely submerged by at least 1 inch of water. Bring the water to a rolling boil and process for 10 minutes.
10. **Cool and Store: ** Carefully remove the jars from the water bath using tongs and place them on a towel-lined surface to cool. As the jars cool, you should hear a popping sound, which indicates that they have sealed properly. Let the jars cool completely for 12-24 hours before checking the seals. To check, press down on the center of each lid. If it doesn’t flex, the jar is sealed. Store unsealed jars in the refrigerator and use them within a few weeks. Sealed jars can be stored in a cool, dark place for up to a year.
Troubleshooting Common Jam-Making Problems
Even the most seasoned jam makers encounter hiccups along the way. Here are a few common problems and how to fix them.
Why Isn’t My Jam Setting?
If your jam is too runny, it could be due to a few reasons. First, make sure you’ve cooked it to the correct temperature (220°F or 104°C). Undercooked jam won’t set properly. Second, too little pectin can also be the culprit. If you’re using fresh fruit that is low in natural pectin, you may need to add more. A splash of lemon juice can also help, as the acidity aids in the setting process. Finally, ensure you measured your ingredients accurately. Precision is key in jam making!
Why Is My Jam Too Thick?
Overcooked jam can become too thick and sticky. If this happens, you can try stirring in a little bit of water or fruit juice to loosen it up. Heat it gently while stirring until it reaches the desired consistency. Next time, keep a closer eye on the temperature and test for doneness frequently. Remember, it’s better to err on the side of slightly undercooked jam, as it will continue to thicken as it cools.
What About Mold?
Mold is a jam maker’s worst nightmare. To prevent mold, always sterilize your jars and lids properly. Make sure the rims of the jars are clean before sealing them. If you spot mold on a jar of jam, discard the entire jar. It’s not worth the risk of consuming contaminated food.
Creative Uses for Your Homemade Blueberry Jam
So, you’ve got a batch of beautiful blueberry jam. Now what? Here are some delicious and creative ways to enjoy your homemade masterpiece:
Classic Pairings
Let’s start with the classics. Spread it on toast, biscuits, or scones for a simple yet satisfying breakfast. Swirl it into yogurt or oatmeal for a burst of fruity flavor. Use it as a filling for thumbprint cookies or a topping for pancakes and waffles. The possibilities are endless! A blueberry jam recipe is versatile.
Savory Twists
Don’t limit your jam to sweet treats. It also pairs surprisingly well with savory dishes. Serve it alongside a cheese board with crackers for a sophisticated appetizer. Use it as a glaze for grilled chicken or turkey. Add a spoonful to a vinaigrette for a sweet and tangy salad dressing. The contrast of sweet and savory is simply divine.
Dessert Magic
Elevate your desserts with a dollop of blueberry jam. Use it as a filling for layer cakes or tarts. Swirl it into ice cream or cheesecake batter for a burst of blueberry flavor. Create a decadent blueberry jam crumble with a buttery oat topping. Your friends and family will be begging for the recipe.
Conclusion for Blueberry Jam Recipe :
Making your own blueberry jam is easier than you might think and the result is far superior to store-bought. Fresh, vibrant, and bursting with flavor, this “Blueberry Jam Recipe” offers a taste of summer all year round. Remember to sterilize your jars properly, cook the jam until it reaches the desired consistency, and don’t be afraid to experiment with a little lemon juice for an extra zing. So go ahead, whip up a batch of this incredible jam and enjoy the sweet taste of homemade goodness.
Print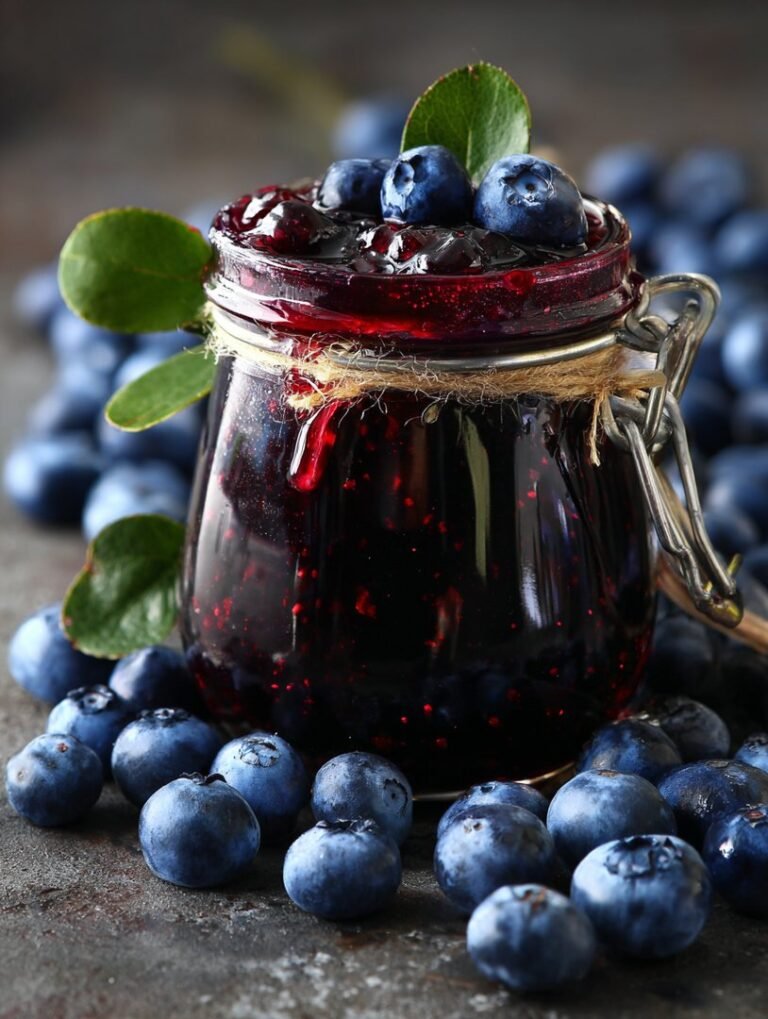
Blueberry Jam Recipe
Delicious blueberry jam recipe recipe with detailed instructions and nutritional information.
- Total Time: 35 minutes
- Yield: 4 servings
Ingredients
- Fresh blueberries: 4 cups
- Granulated sugar: 3 cups
- Lemon juice: 2 tablespoons
- Water: 1/4 cup
- Pectin powder: 1 package (1.75 oz)
- Butter: 1 tablespoon (optional, to reduce foaming)
Instructions
- Step 1: Prepare the blueberries by rinsing them thoroughly and removing any stems or leaves. Gently crush about one cup of the blueberries to release their juices.
- Step 2: In a large, heavy-bottomed saucepan, combine the crushed and whole blueberries, sugar, water, and lemon juice. Stir well to combine.
- Step 3: Bring the mixture to a full rolling boil over medium-high heat, stirring constantly to prevent scorching. A full rolling boil means the mixture continues to boil even while stirring.
- Step 4: Add the pectin powder to the boiling fruit mixture and stir vigorously for one minute, ensuring the pectin is fully dissolved. If using, add the butter to reduce foaming.
- Step 5: Continue boiling the jam for exactly one minute, stirring constantly. Remove the saucepan from the heat.
- Step 6: Skim off any foam from the surface of the jam. Ladle the hot jam into sterilized jars, leaving 1/4 inch headspace. Wipe the jar rims clean, place lids and rings on the jars, and process in a boiling water bath for the time recommended for your altitude.
Notes
- For longer storage, ensure jars are properly sealed after processing; you should hear a "pop" as they cool.
- If your jam sets too firmly, a gentle reheat on the stovetop with a splash of water will loosen it up nicely.
- A spoonful of this homemade blueberry jam is divine swirled into yogurt or spread on warm scones.
- The small amount of lemon juice not only brightens the flavor, but also helps the jam to set properly, so don't skip it!
- Prep Time: 15 minutes
- Cook Time: 20 minutes
- Method: Stovetop
- Cuisine: American
FAQs :
Can I use frozen blueberries for this Blueberry Jam Recipe?
Absolutely! Frozen blueberries work wonderfully. Don’t even bother thawing them first. Just toss them straight into the pot. Think of it as their icy rebellion against room temperature. They might release a bit more liquid, so you might need to cook the jam for a few minutes longer to reach that perfect consistency. Using frozen also means you can enjoy this delicious “Blueberry Jam Recipe” year-round, regardless of whether fresh berries are in season. It’s like having a little piece of summer whenever you want it.
How long does homemade blueberry jam last?
Homemade blueberry jam, when properly sealed in sterilized jars, can last up to a year in a cool, dark place. Once you open a jar, store it in the refrigerator, where it should stay fresh for a couple of weeks – if it lasts that long, that is. Realistically, a jar of this scrumptious blueberry creation never survives more than a few days in my house. Be sure to listen for that satisfying “pop” when you seal the jars; it’s the sound of freshness locked in!
What’s the best way to sterilize jars for Blueberry Jam?
Sterilizing jars is easier than teaching a cat to fetch. There are several methods, but my go-to is boiling them. Place the clean jars in a large pot, cover them with water, and boil for 10 minutes. Remove them carefully with tongs. Place them upside down on a clean towel to dry. You can also sterilize them in the oven or dishwasher. A crucial step in making a shelf-stable “Blueberry Jam Recipe,” ensuring the safety of your delicious creation.
My Blueberry Jam didn’t set, what did I do wrong?
Don’t panic! A jam that refuses to set is a common kitchen conundrum. It could be due to several factors. Not enough pectin, insufficient cooking time, or even the natural sugar content of your blueberries can all play a role. Try cooking it a bit longer, testing frequently for the “jell” stage. If that doesn’t work, you can add a commercial pectin. Remember, making the perfect “Blueberry Jam Recipe” is a journey, not a destination!

Leave a Comment