

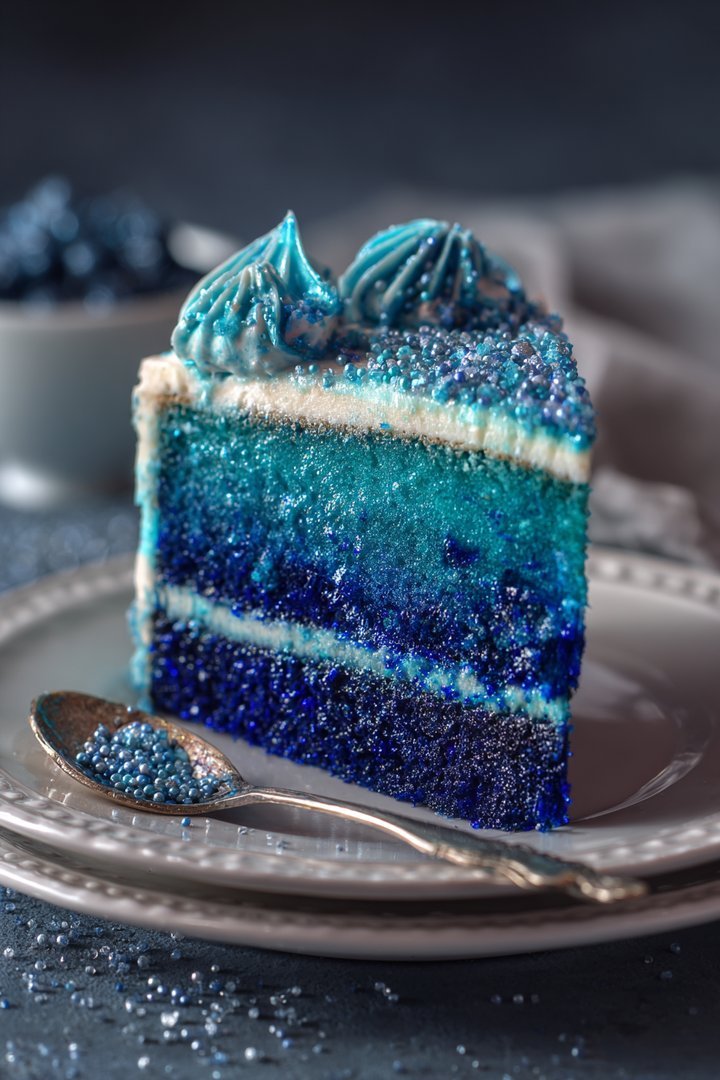
Imagine biting into a cloud of ethereal delight, a cake so vibrant it makes your taste buds sing the blues in the best possible way. That’s exactly what awaits you with this **Blue Velvet Cake Recipe**, a showstopper that’s surprisingly simple to bake and guaranteed to steal the spotlight at any gathering.
This **Blue Velvet Cake Recipe** is more than just a dessert; it’s a nostalgic trip down memory lane, reminiscent of birthday parties and joyous celebrations. With its captivating color and moist, tender crumb, prepare for a taste sensation that will leave everyone begging for seconds.
- Effortless to prepare, this recipe transforms ordinary ingredients into an extraordinary dessert with minimal fuss.
- The unique blend of flavors creates a memorable taste experience that balances sweetness with a hint of tang.
- Its striking blue hue makes it a visually stunning centerpiece, perfect for birthdays, holidays, or any special occasion.
- Versatile enough to be customized with your favorite frosting and decorations, allowing you to create a personalized masterpiece.
Ingredients for Blue Velvet Cake Recipe
Here’s what you’ll need to make this delicious dish:
The full ingredients list, including measurements, is provided in the recipe card directly below.
How to Make Blue Velvet Cake Recipe
Follow these simple steps to prepare this delicious dish:
Step 1: Preheat and Prepare
Preheat your oven to 350°F (175°C). Grease and flour two 9-inch round cake pans. This ensures the cakes don’t stick and release easily. You can also line the bottoms with parchment paper for extra insurance.
Step 2: Cream Butter and Sugar
In a large mixing bowl, cream together the softened unsalted butter and granulated sugar until light and fluffy. This step is crucial for incorporating air into the batter, resulting in a tender cake. Use an electric mixer for best results.
Step 3: Add Eggs and Vanilla
Beat in the eggs one at a time, then stir in the Alcohol-free vanilla extract. Make sure each egg is fully incorporated before adding the next. The vanilla enhances the overall flavor profile of the cake.
Step 4: Combine Dry Ingredients
In a separate bowl, whisk together the all-purpose flour, baking powder, baking soda, and salt. This ensures that the leavening agents are evenly distributed throughout the batter.
Step 5: Alternate Wet and Dry Ingredients
Gradually add the dry ingredients to the wet ingredients, alternating with the buttermilk, beginning and ending with the dry ingredients. Mix until just combined. Be careful not to overmix, as this can result in a tough cake. Add the blue food coloring and mix until the batter is evenly colored.
Step 6: Bake and Cool
Pour the batter evenly into the prepared cake pans and bake for 30-35 minutes, or until a wooden skewer inserted into the center comes out clean. Let the cakes cool in the pans for 10 minutes before inverting them onto a wire rack to cool completely.
Step 7: Prepare Cream Cheese Frosting
While the cakes are cooling, prepare the cream cheese frosting. In a large mixing bowl, beat together the softened cream cheese and unsalted butter until smooth and creamy. Gradually add the powdered sugar, beating until light and fluffy.
Step 8: Frost and Decorate
Once the cakes are completely cooled, frost the top of one cake layer with cream cheese frosting. Place the second cake layer on top and frost the entire cake. Decorate with sprinkles, edible glitter, or your favorite toppings.
Step 9: Serving Suggestion
Refrigerate the cake for at least 30 minutes before serving to allow the frosting to set. Slice and enjoy this stunning blue velvet creation with a cup of coffee or tea. It’s the perfect dessert for any occasion!
Perfecting the Cooking Process
The key to a flawless blue velvet cake is all about timing and temperature. I like to prep all the dry ingredients first, followed by the wet. This helps streamline the mixing process, preventing overmixing and ensuring a tender crumb.
Add Your Touch
Feel free to experiment with the frosting! Instead of plain cream cheese, consider adding a hint of lemon zest or a drop of Alcohol-free vanilla extract for an extra layer of flavor. Chopped pecans or walnuts can also add a delightful crunch.
Storing & Reheating
To keep your blue velvet cake fresh, store it in an airtight container in the refrigerator. It will stay moist and delicious for up to five days. When you are ready to enjoy, let it sit at room temperature for about 30 minutes before serving.
- Don’t skip the buttermilk! It adds essential moisture and tanginess.
- Be careful not to overbake the cake; it should spring back lightly when touched.
- Allow the cake layers to cool completely before frosting to prevent melting.
(Personal anecdote formated as paragraph subheading)
I remember when I first made this cake for my friend’s birthday. Everyone raved about the vibrant color and how moist it was, making me the instant dessert hero of the party.
***
Alright, buckle up buttercups! We’re diving headfirst into the enchanting world of the **Blue Velvet Cake Recipe**. Forget those store-bought imposters, we’re talking about the real deal, the kind that makes angels weep with joy (and maybe a little envy). This isn’t just a recipe; it’s a journey, a quest for the perfect slice of happiness. So, grab your aprons, preheat those ovens, and let’s get baking!
Why Blue Velvet? More Than Just a Pretty Face
You might be thinking, “Another cake? What’s so special about this one?” Well, my friend, prepare to be amazed. The blue velvet cake isn’t just about its stunning hue; it’s about the delicate balance of flavors, the melt-in-your-mouth texture, and the sheer joy it brings to any occasion. It’s a showstopper, a conversation starter, and a guaranteed crowd-pleaser. And the best part? It’s surprisingly easy to make!
Gathering Your Arsenal (Ingredients)
Before we embark on this baking adventure, let’s make sure we have all the necessary tools and ingredients. Think of it as gathering your party of adventurers before heading into the dragon’s lair.
**For the Cake: **
- 2 ½ cups all-purpose flour: Our foundation, the backbone of the cake.
- 2 cups granulated sugar: For sweetness, duh! (And a little bit of magic).
- 1 teaspoon baking soda: The leavening agent, the thing that makes our cake rise to the occasion.
- 1 teaspoon baking powder: A little extra lift, because why not?
- 1 teaspoon salt: To balance the sweetness and enhance the other flavors.
- 1 cup buttermilk: The secret ingredient for a moist and tender crumb. Don’t skip it!
- 1 cup vegetable oil: Keeps things nice and moist.
- 2 large eggs: Binding everything together.
- 2 teaspoons Alcohol-free vanilla extract: A touch of elegance.
- 1 teaspoon white vinegar: Activates the baking soda, contributing to the cake’s rise and texture.
- 1 bottle (1 ounce) blue food coloring: The star of the show! Gel food coloring is highly recommended for the most vibrant color.
**For the Cream Cheese Frosting: **
- 8 ounces cream cheese, softened: The creamy dream.
- ½ cup (1 stick) unsalted butter, softened: Adds richness and helps with the spreadability.
- 4 cups powdered sugar: For sweetness and structure.
- 2 teaspoons Alcohol-free vanilla extract: Because vanilla makes everything better.
The Baking Battle Plan (Instructions)
Now that we’re armed with our ingredients, let’s dive into the step-by-step instructions. Fear not, even if you’re a baking newbie, I’ll guide you through it.
**Step 1: Preheat and Prep**
Preheat your oven to 350°F (175°C). Grease and flour two 9-inch round cake pans. This prevents sticking and ensures easy removal of the cakes.
**Step 2: Dry Ingredients Unite**
In a large bowl, whisk together the flour, sugar, baking soda, baking powder, and salt. Make sure everything is evenly distributed for consistent results.
**Step 3: Wet Ingredients Join the Party**
In a separate bowl, whisk together the buttermilk, oil, eggs, Alcohol-free vanilla extract, vinegar, and blue food coloring. Mix until well combined and the color is uniform.
**Step 4: Combine and Conquer**
Gradually add the wet ingredients to the dry ingredients, mixing on low speed until just combined. Be careful not to overmix, as this can lead to a tough cake.
**Step 5: Divide and Conquer (Again!)**
Divide the batter evenly between the prepared cake pans.
**Step 6: Bake to Perfection**
Bake for 25-30 minutes, or until a wooden skewer inserted into the center comes out clean.
**Step 7: Cool Down Period**
Let the cakes cool in the pans for 10 minutes before inverting them onto a wire rack to cool completely. This prevents them from sticking and allows them to cool evenly.
**Step 8: Frosting Frenzy**
While the cakes are cooling, prepare the cream cheese frosting. In a large bowl, beat the softened cream cheese and butter until smooth and creamy.
**Step 9: Sweeten the Deal**
Gradually add the powdered sugar, beating on low speed until combined. Then, add the Alcohol-free vanilla extract and beat until smooth and fluffy.
**Step 10: Assemble and Admire**
Once the cakes are completely cool, place one layer on a serving plate or cake stand. Spread a generous amount of frosting over the top. Place the second layer on top and frost the entire cake.
Cream Cheese Frosting
: The Crowning Glory
Let’s be honest, the cream cheese frosting is what truly elevates this blue velvet cake recipe. It’s the perfect balance of tangy and sweet, creamy and dreamy. But don’t just take my word for it, try it yourself!
Subheading
: Getting the Frosting Just Right
The key to a perfect cream cheese frosting is softened ingredients. Make sure your cream cheese and butter are at room temperature before you start. This will prevent lumps and ensure a smooth, creamy texture.
Creative Twists
: Level Up Your Blue Velvet Cake
Want to add your personal touch to this already amazing cake? Here are a few ideas to get your creative juices flowing:
- **Add citrus**: A little lemon or orange zest can brighten up the flavor and add a zesty twist.
- **Go nutty**: Chopped pecans or walnuts can add a delightful crunch and nutty flavor.
- **Berry delicious**: Add a layer of fresh berries between the cake layers for a burst of freshness.
- **Chocolate chips**: Fold in some white chocolate chips into the batter for a hint of extra sweetness.
Troubleshooting Tips
: Avoiding Baking Blunders
Even the best bakers encounter occasional mishaps. Here are a few common issues and how to fix them:
- **Cake is dry**: You may have overbaked it. Be sure to check for doneness with a wooden skewer and don’t leave it in the oven any longer than necessary.
- **Frosting is too runny**: Add more powdered sugar, a little at a time, until you reach the desired consistency.
- **Cake is sinking in the middle**: This could be due to underbaking or using too much leavening agent. Make sure to follow the recipe closely and bake until a wooden skewer comes out clean.
The Grand Finale
: Enjoying Your Masterpiece
Congratulations, you’ve conquered the blue velvet cake! Now it’s time to sit back, relax, and enjoy the fruits of your labor. Share it with friends and family, or keep it all to yourself (we won’t judge!).
Remember, baking is all about experimentation and having fun. Don’t be afraid to try new things and put your own spin on this classic recipe. And most importantly, enjoy the process! After all, life is too short to eat boring cake. Now, go forth and bake some magic!
Conclusion for Blue Velvet Cake Recipe :
This Blue Velvet Cake recipe is more than just a dessert; it’s an experience. From its mesmerizing hue to its melt-in-your-mouth texture, it is the perfect centerpiece for any gathering. Remember the buttermilk trick, proper pan prep, and the joy of making it ahead! So go ahead, bake this treat and let it be the star of your next celebration. Enjoy every delightful bite!
Print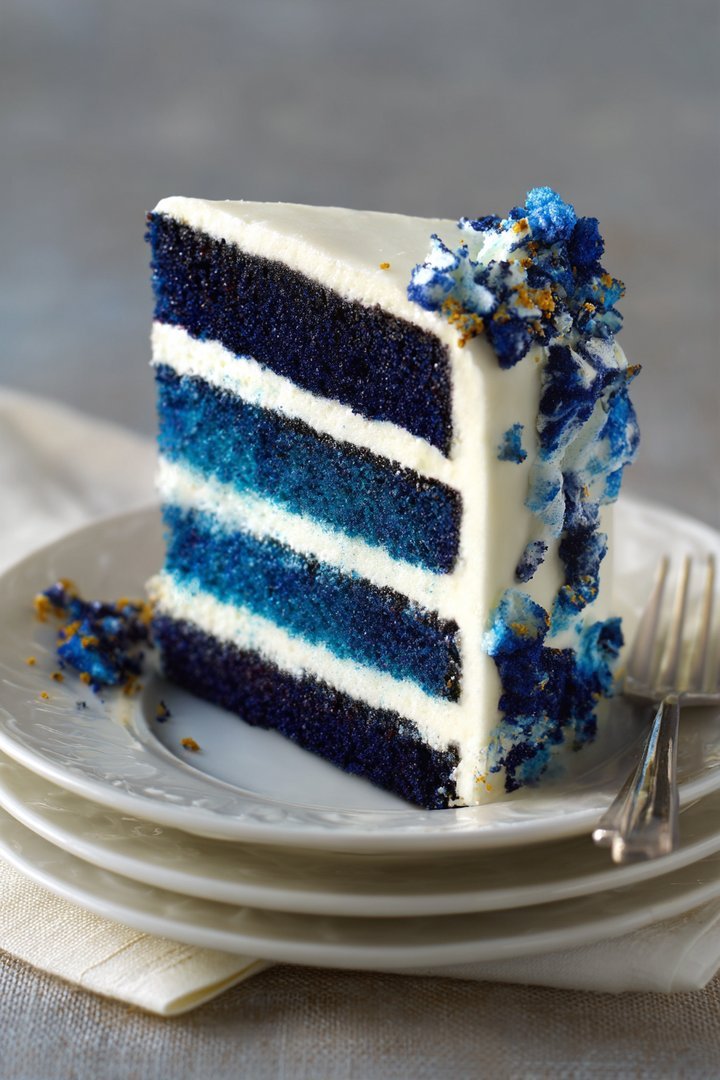
Blue Velvet Cake Recipe
Delicious blue velvet cake recipe recipe with detailed instructions and nutritional information.
- Total Time: 35 minutes
- Yield: 4 servings
Ingredients
- All-purpose flour: 2 1/2 cups
- Granulated sugar: 1 3/4 cups
- Unsweetened cocoa powder: 2 tablespoons
- Baking soda: 1 teaspoon
- Salt: 1 teaspoon
- Vegetable oil: 1/2 cup
- Buttermilk: 1 cup
- Eggs: 2 large
- Blue food coloring: 1-2 tablespoons (gel is preferred)
Instructions
- Step 1: Preheat oven to 350°F (175°C). Grease and flour two 9-inch round cake pans.
- Step 2: In a large bowl, whisk together the flour, sugar, cocoa powder, baking soda, and salt.
- Step 3: In a separate bowl, combine the vegetable oil, buttermilk, eggs, and blue food coloring. Mix well until the color is evenly distributed.
- Step 4: Gradually add the wet ingredients to the dry ingredients, mixing on low speed until just combined. Do not overmix.
- Step 5: Pour the batter evenly into the prepared cake pans.
- Step 6: Bake for 25-30 minutes, or until a toothpick inserted into the center comes out clean. Let cool in the pans for 10 minutes before inverting onto a wire rack to cool completely. Frost with your favorite frosting.
Notes
- To keep your Blue Velvet Cake moist, wrap leftover slices tightly in plastic wrap and store in the refrigerator.
- For a delightful treat, gently warm individual slices in the microwave for 10-15 seconds to enhance the cake's flavor and texture.
- Serve with a dollop of whipped cream or a scoop of vanilla ice cream to complement the cake's rich color and delicate flavor.
- For a vibrant blue hue, use gel food coloring and add it gradually, as the color will deepen slightly as the cake bakes.
- Prep Time: 15 minutes
- Cook Time: 20 minutes
- Method: Stovetop
- Cuisine: American
FAQs :
What makes this Blue Velvet Cake Recipe so special?
Well, let me tell you! Beyond its captivating color, this cake boasts a delightful tang from buttermilk and a tender crumb that practically melts in your mouth. We’ve also swapped out any questionable ingredients (you know, the ones that make you side-eye the label) for wholesome alternatives. The result? A show-stopping dessert that’s as delicious as it is visually stunning. It’s a crowd-pleaser, a party starter, and a guaranteed way to impress your friends and family. Plus, it’s surprisingly easy to make – even for baking beginners.
Can I make this Blue Velvet Cake Recipe ahead of time?
Absolutely! In fact, I encourage it. Baking the cake layers a day in advance actually helps develop the flavors and makes them easier to handle. Just wrap each layer individually in plastic wrap and store them at room temperature. The frosting can also be made a day ahead and stored in the refrigerator. Be sure to let it soften slightly before frosting the cake. This make-ahead tip will save you time and stress on the day you plan to serve your magnificent blue creation.
What can I use if I don’t have buttermilk for this Cake?
Don’t panic if you find yourself buttermilk-less! A fantastic substitute is simply adding a tablespoon of white vinegar or lemon juice to a cup of regular milk. Let it sit for about five minutes, and voila! You’ve got a tangy buttermilk alternative ready to go. This simple trick works wonders and maintains the signature flavor profile of the blue velvet cake. It’s like kitchen magic, without the need for a wand or a pointy hat (though, feel free to wear one if you like!).
How do I prevent my Blue Velvet Cake layers from sticking to the pans?
Ah, the age-old baking dilemma! The key is proper pan preparation. Grease your cake pans generously with shortening, then dust them with flour, tapping out any excess. For extra insurance, you can line the bottoms of the pans with parchment paper rounds. This trifecta of greasing, flouring, and parchment paper will ensure that your cake layers release effortlessly, leaving you with beautiful, intact layers ready to be frosted. No more cake crumbs clinging stubbornly to the pan!


Leave a Comment