


Standing outside the restaurant at closing time just isn’t sustainable, especially when the craving for those savory, cheesy bites hits hard. This quest for the perfect homemade fungi led me to craft theBest Olive Garden Stuffed Mushroomsrecipe, guaranteeing flavor without the long drive. Forget waiting for a table; now you can recreate that legendary appetizer experience right in your kitchen, ensuring a constant supply of rich, herb-laced, oven-baked goodness whenever the mood strikes.
- Uses simple techniques, making this iconic appetizer surprisingly easy to recreate in your own kitchen tonight.
- Achieves that signature savory filling texture with a blend of ground beef, rich cheese, and aromatic Italian herbs.
- The golden-brown, cheesy caps offer a beautiful rustic visual appeal perfect for any party platter or weeknight treat.
- Beyond appetizers, these versatile stuffed caps can easily transform into a decadent side dish for roasted chicken or steak.
The Legendary Appetizer You Can Now Master at Home
There is a certain magic that happens when a humble cremini mushroom cap gets packed to the brim with a ridiculous amount of savory, herby, cheesy filling and then baked until bubbly. For years, I believed this magic was exclusive to the dimly lit dining room of the popular Italian chain. Every trip started with the same declaration: “Just the stuffed mushrooms, please.” But relying on others for my fungi fix proved unsustainable. The withdrawal symptoms were real, folks. I knew I needed to take matters into my own hands, which meant countless hours of testing ratios, experimenting with binder agents, and trying to figure out exactly what secret spice mix made those restaurant versions so addictive. This recipe is the culmination of that obsession—a flawless, flavor-bomb copycat that tastes even better because you didn’t have to wait 45 minutes for a table. What sets this version apart is the deep, umami base provided by sautéed ground beef and caramelized aromatics, which prevents the filling from becoming merely a bland, ricotta-heavy mess. We focus on texture, ensuring the final bite is firm yet creamy, with the earthy mushroom flavor shining through. Whether you are hosting a grand game-day gathering or simply looking for an indulgent snack while watching questionable reality television, these homemade stuffed mushrooms are guaranteed to steal the show. They also happen to freeze beautifully before baking, meaning you can have a gourmet appetizer ready at a moment’s notice, eliminating future emergency trips to the restaurant entirely.
Choosing and Preparing the Perfect Fungi
The key to preventing soggy, sad stuffed mushrooms is starting with the right canvas. Forget the tiny white button mushrooms—they are too delicate and contain too much water. We need girth and flavor here. Opt for Cremini mushrooms, often labeled as Baby Bellas. Their deep, earthy flavor holds up wonderfully against the rich filling, and their structure is robust enough to handle the generous stuffing without collapsing in the oven. When selecting your mushrooms, look for firm caps that are free of blemishes and have tightly closed gills. Preparation is paramount. Never soak mushrooms; they act like tiny, edible sponges and will release all that trapped moisture during baking, leaving you with a watery mess. Instead, gently wipe them clean with a damp cloth or paper towel. Next, carefully remove the stems. You don’t need to be precious about this; a slight wiggle usually pops them right out. Crucially, we are not discarding these stems! We will finely chop them and incorporate them into the filling base, maximizing the earthy mushroom flavor and reducing food waste—a win-win situation. Once the caps are cleaned and stemmed, set them on a cooling rack over a sheet pan while you prepare the filling. This extra air circulation helps dry them out slightly, promoting better texture retention during the cooking process.
Ingredients for Best Olive Garden Stuffed Mushrooms
Here’s what you’ll need to make this delicious dish:
- Large Cremini Mushrooms (Baby Bellas)Choose the largest, firmest caps you can find; these provide the ideal vessel for holding the copious filling.
- Ground BeefLean ground beef works best, providing essential savory depth without adding excessive grease that could make the filling runny.
- Yellow Onion and GarlicThese aromatics are the foundation of the filling, sautéed until soft to release their sweetness and pungent flavor.
- Cream CheeseUse full-fat, softened cream cheese; this provides the essential creaminess and acts as a binder, holding the filling together beautifully.
- Parmesan CheeseFreshly grated Parmesan delivers a necessary salty, nutty punch and helps create that wonderful golden crust when baked.
- Italian Seasoning and Dried ThymeA generous blend of classic herbs provides the signature Italian flavor profile necessary for this copycat recipe.
- Dried Breadcrumbs (Panko or Italian Style)These absorb moisture and prevent the filling from being too dense while adding texture.
- Vegetable BrothA small amount is used during the sautéing process to deglaze the pan and enhance the depth of flavor.
The full ingredients list, including measurements, is provided in the recipe card directly below.
Crafting the Rich Filling: Flavor Is Non-Negotiable
We are aiming for complex, layered flavor, not just a blob of cheese and beef. The magic starts on the stove. Begin by finely chopping the mushroom stems and setting them aside. Heat a large skillet over medium-high heat, then add a drizzle of olive oil. Sauté the finely chopped onions until they turn translucent, which usually takes about five minutes. Add the reserved mushroom stems and minced garlic, continuing to cook until the stems have softened and released their liquid, intensifying their inherent flavor. Now, introduce the ground beef, breaking it up thoroughly with a wooden spoon as it browns. Season the mixture generously with salt and black pepper as it cooks. Once the beef is fully browned, drain off any excess liquid or fat to ensure the filling mixture remains firm, which is crucial for perfect stuffing consistency. Next, deglaze the pan by adding a splash of vegetable broth, scraping up any browned bits stuck to the bottom of the skillet; these bits are packed with flavor. Reduce the heat to low and incorporate the softened cream cheese, stirring until it melts into the beef and vegetable mixture, creating a rich, creamy binder. Remove the skillet from the heat and stir in the Parmesan cheese, Italian seasoning, dried thyme, and breadcrumbs. Taste the filling at this stage; it should be robustly seasoned. If it tastes bland, add more salt or herbs. Allow the filling to cool slightly before moving on to the stuffing process; a warm filling is much easier to handle than a piping hot one, and it prevents the cream cheese from becoming overly oily.
How to Make Best Olive Garden Stuffed Mushrooms
Follow these simple steps to prepare this delicious dish:
Step 1:Preheat and Prep the Pans
Preheat your oven to 375°F (190°C). Lightly grease a large, sturdy baking sheet or line it with parchment paper for easier cleanup. Ensure your mushroom caps are clean, stemmed, and dry, arranging them gill-side up on the prepared baking sheet.
Step 2:Combine and Cool the Filling
As detailed above, cook the ground beef, onions, garlic, and mushroom stems until browned and drained. Mix this savory base thoroughly with the cream cheese, Parmesan, breadcrumbs, and herbs. Let the mixture sit for about 10 minutes to cool slightly and allow the breadcrumbs to fully absorb any remaining moisture.
Step 3:Stuff the Mushroom Caps
Using a small spoon or your fingers, generously mound the cooled filling mixture into each mushroom cap. Do not be shy here—these are meant to be deeply stuffed. Gently pack the filling down to ensure it adheres to the cap, creating a satisfying dome shape over the opening.
Step 4:Bake Until Golden Brown
Transfer the baking sheet to the preheated oven and bake for 18 to 22 minutes. The mushrooms are ready when the caps are tender, and the filling has turned golden brown on top, bubbling slightly around the edges.
Step 5:Rest and Serve
Carefully remove the sheet from the oven. Allow the mushrooms to rest for five minutes before serving, as this brief rest period allows the internal temperature to equalize and prevents burnt tongues. Transfer to plates and garnish with a sprinkle of fresh parsley for the perfect finishing touch.
Variations and Make-Ahead Tips
While the traditional recipe calls for ground beef, you can easily adapt the protein to suit your preferences without sacrificing flavor. For a lighter take, substitute finely ground chicken or turkey breast for the beef, ensuring you add a bit more seasoning to compensate for the lower fat content. Alternatively, for a vegetarian option, you can double the amount of mushroom stems used and incorporate finely chopped walnuts or pine nuts, which offer a hearty texture and savory depth reminiscent of meat. Ensure that you sauté the nuts slightly before mixing them in to enhance their flavor and crunch. If you are preparing these for a large event, theBest Olive Garden Stuffed Mushroomsare fantastic candidates for making ahead. You can fully prepare the filling and stuff the mushroom caps up to 24 hours in advance. Arrange the stuffed caps on the baking sheet, cover them tightly with plastic wrap, and refrigerate until ready to bake. When baking chilled mushrooms, you might need to add an extra five minutes to the cooking time to ensure they heat through completely. Alternatively, you can freeze the stuffed, uncooked mushrooms. Place the prepared caps on a sheet pan in the freezer until solid, then transfer them to a freezer-safe zip-top bag. They can be baked directly from frozen; just increase the baking time to approximately 30–35 minutes. This simple preparation strategy guarantees you always have a restaurant-quality appetizer waiting in the wings for unexpected guests or sudden cravings.
The Accidental Discovery of Sunshine on a Plate
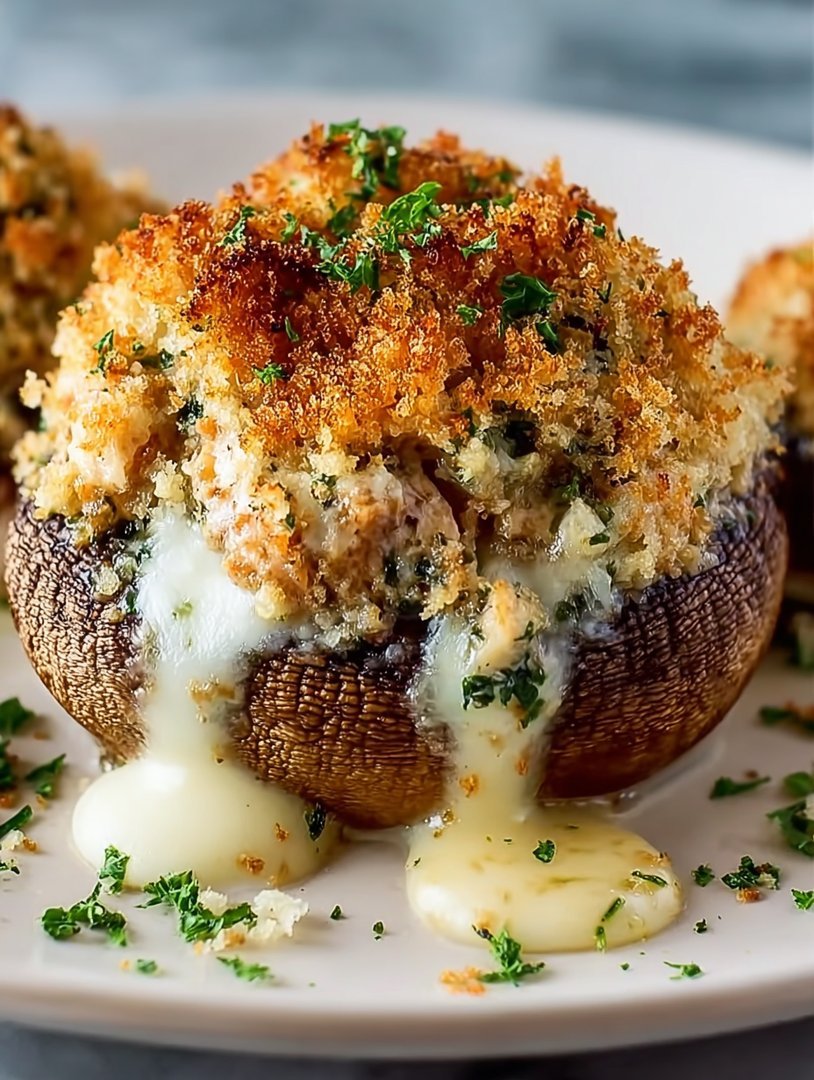
I originally tried this recipe late one rainy Tuesday, desperate for comfort food. I accidentally overfilled one mushroom cap, causing the creamy, cheesy mixture to ooze delightfully onto the pan. Instead of a disaster, I found the secret flavor crust that makes these mushrooms truly irresistible and unforgettable.
There are certain appetizers that transcend the realm of mere snacks and enter the territory of legendary comfort food. For many of us, the stuffed mushrooms served at a famous Italian-American chain restaurant hold that sacred spot. They are simultaneously earthy, garlicky, and overflowing with decadent, melted cheese. After ordering them countless times, I realized two things: first, I was spending way too much money on appetizers, and second, I absolutely had to master this culinary marvel in my own kitchen.
My quest for the Best Olive Garden Stuffed Mushrooms was not easy. It involved several failures, including one batch that smelled vaguely of burnt plastic (don’t ask), and another where the filling slid completely off the caps, leaving behind sad, naked fungi. But through sheer determination—and a lot of taste-testing—I finally unlocked the secrets to replicating, and honestly, improving upon, the original. This version is rich, easy to prepare, and guaranteed to disappear the moment you set the platter down. Get ready to impress your friends, or just yourself, with these savory baked mushrooms.
The Essential Ingredients for Maximum Flavor
The magic of this dish lies in the stuffing. It needs to be creamy, firm enough to hold its shape, and explosive with herbs and Parmesan. We skip any heavier meats to let the mushroom and cheese flavors truly shine, focusing instead on texture and aroma. Gathering your tools and ingredients before you begin is half the battle; having everything prepped means you can focus on the fun part: assembly.
What You Will Need
- 1 pound large white button or Cremini mushrooms (uniform size is best)
- 4 ounces cream cheese, softened
- 1/2 cup finely shredded Parmesan cheese (the good stuff, please!)
- 1/4 cup breadcrumbs (Panko adds great texture)
- 2 tablespoons olive oil
- 3 cloves garlic, minced
- 1/4 cup finely chopped mushroom stems
- 1 tablespoon dried parsley
- 1 teaspoon dried oregano
- Salt and black pepper to taste
- A pinch of red pepper flakes (optional, but highly recommended)
The Quest for the Perfect Cap
Mushrooms are like sponges; they absorb everything they touch. Therefore, cleaning them requires a light hand. Resist the urge to plunge them into a bowl of water! Instead, gently wipe them down with a damp cloth or paper towel to remove any visible dirt. Once cleaned, carefully remove the stems. You want to create a nice, deep cavity perfect for holding all that glorious filling. Don’t discard the stems; finely chop them up and incorporate them into the stuffing—it adds an incredible depth of earthy flavor that is vital for achieving the proper restaurant quality.
Next, we build the foundation of flavor. In a skillet, heat a tablespoon of olive oil over medium heat. Add the minced garlic and the chopped mushroom stems. Sauté them until the stems have softened and released their moisture, which usually takes about five minutes. This step is non-negotiable, as cooking the stems concentrates their flavor and prevents the stuffing from becoming watery during the baking process. Once cooked, set the mixture aside and let it cool slightly before mixing it with the dairy components.
Mastering the Creamy, Cheesy Stuffing
The filling is where the true replication of the Best Olive Garden Stuffed Mushrooms happens. In a medium bowl, combine the softened cream cheese, Parmesan cheese, breadcrumbs, dried herbs (parsley and oregano), and your secret pinch of red pepper flakes. Add the cooled sautéed garlic and mushroom stems. Now comes the critical part: mixing. Use a sturdy spoon or a rubber spatula and mix vigorously until everything is homogenous, creamy, and wonderfully stiff. If the mixture seems too loose, add a tiny bit more Parmesan or breadcrumbs until it holds its shape when squeezed. Taste the filling now and adjust the salt and pepper. Remember, the goal is bold flavor.
When stuffing the caps, resist the urge to spoon the filling delicately. Use a small spoon or, even better, your hands (gloves recommended, unless you enjoy smelling like garlic for two days). Firmly press the filling into the mushroom cavity, ensuring it mounds slightly over the top. This dome shape is essential because as the mushrooms bake, the filling will melt and spread, creating that beautiful golden-brown crust we are aiming for. Place the stuffed caps on a baking sheet lined with parchment paper for easy cleanup.
Perfecting the Cooking Process
Start by gently cleaning and destemming the mushrooms, using the finely chopped stems immediately in the filling mixture. While the filling chills slightly to firm up, preheat your oven to ensure the caps bake evenly and achieve that perfect, deeply golden-brown crust required for the Best Olive Garden Stuffed Mushrooms.
Assembly and Baking Brilliance
Baking is where the transformation occurs. Preheat your oven to a robust 375°F (190°C). Brush the exposed mushroom caps (the outer rim) lightly with the remaining olive oil; this keeps them moist and enhances their earthy flavor while preventing them from drying out. Bake the stuffed mushrooms for about 18 to 22 minutes. You are looking for two things: the mushrooms should be tender when gently pressed, and the filling should be bubbling hot, deeply golden brown, and slightly crusty around the edges.
If your filling isn’t browning enough after 20 minutes, switch the oven to broiler mode for the last minute, watching them like a quail! That cheesy crust goes from perfect to charcoal in about 30 seconds under the broiler. Once beautifully golden, remove them from the oven, let them cool for just a minute or two (otherwise, you risk third-degree cheese burns), and then serve immediately. Garnish with a sprinkle of fresh parsley for a vibrant pop of color and freshness.
Add Your Touch
If you want more smoky depth, substitute the Parmesan with smoked Gouda or Asiago for a different dimension. For a meatier filling, incorporate finely minced, pre-cooked ground turkey or chicken into the cheese mixture. A pinch of red pepper flakes adds a surprising, welcome kick of heat that complements the earthy mushroom flavor wonderfully.
Storing & Reheating
Store cooled leftovers tightly sealed in the refrigerator for up to three days. To reheat, avoid the microwave, as it makes the mushrooms rubbery and the filling sad. Instead, bake them in a toaster oven or regular oven at 300°F (150°C) for about 10 minutes until they are piping hot, maintaining their desirable crisp texture.
Three Tips for Stuffed Mushroom Success
-
To prevent soggy mushrooms, clean them only with a damp cloth instead of washing, as they absorb water quickly and can dilute your carefully prepared stuffing.
-
Always reserve a small amount of Parmesan cheese to sprinkle on top right before they finish baking; this extra layer creates a gorgeous, irresistible golden crust.
-
Do not overfill the caps! The filling expands slightly during baking, and overstuffing causes the crucial cheesy mixture to leak out onto the pan prematurely.
My brother, who famously claims he dislikes vegetables, ate half a tray of these savory baked mushrooms and then asked if he could take the rest home. That, my friends, is the highest possible culinary compliment for these fantastic stuffed mushroom caps.
Conclusion for Best Olive Garden Stuffed Mushrooms
Replicating beloved restaurant appetizers at home is immensely satisfying, and these Best Olive Garden Stuffed Mushrooms truly deliver on flavor and comfort. By focusing on quality ingredients, proper cap preparation, and ensuring that cheesy crust browns perfectly, you create an elegant dish that is sophisticated yet simple. Whether you need an impressive holiday appetizer, a hearty snack, or just a ridiculously delicious bite on a regular weeknight, these savory baked mushrooms will surely become a staple in your kitchen. They prove that the greatest culinary adventures happen right at home, far away from the noisy dining room and endless breadsticks.
Print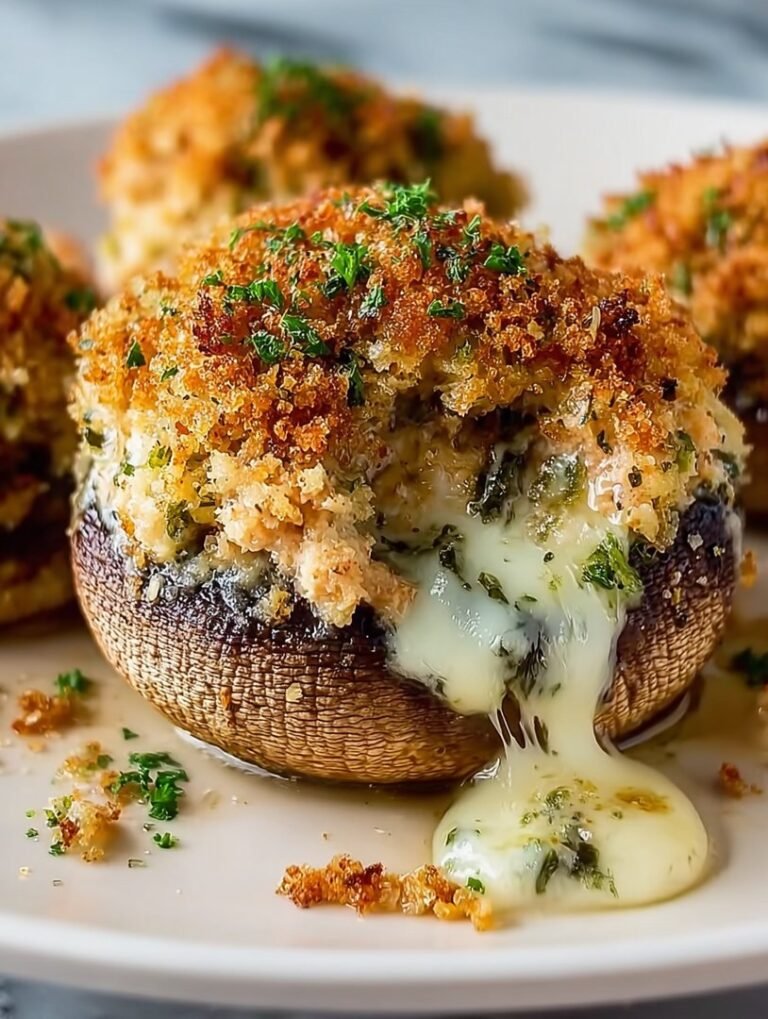
Best Olive Garden Stuffed Mushrooms
Recreate the OG classic! Large Baby Bellas overflow with savory ground beef, rich cream cheese, and sharp Parmesan filling. Cool the mix, stuff, and bake golden.
- Total Time: 35 minutes
- Yield: 4 servings
Ingredients
- Large Cremini Mushrooms (Baby Bellas)Choose the largest, firmest caps you can find; these provide the ideal vessel for holding the copious filling.
- Ground BeefLean ground beef works best, providing essential savory depth without adding excessive grease that could make the filling runny.
- Yellow Onion and GarlicThese aromatics are the foundation of the filling, sautéed until soft to release their sweetness and pungent flavor.
- Cream CheeseUse full-fat, softened cream cheese; this provides the essential creaminess and acts as a binder, holding the filling together beautifully.
- Parmesan CheeseFreshly grated Parmesan delivers a necessary salty, nutty punch and helps create that wonderful golden crust when baked.
- Italian Seasoning and Dried ThymeA generous blend of classic herbs provides the signature Italian flavor profile necessary for this copycat recipe.
- Dried Breadcrumbs (Panko or Italian Style)These absorb moisture and prevent the filling from being too dense while adding texture.
- Vegetable BrothA small amount is used during the sautéing process to deglaze the pan and enhance the depth of flavor.
Instructions
- Step 1:Preheat and Prep the Pans
- Step 2:Combine and Cool the Filling
- Step 3:Stuff the Mushroom Caps
- Step 4:Bake Until Golden Brown
- Step 5:Rest and Serve
Notes
- Leftovers store well refrigerated for 3 days; for future meals, freeze the stuffed but unbaked mushrooms on a tray before transferring them to a bag for long-term storage.
- Skip the microwave when reheating; warm the mushrooms in a 300°F oven for about 10-15 minutes, covering them with foil to prevent the caps from drying out or the cheese crust from burning.
- These rich, savory bites pair perfectly as an appetizer with a glass of crisp, dry Pinot Grigio or served alongside a simple, brightly dressed arugula salad to balance the richness.
- Don't skip the "cool the filling" step—a chilled filling ensures the cream cheese acts as a stable binder, preventing your stuffing from oozing out and keeping the mushroom caps firm during baking.
- Prep Time: 15 minutes
- Cook Time: 20 minutes
- Method: Stovetop
- Cuisine: American

Leave a Comment