

The scent of cinnamon and caramelized apples signals that autumn magic is afoot, or perhaps just that I’ve successfully avoided setting off the smoke detector again. Forget complex pies; sometimes you just need dessert drama without the divorce-worthy effort. Behold the majesty ofBaked Bloomin’ Apples, the dessert that screams “sophisticated” while whispering “I only spent 15 minutes prepping.”
If you love the flavor of apple pie but loathe wrestling with finicky crusts, this recipe is your superhero. It delivers intensely tender fruit bathed in a warm, buttery sauce, ready to impress guests or simply satisfy that deep, urgent craving for comfort food that only sweet, spiced apples can silence.
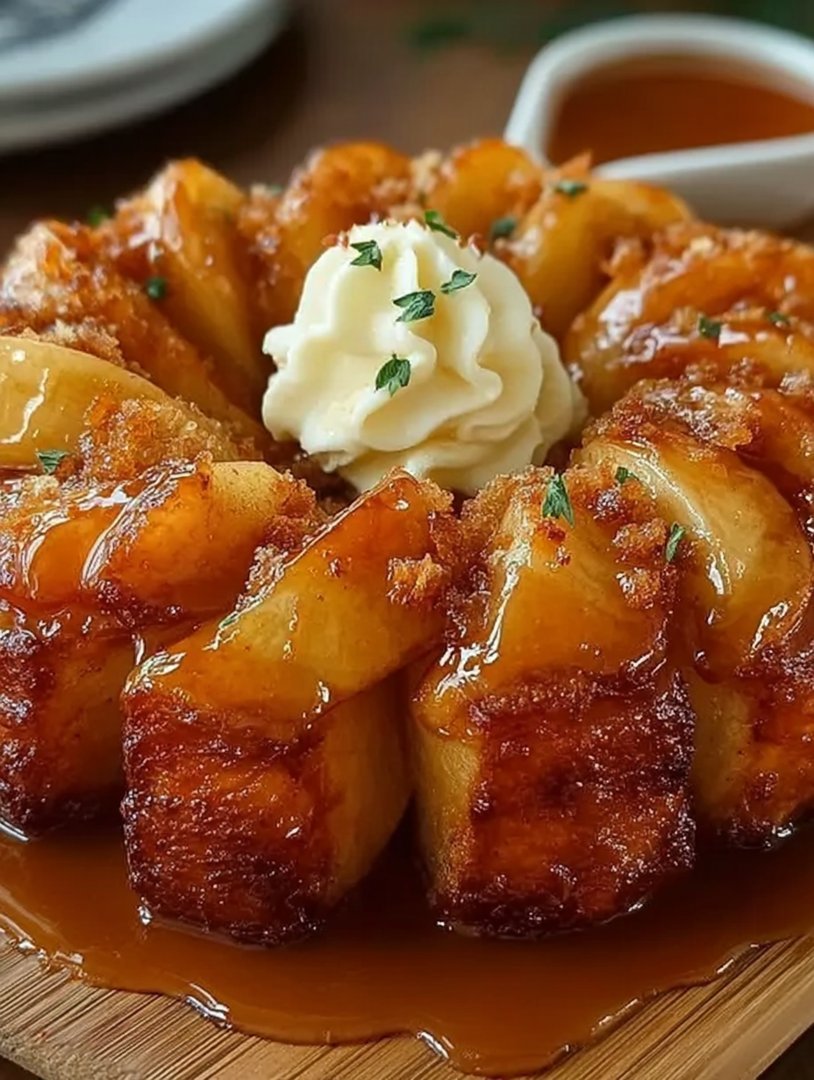
- The “blooming” technique creates a stunning presentation, ensuring every slice is perfectly coated in sweet, spiced caramel sauce right out of the oven, making it highly Instagrammable.
- Enjoy a balanced flavor profile featuring tender, slightly tart apple slices complemented by warm brown sugar, pure vanilla, and robust autumn spices like cinnamon and nutmeg.
- Preparation is incredibly fast, requiring minimal chopping and simple assembly, making this an ideal last-minute dessert for busy weeknights or unexpected company at the dinner table.
- This versatile treat pairs wonderfully with a scoop of creamy vanilla bean ice cream or a generous dollop of fresh whipped topping, adjusting easily for any celebratory season.
The Anatomy of Apple Perfection: Why This Dessert Works
My relationship with traditional apple pie is complicated. It often involves tears, undercooked bottoms, and arguments with rolling pins. I spent years searching for the ideal baked apple presentation—one that maximizes flavor coverage without demanding architectural expertise. That’s when I discovered the magic of slicing the apple like a blooming onion, only far less traumatic to consume and significantly better smelling.
The secret to this recipe’s effortless charm lies entirely in the slicing technique. By cutting the apple nearly to the core without going all the way through, you create tiny valleys and ridges perfect for catching and holding the glorious spiced brown sugar mixture. When the apples bake, they soften beautifully, releasing their own juices which mingle with the butter and sugar, creating an instant, deeply satisfying caramel sauce that permeates every nook and cranny. There is no guesswork involved here; simply load the spices into the crevices and let the oven do the heavy lifting.
While this dessert looks incredibly fancy, requiring what appears to be hours of preparation, the actual hands-on time barely registers. You simply core the fruit, score it, load it up with flavor, and bake. It is the perfect solution for those occasions when you need something stunningly delicious but simply cannot face the monumental cleanup associated with layered pastries or complex custards. This baked apple dessert is a testament to the fact that elegance and simplicity can, and should, coexist in the kitchen.
Selecting the Right Apples for Optimal Flavor and Texture
Choosing the correct apple variety is paramount to the success of this dish. You need an apple that holds its structure during the 45-minute bake time. Nobody wants a mushy apple puddle; we are aiming for tender slices that retain their integrity. Granny Smith apples are the perennial favorite, offering a wonderful tartness that cuts through the richness of the brown sugar sauce, preventing the dish from becoming overly sweet. If you prefer something slightly milder, Honeycrisp or Fuji apples work beautifully, offering a fantastic balance of sweetness and firmness.
Avoid softer apples, such as McIntosh or Red Delicious, as these tend to break down quickly into applesauce territory, which defeats the purpose of the bloomed presentation. If you want to get truly adventurous, try mixing two varieties, perhaps a firm tart apple with a slightly sweeter baking apple, to add complexity to the final product. Remember to select medium to large apples, as smaller ones often dry out or turn too soft before the internal temperature fully caramelizes the sauce.
Ingredients for Baked Bloomin’ Apples
Here’s what you’ll need to make this delicious dish:
- Large Baking Apples (4)Choose firm varieties like Granny Smith, Honeycrisp, or Fuji to ensure they hold their shape throughout the lengthy baking process.
- Unsalted Butter (4 tablespoons)Melted butter acts as the foundational liquid, binding the spices and sugar and helping create that luscious caramelized crust.
- Brown Sugar (1/2 cup, packed)Provides deep, molasses-rich sweetness and is essential for forming the thick, sticky caramel sauce at the bottom of the dish.
- Ground Cinnamon (1 teaspoon)The quintessential fall spice; use high-quality cinnamon for the best aromatic warmth and flavor intensity.
- Ground Nutmeg (1/4 teaspoon)Offers a subtle, warm dimension; fresh grating provides the most potent aroma, but pre-ground works perfectly fine.
- Pure Vanilla Bean Paste (1 teaspoon)Enhances all the other flavors, adding a rich, bakery depth to the overall caramel sauce and the baked fruit.
- Pinch of SaltCrucial for balancing the intense sweetness of the brown sugar, ensuring the resulting caramel tastes complex rather than cloying.
- Water (1/4 cup)Added to the baking dish to create steam, which helps the apples soften evenly and prevents the sugar from scorching on the pan surface.
The full ingredients list, including measurements, is provided in the recipe card directly below.
How to Make Baked Bloomin’ Apples
Follow these simple steps to prepare this delicious dish:
Step 1: Prep the Apples and Preheat the Oven
Preheat your oven to 400°F (200°C). Use a sturdy apple corer or a paring knife to remove the core from the center of each apple, being careful not to cut all the way through the base. Place the cored apples into a small, oven-safe baking dish that snugly fits all four pieces. Next, using a sharp knife, make deep vertical cuts around the apple, stopping about half an inch from the base. You should have eight to ten sections that resemble petals.
Step 2: Prepare the Spiced Caramel Sauce
In a small bowl, combine the melted butter, brown sugar, ground cinnamon, nutmeg, vanilla bean paste, and the pinch of salt. Stir this mixture vigorously until it forms a thick, paste-like sauce. It is important that the sugar is incorporated evenly so the spices adhere correctly to the apple surfaces during the application phase.
Step 3: Stuff and Load the Apples
Using a spoon or your (clean) fingers, gently pry open the scored sections of each apple and spoon the spiced caramel mixture deeply into all the crevices. Make sure the tops and exposed inner surfaces of the apple slices are generously coated. Any remaining sugar mixture should be gently smeared over the exterior skin of the fruit. This ensures maximum flavor penetration and a beautiful glaze.
Step 4: Add Liquid and Begin Baking
Pour the 1/4 cup of water directly into the bottom of the baking dish, avoiding pouring it over the apples themselves. This moisture helps steam the apples slightly, resulting in a much more tender outcome and preventing the rich sugar mixture from burning onto the pan. Carefully place the baking dish into the preheated oven and bake for 40 to 50 minutes. The apples are finished when the skin is wrinkled, the edges are caramelized, and they yield easily when pierced gently with a fork.
Step 5: Rest and Serve
Remove the dish from the oven. The liquid at the bottom should be a thick, bubbling caramel syrup. Let the apples rest in the dish for about 10 minutes; this allows the internal temperature to equalize and the caramel sauce to thicken slightly. Spoon the glorious, sticky sauce from the bottom of the pan liberally over the top of the baked apples before serving. Transfer to plates and drizzle with sauce for the perfect finishing touch.
Creative Ways to Enhance Your Baked Apple Dessert
While the basic baked apple recipe is phenomenal on its own, sometimes you want to dress things up a bit. Think of the apple as a blank canvas awaiting your culinary creativity. One simple but impactful variation involves adding texture before baking. Try sprinkling chopped pecans or walnuts over the apples immediately after stuffing them with the spiced sugar. The nuts toast beautifully in the oven, providing a delightful crunch that contrasts perfectly with the soft, yielding fruit.
For a richer, deeper sauce, consider swapping out a tablespoon of the brown sugar for maple syrup. Maple adds an earthy sweetness that complements the autumnal spices brilliantly. If you want a savory undertone, a tiny splash of aged balsamic vinegar added to the baking water will surprisingly enhance the fruit’s sweetness while adding unexpected depth. This is a subtle variation, but connoisseurs appreciate the complexity it introduces. Always remember that the base recipe for these blossom apples is forgiving, allowing you the freedom to experiment with different flavor profiles without fear of failure.
Perfect Pairings and Presentation Tips
The presentation of the baked bloomin’ apples is half the fun. Since the dish is naturally beautiful, focus on complementary additions that heighten the sensory experience. The classic accompaniment, of course, is a generous scoop of high-quality vanilla bean ice cream. The cold, creamy dairy contrasts brilliantly with the hot, spiced apples and the sticky caramel sauce. If you prefer a lighter option, use freshly whipped cream infused lightly with a touch of cardamom or alcohol-free almond extract for an interesting twist.
For an elegant plated dessert, serve a single apple on a clean white plate. Drizzle the warm caramel sauce around the base, creating a decorative pool. If you are serving this dessert during the holidays, a light dusting of powdered sugar adds a wintry, sophisticated finishing touch. Do not forget the ability of ground spices to elevate the final look; a tiny pinch of cinnamon scattered over the whipped cream is both aromatic and visually appealing. Remember that this recipe is also excellent for meal prepping; you can easily core and score the apples up to 24 hours in advance, keeping them refrigerated until you are ready to stuff and bake them, making entertaining incredibly stress-free.
One of the most engaging aspects of this recipe is the way it fills your home with the most intoxicating aroma of cinnamon and sugar. It is comforting, inviting, and truly sets the tone for a cozy evening. So, abandon the stress of complicated baking projects and embrace the simple, undeniable perfection of these caramelized, spiced fruit masterpieces. They are a guaranteed crowd-pleaser that delivers all the warm feelings of traditional fall desserts without requiring you to spend the entire afternoon fighting with pastry dough.
The Accidental Discovery of Sunshine on a Plate
I was desperate for a fall dessert that wasn’t pie, so I carved up four huge apples hoping for a miracle. The results were spectacular. These amazing, caramelized fruit flowers, or what I now call the ultimate Baked Bloomin’ Apples, were an unexpected dose of delightful surprise and pure comfort.
Why We Love These Baked Bloomin’ Apples
Let’s be honest, sometimes you want a sophisticated dessert without the three hours of rolling, crimping, and weeping over a soggy crust. Enter the humble apple, elevated to star status. These aren’t just baked apples; they are meticulously sliced, generously stuffed with warm spices, brown sugar, and buttery goodness, then baked until they literally burst open like a floral dessert arrangement. It’s pure edible theater, and the best part? The preparation takes about 15 minutes, maximum.
I first attempted this recipe on a rainy Sunday when my patience was thinner than phyllo dough. I needed quick gratification and maximum flavor payoff. The scent that filled my kitchen—a heady mix of cinnamon, nutmeg, and melting caramel—convinced me instantly that I had struck dessert gold. Forget the tedious assembly of a cobbler; we are embracing simple elegance here.
The Magic Behind the “Bloom”
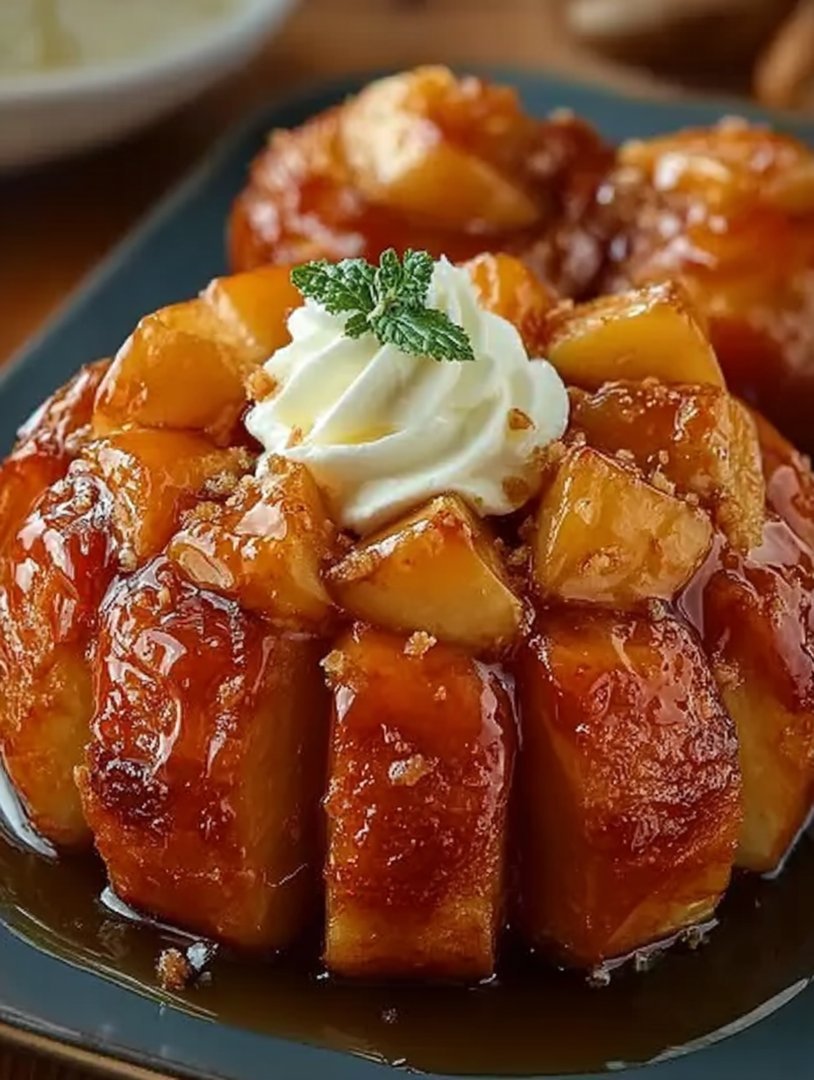
The “blooming” technique is crucial, but wonderfully simple. You core the apple and then slice it almost all the way down, leaving the base intact. Think of it like giving the apple a very intense, vertical haircut. This creates little pockets for the glorious filling to seep into, caramelizing every single layer of fruit. When it bakes, the slices fan out, soaking up all that flavor and creating a stunning presentation. It looks like you spent hours laboring over it, but really, you were just enjoying a cup of tea while the oven did the hard work. This simple technique transforms ordinary baked apples into truly decadent Baked Bloomin’ Apples.
Choosing Your Apple Champions
Not all apples are created equal, especially when it comes to baking. We need firm apples that hold their shape beautifully under high heat. Avoid mushy varieties at all costs. My top recommendations are Honeycrisp, Granny Smith (if you like a tart contrast), or Gala. These champions stand up to the heat and ensure that your dessert remains structurally sound, offering that wonderful contrast between tender, soft interior and the slightly crisp, caramelized edges. Using the right apple is the secret weapon in achieving that perfect, buttery texture and rich sweetness.
The Core of the Recipe: Ingredients
For the Apples
- 4 large firm baking apples (Honeycrisp or Gala recommended)
- 2 tablespoons lemon juice
For the Filling
- 1/4 cup light brown sugar, packed
- 2 tablespoons unsalted butter, softened
- 1/4 cup quick-cooking oats (optional, for texture)
- 1 teaspoon ground cinnamon
- 1/4 teaspoon ground nutmeg
- 1/8 teaspoon ground cardamom (optional, for depth)
For the Caramel Sauce (Non-Alcoholic)
- 1/2 cup heavy cream or plant-based cream alternative
- 1/2 cup granulated sugar
- 1/4 cup water
- 1 tablespoon butter
- 1 teaspoon vanilla bean paste
Instructions for Perfect Baked Bloomin’ Apples
- Preheat and Prep:Preheat your oven to 375°F (190°C). Lightly grease a small baking dish suitable for holding the four apples snugly.
- Core the Apples:Wash and core the apples, removing the seeds but leaving the bottom intact. Brush the cut surfaces of the apples with lemon juice to prevent browning.
- Slice to Bloom:Place the cored apple flat-side down. Using a sharp knife, make vertical slices around the entire apple, stopping about 1/2 inch from the base. You want about 8 to 10 slices per apple. Carefully fan out the slices slightly.
- Prepare the Filling:In a small bowl, combine the brown sugar, softened butter, oats, cinnamon, nutmeg, and cardamom (if using). Mix until well combined and crumbly.
- Stuff and Bake:Gently spoon the filling mixture into the crevices of each apple, pressing it down slightly between the slices. Place the apples in the prepared baking dish.
- Bake:Bake for 30–45 minutes, or until the apples are tender when pierced with a fork. Baking time varies based on the apple size. During the last 10 minutes, you can baste the apples with any melted butter/sugar mixture from the dish.
- Make the Caramel Sauce:While the apples cool slightly, combine sugar and water in a saucepan over medium heat. Do not stir initially. Swirl the pan occasionally until the mixture turns a deep amber color. Remove from heat immediately. Carefully whisk in the cream (it will bubble vigorously), then stir in the butter and vanilla bean paste until smooth.
- Serve:Drizzle the warm caramel sauce generously over the Baked Bloomin’ Apples. Serve immediately with vanilla ice cream or a dollop of whipped topping.
Perfecting the Cooking Process
For peak efficiency, core and slice the apples first, ensuring the filling is ready to go. While the apples bake for the initial 30 minutes, prepare the rich caramel sauce. This synchronization ensures that the warm, caramelized fruit and the fresh, velvety sauce finish baking and cooking at almost the exact same glorious moment.
Add Your Touch
Try swapping the oats for chopped pecans or walnuts for a crunchy texture contrast. Alternatively, infuse the butter filling with a tiny pinch of ground ginger for a spicy kick. For a dairy-free dessert, simply use plant-based butter and cream for the filling and caramel sauce preparation.
Storing & Reheating
Store leftover Baked Bloomin’ Apples in an airtight container in the refrigerator for up to three days. To reheat, microwave them briefly (about 30 seconds per apple) or pop them back in a 350°F oven for 10 minutes until warmed through. Store the caramel sauce separately.
- Always choose apples that are slightly larger than average; they hold their shape better and provide more surface area for the delicious spice filling.
- To ensure the apples soften evenly, gently pour one or two tablespoons of water into the bottom of the baking dish before placing it in the oven.
- If your caramel sauce crystalizes, remove it from the heat, add a splash of water, and reheat gently until the sugars dissolve again, swirling often.
My neighbor tasted these after a particularly rough week and declared they were “happiness in a bowl.” That feedback reminded me that sometimes the simplest desserts carry the most emotional weight and comfort.
Conclusion for Baked Bloomin’ Apples
These Baked Bloomin’ Apples truly redefine the meaning of comfort food, transforming a simple piece of fruit into an elegant, show-stopping dessert. They are proof that you don’t need complex techniques or obscure ingredients to achieve culinary brilliance. The blend of warm cinnamon, tender fruit, and silky caramel creates a memorable experience with minimal fuss. Whether you are hosting a holiday gathering or just craving a cozy weeknight treat, this recipe delivers maximum flavor and presentation points every time. Get ready to ditch the complicated crusts and embrace the bloom!
Print
Baked Bloomin’ Apples
Watch these Honeycrisp apples fan out into a magnificent bloom! Drenched in a warm butter, maple, and cinnamon glaze, they bake into a tender, gooey dessert.
- Total Time: 35 minutes
- Yield: 4 servings 1x
Ingredients
- 4 large baking apples (such as Honeycrisp or Fuji)
- 1/2 cup packed light brown sugar
- 1/4 cup unsalted butter, melted
- 1 teaspoon ground cinnamon
- 1/4 cup maple syrup
- 1/4 cup chopped pecans
- Pinch of ground nutmeg
Instructions
- Step 1: Preheat the oven to 375°F (190°C). Core the apples, then carefully slice them deeply from the top almost to the bottom in 8-10 sections, ensuring the base remains intact so the apple holds its shape (creating the "bloom").
- Step 2: In a small bowl, whisk together the melted butter, brown sugar, cinnamon, nutmeg, and maple syrup until thoroughly combined. Stir in the chopped pecans.
- Step 3: Carefully spoon the spiced mixture evenly into the crevices of the sliced apples, letting the mixture fall towards the core and over the top. Place the prepared apples into a small baking dish.
- Step 4: Bake for 30 to 45 minutes, or until the apples are fork-tender and the topping is bubbly and caramelized. Baste the apples with the accumulated syrup in the dish halfway through the baking time.
- Step 5: Remove the dish from the oven and let the apples cool slightly for about 5 minutes before serving warm, optionally topped with a scoop of vanilla ice cream or extra syrup from the pan.
Notes
- To maintain structure, store leftover apples covered tightly in the fridge for up to three days, keeping in mind the pecan topping will soften slightly upon cooling.
- For the best texture, reheat individual apples in a 350°F oven for about 10 minutes, or until warmed through, rather than using the microwave, which can make them mushy.
- Elevate this dessert by serving it alongside a dollop of fresh whipped cream stabilized with a touch of cream cheese, or a spoonful of rich salted caramel sauce.
- When creating the bloom, place chopsticks or thick rubber bands parallel to the apple base while slicing; they act as a safety stop, preventing your knife from accidentally cutting all the way through the bottom.
- Prep Time: 15 minutes
- Cook Time: 20 minutes
- Method: Stovetop
- Cuisine: American


Leave a Comment