


Picture this: fragrant basmati rice, tender chicken pieces infused with aromatic spices, all layered together in a symphony of flavors. This Authentic Indian Restaurant-Style Chicken Biryani: An Amazing Ultimate Recipe isn’t just food; it’s an edible hug from your favorite Indian eatery, made right in your own kitchen.
Every spoonful is a journey, a flavorful exploration that dances on your taste buds and leaves you craving more. Forget complicated restaurant menus; with this recipe, you are about to become the master of your own biryani destiny. Gather your spices, sharpen your knives, and prepare for a culinary adventure!
- Effortlessly recreate the exquisite taste of restaurant-quality chicken biryani at home.
- Experience a harmonious blend of traditional Indian spices delivering an unforgettable taste.
- The vibrant colors and textures make this biryani a feast for the eyes and stomach.
- Customize the spice level to suit your palate, making it perfect for any occasion.
Ingredients for Authentic Indian Restaurant-Style Chicken Biryani: An Amazing Ultimate Recipe
Here’s what you’ll need to make this delicious dish:
The full ingredients list, including measurements, is provided in the recipe card directly below.
How to Make Authentic Indian Restaurant-Style Chicken Biryani: An Amazing Ultimate Recipe
Follow these simple steps to prepare this delicious dish:
Step 1: Marinate the Chicken
In a bowl, combine the chicken pieces with yogurt, ginger-garlic paste, turmeric powder, red chili powder, biryani masala, salt, and lemon juice. Mix well and let it marinate for at least 30 minutes, or preferably overnight in the refrigerator. The longer it marinates, the more flavorful the chicken will be.
Step 2: Prepare the Rice
Rinse the basmati rice thoroughly under cold water until the water runs clear. Soak the rice in water for 30 minutes. In a large pot, bring water to a boil. Add the soaked rice, salt, and a bay leaf. Cook the rice until it is about 70% cooked. Drain the rice and set aside. It should be slightly undercooked, as it will continue to cook in the biryani.
Step 3: Fry the Onions
Heat vegetable oil or ghee in a large, heavy-bottomed pot or Dutch oven. Add the thinly sliced onions and fry them over medium heat until they are golden brown and crispy. This may take some time, so be patient and stir them frequently to prevent burning. Remove the fried onions from the pot and set aside.
Step 4: Layer the Biryani
In the same pot, add the marinated chicken and cook it over medium heat until it is partially cooked. Add the tomato puree, green chilies, mint leaves, and cilantro leaves. Cook for a few minutes until the tomatoes are softened and the spices are fragrant. Now, create layers in the pot. Start with a layer of rice, followed by a layer of the chicken mixture, and then sprinkle with fried onions, saffron-infused milk, and a few drops of rose water. Repeat the layers until all the rice and chicken are used up, ending with a layer of rice on top.
Step 5: Cook the Biryani
Cover the pot tightly with a lid. You can also seal the lid with foil to prevent steam from escaping. Cook the biryani over low heat for 20-25 minutes, or until the rice is fully cooked and the chicken is tender. Avoid lifting the lid frequently to maintain the steam inside the pot.
Step 6: Serve and Enjoy
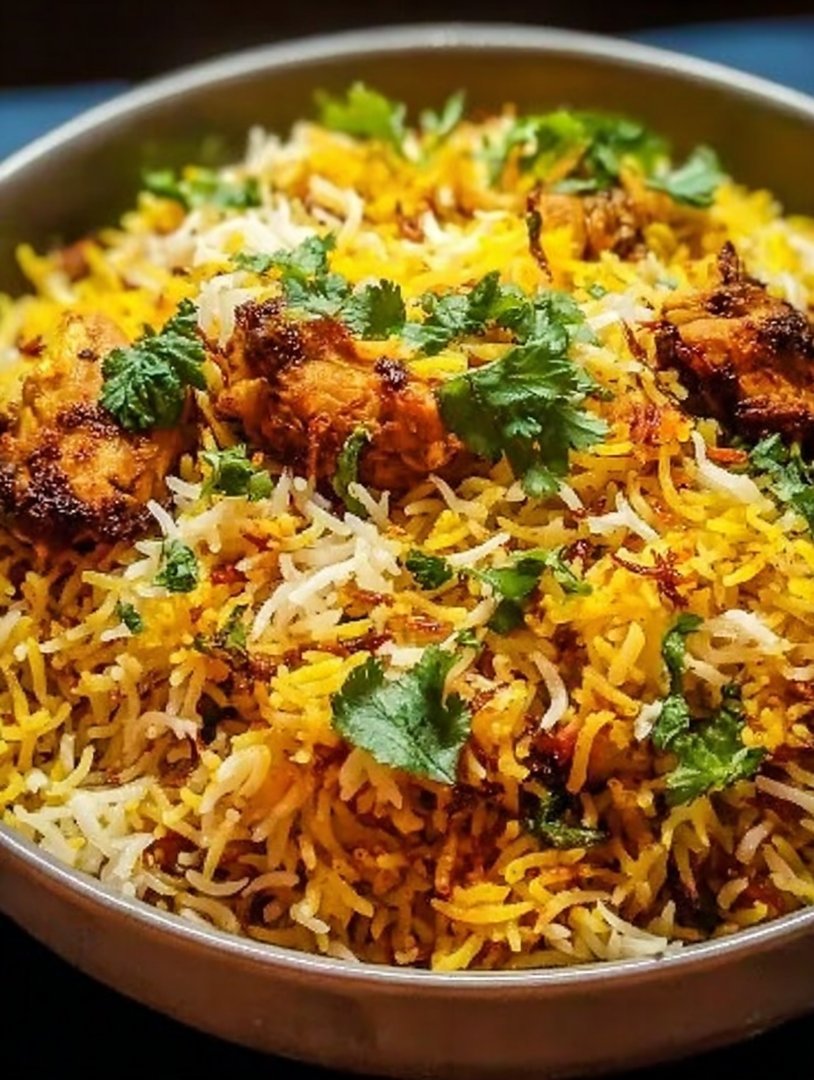
Once the biryani is cooked, gently fluff the rice with a fork. Be careful not to break the rice grains. Let the biryani rest for a few minutes before serving. Garnish with fresh cilantro and a sprinkle of fried onions. Serve hot with raita (yogurt dip) and your favorite Indian side dishes for a complete and satisfying meal.
Tips and Tricks for the Perfect Authentic Indian Restaurant-Style Chicken Biryani: An Amazing Ultimate Recipe (H2 Heading)
Leave an empty line (space) immediately after the H2 heading before starting the content.
Choosing the Right Chicken (H3 Heading)
While chicken thighs are ideal, you can also use chicken breast if you prefer. Just be sure not to overcook it, as it can become dry. Cutting the chicken into uniform pieces ensures even cooking. Consider the source of your chicken as well; organic or free-range options often have better flavor and texture.
Mastering the Rice (H3 Heading)
The key to perfect biryani rice is to use aged basmati rice and to cook it only partially before layering. This allows it to absorb the flavors of the spices and chicken without becoming mushy. Soaking the rice helps to remove excess starch and ensures that the grains remain separate and fluffy.
Spice It Up (or Down) (H3 Heading)
Feel free to adjust the amount of green chilies and red chili powder to suit your spice preference. If you prefer a milder biryani, reduce or omit the green chilies altogether. For a spicier version, add a pinch of cayenne pepper to the marinade. Always taste as you go and adjust the spices accordingly.
The Art of Layering (H3 Heading)
Layering the biryani correctly is essential for even distribution of flavors and textures. Start with a layer of rice to prevent the chicken from sticking to the bottom of the pot. Alternate layers of rice and chicken, and don’t forget to sprinkle each layer with fried onions, saffron-infused milk, and rose water for that authentic restaurant-style touch.
Slow and Steady Wins the Race (H3 Heading)
Cooking the biryani over low heat is crucial for allowing the flavors to meld together and for the rice to cook evenly. Resist the urge to crank up the heat, as this can result in burnt rice and undercooked chicken. Patience is key when it comes to making biryani. Sealing the lid tightly with foil ensures that the steam stays inside the pot, creating a moist and flavorful dish.
Serving Suggestions for Authentic Indian Restaurant-Style Chicken Biryani: An Amazing Ultimate Recipe (H2 Heading)
Leave an empty line (space) immediately after the H2 heading before starting the content.
Classic Raita (H3 Heading)
No biryani is complete without a side of cool and refreshing raita. This yogurt-based dip is typically made with grated cucumber, chopped cilantro, and a pinch of cumin. It provides a perfect contrast to the rich and spicy biryani.
Mirchi ka Salan (H3 Heading)
For those who like it hot, Mirchi ka Salan is a popular accompaniment to biryani. This spicy curry is made with green chilies, peanuts, sesame seeds, and tamarind. It adds a fiery kick that complements the flavors of the biryani.
Boiled Eggs (H3 Heading)
Hard-boiled eggs are a simple yet satisfying addition to biryani. They add a protein boost and a creamy texture that balances out the spices.
Papadums (H3 Heading)
Crispy papadums are a great way to add some crunch to your biryani meal. These thin, lentil-based crackers can be roasted or fried and are perfect for scooping up bits of biryani.
Why This Authentic Indian Restaurant-Style Chicken Biryani: An Amazing Ultimate Recipe is Better Than Takeout (H2 Heading)
Leave an empty line (space) immediately after the H2 heading before starting the content.
Freshness and Quality (H3 Heading)
When you make biryani at home, you have complete control over the ingredients. You can choose the freshest chicken, the highest quality rice, and the most flavorful spices. This ensures that your biryani is not only delicious but also healthier than takeout.
Customization (H3 Heading)
One of the best things about making biryani at home is that you can customize it to your liking. You can adjust the spice level, add your favorite vegetables, or even substitute the chicken with lamb or beef. The possibilities are endless.
Cost-Effective (H3 Heading)
Making biryani at home is significantly cheaper than ordering takeout. With just a few ingredients, you can create a large batch of biryani that will feed your entire family and leave you with leftovers for days.
Satisfaction (H3 Heading)
There’s nothing quite like the satisfaction of creating a delicious meal from scratch. Making biryani at home is a rewarding experience that will leave you feeling proud and accomplished. Plus, you’ll impress your friends and family with your culinary skills.
So, ditch the takeout menu and give this Authentic Indian Restaurant-Style Chicken Biryani recipe a try. You won’t be disappointed!
Perfecting the Cooking Process
Timing is everything! For biryani brilliance, sear the chicken first to lock in those juicy flavors. While it rests, get your rice cooking. This allows you to prep the aromatics for the flavorful gravy without the pressure of juggling multiple tasks at once.
Add Your Touch
Want to make it *your* biryani? Go wild! Try swapping out chicken for lamb or beef. Adjust the spice level to your liking—a little extra chili powder never hurt anyone! Add vegetables like peas, carrots, or potatoes for extra heartiness.
Storing & Reheating
Leftover biryani? Lucky you! Store it in an airtight container in the fridge for up to three days. Reheat it gently in a pan with a splash of broth, or microwave it in short bursts, stirring occasionally, to keep it from drying out.
Here are some tips to elevate your biryani game:
- Always soak the rice for at least 30 minutes before cooking to ensure each grain remains separate and fluffy, preventing a mushy final product.
- Don’t overcrowd the pan when searing the chicken; sear in batches for optimal browning and to avoid steaming the meat.
- Layer the biryani components carefully, alternating rice and chicken gravy, to ensure a balanced distribution of flavors in every bite.
(Personal anecdote formated as paragraph subheading)
I’ll never forget the first time I made biryani for my friends. They devoured it so quickly; I barely got a piece! One even claimed it was better than his favorite restaurant—talk about a compliment!
Authentic Indian Restaurant-Style Chicken Biryani: An Amazing Ultimate Recipe
Okay, folks, buckle up. We’re about to embark on a culinary journey to the heart of India, without the need for a plane ticket (or the questionable airline food). We’re tackling the magnificent, the majestic, the mouthwatering: Authentic Indian Restaurant-Style Chicken Biryani!
Forget those sad, pale imitations you’ve encountered. We’re talking the real deal: fragrant rice, succulent chicken, and a symphony of spices that will have your taste buds doing the Bollywood dance. And the best part? You can totally nail this at home. Trust me. If I can do it (and I once set toast on fire), you can absolutely do it.
This isn’t just a recipe; it’s an experience. It’s the aroma that fills your kitchen, the vibrant colors that tantalize your eyes, and the explosion of flavor that will leave you craving more. We’re going to break down each step, demystify the process, and arm you with the knowledge to create a biryani that will have your friends begging for your secret.
Why This Chicken Biryani is Different (and Better!)
So, what sets this Authentic Indian Restaurant-Style Chicken Biryani apart from the countless other recipes floating around the internet? Well, for starters, we’re focusing on authenticity. We’re not cutting corners or substituting ingredients. We’re using time-honored techniques and the freshest spices to create a flavor profile that is truly unforgettable.
Secondly, we’re keeping it simple. Yes, biryani can seem intimidating, but we’re going to break it down into manageable steps. No fancy equipment or culinary school degree required. Just a little patience and a willingness to experiment.
Finally, and perhaps most importantly, this recipe is all about flavor. We’re not just throwing spices into a pot and hoping for the best. We’re carefully layering flavors, allowing them to meld and deepen over time. The result is a biryani that is rich, complex, and utterly addictive. Think restaurant quality; you are trying to make an Authentic Indian Restaurant-Style Chicken Biryani!
Gathering Your Biryani Arsenal: The Ingredients You’ll Need
Alright, let’s talk ingredients. This isn’t the time to skimp or substitute. Quality ingredients are key to achieving that authentic restaurant flavor. Think of it as an investment in your taste buds (and your bragging rights).
Here’s what you’ll need:
- **For the Chicken Marinade:**
- 1.5 lbs boneless, skinless chicken thighs, cut into bite-sized pieces (thighs are juicier, trust me)
- 1 cup plain yogurt (full-fat is best for flavor and richness)
- 2 tablespoons ginger-garlic paste (freshly made is ideal)
- 1 tablespoon lemon juice (adds a bright tang)
- 1 teaspoon turmeric powder (for that gorgeous golden hue)
- 1 teaspoon red chili powder (adjust to your spice preference)
- 1 teaspoon garam masala (the soul of Indian cuisine)
- Salt to taste (don’t be shy!)
- **For the Rice:**
- 2 cups basmati rice (long-grain and fragrant)
- 4 cups water (or chicken broth for extra flavor)
- 1 bay leaf (adds a subtle, aromatic note)
- 4-5 green cardamoms (lightly crushed)
- 4-5 cloves (whole)
- 1 cinnamon stick (about 2 inches)
- 1 tablespoon oil (vegetable or canola)
- Salt to taste
- **For the Biryani Gravy:**
- 2 large onions, thinly sliced (patience is key here)
- 2 large tomatoes, chopped (ripe and juicy)
- 2-3 green chilies, slit (adjust to your spice preference)
- 1 tablespoon ginger-garlic paste
- 1 teaspoon turmeric powder
- 1 teaspoon red chili powder
- 1 teaspoon coriander powder
- 1/2 teaspoon cumin powder
- 1/2 teaspoon garam masala
- 1/4 cup chopped cilantro (for freshness)
- 1/4 cup chopped mint (for coolness)
- 1/4 cup oil (vegetable or canola)
- A pinch of saffron strands soaked in 2 tablespoons of warm milk (for color and aroma – optional but highly recommended)
- **For Layering and Garnishing:**
- 1/4 cup fried onions (store-bought or homemade)
- 2 tablespoons chopped cilantro
- 2 tablespoons chopped mint
- 2 tablespoons melted ghee (clarified butter – adds richness)
**The Biryani Blueprint: Step-by-Step Instructions**
Okay, deep breaths everyone! We’re about to dive into the actual cooking process. Don’t worry, I’ll be right here with you, holding your hand (metaphorically, of course).
**Step 1: Marinating the Chicken (The Flavor Foundation)**
In a large bowl, combine the chicken pieces with yogurt, ginger-garlic paste, lemon juice, turmeric powder, red chili powder, garam masala, and salt. Mix well to ensure every piece of chicken is coated in that glorious marinade. Cover the bowl and refrigerate for at least 2 hours, or preferably overnight. The longer it marinates, the more flavorful the chicken will be. Think of it as a spa day for your chicken!
**Step 2: Preparing the Rice (The Fluffy Cloud)**
Wash the basmati rice thoroughly under cold running water until the water runs clear. This removes excess starch and prevents the rice from becoming sticky. Soak the rice in water for 30 minutes. This helps the rice cook evenly and become extra fluffy.
In a large pot, bring 4 cups of water (or chicken broth) to a boil. Add bay leaf, green cardamoms, cloves, cinnamon stick, oil, and salt. Drain the soaked rice and add it to the boiling water. Bring it back to a boil, then reduce the heat to low, cover the pot, and simmer for 15-20 minutes, or until the rice is cooked but still slightly firm. Fluff the rice with a fork and set aside.
**Step 3: Cooking the Biryani Gravy (The Aromatic Heart)**
Heat oil in a large, heavy-bottomed pot or Dutch oven over medium heat. Add sliced onions and cook until golden brown and caramelized, stirring occasionally. This may take 15-20 minutes, but trust me, it’s worth the effort. Caramelized onions add a depth of flavor that is simply irresistible.
Add ginger-garlic paste and green chilies and sauté for another minute until fragrant. Add chopped tomatoes, turmeric powder, red chili powder, coriander powder, cumin powder, and garam masala. Cook until the tomatoes are softened and the oil starts to separate from the gravy.
Add the marinated chicken to the gravy and cook until the chicken is cooked through and tender, stirring occasionally. Add chopped cilantro and mint and mix well.
**Step 4: Layering the Biryani (The Art of Construction)**
This is where the magic happens! In the same pot or Dutch oven, start layering the biryani. Spread a layer of cooked rice evenly over the chicken gravy. Sprinkle some fried onions, chopped cilantro, and chopped mint over the rice. Repeat the layers, alternating between rice and chicken gravy, until all the ingredients are used up.
Pour the saffron milk evenly over the top layer of rice (if using). Drizzle the melted ghee over the top layer of rice.
**Step 5: Dum Cooking (The Secret to Perfection)**
Cover the pot tightly with a lid. You can also seal the lid with dough or aluminum foil to prevent any steam from escaping. This process is called “dum cooking,” and it allows the flavors to meld and deepen.
Place the pot over very low heat (or use a heat diffuser) and cook for 20-25 minutes. Alternatively, you can bake the biryani in a preheated oven at 300°F (150°C) for 20-25 minutes.
**Step 6: Serving and Enjoying (The Grand Finale)**
Turn off the heat and let the biryani rest for 10 minutes before opening the lid. This allows the flavors to settle. Gently fluff the biryani with a fork, being careful not to break the rice grains. Serve hot with raita (yogurt dip) and your favorite Indian accompaniments.
Troubleshooting Your Biryani: Common Issues and Solutions
Even the most seasoned cooks can run into a few snags along the way. Here are some common biryani problems and how to fix them:
- **Rice is Mushy:** You probably added too much water or cooked the rice for too long. Next time, reduce the amount of water or cooking time. Soaking the rice beforehand also helps prevent mushiness.
- **Chicken is Dry:** You may have overcooked the chicken. Make sure to use chicken thighs instead of breasts, as they are more forgiving. Also, don’t overcook the chicken in the gravy.
- **Biryani is Bland:** You probably didn’t use enough spices or didn’t marinate the chicken long enough. Don’t be afraid to experiment with different spices and adjust the quantities to your liking.
- **Biryani is Too Spicy:** You added too many green chilies or too much red chili powder. Next time, reduce the amount of chilies or chili powder. You can also add a dollop of yogurt or raita to cool down the heat.
Spice Up Your Life: Exploring Different Biryani Variations
Once you’ve mastered the basic chicken biryani, the possibilities are endless! Here are a few variations to get your creative juices flowing:
- **Vegetable Biryani:** Replace the chicken with mixed vegetables like carrots, peas, potatoes, and cauliflower.
- **Lamb or Beef Biryani:** Substitute the chicken with lamb or beef, adjusting the cooking time accordingly.
- **Egg Biryani:** Add hard-boiled eggs to the layers of biryani for a protein-packed meal.
- **Prawn Biryani:** Use prawns instead of chicken for a delicious seafood twist.
Authentic Indian Restaurant-Style Chicken Biryani is more than just a meal; it’s a celebration of flavor, culture, and culinary artistry. So, gather your ingredients, put on some Bollywood music, and get ready to create a biryani masterpiece that will transport you to the vibrant streets of India. Happy cooking!
Conclusion for Authentic Indian Restaurant-Style Chicken Biryani: An Amazing Ultimate Recipe:
This Authentic Indian Restaurant-Style Chicken Biryani recipe is truly an experience. It is a journey for your taste buds, offering a symphony of flavors and textures that will leave you craving more. From the aromatic basmati rice to the tender, flavorful chicken, every element is carefully crafted to create a dish that’s both satisfying and impressive. This recipe offers a wonderful way to create restaurant quality biryani in your home. Now, gather your spices, put on your apron, and prepare to embark on a culinary adventure. You might just surprise yourself with how amazing it turns out!
Print
Authentic Indian Restaurant-Style Chicken Biryani: An Amazing Ultimate Recipe
Delicious authentic indian restaurant-style chicken biryani: an amazing ultimate recipe recipe with detailed instructions and nutritional information.
- Total Time: 35 minutes
- Yield: 4 servings
Ingredients
- Chicken pieces (bone-in, skinless): 1 kg
- Basmati rice: 750g (soaked for 30 minutes)
- Onions: 3 large, thinly sliced
- Tomatoes: 2 large, chopped
- Ginger-garlic paste: 2 tablespoons
- Green chilies: 4-6, slit
- Yogurt: 1 cup
- Biryani masala: 3-4 tablespoons
- Saffron strands: 1/4 teaspoon (soaked in 2 tablespoons of warm milk)
Instructions
- Step 1: Marinate the chicken: In a large bowl, combine the chicken with ginger-garlic paste, yogurt, biryani masala, and salt to taste. Mix well and let it marinate for at least 2 hours (or overnight in the refrigerator).
- Step 2: Fry the onions: Heat oil in a large, heavy-bottomed pot or Dutch oven. Fry the sliced onions until golden brown and crispy. Remove half of the fried onions and set aside for garnish.
- Step 3: Cook the chicken: In the same pot, add the marinated chicken. Cook on medium-high heat, stirring occasionally, until the chicken is browned and the yogurt has reduced. Add the chopped tomatoes and green chilies. Cook until the tomatoes are softened and the oil starts to separate.
- Step 4: Parboil the rice: In a separate pot, bring water to a boil with salt and a few whole spices (like bay leaf, cardamom, cloves). Add the soaked rice and parboil it until it's about 70% cooked. Drain the rice and set aside.
- Step 5: Layer and assemble: Layer half of the parboiled rice over the chicken. Sprinkle with some saffron milk and fried onions. Add the remaining rice, saffron milk, and fried onions on top. Drizzle with a little ghee (clarified butter).
- Step 6: Dum cooking: Cover the pot tightly with a lid. You can seal the edges with dough or use a heavy object to weigh it down. Cook on low heat (dum) for 25-30 minutes. Remove from heat and let it rest for 10 minutes before opening. Serve hot with raita.
Notes
- For longer storage, portion the biryani into airtight containers after it has cooled completely and freeze for up to 2 months.
- Reheat biryani gently in a microwave with a splash of water or stock to prevent it from drying out.
- Serve your biryani with a cooling cucumber raita and a side of papadums for a complete and delightful Indian feast.
- Chef's tip: Don't skip the overnight marination; it allows the chicken to fully absorb the flavors and become incredibly tender during cooking.
- Prep Time: 15 minutes
- Cook Time: 20 minutes
- Method: Stovetop
- Cuisine: American
FAQs :
How can I achieve the perfect layering in my Restaurant-Style Chicken Biryani?
Layering is the secret weapon! Start with a base of rice, then add a layer of the flavorful chicken gravy, followed by another layer of rice. Repeat until all the ingredients are used, finishing with a final layer of rice. This ensures every bite is an explosion of taste. Don’t be afraid to get creative with your layers, adding fried onions, cilantro, and mint between them for an extra burst of flavor. Think of it as building a delicious, edible lasagna, but with aromatic rice and tender chicken!
What kind of rice works best for this Authentic Chicken Biryani recipe?
Basmati rice is the undisputed champion! Its long, slender grains stay separate and fluffy, creating that signature biryani texture. Before cooking, rinse the rice thoroughly under cold water until the water runs clear to remove excess starch. This prevents the rice from becoming sticky. For an extra fluffy result, soak the rice for at least 30 minutes before cooking. Trust me, this simple step makes a world of difference. You’ll have perfectly cooked rice that complements the rich flavors of the chicken.
Can I make this Authentic Chicken Biryani recipe spicier?
Absolutely! If you’re a spice aficionado like me, feel free to turn up the heat. Add more green chilies to the chicken marinade and gravy. You can also include a pinch of cayenne pepper or red chili powder for an extra kick. Don’t be shy! Experiment with different types of chilies to find your preferred level of spiciness. Just remember to taste as you go, so you don’t accidentally blow your taste buds off. A little heat can elevate this biryani to a whole new level.
How do I prevent the chicken from drying out in my Authentic Chicken Biryani?
Nobody wants dry chicken! The key is to marinate it for a good amount of time. Overnight is ideal, but at least 2-3 hours will do the trick. This allows the marinade to penetrate the chicken, keeping it moist and tender during cooking. Also, be sure to cook the chicken in the gravy until it’s almost fully cooked before layering it with the rice. This ensures the chicken stays juicy and flavorful throughout the entire biryani-making process. Trust me, patience is a virtue when it comes to juicy chicken biryani!


Leave a Comment