


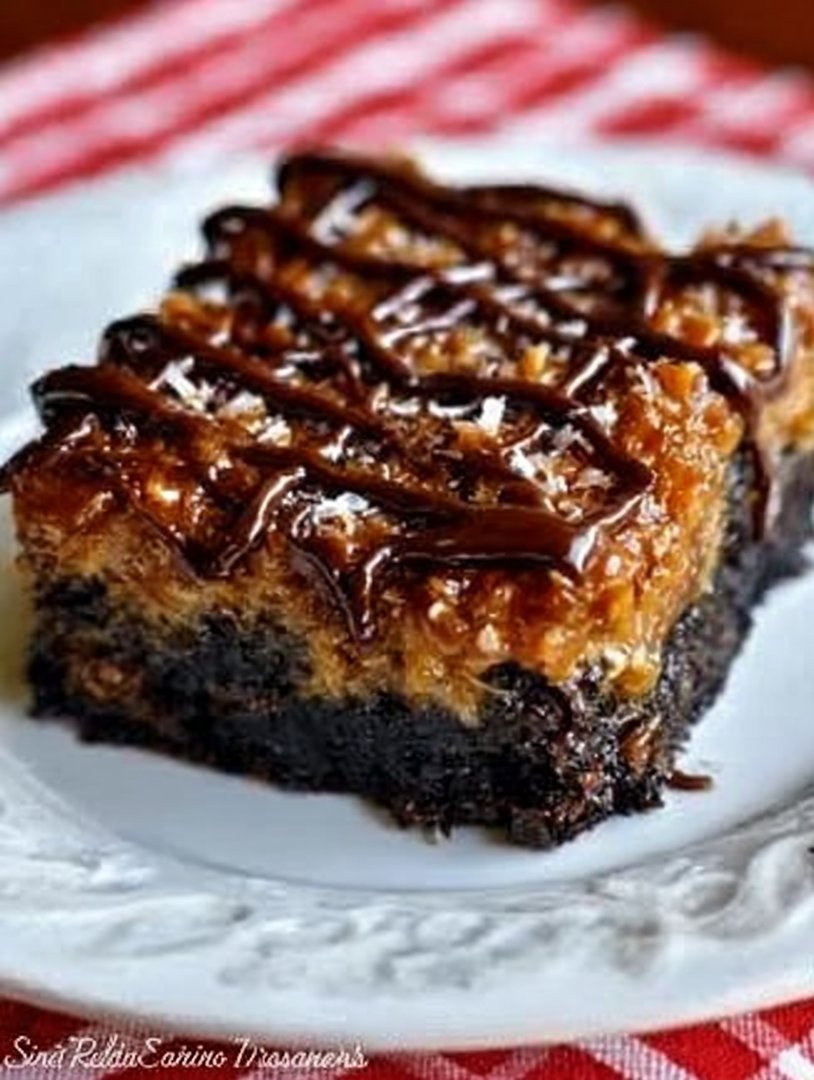
Forget everything you thought you knew about brownies. These Samoa Brownies aren’t just a dessert; they’re an experience, a symphony of rich chocolate, gooey caramel, and toasted coconut. Each bite delivers an irresistible crunch and a fudgy decadence that will transport your taste buds to pure bliss. Prepare for serious dessert adoration.
- Effortlessly achievable, this recipe brings gourmet bakery flavors right to your kitchen, perfect for bakers of all skill levels.
- A harmonious blend of deep chocolate, sweet caramel, and nutty toasted coconut ensures an unforgettable flavor explosion.
- Visually stunning, these Samoa Brownies feature beautiful layers and textures, making them a showstopper for any gathering.
- Versatile enough for potlucks, parties, or a cozy night in, these delicious treats always hit the spot with their unique appeal.
Ingredients for Samoa Brownies
Here’s what you’ll need to make this delicious dish:
- All-Purpose FlourThe foundation of our fudgy brownie base, providing structure without making them tough.
- Unsweetened Cocoa PowderEssential for that deep, rich chocolate flavor that makes these brownies so irresistible.
- Granulated SugarSweetens the brownies and helps create that desirable moist, chewy texture.
- Light Brown SugarAdds a nuanced sweetness and an extra layer of moisture, contributing to the ultimate fudginess.
- Unsalted ButterProvides richness and binds our brownie ingredients together for a truly decadent treat.
- Large EggsAct as a binder, adding structure, moisture, and helping the brownies achieve their signature chewiness.
- Vanilla Bean PasteA flavor enhancer that complements the chocolate beautifully, adding warmth and depth.
- SaltBalances the sweetness and amplifies all the other flavors, bringing them into perfect harmony.
- Sweetened Shredded CoconutThe star of our topping, offering a chewy texture and a delightful tropical sweetness.
- Caramel SauceThe gooey, luscious layer that brings the classic Samoa flavor profile to life. Choose a plant-based option if desired.
- Chocolate ChipsUsed for the drizzle, these add an extra touch of chocolatey goodness and visual appeal.
- Vegetable OilA small amount is perfect for thinning out the melted chocolate chips for easy drizzling.
The full ingredients list, including measurements, is provided in the recipe card directly below.
How to Make Samoa Brownies
Follow these simple steps to prepare this delicious dish: Step 1: Prepare the Brownie Batter Preheat your oven to 350°F (175°C). Line a 9×13 inch baking pan with parchment paper, leaving an overhang on the sides for easy removal, then lightly grease it. In a large microwave-safe bowl, melt the unsalted butter. Whisk in both granulated sugar and light brown sugar until thoroughly combined. Add the eggs one at a time, mixing well after each addition until the mixture is smooth and glossy. Stir in the vanilla bean paste. In a separate bowl, whisk together the all-purpose flour, unsweetened cocoa powder, and salt. Gradually add the dry ingredients to the wet ingredients, mixing until just combined. Be careful not to overmix the batter. Step 2: Bake the Fudgy Brownie Base Pour the brownie batter into the prepared baking pan and spread it evenly with a spatula. Bake for 25-30 minutes, or until a toothpick inserted into the center comes out with moist crumbs, but not wet batter. Avoid overbaking, as this will prevent your brownies from being delightfully fudgy. Once baked, remove the pan from the oven and allow the brownies to cool completely in the pan on a wire rack. Patience is key here; warm brownies will make for a messy caramel layer. Step 3: Toast the Coconut While the brownies are cooling, spread the sweetened shredded coconut in a single layer on a baking sheet. Bake in the preheated oven for 5-7 minutes, stirring halfway through, until the coconut turns golden brown and fragrant. Keep a close eye on it, as coconut can go from perfectly toasted to burnt very quickly. Remove from the oven and set aside to cool. This step is crucial for achieving that characteristic nutty flavor. Step 4: Assemble the Samoa Brownies Once the brownies are completely cool, gently lift them out of the pan using the parchment paper overhang and place them on a cutting board or flat surface. Evenly spread a generous layer of caramel sauce over the cooled brownie base, extending it to the edges. Sprinkle the toasted coconut generously over the caramel layer, pressing it down lightly to ensure it adheres well. Step 5: Drizzle with Chocolate In a small microwave-safe bowl, melt the chocolate chips with the vegetable oil in 30-second intervals, stirring until smooth. Transfer the melted chocolate to a piping bag with a small tip, or simply use a spoon. Drizzle the chocolate artfully over the coconut layer in thin lines, mimicking the classic cookie pattern. Allow the chocolate to set for at least 15-20 minutes at room temperature, or briefly in the refrigerator, before slicing. Step 6: Slice and Serve Once the chocolate drizzle has set, use a sharp, warm knife to cut the Samoa Brownies into squares or rectangles. Clean your knife between cuts for the cleanest possible edges. Transfer to plates and drizzle with extra caramel if you dare, for the perfect finishing touch.
The Anatomy of a Perfect Samoa Brownie
Ever wondered what makes a Samoa Brownie truly sing? It’s a delightful dance of textures and flavors, a carefully orchestrated symphony where each layer plays a vital role. First, we have the brownie base itself: fudgy, intensely chocolatey, and just chewy enough to satisfy. This isn’t a cakey brownie; it’s a dense, rich foundation designed to hold up to its decadent toppings. Getting this base right is non-negotiable for a truly authentic experience. It’s the canvas upon which our masterpiece is built, promising a deep chocolate experience from the very first bite. Next comes the luscious caramel layer. This isn’t just any caramel; it’s a sweet, sticky embrace that melts in your mouth, bridging the gap between the dark chocolate and the bright coconut. The gooey texture of the caramel provides a wonderful contrast to the chewiness of the brownie and the slight crispness of the toasted coconut. We recommend using a good quality, thick caramel sauce for the best results, ensuring it holds its form while delivering maximum flavor. The richness of this layer is what elevates these from simple brownies to an extraordinary dessert. Finally, the star of the show: the toasted coconut. This isn’t just shredded coconut sprinkled on top; it’s coconut that has been carefully toasted to golden perfection, bringing out its nutty, almost buttery notes. The toasting process intensifies its flavor and gives it a delightful chew and slight crunch that is utterly irresistible. This layer, coupled with a delicate chocolate drizzle, completes the iconic Samoa profile. Each element works in harmony, creating a complex yet perfectly balanced treat that’s guaranteed to disappear quickly from any dessert table.
Tips for Samoa Brownie Success
Achieving Samoa Brownie perfection is easily within your grasp with a few insider tricks. Firstly, do not, under any circumstances, overbake your brownie base. An overbaked brownie is a dry, crumbly tragedy, and we’re aiming for fudgy bliss here. Set a timer and check for those moist crumbs, pulling them out promptly. Underbaking slightly is always better than overbaking. The residual heat will continue to cook them as they cool, ensuring an ideal texture. When it comes to the caramel layer, ensure your brownies are completely cool before spreading. A warm brownie will cause the caramel to melt and seep into the cake, creating a sticky mess instead of a distinct, gooey layer. If your caramel sauce is too thick to spread easily, gently warm it in the microwave for a few seconds until it reaches a pourable consistency, but be careful not to make it too hot. You want it pliable, not runny. Toasting the coconut requires your undivided attention. Coconut can burn in a blink, transforming from a golden dream to an acrid nightmare. Keep it in a single layer, stir frequently, and stay by the oven. The moment it turns fragrant and golden, pull it out immediately. For the chocolate drizzle, a small squeeze bottle or a zip-top bag with the corner snipped off works wonderfully for creating neat lines. If your melted chocolate is too thick, a tiny bit more vegetable oil will thin it out beautifully without affecting the flavor.
Customizing Your Samoa Brownies
While the classic Samoa Brownies are a masterpiece on their own, there’s always room for a little personalization. Feeling extra adventurous? Consider adding a pinch of sea salt to your caramel layer. A touch of flaky sea salt scattered over the warm caramel will elevate the flavors and provide a delightful contrast, intensifying the sweetness and richness. It’s a sophisticated twist that always impresses. For those who love extra crunch, a sprinkling of finely chopped pecans or walnuts could be added to the toasted coconut layer. The nutty crunch of the additional nuts would complement the coconut beautifully, adding another dimension of texture and flavor. Just be sure to toast them lightly alongside your coconut for maximum impact. You could even swirl a little bit of peanut butter into your caramel for a unique, savory-sweet variation. If you are a serious chocolate fiend, consider adding a handful of mini chocolate chips to your brownie batter before baking. This will create pockets of melted chocolate within the fudgy base, enhancing the overall chocolate experience. For a slightly different flavor profile, try using a dark chocolate caramel sauce or even a white chocolate drizzle instead of traditional semi-sweet, opening up a world of delightful possibilities for your Samoa Brownies.
Storage and Enjoyment
These delectable Samoa Brownies are so good, they rarely last long enough to worry about storage! However, if you happen to find yourself with leftovers (a rare and wonderful problem), proper storage ensures they remain fresh and delicious. Store your brownies in an airtight container at room temperature for up to 3-4 days. This helps maintain their fudgy texture and prevents the coconut from drying out. For longer storage, you can refrigerate them for up to a week. If refrigerating, consider bringing them back to room temperature before serving for the best texture and flavor. The caramel and brownie will soften beautifully once out of the cold. You can also freeze individual Samoa Brownies for up to 2-3 months. Wrap each brownie tightly in plastic wrap, then place them in an airtight freezer-safe container. Thaw them at room temperature for a few hours, and they’ll taste almost as good as freshly baked. Enjoy every single bite of these irresistible treats!
The Accidental Discovery of Sunshine on a Plate
It all started with a craving for two classics: rich, fudgy brownies and those iconic coconut caramel cookies. One rainy afternoon, a mad scientist’s spark ignited. What if I married them? The kitchen became my laboratory, and after a few delightfully messy attempts, these Samoa Brownies were born—pure, unexpected sunshine in every glorious bite.
Life, much like a perfectly baked dessert, often surprises us with its most delightful creations when we least expect them. My journey to mastering the art of Samoa Brownies began quite by accident, spurred by a relentless sugar craving and a refrigerator that whispered sweet nothings about leftover coconut flakes. I was aiming for a standard chocolate brownie, but my mind, a mischievous culinary matchmaker, kept picturing the irresistible combination of toasted coconut, gooey caramel, and rich chocolate found in those beloved cookies. The idea seemed audacious, almost sacrilegious to some brownie purists, but my taste buds insisted it was a stroke of genius.
The Genesis of a Brilliant Idea
There’s something inherently magical about the flavors of a classic Samoa cookie: the earthy crunch of toasted coconut, the buttery pull of a golden caramel, all enrobed in a cloak of dark chocolate. And then there’s the brownie, a dense, fudgy beacon of chocolatey comfort. Separately, they are titans of dessert. Together? Well, I imagined a harmonious union, a culinary power couple destined for greatness. The initial thought was simple: take a fantastic brownie, then adorn it with the essence of its tropical-inspired cookie cousin. My internal monologue, a constant stream of food-related debates, finally conceded that this was a gamble worth taking. It was less about following a recipe and more about chasing a delicious dream.
More Than Just a Cookie
What unfolded in my kitchen was more than just a topping experiment; it was an alchemy of textures and tastes. These weren’t simply brownies with things piled on top; they were a thoughtful, layered construction designed to deliver an explosion of flavor with every mouthful. My first batch was, shall we say, “rustic.” The caramel had a mind of its own, and the chocolate drizzle looked more like abstract art than neat stripes. But even in their imperfect glory, the flavors sang. Friends, initially skeptical of my “Franken-dessert,” took one bite and their eyes widened in delightful surprise. That moment, witnessing the sheer joy on their faces, confirmed it: I had accidentally stumbled upon a masterpiece. The Samoa Brownies had arrived, and they were here to stay.
Perfecting the Cooking Process
For ultimate efficiency, begin by baking the brownie base until just set. While it cools slightly, prepare the sticky coconut layer. Next, whisk together the luscious caramel, allowing it to cool a bit before spreading. Finally, melt and drizzle the chocolate, creating those signature stripes. This sequence ensures smooth transitions and perfectly layered Samoa Brownies.
Crafting the Fudgy Brownie Foundation
Every magnificent edifice needs a strong foundation, and our Samoa Brownies are no exception. We start with a rich, fudgy brownie base, designed to be dense and chocolatey, providing the perfect counterpoint to the sweet layers above. Begin by melting unsalted butter with granulated sugar until the sugar starts to dissolve, creating a shiny, dark pool of sweetness. This step is crucial for that signature crackly top. Once slightly cooled, vigorously whisk in large eggs and a splash of pure vanilla bean paste until the mixture is lightened and airy. This aeration brings a wonderful texture to the finished brownie. Gently fold in good quality cocoa powder, all-purpose flour, and a pinch of salt until just combined. The key here is not to overmix, as that can lead to a tough brownie. Pour this glorious batter into a prepared baking pan and bake until a toothpick inserted into the center comes out with moist crumbs, but not wet batter. A slightly underbaked brownie is always preferable for ultimate fudginess.
The Irresistible Coconut Layer
While your brownie base cools, it’s time to create the iconic chewy coconut layer that gives these Samoa Brownies their undeniable character. Begin by toasting unsweetened shredded coconut flakes in a dry skillet over medium-low heat. Stir constantly, as coconut can go from perfectly golden to burnt in a matter of seconds. The aroma alone will transport you to a tropical paradise! Once beautifully golden and fragrant, remove it from the heat. In a bowl, combine the toasted coconut with sweetened condensed milk and a touch of melted butter. This mixture will be sticky and wonderfully fragrant. Press this heavenly coconut concoction firmly and evenly over the cooled brownie base. A flat spatula or even your clean hands can help achieve a perfectly uniform layer. This careful pressing ensures that the coconut layer holds its shape and provides that satisfying chewiness we all adore.
That Golden River of Caramel
Now, for the pièce de résistance: the buttery, gooey caramel that ties all the flavors together. Making homemade caramel might sound intimidating, but I promise it’s surprisingly simple and infinitely more delicious than anything store-bought. In a saucepan, combine unsalted butter, light brown sugar, and a generous splash of heavy cream. Bring this mixture to a gentle boil over medium heat, stirring continuously to prevent scorching. Allow it to simmer for about five to seven minutes, continuing to stir, until it thickens and reaches a beautiful golden-amber hue. A good way to test for readiness is to drip a small amount onto a cold plate; if it holds its shape and is sticky, it’s ready. Remove it from the heat and stir in a teaspoon of vanilla bean paste and a pinch of salt to balance the sweetness. Let the caramel cool slightly before pouring it evenly over the coconut layer. This slight cooling prevents the layers from melding too much and helps the caramel set beautifully.
The Signature Chocolate Drizzle
No Samoa Brownies would be complete without their distinctive chocolate stripes. This final flourish adds both visual appeal and another layer of rich chocolate flavor. Melt your favorite chocolate chips or chopped chocolate (milk or semi-sweet work wonderfully) in a microwave-safe bowl in 30-second intervals, stirring between each, or over a double boiler. For a super smooth drizzle, you can add a tiny bit of coconut oil or shortening to the chocolate as it melts. Once smooth and glossy, transfer the melted chocolate to a piping bag with a small round tip, or simply snip a tiny corner off a zip-top bag. Drizzle the chocolate decoratively across the caramel layer, creating those iconic parallel lines. Let the brownies set completely before slicing, preferably by chilling them in the refrigerator for an hour or two. This firming-up process ensures clean, sharp cuts and allows the flavors to fully meld into a cohesive, delectable whole.
Add Your Touch
Feel free to personalize these decadent Samoa Brownies! Swap milk chocolate for dark chocolate in the drizzle for a richer finish, or sprinkle a pinch of flaky sea salt over the caramel for an irresistible sweet and savory kick. You could even add chopped pecans to the brownie batter for extra crunch.
Beyond the Classic: Creative Swaps
While the classic Samoa Brownies recipe is undoubtedly perfect as is, part of the joy of home baking is making a dish uniquely yours. Don’t shy away from experimenting with different chocolate varieties for the drizzle. A high-quality dark chocolate will lend a more sophisticated, intense cocoa flavor, while white chocolate could add a contrasting sweetness and visual pop. For those who adore a nutty element, stirring in a handful of finely chopped roasted almonds or macadamia nuts into the brownie batter or even sprinkling them over the coconut layer before the caramel goes on can add a delightful textural dimension and depth of flavor. Think of these as your canvas; the possibilities are as endless as your imagination.
Elevating the Flavor Profile
Small tweaks can lead to big flavor payoffs. A generous sprinkle of flaky sea salt over the warm caramel layer, just before the chocolate drizzle, is a game-changer. It creates an incredible sweet and savory dynamic that will have everyone reaching for another piece. If you want to lean into the tropical vibe even more, consider adding a few drops of coconut extract to the brownie batter or even the caramel itself. This subtle enhancement can amplify the overall “Samoa” experience. Remember, these are your treats, so feel empowered to adjust and adapt to your personal preferences. After all, the best recipes are those that taste like home, tailored precisely to your liking.
Storing & Reheating
Store your Samoa Brownies in an airtight container at room temperature for up to three days, or in the refrigerator for up to a week. For optimal freshness, bring them to room temperature before serving. While reheating isn’t typically necessary, a quick 10-second zap in the microwave can enhance their gooey texture.
Keeping Your Treats Fresh
Once you’ve invested time and love into creating these glorious Samoa Brownies, you’ll want to ensure they stay fresh and delicious for as long as possible. For short-term storage, an airtight container at room temperature is ideal, keeping them soft and chewy for up to three days. If you’ve made a larger batch or want to enjoy them throughout the week, pop them into an airtight container and store them in the refrigerator for up to seven days. For even longer preservation, these brownies freeze beautifully. Wrap individual squares tightly in plastic wrap, then place them in a freezer-safe bag or container for up to two months. Thaw them at room temperature for a few hours before serving.
Reviving the Gooey Goodness
While these Samoa Brownies are utterly delightful straight from the fridge or at room temperature, a little warmth can work wonders, especially for bringing back that fresh-baked gooeyness. If you’ve stored them in the refrigerator, allow them to come to room temperature for about 15-20 minutes before indulging. For an extra special treat, place an individual brownie in the microwave for a mere 10-15 seconds. This brief warming will soften the caramel and chocolate, creating a melty, irresistible texture that truly enhances the experience. Just be careful not to overheat, or your perfectly layered masterpiece might turn into a delicious, but shapeless, puddle.
- For fudgy Samoa Brownies, avoid overbaking the base. A slightly underbaked brownie ensures a melt-in-your-mouth texture, perfectly complementing the chewy coconut and soft caramel.
- Achieve uniform layers by pressing down the coconut layer firmly with a spatula before adding the caramel. This creates a neat division and a satisfying bite every time.
- For perfectly clean chocolate stripes, use a piping bag with a small round tip or a zip-top bag with the corner snipped. Work swiftly before the chocolate sets.
My family devoured these Samoa Brownies so fast I barely got a second piece! My niece declared them “better than cookies,” which is the highest praise any baker can receive. That moment solidified their place as a cherished household favorite.
Conclusion for Samoa Brownies
These Samoa Brownies are a true testament to culinary creativity, blending the beloved flavors of coconut, caramel, and chocolate into one irresistible bar. They offer a delightful escape with every rich, chewy bite. Whether you’re baking for a special occasion or simply treating yourself, this recipe delivers maximum delight with minimal fuss. Embrace the joy of creating these tropical-inspired dessert bars and watch them disappear from the plate faster than you can say “Aloha!”
Print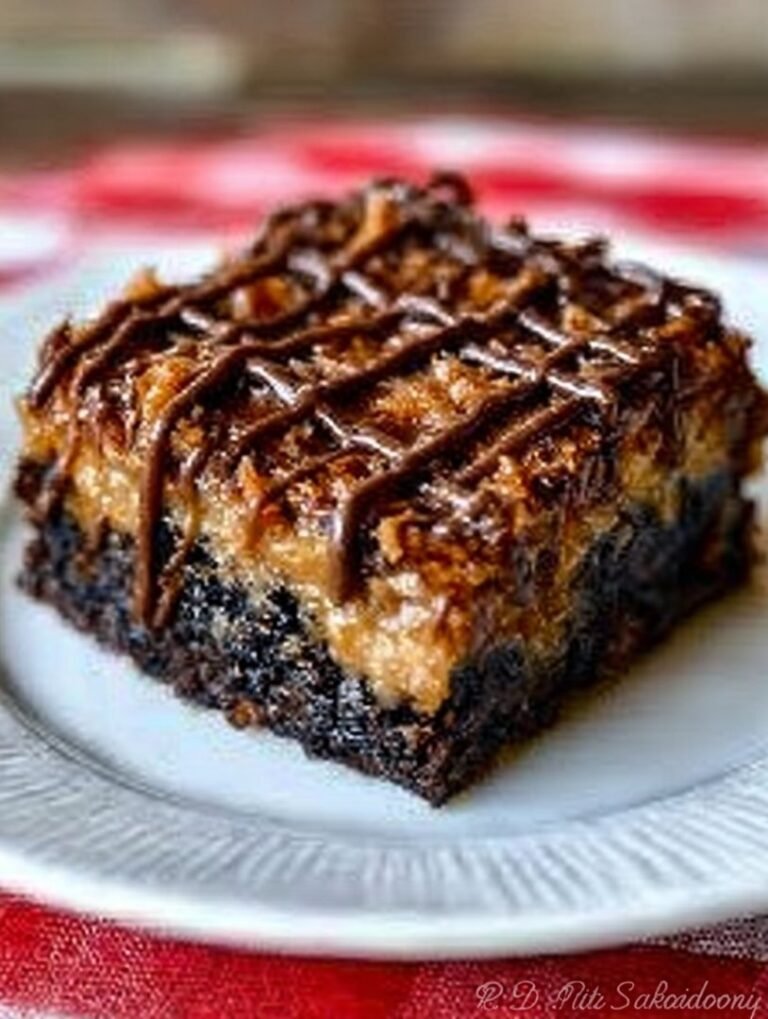
Samoa Brownies
Recreate the iconic cookie magic with these Samoa Brownies! Rich, gooey chocolate meets crispy toasted coconut for an irresistible treat. Dive into the step-by-step guide and nutritional breakdown.
- Total Time: 35 minutes
- Yield: 4 servings 1x
Ingredients
- 1 cup (2 sticks) unsalted butter, melted
- 1 ½ cups granulated sugar
- 3 large eggs
- 1 teaspoon vanilla bean paste
- ¾ cup all-purpose flour
- ¾ cup unsweetened cocoa powder
- ½ teaspoon salt
- 1 cup dulce de leche or thick caramel sauce
- 1 ½ cups sweetened shredded coconut
- ½ cup semi-sweet chocolate chips (for drizzle)
Instructions
- Step 1: Preheat oven to 350°F (175°C). Line a 9×13 inch baking pan with parchment paper, leaving an overhang on the sides for easy removal. In a large bowl, whisk together the melted butter and granulated sugar until well combined. Beat in the eggs one at a time, then stir in the vanilla powder until smooth. Gradually fold in the all-purpose flour, cocoa powder, and salt until just combined; do not overmix. Pour the brownie batter into the prepared pan and spread evenly.
- Step 2: Bake the brownie base for 20-25 minutes, or until the edges are set but the center is still slightly gooey. While the brownies are baking, spread the sweetened shredded coconut on a separate baking sheet and toast in the oven alongside the brownies for 5-7 minutes, stirring occasionally, until golden brown. Watch carefully to prevent burning. Remove toasted coconut from the oven.
- Step 3: In a medium bowl, combine the toasted shredded coconut with the dulce de leche (or caramel sauce), mixing until the coconut is fully coated. If the caramel is too thick to mix, warm it slightly in the microwave for 15-20 seconds.
- Step 4: Carefully remove the partially baked brownies from the oven. Evenly spread the caramel-coconut mixture over the warm brownie layer. Return the pan to the oven and continue baking for another 15-20 minutes, or until the coconut caramel topping is bubbly and the brownies are set.
- Step 5: Remove the brownies from the oven and let them cool completely in the pan on a wire rack. Once cooled, melt the semi-sweet chocolate chips in a microwave-safe bowl in 30-second intervals, stirring until smooth. Drizzle the melted chocolate artistically over the cooled brownies. Allow the chocolate to set before slicing and serving.
Notes
- Store these delightful Samoa Brownies in an airtight container at room temperature for up to 3-4 days to keep them perfectly moist and chewy.
- If you prefer a warm, gooey treat, gently reheat individual squares in the microwave for 10-15 seconds; just enough to soften the caramel and chocolate without melting completely.
- Elevate your Samoa Brownie experience by serving a warm square with a scoop of vanilla bean ice cream or a dollop of fresh whipped cream for an irresistible dessert.
- For perfectly clean slices and beautifully set chocolate drizzle, be sure to let your Samoa Brownies cool completely in the pan before attempting to cut them; patience is key for presentation!
- Prep Time: 15 minutes
- Cook Time: 20 minutes
- Method: Stovetop
- Cuisine: American
Leave a Comment