


Have you ever stared longingly at a dessert garnish, wondering how that humble orange peel became a sparkling jewel? MakingCandied Orange Slicesisn’t just cooking; it’s an alchemy of sugar and time, turning bitterness into bliss. This recipe takes the vibrant flavor of fresh citrus and transforms it into an elegant, chewy confection that is perfect for holiday gifting or just elevating your Tuesday night cake. Get ready to turn your kitchen into a fragrant, syrupy wonderland.
- The process is surprisingly straightforward, requiring mostly patience while the fruit gently simmers and absorbs the sweet syrup.
- Experience an incredible flavor profile that perfectly balances the sharp, intense citrus oil with highly concentrated sweetness.
- These glittering orange confectionary jewels add professional-level visual appeal to any homemade cake, tart, or ice cream dish.
- The finished preserved citrus rounds are incredibly versatile, ideal for elegant garnishes, dipping in chocolate, or sophisticated snacking.
Ingredients for Candied Orange Slices
Here’s what you’ll need to make this delicious dish:
- OrangesChoose firm, unblemished Navel or Valencia oranges with thick skins, as these hold their shape best during the long simmering process.
- Granulated SugarThis provides the necessary crystal structure and intense sweetness required to draw moisture from the fruit and preserve the slices.
- WaterNeeded to create the initial simple syrup base; use clean, filtered water for the best results.
- Pinch of Salt (Optional)A tiny pinch can help balance the intense sweetness and make the orange flavor pop.
The full ingredients list, including measurements, is provided in the recipe card directly below.
How to Make Candied Orange Slices
Follow these simple steps to prepare this delicious dish:
Step 1: Preparation and Blanching the Citrus
Wash the oranges thoroughly. Using a sharp knife, slice the oranges uniformly thin, aiming for about 1/8 to 1/4 inch thickness; any thicker and they won’t fully candy. Place the slices in a large pot and cover them completely with cold water. Bring the water to a boil, then immediately drain the oranges. Repeat this blanching process two more times (three total blanched cycles). This crucial step removes the excessive bitterness from the pith, ensuring your final preserved citrus rounds are pleasantly sweet, not acrid.
Step 2: Creating the Infusion Syrup
In the same large pot, combine the granulated sugar and the required amount of fresh water. Bring this mixture to a rolling boil over medium-high heat, stirring only until the sugar is fully dissolved and the liquid is completely clear. Reduce the heat immediately to maintain a gentle simmer. You must ensure the sugar is fully dissolved before adding the fruit, otherwise, the slices might crystalize later.
Step 3: The Long Simmer
Carefully add the drained orange slices to the simmering syrup, ensuring they are fully submerged. If they float, place a small heatproof plate on top of them to keep them pressed down under the syrup. Maintain a very low, slow simmer—the syrup should barely bubble. Cook the slices for 90 to 120 minutes. You know they are ready when the white pith becomes translucent and the pulp looks slightly caramelized.
Step 4: Cooling and Drying
Remove the pot from the heat and allow the orange slices to cool completely in the syrup. This cooling step allows the citrus fibers to fully absorb the remaining sugary liquid, ensuring maximum chewiness and flavor. Once cooled, use tongs to carefully lift each slice from the syrup. Lay them flat on a wire rack placed over a baking sheet to catch any drips. Let the slices air dry for 12 to 24 hours until they are tacky but no longer sticky.
Step 5: Optional Sugar Coating
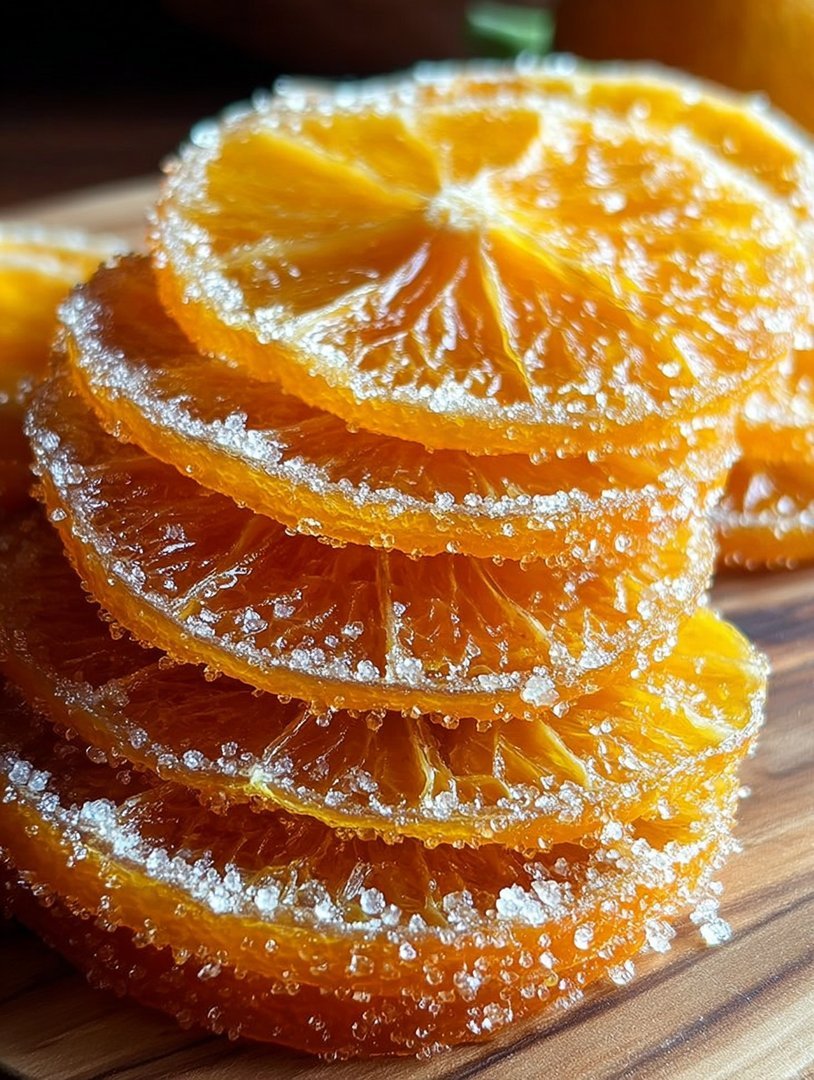
For a beautiful frosted finish, roll the driedCandied Orange Slicesgently in extra granulated sugar or superfine sugar. Transfer to plates and drizzle with the leftover syrup for the perfect finishing touch, or simply enjoy them as they are.
Mastering the Science of Sugar and Citrus
The magic behind truly phenomenalCandied Orange Sliceslies in understanding the osmotic process—a fancy word for a simple exchange. When you simmer the citrus in a dense sugar solution, the concentrated sugar molecules slowly migrate into the orange cells, while the water and bitter compounds are simultaneously drawn out. This preservation technique not only sweetens the fruit but fundamentally changes its structure, making the peel pliable and translucent. The key is low and slow heat. Rushing the simmer causes the sugar to crystallize too quickly or boil the orange flesh apart. You are aiming for a gentle, two-hour exchange where the cell walls remain intact, leading to a perfectly chewy, glossy result.
Why Blanching is Non-Negotiable
If you’ve ever tried to candy oranges without the blanching step, you probably ended up with something intensely bitter, forcing you to grimace while tossing your hard work. Oranges contain compounds, especially in the thick, white pith, that are unpleasantly sharp and concentrated. The triple blanching process—boiling the slices briefly three times and discarding the water—leaches out these harsh flavors. It’s a small investment of time that pays massive dividends in the final product’s flavor profile, ensuring that only the bright, floral essence of the orange zest remains, beautifully contrasted by the sweetness of the syrup. Skimp on the blanching, and you risk failure; embrace the blanching, and delicious success awaits.
Storing and Preserving Your Citrus Jewels
Proper storage ensures your beautiful sugared citrus disks remain fresh and perfectly textured for weeks. Once the slices are fully dried and tacky to the touch, store them in an airtight container at room temperature. Layer them between sheets of parchment paper to prevent sticking. They will keep beautifully for up to three weeks, provided they are stored away from direct humidity or heat. For longer storage, you can easily freeze them. Lay the slices in a single layer on a baking sheet until solid, then transfer them to a freezer-safe bag. They thaw quickly at room temperature and retain their exquisite texture, making them ideal for prepping well in advance of a major baking project.
Creative Ways to Use Your Sugared Citrus Disks
While popping these sweet, glittering jewels straight into your mouth is a perfectly acceptable use (and highly encouraged), their true potential shines when they are incorporated into other culinary creations. Think beyond the simple garnish. For a luxurious treat, dip half of each slice into tempered dark chocolate—the bitterness of the cocoa perfectly complements the intense sweetness of the preserved orange. These chocolate-dipped delights make fantastic homemade gifts, elegantly packaged in a small tin or box.
Elevating Everyday Desserts
Imagine your next vanilla pound cake or a batch of lemon poppyseed muffins adorned with these shimmering rounds. The resulting visual impact is stunning, transforming something simple into a centerpiece. You can also finely chop the dried slices and fold them into cookie dough or scone batter for a vibrant burst of flavor and chewiness. If you love homemade ice cream, slightly softened slices can be chopped and swirled into a classic vanilla base during the final freezing stages, creating a sophisticated orange ripple effect that delights every time.
Don’t Waste the Syrup!
A phenomenal byproduct of makingCandied Orange Slicesis the highly concentrated, flavorful syrup left behind in the pot. This is liquid gold, intensely flavored with both sugar and orange oil. Do not pour it down the drain! Strain the syrup through a fine-mesh sieve and store it in a sealed jar in the refrigerator. Use it to sweeten iced tea, brush over cake layers to keep them moist, or drizzle it over pancakes, waffles, or even Greek yogurt for an instant flavor upgrade. This syrup adds incredible depth to cocktails and mocktails, offering a vibrant citrus kick that commercial simple syrups simply cannot match. Maximize your kitchen efficiency by utilizing every bit of flavor from this process.
We all have that moment in the kitchen where ambition completely outpaces ability. Mine involved a tragically dense layer cake destined for a potluck, a cake so structurally unsound it looked like it was actively trying to escape the plate. I realized then that my culinary destiny did not lie in multi-tiered masterpieces, but in elegant simplicity—the kind of treat that looks infinitely harder than it actually is. Enter the world of citrus confit, specifically the magnificent, shimmering disks known as Candied Orange Slices.
Forget everything you think you know about dried fruit. These are not sad, chewy little pucks you forget in the back of your pantry. These are pieces of edible sunshine, translucent, sweet, and possessing a sophisticated, slightly bitter edge that makes them the perfect garnish or stand-alone indulgence. Once you master the simple technique of transforming ordinary oranges into glorious, glistening orange candy, your dessert game will elevate dramatically, all without requiring a structural engineering degree.
The Magic Behind the Gloss: Why Candying Works
The biggest hurdle people face when working with oranges in this capacity is the inherent bitterness lurking in the pith, that white, spongy layer beneath the brightly colored peel. If you skip the initial boiling steps, you will inevitably end up with something tasting vaguely like intensely sweet disappointment. The process of candying relies on osmosis: slowly drawing the water out of the fruit while replacing it, cell by cell, with heavy sugar syrup. This transformation requires patience, but the resulting texture—pliable, slightly chewy, and entirely non-bitter—is absolutely worth every minute.
We begin with a series of quick boils, or blanching, which is essentially a culinary spa treatment for the oranges. This rinse-and-repeat cycle washes away the intense bitterness and starts softening the peel. Think of it as preparing the orange structure to absorb the sweetness properly. Once blanched, the slices steep slowly in a syrup, absorbing the sweetness over an hour or two until they achieve that perfect, jewel-like transparency. The final, critical step is drying, where that gorgeous sugar layer crystallizes, giving these crystallized orange rounds their signature sparkle.
Choosing the Perfect Orange
While you might be tempted to grab the biggest naval orange you see, thin-skinned varieties actually work much better here. Valencia or Seville oranges are fantastic choices because their peels tend to hold up better during the simmering process, offering a firm but tender result. Whatever variety you select, make sure they are thoroughly washed. Since you are consuming the entire peel, any residual wax or dirt needs to be banished before the cooking commences. A quick scrub under hot water does the trick efficiently.
The Accidental Discovery of Sunshine on a Plate
I initially attempted to make orange marmalade, but accidentally left the slices simmering far too long. Instead of jam, I pulled out these shimmering, jewel-toned disks. The unexpected sweetness combined with that wonderful, zesty punch was an instant revelation, proving that sometimes, kitchen distraction is the secret ingredient.
Ingredients for Candied Orange Slices
- 4 large, firm oranges (preferably thin-skinned like Valencia or Seville)
- 4 cups granulated white sugar (for syrup)
- 4 cups water (for syrup)
- 1 cup additional granulated sugar (for coating)
- 1 teaspoon vanilla powder (optional, for depth)
The Step-by-Step Confession
Preparation:Start by slicing the oranges about 1/8 to 1/4 inch thick. Try to maintain consistent thickness so they cook evenly. Remove any seeds. For the blanching process, place the slices into a large saucepan and cover them generously with cold water. Bring this to a rolling boil, let it bubble vigorously for two minutes, then carefully drain the oranges and repeat the process two more times. This critical step guarantees a non-bitter final product.
The Syrup Bath:After the final blanching, return the slices to the clean saucepan. Combine the four cups of sugar and four cups of water to create your syrup base. Bring this mixture to a boil, stirring until the sugar completely dissolves. Once boiling, reduce the heat immediately to a gentle simmer. Add the vanilla powder if using.
Slow and Steady Wins:Carefully place the orange slices into the simmering syrup, ensuring they are mostly submerged. Let them simmer very gently for 90 minutes to two hours. The goal is transparency; the white pith should look glassy and translucent. Do not rush this stage, or the pith will remain chewy and opaque.
The Drying Phase:Once transparent, use tongs to remove the slices delicately and place them on a wire rack set over a baking sheet. Allow them to dry at room temperature for at least 12 hours, or until they feel slightly tacky but not wet. If your kitchen is particularly humid, you might need up to 24 hours to achieve the perfect surface dryness.
The Final Sparkle:Once sufficiently dried, gently roll the sugar-crusted citrus wheels in the extra cup of granulated sugar until fully coated. This step prevents sticking and adds that glorious crystallized texture. Alternatively, you can dip half the slice in high-quality dark chocolate for a truly decadent and beautiful treat.
Perfecting the Cooking Process
Always perform the three mandatory blanching steps first to eliminate bitterness from the pith. Next, prepare the syrup and ensure it reaches a gentle simmer before adding the slices. Finally, allow ample drying time, which is essential for achieving that desirable, non-sticky, crystallized exterior.
Add Your Touch
For a different flavor profile, infuse the syrup with star anise, a cinnamon stick, or a few cardamom pods during the simmering stage. You can also swap out the vanilla for a splash of rose water for a floral note. Try coating them in superfine turbinado sugar for an extra crunch.
Storing & Reheating
Store your finished crystallized orange rounds in an airtight container at room temperature for up to two weeks, layered between sheets of parchment paper. If they become tacky, simply toss them in fresh granulated sugar. They do not require refrigeration and should not be reheated.
My grandmother, who insists all desserts must contain chocolate, once tried these plain and declared them “barely acceptable.” The next time, when I dipped half in dark chocolate, she ate three before dinner, finally admitting these glittering treats were truly irresistible.
Expert Tips for Flawless Citrus Confit
-
Ensure your syrup only bubbles very slightly during the 90-minute simmer; if it boils too hard, the slices will tear and become mushy instead of firming up beautifully.
-
If you plan to dip the slices in melted chocolate, skip the final sugar rolling step; the chocolate adheres better to the tacky, unsugared surface.
-
Use the leftover citrus syrup! This intensely flavored liquid makes a phenomenal cocktail mixer, a drizzle for pancakes, or a sophisticated sweetener for iced tea.
Conclusion for Candied Orange Slices
These simple yet sophisticated candied orange slices elevate any dessert table, offering a beautiful balance of sweet and zesty bitterness. The key to success lies in patiently blanching the oranges to remove the pith’s harshness and allowing sufficient time for the syrup to penetrate the fruit fibers completely. Whether you use them to garnish a cake, dip them in chocolate, or simply savor them alone, these glistening rounds prove that the simplest ingredients often yield the most luxurious results. Embrace the slow simmer, and prepare to enjoy sunshine on a plate, crafted right in your own kitchen.
Print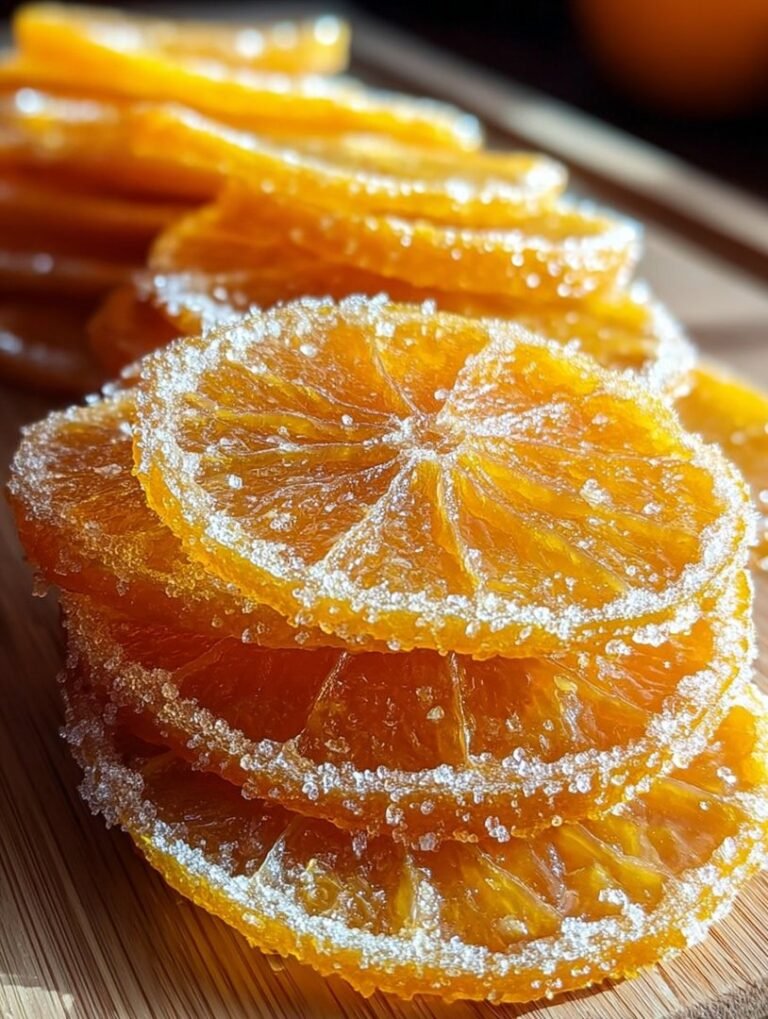
Candied Orange Slices
Achieve perfectly glossy, non-bitter candied orange slices using our crucial triple-blanching method. This recipe ensures a delicate chew and brilliant citrus flavor.
- Total Time: 35 minutes
- Yield: 4 servings 1x
Ingredients
- 4 large Navel oranges (preferably organic)
- 2 cups granulated sugar (for syrup)
- 1 cup water (for syrup)
- 8 cups water (for blanching)
- 1/2 cup extra fine granulated sugar (for coating)
- 1/4 teaspoon fine sea salt
Instructions
- Step 1: Slice the oranges thinly (about 1/8 to 1/4 inch thick). In a large pot, bring 8 cups of water to a boil. Add the orange slices and boil for 2 minutes, then drain immediately. Repeat this blanching process two more times, using fresh water each time, to remove the bitterness from the pith.
- Step 2: Combine the 2 cups of sugar, 1 cup of water, and the salt in a wide, heavy-bottomed pot. Bring the mixture to a boil over medium-high heat, stirring until the sugar is fully dissolved, creating the syrup base.
- Step 3: Reduce the heat to low and gently add the blanched orange slices to the simmering syrup, ensuring they are submerged. Simmer very gently for 45 to 60 minutes, or until the orange rinds become translucent and the slices appear glossy.
- Step 4: Using a fork or tongs, carefully remove the candied slices and arrange them in a single layer on a wire cooling rack placed over parchment paper. Allow the slices to air dry at room temperature for 12 to 24 hours until the surfaces are tacky but no longer wet.
- Step 5: Once dried, gently roll the candied orange slices in the 1/2 cup of extra fine granulated sugar until fully coated. Store the finished slices in an airtight container at room temperature.
Notes
- To prevent the candied slices from sticking together during long-term storage, layer them between sheets of parchment or wax paper inside the airtight container.
- If your stored slices become slightly soft due to humidity, simply place them back on a rack at room temperature for a few hours to allow excess moisture to evaporate and restore their tackiness.
- For an elegant touch, dip one half of the finished slice in tempered dark chocolate before the final sugar coating, or use them as a beautiful garnish atop cheesecake or ice cream.
- Do not skip or rush the three blanching cycles; this vital step is crucial for removing bitterness from the rind and pith, guaranteeing a perfectly sweet candy.
- Prep Time: 15 minutes
- Cook Time: 20 minutes
- Method: Stovetop
- Cuisine: American


Leave a Comment