

The store-bought packets are fine for emergencies, but nothing beats the satisfying, springy chew of trueHomemade Ramen Noodles. Imagine that savory aroma lifting from a bowl of perfectly balanced broth—it’s pure culinary magic. Forget everything you think you know about making pasta; this dough is a different beast entirely, promising the elasticity and texture necessary to cradle magnificent toppings. Get ready to ditch the dry stuff forever and elevate your soup game instantly.
- Achieve the quintessential ramen texture known askoshi, offering unparalleled springiness and resistance in every single bite.
- The process of crafting these alkaline noodles is surprisingly straightforward, requiring only minimal ingredients and basic kitchen equipment.
- Customize the thickness and shape of your fresh pasta, allowing you to perfectly pair the noodles with rich beef or delicate chicken broth.
- Creating these beautiful golden strands transforms a simple soup into a deeply satisfying, restaurant-quality culinary experience at home.
The Pursuit of the Perfect Chew: Why Homemade Ramen Noodles Reign Supreme
For years, I believed that excellent ramen required secret ingredients and a mysterious kitchen wizardry reserved only for experienced chefs operating out of tiny, dimly lit shops. Every attempt I made at home resulted in something palatable, yes, but decidedly missing that glorious, springy snap—the elusivekoshi—that separates the good from the transcendent. My journey finally led me to the revelation: the noodle is everything. It’s not just flour and water; it’s a delicate, high-stakes negotiation with alkalinity, hydration, and brute force.
Many home cooks shy away from attempting to makeHomemade Ramen Noodles, assuming it’s too complicated or messy. I am here to tell you that these fears are entirely unfounded, mostly perpetuated by those who want to keep the best secrets to themselves. Yes, it involves kneading, and yes, your shoulders might complain the next day, but the payoff is immense. This isn’t just making pasta; it’s engaging in a beautiful, ancient chemical process that changes the structure of the dough itself.
The secret weapon in achieving that characteristic ramen bounce iskansui, an alkaline solution traditionally made from mineral-rich water. Since finding truekansuioutside specialty stores can feel like a culinary scavenger hunt, we employ a clever and readily available substitute: baked baking soda. By baking standard baking soda, you chemically convert the sodium bicarbonate into sodium carbonate. This significantly raises the pH level, strengthening the gluten structure in the dough, which is what gives these delicious alkaline noodles their distinctive yellow hue and incredible bite.
Myth Busting: Ramen Dough vs. Standard Pasta Dough
Do not treat this recipe like the Italian pasta dough you might be familiar with. Throw out the olive oil and forget the eggs for now. Ramen dough is intentionally low-hydration and very firm—almost crumbly when you first bring it together. If your dough feels too sticky and easy to knead, you’ve gone too far! The resistance is crucial. That stiff dough is what allows the gluten network to develop into those powerful, interconnected strands, ready to withstand a boiling broth and still retain their satisfying chew. This process requires patience and persistence. You might need to step on the dough bag if your arms give out. (Don’t worry, it’s a legitimate, old-school technique, provided your feet are clean and you use a sturdy bag!)
Furthermore, these alkaline noodles are designed to absorb the flavorful broth much more efficiently than standard wheat pasta. Their surface texture and composition allow them to carry the richness of a deeply flavored chicken or mushroom stock right to your palate. This synergy between the liquid and the noodle is what elevates a simple soup into a complex meal. Mastering the balance of flour type and the precise amount of the alkaline solution is key to consistent success. Once you achieve that perfect batch of fresh noodles, you will find yourself refusing all lesser, dried imitations forever.
Ingredients for Homemade Ramen Noodles
Here’s what you’ll need to make this delicious dish:
- Bread Flour (High-Protein Flour)Select a flour with a high protein content (12–14%) as this ensures strong gluten development, which is vital for the desired chewiness.
- Baked Baking Soda (Kansui Substitute)This creates the necessary alkalinity in the water, giving the noodles their signature yellow color, texture, and springiness (koshi).
- Fine Sea SaltEssential for seasoning the dough and helping to regulate the speed and hydration of the gluten development during the resting phase.
- Ice-Cold Filtered WaterUsing very cold water helps control the dough’s temperature and prevents the gluten from over-developing prematurely during mixing.
- Cornstarch or Potato StarchUsed primarily for dusting to prevent the cut noodles from sticking together while they wait to be boiled.
The full ingredients list, including measurements, is provided in the recipe card directly below.
How to Make Homemade Ramen Noodles
Follow these simple steps to prepare this delicious dish:
Step 1: Preparing the Alkaline Solution
Preheat your oven to 300°F (150°C). Spread 3 tablespoons of baking soda thinly on a parchment-lined baking sheet. Bake for exactly one hour to convert it into sodium carbonate, which is ourkansuisubstitute. Allow the baked baking soda to cool completely before dissolving the required amount into the ice-cold filtered water along with the salt. Stir until fully dissolved, ensuring no granules remain.
Step 2: Mixing the Low-Hydration Dough
Place the high-protein bread flour into a large mixing bowl or the bowl of a stand mixer fitted with a dough hook. Slowly stream the alkaline water solution into the flour while mixing on the lowest speed. The dough will look incredibly dry and shaggy, resembling coarse crumbs—this is exactly what you want. Continue mixing until no loose dry flour remains, which typically takes 5 to 7 minutes.
Step 3: Kneading and Compacting the Dough
Transfer the crumbly dough mixture onto a clean surface. Using your hands, press and consolidate the crumbs into a cohesive mass. Because the dough is so stiff and low-hydration, traditional kneading methods are difficult. Flatten the dough, fold it, and then press down with your full weight. Alternatively, place the dough ball inside a heavy-duty, sealable plastic bag and repeatedly stomp on it to flatten and re-press the dough until it becomes relatively smooth and uniform. This forceful action is essential for developing gluten strength.
Step 4: Resting and Gluten Maturation
Once the dough forms a smooth, firm ball, wrap it tightly in plastic wrap to prevent any drying. Allow the dough to rest at room temperature for a minimum of 30 minutes, or ideally, up to 2 hours. This resting period is crucial for relaxing the aggressively developed gluten network, making the dough pliable enough to roll out and cut without tearing or shrinking excessively.
Step 5: Sheeting and Cutting the Noodles
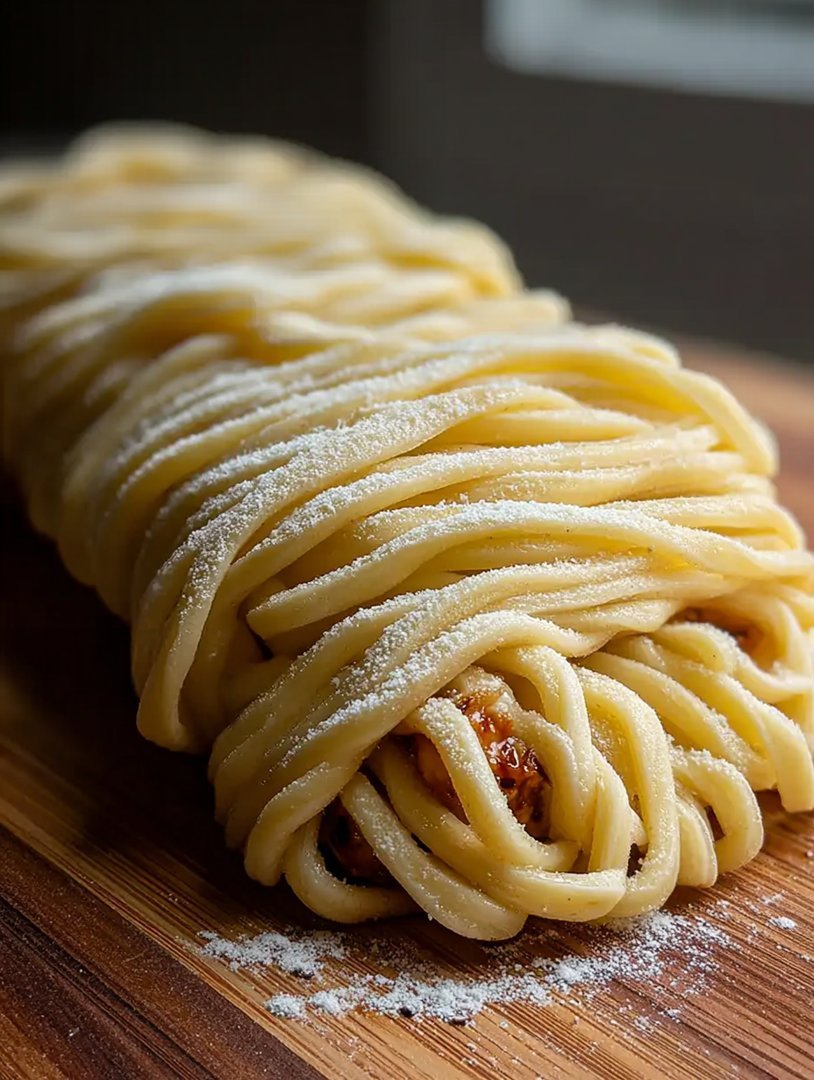
Divide the rested dough into four manageable portions. Working with one piece at a time, use a pasta machine to roll out the dough, starting at the widest setting. Fold the dough in half and pass it through again several times to smooth the edges. Gradually decrease the thickness setting, passing the sheet through each setting only once until you reach your desired thickness (typically settings 3 or 4 for classic ramen noodles). Dust the finished sheets heavily with starch, and then pass them through the ramen cutter attachment.
Step 6: Cooking and Preparing for Serving
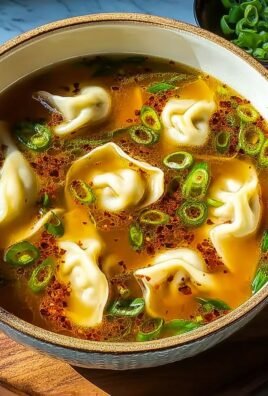
Bring a large pot of water to a vigorous boil. Drop the freshly cutHomemade Ramen Noodlesinto the boiling water, shaking off any excess starch first. Fresh noodles cook very quickly, usually between 60 and 90 seconds, depending on the thickness. Use a spider strainer to scoop the noodles out, drain them thoroughly, and immediately place them into bowls containing hot, prepared beef or turkey broth and your desired toppings.
Transfer to bowls immediately and submerge the fresh strands in steaming, savory broth for the perfect finishing touch.
Mastering the Technique: Troubleshooting and Storage Tips
The first time you try to make this alkaline pasta, you might encounter a few hiccups. Don’t worry, the process is forgiving, provided you understand the science behind the resistance. If your dough feels like concrete and won’t sheet easily, it might be slightly under-hydrated. Mist it lightly with water and try kneading it in again. If, conversely, the noodles feel soft or mushy after boiling, they were likely over-hydrated or needed more kneading to build sufficient gluten strength. Patience and a willingness to feel the dough are your greatest assets in this culinary endeavor.
The Importance of Precision in Alkaline Water
When dealing withkansui, even the slight variations in quantity can dramatically affect the outcome. Too much sodium carbonate makes the noodles taste soapy or overly brittle; too little, and you end up with standard, flabby pasta. Measure the baked baking soda and the water precisely. Using an electronic kitchen scale for the flour and water ratios is highly recommended, as volume measurements for flour can fluctuate wildly based on humidity and packing technique. Target a hydration level between 30% and 35% for optimal ramen texture.
Storage and Preparation for the Week Ahead
One of the best features of makingHomemade Ramen Noodlesis their versatility in storage. If you plan to use them immediately, they are ready to go after the final cut. However, if you want to prepare a large batch, you have two excellent options. For short-term storage (1-2 days), generously dust the nests of fresh noodles with cornstarch or potato starch, place them in an airtight container, and refrigerate. The starch prevents them from clumping into an unusable block.
For longer storage, freezing is the way to go. Flash-freeze the dusted noodle nests individually on a baking sheet until solid, then transfer them to freezer bags. They will keep perfectly for up to two months. When you are ready to use frozen noodles, do not thaw them. Simply drop the frozen nests directly into boiling water and add about 30 seconds to the cooking time. The ability to pull restaurant-quality alkaline noodles from your freezer on a busy weeknight is a game-changer for anyone serious about elevating their soup game.
Serving Suggestions for Your Fresh Noodles
Once you have those beautiful, chewy noodles ready, the possibilities for creating an incredible meal are endless. While the noodles are certainly the star, they need a supporting cast. Pair your freshly made strands with a rich, slow-simmered beef broth seasoned with soy sauce and ginger for a deep, earthy flavor. Alternatively, a lighter turkey or chicken broth enriched with dried shiitake mushrooms and a touch of vinegar offers a bright and savory counterpoint.
Consider topping your bowl with tender slices of slow-cooked beef brisket, marinated soft-boiled eggs (known asajitama), thinly sliced green onions, and some crunchy, toasted sesame seeds. If you prefer a vegetarian approach, focus on textures: blistered tofu cubes, sautéed spinach, bamboo shoots, and a drizzle of chili oil work wonders. Remember, the perfect ramen experience is highly personal, but it always starts with the unparalleled foundation provided by truly fresh and springyHomemade Ramen Noodles.
The Accidental Discovery of Sunshine on a Plate

I first attempted Homemade Ramen Noodles on a rainy Tuesday, expecting disaster. Instead, I pulled perfectly chewy strands from the dough—it felt like unlocking a secret level of culinary mastery. That rich, silky texture was pure sunshine, proving store-bought substitutes just wouldn’t cut it anymore.
There is a profound, almost spiritual joy that comes from realizing you can replicate high-quality restaurant food in your own kitchen. For years, ramen was my ultimate comfort food, a savory blanket of umami perfection that I only trusted professionals to create. The packaged stuff felt like a pale imitation, and the notion of making the actual noodles from scratch? That seemed like something only a culinary wizard with a lot of counter space and an unhealthy devotion to specialized equipment could attempt. I imagined vast, complex machines and arcane Japanese techniques. However, one particularly dreary winter weekend, driven by a craving that no amount of microwave broth could satisfy, I decided to tackle the ultimate challenge: true, chewy, springy, beautiful ramen noodles.
The secret, as I learned through many flour-dusted failures, isn’t complex machinery; it’s patience, hydration control, and a surprising alkaline ingredient. Forget those soft, flabby instant noodles. We are creating strands with an incredible texture, often called *koshi*, that delightfully snaps back when you bite it. This adventure isn’t just about cooking; it’s about transforming simple wheat and water into something extraordinary. Be warned: once you taste the difference that freshly extruded or cut noodles make, there is no turning back to the dusty packets hiding in the back of your pantry.
The Anatomy of the Perfect Noodle
Before diving into the recipe, understanding what makes a ramen noodle different from, say, spaghetti, is crucial. The defining characteristic is the use of *kansui*, an alkaline solution usually consisting of potassium carbonate and sodium carbonate. This raises the pH of the dough, which drastically changes how the gluten interacts, resulting in that distinctive yellow hue, firm bite, and unique flavor. Since getting commercial kansui can be tricky, we utilize a brilliant kitchen hack: baked baking soda. Baking regular baking soda (sodium bicarbonate) converts it into sodium carbonate, giving us the perfect alkaline solution for our Homemade Ramen Noodles.
The dough itself is incredibly stiff—almost stubbornly so. If you’ve made pasta before, forget everything you know about soft, pliable dough. This ramen dough should be so dry and firm that you genuinely question whether it will ever combine into a cohesive mass. This low hydration is absolutely key to achieving that desirable springiness. Get ready for a workout; this recipe doubles as arm day at the gym. When you successfully wrangle this dry mixture into a smooth log, you’ve earned the right to brag about your culinary achievements for at least a week.
Ingredients for Homemade Ramen Noodles (Kansui Style)
Making the noodles requires just a handful of straightforward ingredients, proving that the most delicious results often come from simplicity. Remember, quality flour makes a big difference here; look for high-protein bread flour if possible.
For the Baked Alkaline Water
- 1 teaspoon baking soda (sodium bicarbonate)
- 2/3 cup filtered water
For the Noodles
- 2 cups (240g) bread flour (high protein is best)
- 1/4 cup whole wheat flour (for texture and color)
- 1/2 teaspoon salt
- 1 large egg white (optional, adds color and elasticity)
Crafting the Noodle Dough
The preparation starts with creating your alkaline solution. Preheat your oven to 300°F (150°C). Spread the baking soda thinly on a baking sheet lined with parchment paper. Bake for one hour. This converts it into sodium carbonate. Once cooled, dissolve the baked soda and salt in the 2/3 cup of filtered water. This is your kansui substitute.
In a large bowl or stand mixer, combine the flours and the egg white, if using. Gradually pour in the alkaline water mixture while mixing. The dough will look shaggy and crumbly—this is good. It might take several minutes to absorb all the liquid. Once it forms small clumps, turn it out onto your counter.
Here is where the real fun—or struggle—begins. You must knead this incredibly stiff dough. Use your body weight, pushing down and folding repeatedly. If the dough seems impossible to manage, put it into a sturdy Ziploc bag and stomp on it gently (yes, seriously) for a few minutes to help it cohere. Knead for about 10–15 minutes until it forms a stiff, smooth mass. Wrap it tightly in plastic and let it rest at room temperature for at least 30 minutes, or up to 2 hours. This resting phase is non-negotiable, as it relaxes the gluten and makes it runnable through a pasta machine.
Rolling and Cutting the Strands
After resting, the dough should be significantly easier to handle. Cut the dough into four manageable portions. Flatten one piece with a rolling pin until it is thin enough to fit through the widest setting of your pasta roller. Run it through the machine, fold it into thirds (like a letter), and run it through again, repeating this folding and rolling process three or four times. This is called laminating, and it builds layers and strength into the noodle.
Next, gradually decrease the setting on your pasta machine. Run the dough through each subsequent setting without folding, until you reach your desired thickness. For a standard ramen noodle, the second to last or third to last setting usually works best. Finally, switch to the spaghetti or thin fettuccine cutter attachment. Catch the beautiful, wavy strands as they fall, dusting them generously with flour to prevent sticking. Place the finished Homemade Ramen Noodles on a tray dusted with flour or cornstarch until ready to cook.
Perfecting the Cooking Process
Start by preparing the broth base to allow flavors to meld fully. Cook the Homemade Ramen Noodles last, boiling them quickly in fresh water, never the broth. This prevents starch from clouding your beautiful, rich soup base.
Quick Chicken and Mushroom Broth Base
While the noodles rest, prepare a deeply savory broth. We rely on time and quality ingredients for depth. Combine 6 cups of rich chicken or vegetable broth with a quarter cup of soy sauce, 2 tablespoons of apple juice with sugar (or substitute with white grape juice concentrate and a dash of white vinegar), 2 cloves of smashed garlic, and 1 inch of ginger sliced thinly. Add dried shiitake mushrooms for maximum umami depth. Simmer this mixture gently for at least 45 minutes, allowing the liquid to reduce slightly and the flavors to concentrate into a powerful elixir. Strain the broth before serving to achieve a clean base.
For toppings, hard-boiled or soft-boiled eggs marinated in soy sauce (known as *ajitsuke tamago*) are highly recommended, alongside thin slices of roasted chicken breast or slow-cooked beef. Fresh scallions, toasted sesame seeds, and a few drops of roasted sesame oil complete the masterpiece. Having all these elements ready before cooking the noodles is key to a perfectly timed bowl.
Add Your Touch
Feel free to swap shredded chicken for sliced beef or ground turkey. If you lack traditional *kansui*, use baking soda treated with heat (baked soda) for that crucial alkaline bite. Try chili oil or a splash of rice vinegar for extra zing.
Storing & Reheating
Store the broth and Homemade Ramen Noodles separately in airtight containers. Reheat the broth gently on the stove. Boil the noodles quickly just before serving to avoid mushiness; combining them too early spells tragedy.
Expert Noodle Handling Tips
- Don’t skimp on the noodle resting time; this develops the gluten structure, which is essential for that signature chewiness you crave.
- When kneading, the dough should feel very stiff and dry. If it seems too sticky, add a teaspoon of flour, not water, until it resists strongly.
- For true alkaline flavor, bake your baking soda at 300°F for an hour before mixing it into the water. This creates the essential sodium carbonate.
My friend swore she was ordering takeout until she tried my hand-pulled noodles. She immediately demanded the recipe, admitting she never knew simple flour and water could taste so deeply complex.
Conclusion for Homemade Ramen Noodles
Making Homemade Ramen Noodles is more a journey than a simple recipe. While it requires patience during the kneading and resting phases, the reward is incredible: superior texture, flavor, and a satisfying sense of accomplishment. Remember to keep your dough stiff, rest it thoroughly, and always cook the noodles separately from the beautiful broth. Dive in and transform your next cozy meal with this elevated comfort food. You will find that the satisfaction of serving your own perfectly chewy strands far outweighs the minor effort required. Enjoy the results of your hard work!
Print
Homemade Ramen Noodles
Master the perfect, chewy Shibori ramen texture! Our recipe uses an alkaline solution (baked baking soda) and high-protein flour for that signature snap.
- Total Time: 35 minutes
- Yield: 4 servings
Ingredients
- Bread Flour (high protein): 300 grams
- Cold Water: 120 ml
- Baked Baking Soda (Sodium Carbonate): 3 grams (or 1 teaspoon)
- Salt (fine grain): 3 grams (or 1/2 teaspoon)
- Large Egg White (optional, for elasticity): 1
- Cornstarch or additional flour (for dusting): 1/4 cup
Instructions
- Step 1: In a small bowl, whisk together the cold water, baked baking soda, salt, and egg white (if using) until the solids are fully dissolved, creating the alkaline solution.
- Step 2: Place the bread flour in a large bowl or stand mixer fitted with a dough hook. Slowly drizzle in the alkaline solution while mixing on low speed. The dough will be extremely stiff and crumbly; mix until no dry flour remains, then gather the crumbs into a tight ball, wrap in plastic, and let rest for 30 minutes to hydrate.
- Step 3: Cut the stiff dough into four pieces. Flatten the first piece with a rolling pin and feed it through a pasta machine on its widest setting. Fold the resulting sheet in half or thirds (like a letter) and feed it through the widest setting again. Repeat this folding and laminating process 5-6 times to strengthen the gluten.
- Step 4: Continue feeding the dough through the pasta machine, gradually reducing the thickness setting notch by notch until the desired thinness is achieved (usually setting 2 or 3 on most standard machines). Lay the finished sheets flat and dust lightly with cornstarch or flour to prevent sticking.
- Step 5: Attach the cutter attachment (ramen cutters are typically thin, about 1.5mm). Feed the thin dough sheets through the cutter. Immediately toss the fresh noodles with a light coating of cornstarch to prevent clumping while preparing the broth.
- Step 6: To cook, bring a large pot of water to a rolling boil. Add the fresh noodles and cook for only 60-90 seconds. Drain immediately and serve in your prepared ramen broth.
Notes
- Freeze freshly cut noodles, heavily dusted with cornstarch, in an airtight bag for up to 4 weeks; cook them directly from frozen by adding 30 seconds to the boiling time.
- To refresh leftover cooked noodles, blanch them quickly (15-20 seconds) in plain boiling water, shaking off excess moisture thoroughly before adding them back to fresh, hot broth.
- Maximize the al dente texture by cooking the noodles only after the ramen bowls are ready and filled with piping hot broth, ensuring they travel immediately from the 90-second boil directly into the final serving vessel.
- Ensure the baked baking soda and salt are fully dissolved into the cold water before mixing with the flour; undissolved alkaline crystals will create yellow spots and ruin the even texture of the final dough.
- Prep Time: 15 minutes
- Cook Time: 20 minutes
- Method: Stovetop
- Cuisine: American


Leave a Comment