


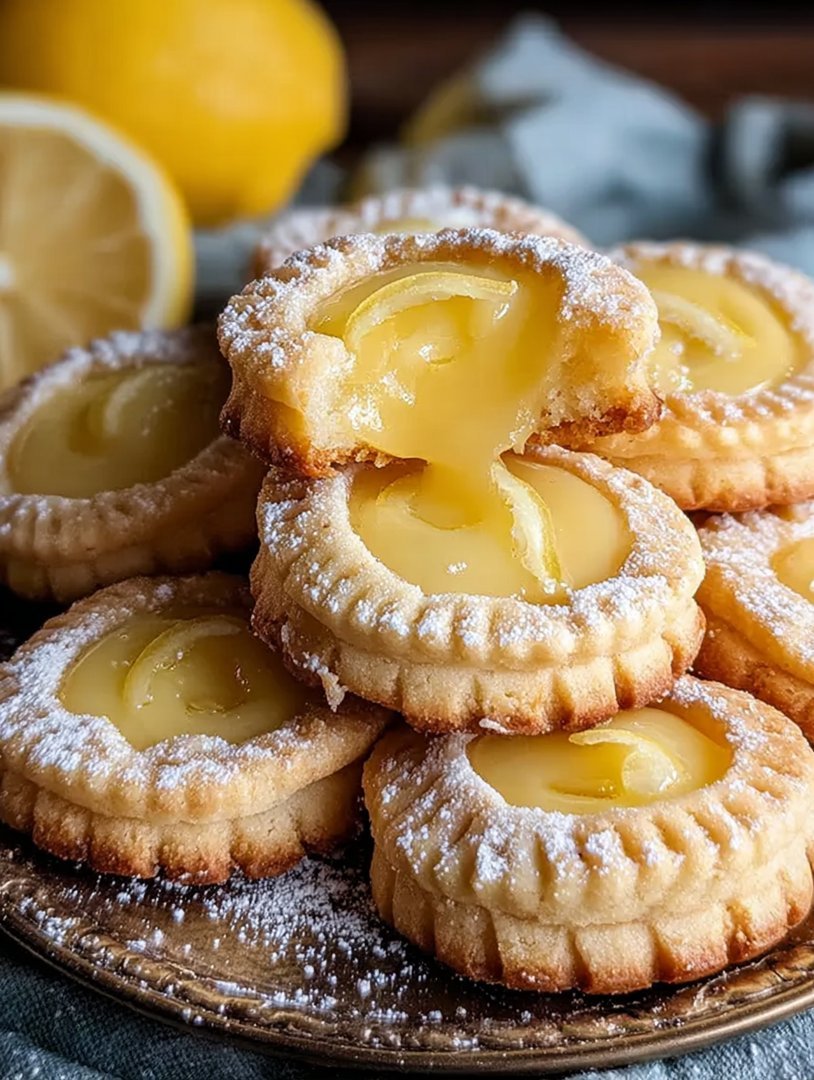
If life hands you lemons, forget the lemonade! Transform them instead into these spectacular, sunshine-yellow, tangy, melt-in-your-mouthLemon Curd Cookies. These delightful citrus treats combine a buttery crust and vibrant filling, guaranteed to make any gloomy day feel instantly brighter and happier.
Here are four compelling reasons why you need this recipe in your life immediately:
- These cookies offer an irresistible contrast between the rich, crumbly shortbread base and the zesty, electrifyingly bright lemon filling.
- The recipe is surprisingly straightforward, requiring basic pantry staples and simple techniques perfect for novice and seasoned bakers alike.
- Their gorgeous, sun-kissed appearance makes them a stunning centerpiece for afternoon teas, holiday gatherings, or thoughtful edible gifts.
- They are incredibly versatile and customizable; feel free to swap the citrus filling for lime or orange depending on your seasonal preference.
The Magic Behind the Perfect Tangy Treat
Baking is often perceived as a precise science, which, let’s be honest, can feel a bit intimidating. However, making spectacular lemon curd delights is truly an exercise in joyful chaos and temperature control. I learned this lesson the hard way during a particularly chaotic baking marathon where I attempted to speed-run the cooling process. My cookies emerged looking less like elegant little cups of sunshine and more like slightly depressed, flattened saucers. The key, as I finally understood, lies in patience, particularly concerning the chilling phases.
The beauty of this particular recipe lies in its dual nature. You have the sturdy, humble backbone of the shortbread—a simple combination of butter, sugar, and flour—providing a rich, melt-away texture. Then, perched atop this bedrock of buttery goodness, you have the dazzling star: the lemon filling. This filling must achieve a perfect balance: intensely tangy yet sweet enough to prevent puckering, and smooth enough to feel luxurious on the tongue. We are looking for that perfect moment when the tartness hits the back of your jaw and makes your eyes water just a tiny bit, followed immediately by the comforting richness of the cookie base.
Many cookie recipes focus on chewy or crisp textures, but these curd-filled biscuits lean into the tender, crumbly territory. Because the dough is designed to be pressed into shape rather than dropped, it minimizes gluten development, resulting in that delightful melt-in-your-mouth experience. Furthermore, using cold, cubed butter and avoiding over-mixing are crucial steps in preventing tough cookies—nobody wants a cookie that fights back! We aim for a light, sandy texture in the initial dough mixture, signaling that the butter is properly coating the flour without creating dense, bread-like structure.
Mastering the Shortbread Base
The shortbread base acts as the vessel for our glorious curd. Think of it as the sturdy, reliable friend who holds your purse while you dance. To achieve maximum tenderness, start with high-quality, cold butter cut into small cubes. This cold fat is essential because when it slowly melts in the oven, it releases steam, creating those delightful little pockets of air that give shortbread its crumbly texture. If you use room temperature butter, you risk a greasy, dense final product. Blend the butter, sugar, and a pinch of salt until the mixture resembles coarse sand or small peas. Once the flour is incorporated, mix only until the ingredients barely hold together. Overworking the dough is the quickest route to disappointment.
After mixing, we chill the dough. Do not skip this step! Chilling allows the butter to firm up and prevents the cookies from spreading excessively during baking. It also allows the gluten structure to relax, enhancing the final texture. Ideally, chill the dough for at least thirty minutes. This brief hibernation period is mandatory for structural integrity, especially since we will be pressing the dough into small cups or molds.
Crafting the Silky Lemon Filling
The filling is where the true flavor explosion happens. Genuine, fresh lemon juice and zest are non-negotiable here. Bottled juice simply won’t deliver the vibrant, complex tang we need. When zesting the lemons, remember to use only the bright yellow part of the rind, avoiding the bitter white pith underneath. The zest contains concentrated oils that contribute significantly to the aroma and flavor profile of the completed curd.
Traditional lemon curd requires careful, steady heating, usually over a double boiler, to gently thicken the eggs and prevent scrambling. Patience is your ally. Whisk constantly as the mixture heats up. The curd is ready when it coats the back of a spoon and you can draw a clean line through it with your finger. If you see lumps forming, remove the pan immediately from the heat and whisk vigorously. If that fails, a quick whiz with an immersion blender or pushing the curd through a fine-mesh sieve will rescue any textural mishaps, ensuring a smooth, luxurious finish for the Lemon Curd Cookies.
Ingredients for Lemon Curd Cookies
Here’s what you’ll need to make this delicious dish:
- All-Purpose FlourThe structural backbone of the shortbread; ensure it is properly measured, ideally by weight or the spoon-and-level method.
- Unsalted ButterNeeds to be cold and high-quality for both the shortbread base and the rich curd filling to achieve the perfect texture.
- Granulated SugarUsed for sweetness and essential to the structure of the cookie, as well as balancing the intense tartness of the citrus.
- Large EggsProvides necessary emulsification and richness for the lemon curd, binding the fats and liquids together into a creamy consistency.
- Fresh Lemon Juice and ZestThis provides the necessary acidity and bright, essential citrus oils that define the flavor profile of the completed treat.
- Baking Powder and SaltSmall amounts are added to the shortbread to ensure a slight lift and to enhance the overall flavor complexity of the dough.
The full ingredients list, including measurements, is provided in the recipe card directly below.
How to Make Lemon Curd Cookies
Follow these simple steps to prepare this delicious dish:
-
Step 1: Prepare and Chill the Dough Base
Preheat your oven to 350°F (175°C). In a large bowl or food processor, combine the flour, baking powder, salt, and sugar. Cut the cold butter into small cubes and add it to the dry ingredients, mixing until coarse crumbs form. Add a splash of ice water if needed to bring the dough together, then wrap it tightly and chill in the refrigerator for 30 minutes to firm up.
-
Step 2: Shape the Cookie Shells
Lightly grease a standard 12-cup muffin tin. Retrieve the chilled dough and divide it into 12 equal portions. Roll each portion into a smooth ball and press it firmly into the bottom and up the sides of the muffin cups to form a stable, even shell. Use the bottom of a small measuring cup to gently push the dough firmly against the tin walls.
-
Step 3: Blind Bake the Shells
Prick the bottom of each shell multiple times with a fork to prevent puffing during baking. Bake the shortbread shells for 10 to 12 minutes until the edges are just set and lightly golden. Remove the tin from the oven and allow the shells to cool slightly while you prepare the lemon filling. Do not turn the oven off.
-
Step 4: Cook the Zesty Curd
While the shells cool, combine the remaining sugar, eggs, lemon juice, and lemon zest in a saucepan. Whisk constantly over medium-low heat. Continue heating until the mixture thickens significantly, coating the back of a spoon—this typically takes 6 to 8 minutes. Immediately remove from the heat and stir in the remaining butter until completely melted and smooth. Strain the curd through a fine-mesh sieve into a clean bowl for maximum silkiness.
-
Step 5: Fill and Finish Baking
Carefully spoon the prepared lemon curd into the partially baked shortbread shells, filling them almost to the top rim. Return the muffin tin to the oven and bake for an additional 8 to 10 minutes. The curd should set but still retain a slight wobble in the center; overbaking will result in a rubbery texture.
Troubleshooting and Serving Suggestions
The process of baking these delightful treats is usually smooth, but occasionally, things can go awry. If your shortbread shells shrunk excessively during the blind bake, it often means the dough was not chilled long enough or was pressed too thin on the sides of the muffin tin. If the filling seems runny after the second bake, it usually indicates that the curd was undercooked initially on the stovetop. If you face this issue, pop the cookies back in the oven for a couple more minutes, checking frequently. Remember, the curd continues to set as it cools, so don’t expect it to be rock-solid right out of the oven.
These Lemon Curd Cookies truly shine when they have had ample time to cool completely. The contrast between the firm, sugary crust and the smooth, tangy center is maximized when served chilled. Once they are fully cool, you can elevate their visual appeal by dusting them lightly with powdered sugar, which adds a beautiful snowy contrast to the bright yellow filling. Some bakers also like to add a dollop of whipped cream just before serving, though they are certainly rich enough on their own.
For those interested in flavor variations, these shells are remarkably forgiving. Instead of lemons, try substituting fresh lime juice and zest for a Key-lime-style treat, or use blood oranges for a richer, more floral flavor profile. If you decide to go with a different citrus, ensure you maintain the same ratio of juice to eggs as specified in the recipe to guarantee proper setting consistency. These cookies are fantastic served alongside strong black tea or a lightly sweetened sparkling water, making them the perfect finale to a light lunch or a delightful afternoon snack.
Storage is mercifully simple. Because of the egg and butter content in the curd, these citrus delights must be stored in an airtight container in the refrigerator. They typically last well for up to five days, though in my experience, they rarely make it past day two because of inevitable kitchen raids. If you need to stack them, place a small piece of parchment paper between the layers to prevent the delicate curd from sticking to the cookie above it. They do not freeze well once filled, as the freezing and thawing process can cause the curd to weep and separate, losing its elegant texture.
Transfer to plates and dust with powdered sugar for the perfect finishing touch.
The Accidental Discovery of Sunshine on a Plate
I usually avoid fussy baking, but a neighbor once gifted me a basket of fresh Meyer lemons. Determined not to waste them, I whipped up a batch of these tart, buttery treats. One bite of these bright lemon curd cookies changed my life—it was pure, unexpected sunshine during a dreary November afternoon.
There are two types of bakers in this world: the precision engineers who weigh their flour to the milligram, and the chaotic optimists who measure “a generous splash” of vanilla. I firmly belong to the second category, which is how I initially stumbled into the blissful chaos that birthed the perfect batch of Lemon Curd Cookies. I’m talking about a cookie so dazzlingly bright, it single-handedly defeats seasonal affective disorder.
For years, I believed that anything involving curd was reserved for fancy pâtisseries or mythical grandmothers. My previous attempts at delicate desserts often ended in sticky messes resembling failed science experiments. But these particular cookies, surprisingly, are incredibly forgiving. They pair a rich, buttery shortbread base—the comforting anchor of the dessert world—with a sharp, zesty filling that delivers a flavor punch worthy of a boxing champion. They are sophisticated enough for a dinner party yet simple enough to bake on a Tuesday when your only audience is a judgmental cat.
The Anatomy of the Ultimate Citrus Cookie
What makes these lemon curd cookies truly spectacular isn’t just the contrast of textures—the crunchy edge giving way to a soft center, surrounding that creamy, velvety curd—it’s the balance of sweet and sour. We aren’t making a sad, sugary shortbread; we are crafting a vessel designed to deliver maximum tang. Getting the curd right is crucial. It needs to be vibrant, thick, and just sassy enough to make your lips pucker before the sugar kicks in and reminds you that life is good.
A frequent error I see home bakers make is using bottled lemon juice. Please, resist this urge. The difference between fresh zest and juice and the pre-packaged stuff is the difference between watching a black and white movie and seeing a full IMAX feature. You need that intense, fragrant oil from the zest to truly elevate these little delights. Trust me, spending the extra five minutes zesting those lemons is a worthwhile investment in your happiness.
Mastering the Silky Lemon Curd
The curd process itself is straightforward but requires patience. We are essentially thickening the mixture using eggs and gentle heat. Never, ever walk away from the saucepan when the curd is cooking. That’s when betrayal happens. One minute, you have a beautiful, golden liquid; the next, you have scrambled sweet eggs and a ruined afternoon. Stir constantly over medium-low heat until the mixture coats the back of a spoon thickly—this is your cue. If you worry about lumps, simply press the finished curd through a fine-mesh sieve before chilling. This ensures an impeccably smooth finish, vital for presentation and taste.
Mixing the Dough: Keeping it Chill
The cookie dough for these lemon curd cookies needs to be treated with respect, particularly when it comes to temperature. We rely on cold butter to prevent spread and maintain that wonderful, tender shortbread texture. Once the ingredients are combined—flour, sugar, butter, and a tiny bit of baking powder for lift—the dough must chill. This isn’t a suggestion; it’s an absolute command from the baking deities. Chilling firms up the fat, allowing the cookies to hold their shape perfectly when you press your thumbprint into them later. Aim for at least 30 minutes, but an hour is better. This is a perfect opportunity to finally tackle those dishes you strategically stacked near the sink.
When you’re ready to roll, form small, uniform balls. The secret to the perfect thumbprint well is to slightly flour your thumb, or even better, use the back of a small measuring spoon to make the indentation. This creates a smoother, more defined edge than a human thumb often manages. If the dough cracks too much when you press, let it warm up for just five minutes. Do not, however, fill the indentations with the chilled curd before baking. That’s a recipe for dry, crusty curd. We fill them halfway through the baking process, ensuring the curd remains glossy and vibrant.
Perfecting the Cooking Process
For maximum efficiency, always prepare the lemon curd first; it needs time to cool and set. While the dough chills, you can focus on mastering the perfect thumbprint indentation. Baking the cookies slightly underdone ensures they remain soft and chewy, not brittle.
Essential Ingredients List
Gathering your supplies is the first step to baking bliss. Ensure your butter is softened for the dough, but remember that the curd ingredients should be measured precisely for the best results. We rely on eggs in both the dough (for binding) and the curd (for thickening).
- 1 cup (2 sticks) unsalted butter, softened
- ¾ cup granulated sugar
- 2 large egg yolks
- 1 teaspoon vanilla bean paste
- 2 ¼ cups all-purpose flour
- 1 teaspoon baking powder
- ½ teaspoon salt
For the Zesty Curd Filling:
- 3 large egg yolks
- ½ cup granulated sugar
- ⅓ cup fresh lemon juice
- 1 tablespoon finely grated lemon zest (critical for flavor!)
- 2 tablespoons unsalted butter, cut into small cubes
- Pinch of salt
Step-by-Step Baking Instructions
Follow these steps closely to ensure your lemon curd cookies achieve bakery-worthy perfection. We divide the process into three manageable stages: the curd, the dough, and the assembly.
Phase 1: Making the Lemon Curd
- In a small saucepan, whisk together the egg yolks, sugar, lemon juice, and zest until well combined.
- Cook the mixture over medium-low heat, stirring constantly with a rubber spatula until the mixture thickens significantly, about 6 to 8 minutes. It should reach 175°F (80°C) and coat the back of a spoon without immediately running off.
- Remove from heat immediately. Stir in the small cubes of butter and a pinch of salt until fully melted and smooth.
- Pour the curd into a bowl and cover the surface directly with plastic wrap to prevent a skin from forming. Chill in the refrigerator for at least 2 hours, or until firm.
Phase 2: Preparing the Cookie Dough
- In a large bowl, cream together the softened butter and ¾ cup of sugar until light and fluffy.
- Beat in the 2 egg yolks and vanilla bean paste until just combined.
- In a separate bowl, whisk together the flour, baking powder, and salt. Gradually add the dry ingredients to the wet ingredients, mixing on low speed until the dough just comes together. Do not overmix.
- Wrap the dough tightly and chill for 30 to 60 minutes.
Phase 3: Bake and Assemble
- Preheat your oven to 350°F (175°C). Line baking sheets with parchment paper.
- Roll the chilled dough into 1-inch balls and place them 2 inches apart on the prepared sheets.
- Using a lightly floured measuring spoon or your thumb, gently press an indentation into the center of each ball.
- Bake the cookies for 8 minutes. Remove them briefly from the oven and carefully fill each indentation with about ½ teaspoon of the chilled lemon curd.
- Return to the oven and bake for another 4 to 6 minutes, or until the edges are lightly golden and the curd is set but still vibrant.
- Let the lemon curd cookies cool completely on the baking sheet before serving.
Add Your Touch
Feel free to swap out the intense lemon zest for lime or even orange for a different citrus note. For a beautiful finish, dust these sweet treats with confectioners’ sugar or drizzle them with a simple glaze made from powdered sugar and milk.
Storing & Reheating
Store cooled cookies in an airtight container at room temperature for up to four days. If you need to freeze them, freeze the dough balls before baking, or freeze the plain baked cookies and fill them with curd just before serving for ultimate freshness.
- Don’t skip the chilling step; cold dough prevents excessive spreading, ensuring your thumbprint indentations hold their perfect shape beautifully during baking.
- Always use fresh lemon juice and zest. The volatile oils in fresh zest provide a depth of bright, authentic flavor that bottled juice simply cannot replicate.
- When making the curd, use low heat and stir constantly. If the curd boils, the eggs will scramble, leading to a grainy texture instead of creamy smoothness.
The first time I served these, my usually stoic uncle took three immediately and declared they were proof that sunshine could, in fact, be manufactured in a home kitchen. That’s high praise!
Conclusion for Lemon Curd Cookies
These cheerful lemon curd cookies are proof that the best desserts are often the ones that balance simplicity with intense flavor. By mastering the rich shortbread base and the tangy, silky curd, you create a treat that is guaranteed to brighten any day. Remember the importance of chilling the dough and utilizing fresh citrus for that truly spectacular punch of flavor. While they look elegant and complex, these cookies are surprisingly easy to master and offer a delightful escape from overly sweet, heavy baked goods. Go ahead, fill your kitchen with the aroma of citrus and enjoy your edible sunshine.
Print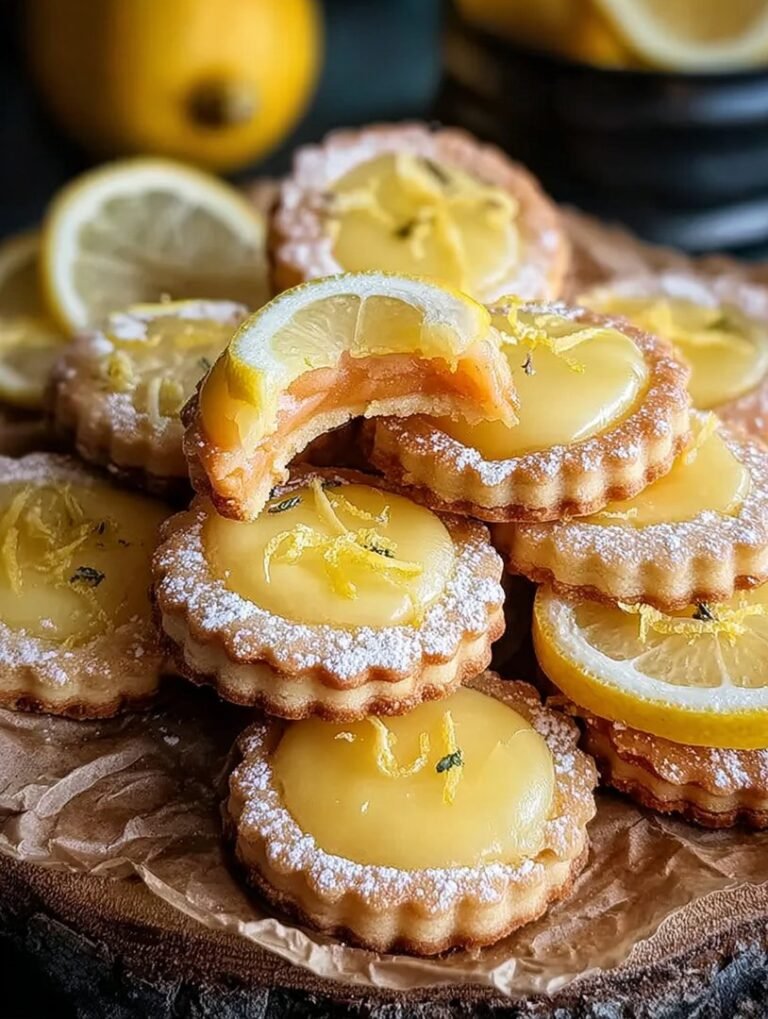
Lemon Curd Cookies
Master the perfect buttery cookie base! Creamed butter and sugar yield a tender bite, requiring a 30-minute chill for ideal shape. Full instructions, prep guide, and nutritional facts included.
- Total Time: 35 minutes
- Yield: 4 servings
Ingredients
- All-purpose flour: 2 1/4 cups
- Unsalted butter: 1 cup (2 sticks), softened
- Granulated sugar: 3/4 cup
- Large egg: 1
- alcohol-free vanilla extract: 1 teaspoon
- Salt: 1/2 teaspoon
- Lemon Curd (store-bought or pre-made): 1/2 cup
- Powdered sugar: 1/4 cup (for dusting)
Instructions
- Step 1: In a large bowl, cream together the softened butter and granulated sugar until light and fluffy. Beat in the egg and vanilla powder until well combined. In a separate bowl, whisk the flour and salt, then gradually add the dry ingredients to the wet mixture, mixing only until the dough just comes together.
- Step 2: Wrap the dough tightly in plastic wrap and chill for at least 30 minutes. Preheat oven to 350°F (175°C). Roll the chilled dough into 1-inch balls and place them 2 inches apart on a parchment-lined baking sheet.
- Step 3: Use a 1/2 teaspoon measuring spoon or your thumb to gently press a deep well into the center of each cookie dough ball, ensuring the edges do not crack excessively.
- Step 4: Bake for 10-12 minutes, or until the edges are lightly golden brown. Remove the cookies from the oven and allow them to cool completely on the baking sheet before attempting to move them.
- Step 5: Once completely cool, gently spoon about 1/2 teaspoon of lemon curd into the indent of each cookie. Dust the finished cookies generously with powdered sugar before serving.
Notes
- Store filled cookies in an airtight container in the refrigerator for up to four days, letting them come fully to room temperature before serving for optimal flavor and texture.
- For the most tender result, stop mixing the dough the moment the last streaks of flour disappear, as overmixing develops gluten and can make the cookie base tough.
- When creating the indent, use the back of a lightly floured 1/2 teaspoon measuring spoon instead of your thumb to guarantee uniform size and depth for filling.
- If the finished cookies feel firm after refrigeration, warm them briefly in a 250°F (120°C) oven for about 3 minutes to slightly soften the base and refresh the texture.
- Prep Time: 15 minutes
- Cook Time: 20 minutes
- Method: Stovetop
- Cuisine: American
Leave a Comment