

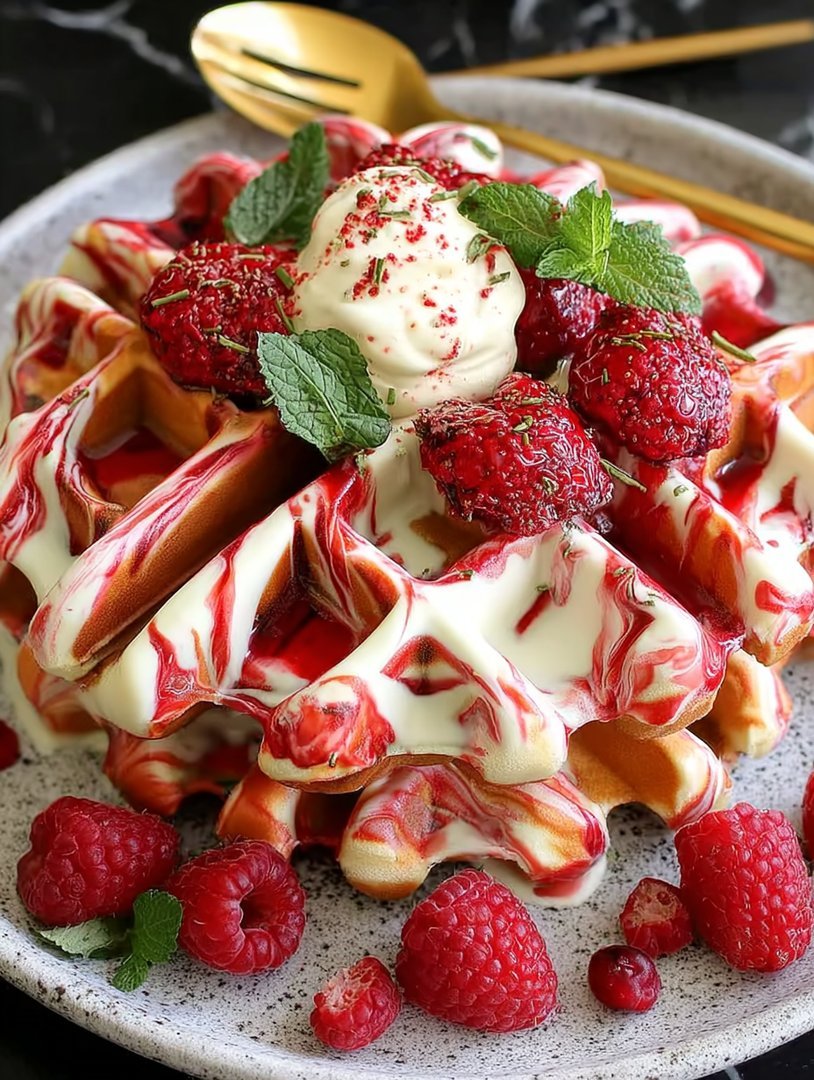
Forget bland mornings! We are diving headfirst into a dessert masquerading as breakfast. TheseRed Velvet Marble Wafflesare the ultimate way to start your day with a luxurious, cocoa-rich swirl. I once accidentally turned my kitchen into a war zone trying to perfect this ruby-hued delight, but the resulting crisp exterior and tender center of these magnificentRed Velvet Marble Wafflesmade the mess worth every drop of batter spilled.
Here’s why these waffles will become your new brunch obsession:
- Experience the perfect blend of rich, dark cocoa and subtle buttermilk tang, creating a deep, dessert-like flavor profile ideal for any brunch spread.
- Achieve that dramatic, bakery-quality marble swirl that will instantly elevate your breakfast table and impress even the most skeptical guests.
- Designed for busy mornings, this recipe simplifies the marbling technique so you can create stunning, complex-looking waffles without extra fuss.
- These ruby-hued waffles pair beautifully with classic cream cheese frosting, fresh berries, or a simple dusting of powdered sugar for versatility.
The Quest for the Perfect Waffle: Why Red Velvet?
There is a certain magic that happens when you combine the fluffy, comforting structure of a perfect waffle with the decadent flavor profile of a classic red velvet cake. For years, I chased that elusive balance: a waffle that was moist and tender on the inside, wonderfully crisp on the outside, and delivered that unmistakable hint of cocoa and tang that defines true red velvet. Most recipes fall flat, resulting in either a dry, cardboard texture or a color that looks suspiciously like faded brick. We don’t tolerate culinary disappointment here, especially before 10 AM.
The secret lies not just in the ingredients, but in the ratio of the two distinct batters. We are creating a stunning visual contrast—a dance between the creamy vanilla base and the rich, cocoa-dusted red velvet base. This isn’t just about dumping food coloring into plain batter; it’s about building two separate flavor profiles that complement each other when swirled together. Think of it as painting with breakfast food. If you’ve ever felt intimidated by marbling, relax. We’re going to make it ridiculously easy, proving that stunning presentation doesn’t require a culinary degree or a private pastry chef. All you need is a steady hand and a deep desire for a breakfast that looks as good as it tastes.
The Magic Behind the Marble Swirl
Achieving those gorgeous, defined swirls in yourRed Velvet Marble Wafflesis less about precision and more about knowing when to stop mixing. Over-mixing is the enemy of marbling. If you stir the two batters together too vigorously, you end up with one homogenous, slightly depressing pink batter—which, while still edible, completely misses the point of the visual drama. We are aiming for distinct rivers of color flowing through the squares.
The key steps involve creating the primary white or vanilla batter first, then separating a portion of it to create the deep red, cocoa-enhanced batter. The cocoa powder is vital not just for flavor, but for the depth of color. Authentic red velvet uses a chemical reaction between buttermilk, vinegar, and natural cocoa powder to deepen the red hue. Even when using a touch of liquid red food coloring, the cocoa anchors the color and prevents it from looking neon or artificial. When it comes time to combine them, you will gently spoon the two colors onto the hot waffle iron and use the back of a spoon or a toothpick to draw a single, lazy figure eight through the batter. That’s it! The heat and pressure of the waffle iron will handle the rest, locking in those mesmerizing swirls.
Ingredients for Red Velvet Marble Waffles
Here’s what you’ll need to make this delicious dish:
- All-Purpose FlourProvides the foundational structure for the waffles. Ensure it is spooned and leveled for accurate measurement, avoiding dense waffles.
- Granulated SugarSweetens the batter and contributes to the crisp exterior when caramelized on the iron.
- Baking Powder and Baking SodaThese crucial leavening agents ensure the waffles rise beautifully and maintain a light, airy internal texture.
- Unsweetened Cocoa PowderEssential for the distinct red velvet flavor profile; select high-quality Dutch-processed cocoa for deep flavor and color anchoring.
- ButtermilkAdds a characteristic tang to the red velvet portion and reacts with the baking soda to create a tender crumb structure.
- Large EggsAct as a binder for the batter, providing structure and richness. Ensure they are at room temperature for better emulsification.
- Vegetable Oil or Melted ButterAdds necessary moisture and fat, contributing to a tender interior and helping the exterior crisp up during cooking.
- Vanilla Bean PasteEnhances the flavor profile of both batters, adding warmth and depth to the overall taste.
- Distilled White VinegarReacts with the buttermilk and cocoa powder, intensifying the red color and ensuring the classic red velvet tang is present.
- Red Food Coloring (Liquid or Gel)Use a high-quality gel color for the deepest, most vibrant red without excessively thinning the batter.
The full ingredients list, including measurements, is provided in the recipe card directly below.
How to Make Red Velvet Marble Waffles
Follow these simple steps to prepare this delicious dish:
Step 1: Prep the Waffle Iron and Dry Ingredients
Preheat your waffle iron according to the manufacturer’s instructions. Set it to a medium-high setting for a golden, crispy result. In a large bowl, whisk together the flour, sugar, baking powder, baking soda, and a pinch of salt. This thorough mixing ensures the leavening agents are distributed evenly before any liquids are added, which is vital for a consistent rise.
Step 2: Prepare the Base Batter
In a separate medium bowl, whisk together the eggs, oil (or melted butter), and vanilla bean paste until they are fully combined and slightly frothy. Pour the wet ingredients into the dry ingredients and gently mix until just combined. A few lumps are perfectly acceptable and even desirable, as over-mixing develops gluten and leads to tough waffles. This mixture forms the neutral, creamy foundation.
Step 3: Create the Red Velvet Batter
Carefully separate about half of the base batter into another bowl. To this half, add the cocoa powder, buttermilk, distilled white vinegar, and the red food coloring. Whisk these ingredients gently until the mixture is a uniform, deep, vibrant red. The vinegar and buttermilk are crucial here for flavor and color intensity. You should now have two distinct batters: one light and one deep ruby red.
Step 4: The Marbling Technique
Using two separate spoons, alternate dolloping the light batter and the red velvet batter onto the hot waffle iron. Start with a spoonful of one color, then place a spoonful of the other color directly next to it. Once the iron grid is mostly covered, take a butter knife or skewer and gently swirl through the batter one or two times. Remember, you are aiming for swirls, not a uniform blend. Immediately close the waffle iron.
Step 5: Cooking and Resting
Allow the waffles to cook until they are crisp and golden brown, usually 4 to 6 minutes, depending on your waffle iron model. The steam escaping from the sides will generally cease when the waffle is fully cooked. Use tongs to carefully remove the finished waffles. Transfer them to a wire rack rather than a flat plate to prevent steam from softening the crisp exterior while you finish cooking the remaining batter. Serving soft, steamy waffles immediately is highly recommended, but the wire rack ensures maximum crispness for those waiting their turn.
Elevating Your Waffle Experience
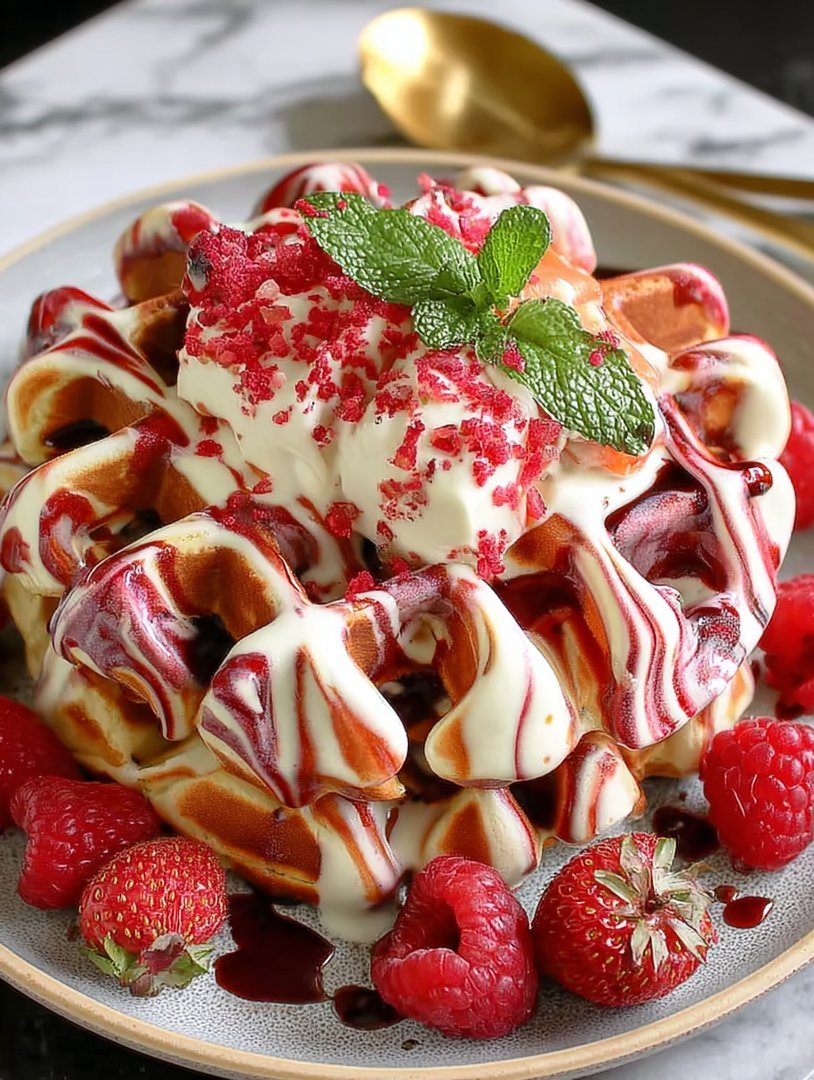
Once you’ve mastered the art of theRed Velvet Marble Waffles, you might be wondering how to take this decadent breakfast to the next level. Because these waffles are essentially cake for breakfast, they beg for luxurious toppings that enhance the cocoa and buttermilk notes. The absolute classic pairing is a light, tangy cream cheese glaze. Instead of the heavy, thick frosting you might put on a cake, create a simple glaze using powdered sugar, a touch of cream cheese, a splash of milk, and a bit of vanilla. This provides the signature red velvet flavor complement without weighing down the waffle.
If you prefer a lighter touch, fresh raspberries or sliced strawberries provide a wonderful tart contrast to the deep, sweet cocoa. A dollop of fresh whipped cream and a sprinkle of chocolate shavings also makes for an incredibly elegant presentation. Remember that the deep, dramatic color of the waffles already does most of the heavy lifting visually, so don’t overcomplicate the plating. Sometimes, a simple dusting of powdered sugar over the plate is all the presentation needed to highlight the striking marble pattern.
For those early weekend mornings when the whole family is involved, you can prepare the two batters the night before. Store them separately, covered, in the refrigerator. In the morning, let them come back to room temperature for about 15 minutes before swirling and cooking. This pre-planning strategy turns a potentially messy morning creation into a streamlined process, allowing you to enjoy your luxurious breakfast sooner and with less fuss. Whether served alongside a steaming cup of coffee or as the centerpiece of a decadent holiday brunch, these waffles promise an unforgettable experience. Transfer to plates and drizzle with the cream cheese glaze for the perfect finishing touch.
The Accidental Discovery of Sunshine on a Plate
I was having one of those chaotic Saturday mornings—you know, the kind where you try to make pancakes and simultaneously organize your sock drawer? It was a disaster waiting to happen. I had intended to make simple buttermilk waffles, but I also had leftover ingredients from a recent red velvet cake experiment. In a moment of sheer, sleep-deprived genius, I decided to merge the two. The result? Pure, unadulterated joy. TheseRed Velvet Marble Waffleswere born from kitchen entropy, proving that sometimes, the best recipes are the happy accidents you never planned for.
A Culinary Confession and the Waffle Iron Scandal
Let me be honest, my relationship with the waffle iron has always been fraught with tension. It promises crisp edges and fluffy interiors, but often delivers scorched chaos and unevenly cooked batter. For years, I avoided anything more complex than a standard Belgian batter, believing that swirling two colors—especially rich red velvet—was a task reserved only for pastry superheroes. But the desire for a beautiful, two-toned breakfast treat was too strong. I needed something theatrical for brunch, something that screamed, “Yes, I woke up early and mastered advanced breakfast artistry,” even if I was secretly still in my pajamas.
The trick to mastering theseRed Velvet Marble Waffleslies not just in the ingredients, but in the technique of the swirl. Forget complicated pastry bags. We are going straight for the “controlled chaos” method—a spoon, a prayer, and a firm belief that unevenness equals character. These waffles look impossibly sophisticated, yet they are shockingly forgiving. The creamy, rich vanilla batter contrasts perfectly with the slightly acidic, deeply cocoa-flavored red velvet batter, creating swirls that make every bite an adventure.
The Essential Ingredients for Velvet Perfection
Creating these vibrantRed Velvet Marble Wafflesrequires two distinct batters—a classic vanilla and the signature red velvet. The red velvet portion gets its unique tang from buttermilk and a touch of distilled white vinegar, which reacts beautifully with the baking soda to ensure maximum fluffiness. And don’t skimp on the high-quality cocoa powder; that’s where the depth of flavor lives. For the vanilla base, simple ingredients are best, but remember that fresh, quality vanilla bean paste makes a surprising difference.
-
For the Vanilla Batter:All-purpose flour, baking powder, a pinch of salt, sugar, eggs, buttermilk, melted unsalted butter, and vanilla bean paste.
-
For the Red Velvet Batter:All-purpose flour, cocoa powder (unsweetened, high quality), baking soda, a dash of vinegar, red food coloring (gel preferred for intensity), sugar, eggs, buttermilk, and melted unsalted butter.
-
Optional Toppings:Cream cheese glaze (essential!), fresh raspberries, powdered sugar.
Crafting the Two-Tone Marvel
Separation is key here. You must treat these as two separate recipes until the very last moment. Start by combining all the dry ingredients for the vanilla batter in one bowl and the wet ingredients in another. Gently incorporate the wet into the dry. Repeat this exact process for the red velvet mixture, ensuring you whisk in the cocoa powder thoroughly and finally introduce that vibrant red gel coloring. Use gel coloring rather than liquid, as the liquid variety can mess with the batter’s delicate consistency, resulting in soggy disappointment.
Now comes the fun part—the marbling! Take half a scoop of the vanilla batter and dollop it into the preheated, lightly oiled waffle iron. Follow immediately with a smaller dollop of the red velvet batter right next to it. Using a chopstick or the tip of a knife, gently swirl the two colors together once or twice. Resist the urge to over-mix; you want ribbons, not a muddy pink mess. Close the lid and let the magic happen. Typically, they take about three to five minutes, depending on your waffle iron’s heat setting. You know they are ready when the steam stops pouring out.
Perfecting the Cooking Process
Achieving perfect waffle texture requires speed and timing. Start by preheating the waffle iron completely while you mix the batters. Once mixed, alternate spooning the vanilla and red velvet mixtures onto the iron, swirling quickly. Cook immediately, and transfer finished waffles directly onto a cooling rack to prevent them from steaming and losing their delightful crispness.
The Essential Cream Cheese Glaze
ARed Velvet Marble Wafflesexperience is incomplete without a drizzle of tangy, sweet cream cheese glaze. This topping elevates the breakfast from merely delicious to truly decadent. Whisk softened cream cheese with powdered sugar, a little milk or buttermilk, and a splash of vanilla bean paste until it reaches a smooth, pourable consistency. If the glaze is too thick, add buttermilk one teaspoon at a time until you achieve the desired drizzly texture. Serve these beauties immediately, drowned in glaze, and watch your brunch guests gasp in delight at the presentation.
Tips for Fluffier Waffles
If you aim for sky-high fluffiness, temperature is your secret weapon. Ensure your buttermilk is at room temperature before mixing. This allows the chemical leaveners to activate more effectively, promising a loftier result. If you don’t have buttermilk, you can substitute by adding one tablespoon of white vinegar or lemon juice to a cup of milk and letting it sit for five minutes before use, although the authentic buttermilk flavor is truly unmatched.
Another crucial tip involves resting the batter. While impatient cooks might skip this step, allowing the batter to rest for ten minutes after mixing lets the gluten relax. A rested batter yields more tender waffles and helps absorb the moisture evenly. This small waiting period separates a good waffle from a great, airy, perfectRed Velvet Marble Waffles.
Add Your Touch
These beautiful breakfast treats invite personalization. If red velvet isn’t vibrant enough, try a chocolate chip swirl within the vanilla batter for an added crunch. For a subtle flavor swap, substitute half the buttermilk with plain yogurt for extra tanginess. A sprinkle of chopped pecans or walnuts adds wonderful texture to the finished product.
Storing & Reheating
Store cooled leftover waffles in an airtight container or zip-top bag, separating layers with parchment paper for up to three days. To reheat, avoid the microwave! Instead, pop them into a toaster or toaster oven until crisp, preserving their original texture. They freeze beautifully, lasting up to two months when properly wrapped.
Expert Advice for Your Waffle Game
-
Always mix the batter only until just combined; overmixing develops gluten, resulting in tough, chewy waffles instead of light, tender ones.
-
Use gel food coloring for the red velvet portion, as liquid coloring adds too much moisture, potentially compromising the crispness of the final waffle.
-
Never skip the cooling rack; placing hot waffles on a flat plate traps steam beneath them, turning your crispy edges instantly into soggy disappointment.
I once served a batch of these gloriousRed Velvet Marble Wafflesto my notoriously picky nephew, who usually only eats plain toast. He didn’t just eat them; he demanded seconds, cementing their status as a universally beloved masterpiece in my household.
Conclusion for Red Velvet Marble Waffles
The journey to creating the perfect breakfast is often paved with messy counters and spontaneous decisions, and theseRed Velvet Marble Wafflesare a testament to kitchen serendipity. They offer the richness of a classic dessert combined with the light, airy texture of a perfect morning pastry.
By mastering the two-batter technique and remembering the essential cream cheese glaze, you unlock a breakfast experience that is both visually stunning and deeply satisfying. This recipe ensures every bite is a delightful contrast of velvety cocoa and sweet vanilla. Go ahead, transform your brunch into a masterpiece of marbling and flavor, guaranteed to impress anyone lucky enough to snag a plate.
They are surprisingly straightforward, incredibly rewarding, and prove that a little red swirl goes a very long way in making morning meals unforgettable.
Print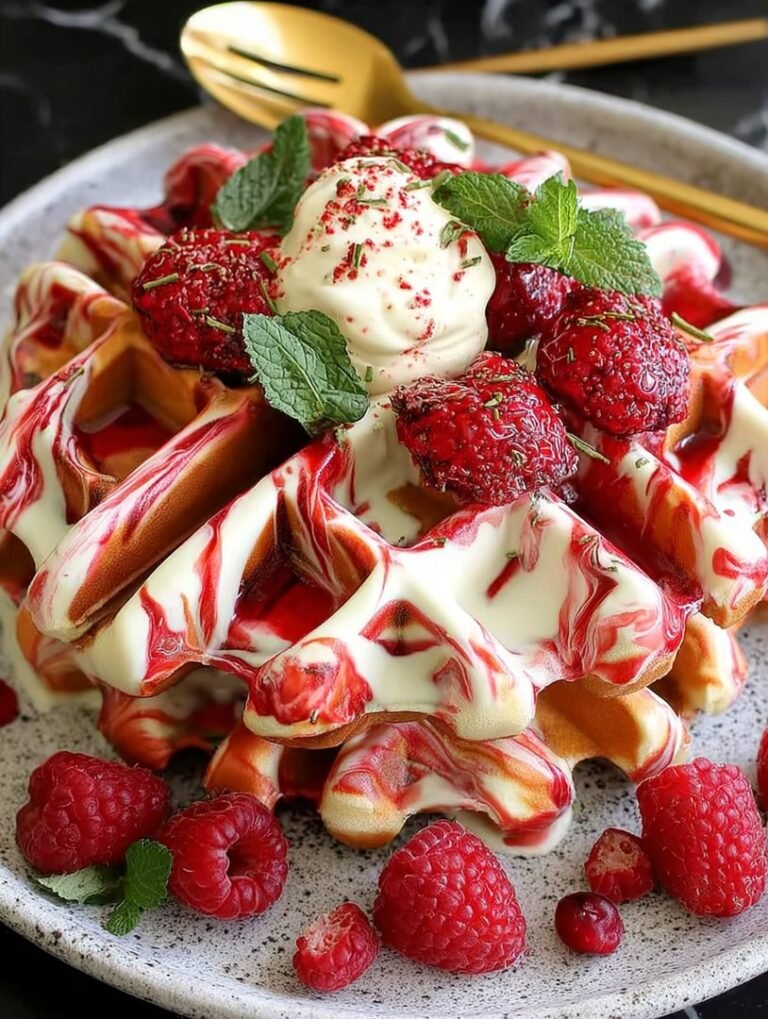
Red Velvet Marble Waffles
Craft striking, fluffy Red Velvet Marble Waffles using our simple two-batter technique. Enjoy the subtle cocoa flavor and dramatic swirl.
- Total Time: 35 minutes
- Yield: 4 servings
Ingredients
- All-purpose flour: 2 cups
- Granulated sugar: 1/4 cup
- Baking powder: 2 teaspoons
- Large eggs: 2
- Milk (whole or 2%): 1 3/4 cups
- Unsalted butter, melted and cooled slightly: 1/2 cup
- Unsweetened cocoa powder: 2 tablespoons
- Red gel food coloring: 1 1/2 teaspoons
Instructions
- Step 1: In a large bowl, whisk together the flour, sugar, and baking powder. In a separate medium bowl, whisk the eggs, milk, and melted butter until well combined. Pour the wet mixture into the dry ingredients and whisk until just incorporated, ensuring there are still a few small lumps.
- Step 2: Divide the prepared waffle batter evenly into two separate bowls. Set one bowl aside (this will be the plain white batter).
- Step 3: To the second bowl (the Red Velvet portion), add the unsweetened cocoa powder and the red gel food coloring. Whisk thoroughly until the cocoa is dissolved and the color is a deep, uniform red.
- Step 4: Preheat your waffle iron. To create the marble effect, drop alternating spoonfuls of the plain white batter and the red velvet batter onto the center of the waffle iron. Use a small skewer or toothpick to gently swirl the two colors together 1-2 times, being careful not to fully mix the batters.
- Step 5: Close the lid of the waffle iron and cook according to manufacturer instructions, usually 3-5 minutes, or until the waffle is crispy and the steam has nearly stopped. Carefully remove the waffle and serve warm.
Notes
- For longer storage, cool waffles completely on a wire rack, then flash freeze them on a sheet tray before transferring them to an airtight freezer bag for up to two months.
- Skip the microwave when reheating; instead, revive the texture by popping frozen or refrigerated waffles into a toaster or toaster oven for 2–3 minutes until they are crispy again.
- Enhance the classic flavor profile by serving these warm waffles immediately with a dusting of powdered sugar and a generous dollop of cream cheese glaze or whipped cream.
- To guarantee a beautiful marble effect, swirl the batters gently only 1-2 times with your skewer, as overmixing will result in a uniform pink color rather than distinct red and white veins.
- Prep Time: 15 minutes
- Cook Time: 20 minutes
- Method: Stovetop
- Cuisine: American


Leave a Comment