


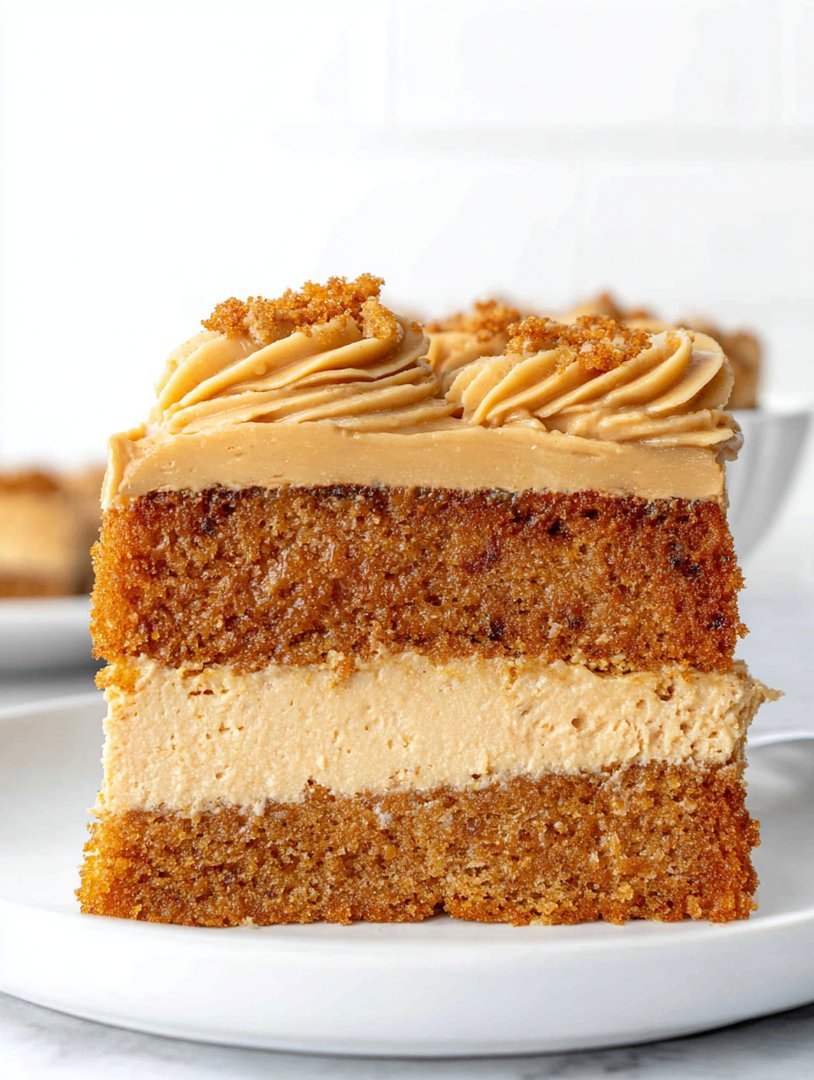
The smell of caramelized cookies melting into vanilla cream is pure heaven, a scent that promises the ultimate indulgence. You are about to embark on a journey with the legendaryBiscoff Cake, a dessert so good it should come with a warning label.
This isn’t just baking; it’s a culinary hug disguised as a towering masterpiece, perfect for turning any Tuesday into a celebration. Get ready to ditch the bland sponges and embrace the irresistible spice.
- Effortless Elegance: This recipe provides straightforward steps, ensuring even novice bakers can achieve a professionally stunning layer cake appearance.
- Spice-Forward Flavor: Experience the perfect balance of warm spices like cinnamon and nutmeg paired with rich, deep caramelized notes.
- Showstopper Presentation: Learn how to create a dramatic waterfall drip effect using melted cookie butter and crushed speculoos crumbs for visual impact.
- Year-Round Versatility: Ideal for sophisticated holiday gatherings, cozy winter evenings, or a stunning centerpiece at summer celebrations.
The Legend of the Spiced Cookie Dessert
There are cakes, and then there is theBiscoff Cake. If regular cakes are quiet dinner guests, this spiced caramel marvel is the rock star who arrives fashionably late, holding a bouquet of cinnamon sticks, and demands immediate attention. I first discovered the true power of this specific dessert accidentally. I was tasked with bringing a simple sheet cake to a family event. Naturally, I procrastinated until the last minute, resulting in a cake that looked suspiciously like a sad, brown brick. Desperate to salvage the situation, I grabbed the only vaguely festive item in my pantry: a jar of cookie butter.
I smeared it, swirled it, and topped it with crushed cookies, hoping the sheer audacity of the presentation would distract everyone from the dense crumb underneath. The reaction? Silence. Then, an eruption of joyous chewing. People weren’t just eating the cake; they were hoarding it. I had accidentally stumbled upon the sweet alchemy that turns a simple spice cake into an unforgettable, viral sensation. That day, I learned the crucial lesson: when in doubt, just add more speculoos. This specific cake possesses a flavor profile that is simultaneously nostalgic and sophisticated. It manages to feel cozy, like a winter sweater, while remaining light enough to enjoy even on the hottest summer day.
Why Speculoos Cookies Are the Secret Weapon
The magic isn’t just in the butter; it’s in the foundational cookie. Speculoos biscuits are traditionally crispy, thin, and deeply spiced shortbread cookies, often featuring delightful images stamped on them. Their success lies in their balance. They offer a deep, molasses-like caramel note without being overly sweet, complemented perfectly by a medley of spices, usually including cinnamon, cloves, and ginger. When you incorporate these pulverized cookies into the batter and the frosting, you create an unparalleled textural and flavor experience. The result is a cake layer that is incredibly moist, possessing a subtle chewiness that standard flour sponges simply cannot replicate. We aren’t just adding flavor; we are building an entire architectural framework of caramelized goodness.
Many home bakers rely on basic vanilla buttercream, but we are elevating this game. We are crafting a cookie butter swirl that guarantees a burst of concentrated flavor in every slice. Forget about those dry, bland cakes that require copious amounts of coffee just to swallow; this recipe focuses on moisture retention and flavor intensity at every stage. We achieve this by balancing the dry ingredients carefully and ensuring the wet ingredients, especially the buttermilk or alternative milk mixed with vinegar, contribute to a light yet structurally sound crumb. The goal is a cake that stands tall and proud, yet melts beautifully on the palate.
Essential Tips for Baking Success
Baking a layer cake might seem intimidating, but the secret to success often lies in meticulous preparation and understanding a few crucial techniques. Treat your baking kitchen like a laboratory where precision equals perfection. Always ensure your ingredients are at the correct temperature—a step often skipped by impatient bakers, resulting in dense, disappointing results. Room temperature eggs and butter emulsify seamlessly, trapping necessary air bubbles that ensure a high, fluffy rise. If your butter is too cold, it refuses to cooperate; if it’s too warm, the emulsion breaks, leaving you with a greasy mess.
Measuring Like a Pro
The most common mistake people make when tackling any layer cake, particularly one as sensitive as theBiscoff Cake, is mismeasuring the flour. Never scoop flour directly out of the container with your measuring cup. This compresses the flour, meaning you end up adding far more than the recipe requires, resulting in a dry, heavy brick. Instead, use the “spoon and level” method: gently spoon the flour into the measuring cup until overflowing, and then scrape the excess off the top with a straight edge. This simple technique dramatically improves the final texture of your cake.
When mixing, stop the mixer the moment the streaks of flour disappear. Overmixing develops the gluten too much, leading to toughness. We want a tender crumb, not a rubber band. This cake requires swift, decisive action once the dry and wet ingredients combine. Trust the process, do not overthink it, and definitely resist the urge to keep mixing just to be sure. A few lumps of batter are entirely acceptable and often lead to a moister final product than a perfectly smooth, over-mixed one.
Crafting the Perfect Cookie Butter Frosting
The frosting is where theBiscoff Caketruly shines, transforming from a simple spiced dessert into a magnificent centerpiece. We are aiming for a stable, pipeable, yet luxuriously smooth cookie butter buttercream. Start with high-quality unsalted butter, beaten until pale and fluffy—this process incorporates air and lightens the texture. Then, slowly introduce the powdered sugar. Don’t dump it all in at once unless you enjoy cleaning a powdered sugar cloud off your kitchen ceiling. Gradual addition ensures smooth incorporation.
The key ingredient, the melted cookie butter, must be added slowly to avoid breaking the emulsion. If the frosting seems too thick, use a tablespoon of milk or cream substitute to thin it out slightly. If it suddenly looks curdled or separated, don’t panic! This usually means the temperatures were off. Try adding a tablespoon of powdered sugar and mixing on high speed for 30 seconds, or adding a teaspoon of warm milk while beating. Most curdled buttercreams can be rescued with quick temperature correction or added bulk.
Ingredients for Biscoff Cake
Here’s what you’ll need to make this delicious dish:
- All-Purpose FlourEnsure it is freshly purchased and properly measured using the spoon and level technique for maximum cake height.
- Granulated Sugar and Brown SugarThe combination adds necessary sweetness and structure, with brown sugar specifically enhancing the deep caramelized notes.
- Baking Powder and Baking SodaThese dual leaveners ensure a strong, even rise and contribute to the tenderness of the crumb structure.
- Ground SpicesUse a blend of cinnamon, nutmeg, and ginger to mimic the signature warm flavor profile of the speculoos cookie.
- Unsalted ButterUse high-quality butter, ensuring it is softened to true room temperature before creaming for optimal emulsification.
- Large EggsMust be room temperature to combine seamlessly with the butter and prevent the batter from curdling during the mixing process.
- Buttermilk SubstituteMix plant-based milk (like soy or oat) with a tablespoon of vinegar; the acid reacts with the baking soda to tenderize the cake.
- Speculoos CookiesThese will be finely crushed and added directly into the batter to provide texture and an intense caramelized spice flavor.
- Cookie Butter SpreadThe star ingredient, used extensively in the frosting and melted down for the essential decorative drip on the finished cake.
- Powdered SugarEssential for the buttercream frosting, providing sweetness and stability without the grittiness of granulated sugar.
The full ingredients list, including measurements, is provided in the recipe card directly below.
How to Make Biscoff Cake
Follow these simple steps to prepare this delicious dish:
Step 1: Prepare the Cake Batter and Pans
Preheat your oven to 350°F (175°C). Grease and flour three 8-inch round cake pans, or line the bottoms with parchment paper rounds for easy release. In a medium bowl, whisk together the flour, baking powder, baking soda, salt, and all ground spices; set aside. This ensures the leaveners are evenly distributed.
Step 2: Cream Butter and Sugars
In a large bowl using an electric mixer, cream the room temperature butter and both sugars (granulated and brown) on medium-high speed until the mixture is light and fluffy, about 3 to 4 minutes. Scrape down the sides of the bowl often. This is the crucial step for creating a light cake structure.
Step 3: Add Eggs and Wet Ingredients
Beat in the room temperature eggs one at a time, ensuring each is fully incorporated before adding the next. In a separate bowl, combine the buttermilk substitute and vanilla bean paste. Alternate adding the dry ingredients mixture and the wet ingredients to the creamed mixture, beginning and ending with the dry. Mix only until just combined.
Step 4: Incorporate Speculoos Crumbs and Bake
Gently fold the finely crushed speculoos cookies into the finished batter using a spatula. Divide the batter evenly among the prepared cake pans. Bake for 25 to 30 minutes, or until a wooden skewer inserted into the center of the cake comes out clean. Cool the cakes in the pans on a wire rack for 10 minutes before inverting and removing them completely to finish cooling.
Step 5: Assemble and Frost the Cake
While the cakes cool completely, prepare the cookie butter buttercream as instructed above. Once the layers are fully cooled, level them if necessary. Place the first layer on a serving platter, spread a generous layer of frosting, and repeat with the remaining layers. Apply a crumb coat, chill for 15 minutes, and then finish with a final layer of smooth frosting.
Step 6: Decorate with Cookie Butter Drip
Gently warm 1/4 cup of cookie butter spread in the microwave until slightly runny but not hot, about 15-20 seconds. Transfer the melted spread to a piping bag or small spoon. Carefully pipe or drizzle the warm cookie butter around the top edge of the cake, allowing it to drip down the sides for a dramatic visual effect. Finish by topping the cake with whole speculoos cookies or a sprinkle of extra crushed crumbs.
Transfer to plates and drizzle with sauce for the perfect finishing touch.
Storing and Serving Your Masterpiece
This magnificentBiscoff Cakeis best enjoyed at room temperature, which allows the subtle spice notes of the cookie butter to truly shine and ensures the buttercream remains wonderfully soft. If you are serving it within two days of baking, storing the cake covered at room temperature is acceptable, especially if your kitchen remains cool. For longer storage, or if the cake contains any cream cheese or fresh dairy, it should be stored in the refrigerator.
To prevent the cake from drying out in the cold environment of the refrigerator, ensure it is completely covered with a cake dome or plastic wrap. Remove the cake from the refrigerator at least 90 minutes before serving to allow it time to temper. Cold cake layers taste dull and the texture is often compromised, so this waiting period is non-negotiable for the best experience.
If you find yourself with leftovers—a truly impressive feat, given the addictive nature of this dessert—you can freeze individual slices. Wrap each slice tightly in plastic wrap, followed by a layer of aluminum foil, and store in a freezer-safe container for up to three months. To thaw, simply unwrap the foil and plastic, and let the slice come to room temperature on the counter. This careful freezing technique ensures that the moist crumb and rich flavor of the spiced caramel cake are perfectly preserved, ready for a midnight snack emergency or an unexpected visitor.
Pair this spectacular cake with a strong cup of black coffee or a delicate cup of spiced tea to balance the sweetness. The warmth of the beverage complements the cinnamon and ginger in the speculoos, creating a symphony of comfort. Whether you are baking this for a grand celebration or just because you survived Monday, prepare for immediate rave reviews and multiple requests for the recipe.
The Accidental Discovery of Sunshine on a Plate
I was trying to make a sensible lemon drizzle, but halfway through, I found a forgotten jar of cookie spread glaring at me from the pantry shelf. It felt like a culinary challenge, a whispered dare. That moment of chaotic ingredient swapping birthed this magnificent Biscoff Cake, proving sometimes the best recipes are happy accidents drenched in spiced cookie goodness.
The Day I Ditched Drizzle for Cookie Spread
There are desserts, and then there areevents. This Biscoff Cake isn’t just a dessert; it’s a creamy, spiced, crunchy declaration of independence from boring baked goods. I first created this recipe during a serious baking slump. My kitchen felt hostile, my flour seemed judged, and my oven was throwing serious shade. I desperately needed a win, preferably one that involved zero actual baking time.
Enter the unassuming Biscoff cookie. You know the one—the delightfully crunchy, caramelized biscuit that mysteriously appears alongside your coffee at cafes. I realized that the essence of that cookie needed to be captured, magnified, and then layered into a towering, unapologetically decadent dessert. The challenge was making it taste complex without demanding complex effort. This is the ultimate lazy genius recipe, requiring no oven time but delivering flavor equivalent to a full day of artisanal pastry work.
The magic truly happens in the center, where a cloud-like cream cheese filling merges with melted cookie butter, creating a symphony of deep caramel notes and warming cinnamon. Forget subtle hints; we are diving headfirst into rich flavor. If a cozy winter blanket and a perfect cappuccino had a baby, it would be this glorious dessert. It’s the sweet treat everyone asks about, the one that makes people temporarily forget their names, lost in pure cookie euphoria.
Gathering Your Spiced Cookie Supplies
Achieving this level of dessert excellence requires simple, high-quality components. Remember, we are building texture from the bottom up—a firm, buttery crust leading to a light, spiced filling, topped with extra crunch and drizzle. Don’t skimp on the cream cheese; use full-fat for that necessary structural integrity and richness that allows the cake to hold its majestic shape.
Ingredients for the No-Bake Biscoff Cake
-
For the Crust
- 10 ounces (about 40) Biscoff cookies (or similar spiced speculoos biscuits)
- 6 tablespoons (3 ounces) unsalted butter, melted
-
For the Creamy Filling
- 16 ounces (two blocks) full-fat cream cheese, softened
- 1 cup confectioners’ sugar, sifted
- 1 teaspoon vanilla bean paste
- 1/2 cup smooth Biscoff cookie spread, melted and slightly cooled
- 1 cup heavy whipping cream, cold
- 1 teaspoon plant-based gelling agent (like agar-agar powder, optional, for extreme stability)
-
For the Topping and Garnish
- 1/2 cup smooth Biscoff cookie spread, warmed for drizzling
- 8 whole Biscoff cookies, coarsely crushed
Perfecting the Cooking Process
For this no-bake marvel, efficiency is key. Start by crushing the cookies finely for the crust layer, pressing it firmly into your springform pan. Next, prepare the cream cheese frosting, incorporating the melted Biscoff spread quickly. Finally, chill the cake for the mandatory four hours before you even think about slicing it.
Crafting the Perfect Biscoff Masterpiece
This recipe moves fast once you start whipping the cream, so ensure all your ingredients are measured and ready. A stand mixer makes this exponentially easier, transforming heavy cream into stiff peaks in mere moments, which is essential for that perfect airy filling texture we are aiming for.
Step 1: Constructing the Foundation
In a food processor, pulse the Biscoff cookies until they resemble fine, uniform crumbs. Transfer the crumbs to a medium bowl and mix thoroughly with the melted butter until everything is evenly moistened, giving it a texture similar to wet sand. Press this mixture firmly into the bottom and slightly up the sides of a 9-inch springform pan. Use the flat bottom of a drinking glass to ensure the crust is tightly packed and even. Place the pan in the freezer to set quickly while you prepare the filling.
Step 2: Whipping the Cream Dream
In a large, chilled bowl, whip the cold heavy cream until stiff peaks form. If you are using agar-agar for extra structure, mix it with a tablespoon of cold water, then dissolve it gently in a small saucepan over low heat before letting it cool slightly. Fold this gently into the whipped cream before setting the finished whipped cream aside. Keep it cold.
Step 3: Creating the Spiced Filling
In a separate large bowl, beat the softened cream cheese using an electric mixer until it is smooth and entirely lump-free. Add the sifted confectioners’ sugar and vanilla bean paste, mixing until just combined. Gently incorporate the melted cookie spread until the mixture is uniform and creamy. Now, using a rubber spatula, carefully fold the prepared whipped cream into the cream cheese mixture until the filling is homogenous and fluffy. Be cautious not to aggressively mix and deflate the air you incorporated.
Step 4: Assembly and The Wait
Pour the luxurious filling over the chilled cookie crust in the springform pan. Smooth the top surface with an offset spatula for a professional finish. Cover the pan tightly with plastic wrap and transfer it immediately to the refrigerator. This specific dessert needs a minimum of four hours to set completely, though overnight chilling ensures the cleanest slices and the best possible structural stability. Patience, truly, is your final secret ingredient for the perfect texture.
Step 5: The Grand Finale
Before serving, remove the cake from the refrigerator and carefully release the springform collar. Warm the reserved cookie spread slightly until it is easily drizzled off a spoon. Drizzle generously over the top of the cake, allowing it to cascade dramatically down the sides. Finish by sprinkling the coarsely crushed Biscoff cookies around the edge for that perfect, satisfying crunch and visual appeal.
Add Your Touch
If you prefer a tangier finish, swap half the vanilla bean paste for a teaspoon of fresh orange zest in the cream cheese filling. For a richer texture, mix finely chopped roasted pecans into the crust. You can also drizzle melted white chocolate over the finished Biscoff Cake for visual flair.
Expert Tips for Biscoff Cake Perfection
This cake is deceptively simple, but a few expert tricks will ensure your results are jaw-droppingly perfect every single time. Listen closely, these are the secrets I only tell my favorite students.
-
Ensure your cream cheese is truly at room temperature before mixing; this prevents lumps and ensures the smoothest, silkiest Biscoff filling texture possible.
-
Do not over-mix the filling once the whipped cream is incorporated; this risks deflating the cream, resulting in a dense, rather than airy, Biscoff Cake texture.
-
For easy removal from the springform pan, line the bottom with a circle of parchment paper before adding the crust mixture, guaranteeing a clean presentation.
My cousin once tried to rush the chilling time, serving it after only an hour. It was delicious but slumped dramatically, teaching us all that this Biscoff Cake demands respect and patience.
Storing & Reheating
Store this Biscoff Cake in an airtight container in the refrigerator for up to five days; it actually tastes better the second day! Since this is a chilled dessert, avoid freezing the finished cake, as the cream cheese filling tends to weep upon thawing. Always serve it cold for the best texture.
Conclusion for Biscoff Cake
This no-bake Biscoff Cake recipe proves that minimal effort can yield maximum flavor impact. From its buttery, spiced crust to the impossibly creamy, caramel-infused filling, it hits every texture and taste note perfectly. Remember to use quality, full-fat ingredients and give it plenty of time to chill—that structural integrity is non-negotiable for success. Whether you are seeking a showstopper dessert for a gathering or just need a serious cookie fix, this spiced wonder delivers absolute joy with every slice. Prepare yourself for endless compliments and a severe addiction to cookie butter.
Print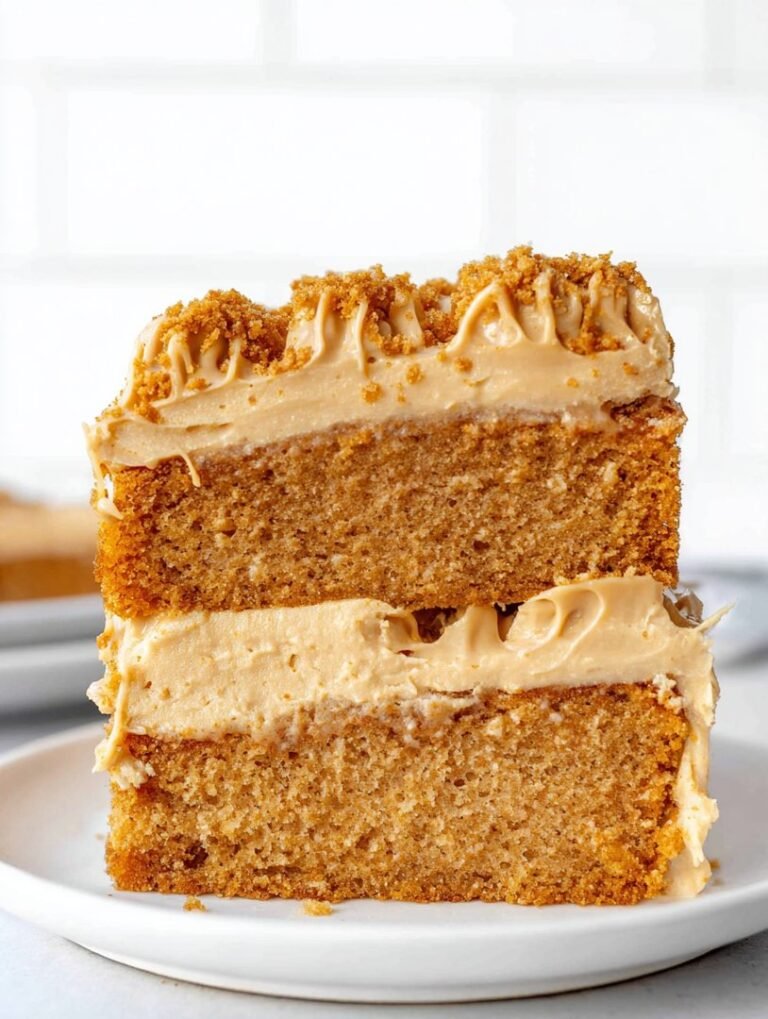
Biscoff Cake
Master the ultimate Biscoff layer cake! Its delicate, light crumb comes from carefully creaming 1 cup of butter and alternating the flour addition. This moist, spiced wonder is pure indulgence.
- Total Time: 35 minutes
- Yield: 4 servings
Ingredients
- All-purpose flour: 2 1/4 cups
- Granulated sugar: 1 3/4 cups
- Unsalted butter (softened): 1 cup (2 sticks)
- Large eggs: 4
- Baking powder: 1 tablespoon
- Whole milk or buttermilk: 1 cup
- Lotus Biscoff cookie spread (creamy): 1 (14 oz) jar
- Powdered sugar: 4 cups
Instructions
- Step 1: Preheat the oven to 350°F (175°C) and grease and flour two 8-inch round cake pans. In a large bowl, cream together the softened butter and granulated sugar until light and fluffy. Beat in the eggs one at a time, ensuring each is incorporated before adding the next.
- Step 2: In a separate bowl, whisk together the flour and baking powder. Gradually add the dry ingredients to the wet mixture, alternating with the milk, beginning and ending with the flour mixture. Mix only until just combined, being careful not to overmix the batter.
- Step 3: Divide the batter evenly between the prepared cake pans. Bake for 28-32 minutes, or until a toothpick inserted into the center comes out clean. Allow the cakes to cool in the pans for 10 minutes before inverting them onto a wire rack to cool completely.
- Step 4: While the cakes cool, prepare the Biscoff buttercream: in a large bowl, beat 1 cup of softened butter until smooth. Gradually add the powdered sugar. Melt 1 cup of the Biscoff spread slightly in the microwave (about 30 seconds) and beat it into the frosting until light and smooth.
- Step 5: Assemble the cake by placing the first cooled layer on a serving plate. Spread a generous layer of Biscoff buttercream over the top, then place the second cake layer on top. Cover the entire cake with the remaining buttercream and decorate the sides with crushed Biscoff cookies or a drizzle of warmed Biscoff spread.
Notes
- For maximum freshness, keep the assembled cake covered and airtight at room temperature for up to two days, or refrigerate for longer storage, but always let it sit out for 30 minutes before serving to ensure the cake and frosting are soft.
- If the Biscoff drizzle on the finished cake hardens significantly, lightly microwave a plated slice for 5-10 seconds to slightly warm the frosting and soften the spread texture.
- This intensely rich and spiced cake pairs beautifully with a scoop of vanilla bean ice cream or a side of tart raspberries to balance the sweetness of the Biscoff buttercream.
- When preparing the Biscoff buttercream, ensure the small amount of melted spread is slightly cooled before beating it in; if the melted spread is too hot, it can melt the softened butter and cause your frosting to break or curdle.
- Prep Time: 15 minutes
- Cook Time: 20 minutes
- Method: Stovetop
- Cuisine: American


Leave a Comment