


Forget your flour-dusting fears, because we are diving headfirst into the magnificent world of the best-tasting appetizers known to humankind. Imagine tearing into a cloud of soft, garlicky dough—pure bliss awaits.
I perfected these incredibleGluten-Free Garlic Knotsafter one too many tragic attempts at bread-making, and trust me, this recipe is so easy, even my cat could knead it (if she had opposable thumbs, of course).
- Effortless Dough Mastery This recipe utilizes a simple, forgiving gluten-free flour blend, making preparation remarkably quick and stress-free for novice bakers.
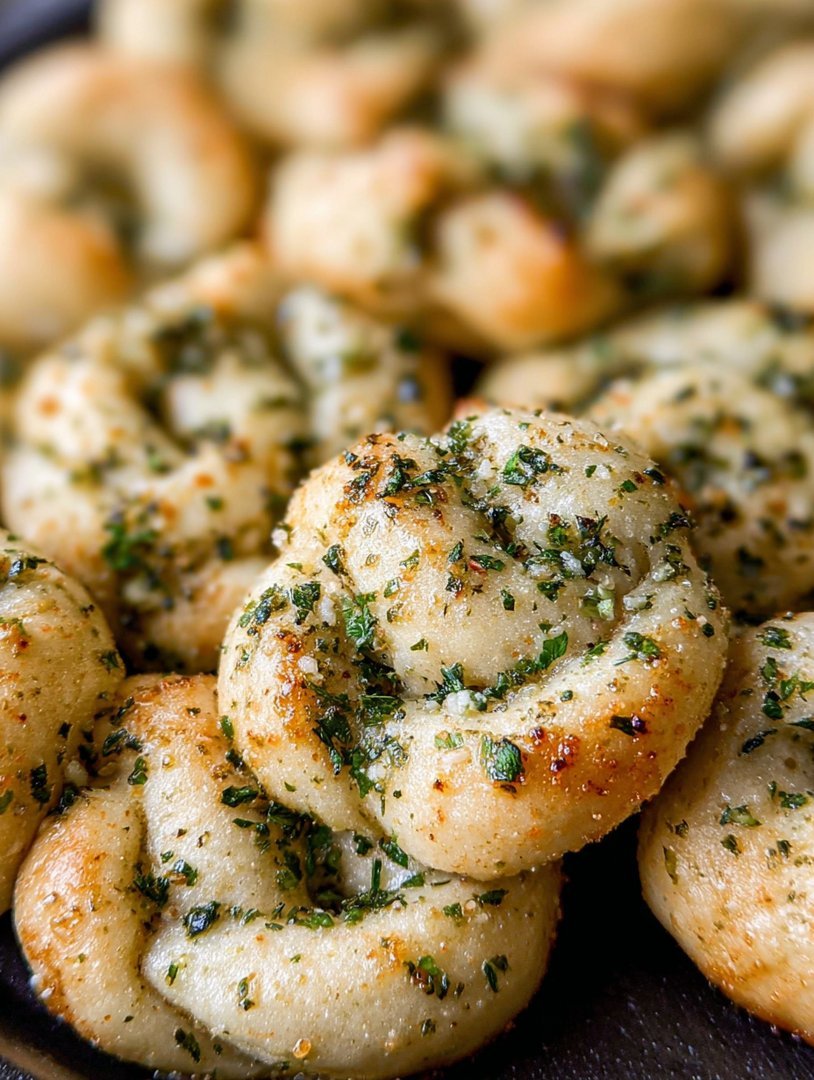
- Intense Flavor Burst Each knot is bathed in a luxurious blend of fresh garlic, rich olive oil, and fragrant parsley, guaranteeing maximum savory impact in every bite.
- Picture-Perfect Presentation These golden-brown knots twist beautifully, offering an appealing, artisanal look perfect for entertaining guests or elevating family dinners.
- Highly Versatile Snack Serve these warm, irresistible knots alongside marinara sauce, hearty chili, or a creamy hummus for a magnificent, satisfying appetizer.
The Epic Quest for the Perfect Gluten-Free Garlic Knots
My journey to these flawlessGluten-Free Garlic Knotsbegan, as all great culinary adventures do, with abject failure. I remember the first time I attempted gluten-free bread. It wasn’t bread; it was a brick. A dense, pale, doorstop of disappointment. The dough refused to rise, laughed in the face of yeast, and achieved a structural integrity usually reserved for granite countertops. If you’ve ever baked without gluten, you know the struggle is real. Achieving that light, airy texture that characterizes truly great garlic knots seems like a miracle.
However, after extensive experimentation (and a few therapy sessions dedicated solely to kneading frustration), I cracked the code. The secret isn’t just the ingredients; it’s the technique, specifically how you handle the hydration and proofing. Gluten-free dough acts more like thick batter than traditional wheat dough. You must embrace the stickiness and let go of the need for that elastic stretch. This specific blend and method ensures the knots stay tender, soft, and unbelievably fluffy inside, while achieving that coveted golden, crunchy exterior.
These garlicky appetizers are essential for any gathering, whether you are hosting a formal dinner party or just watching a movie on the couch. They disappear faster than leftovers on November Feast morning, so consider doubling the recipe immediately. People often ask me if they truly taste like the real deal, and my answer is always the same: they taste better. The richness of the olive oil and the freshness of the herbs truly shine when they aren’t overshadowed by heavy wheat flour.
Understanding the Dough: Key to Fluffy GF Knots
Making light, fluffy dough when avoiding gluten requires understanding the role various starches and binders play. Since we don’t have gluten—the protein network that gives traditional bread its structure and elasticity—we rely heavily on ingredients like psyllium husk powder or xanthan gum. For this recipe, the xanthan gum is our personal superhero, replacing the necessary elasticity that allows the dough to stretch slightly and capture the gases released by the yeast. Without it, you truly end up with that infamous “brick.”
Hydration is another crucial factor. We use warm water and sometimes a touch of sugar or agave nectar to wake up the active dry yeast. The temperature of the water is vital—too hot, and you annihilate your yeast; too cold, and your yeast sleeps through the entire party. Aim for about 105°F to 115°F (40°C to 46°C), which feels warm but not scalding to the touch. Once the yeast is bubbly and foamy, you know it’s ready to perform its magical duties.
Mixing time is relatively short. Unlike wheat dough, which benefits from vigorous kneading to develop gluten strands, gluten-free dough only needs enough mixing time to fully hydrate the flour blend and the xanthan gum. Overmixing can actually lead to a gummy texture, which is the nemesis of all good baked goods. Use a stand mixer with a dough hook if you have one, or mix thoroughly with a sturdy wooden spoon until the dough comes together in a sticky, cohesive mass. Don’t worry if it looks wet; that moisture is essential for keeping the final product tender.
Proofing theseGluten-Free Garlic Knotstakes a bit longer than their wheat counterparts. Provide them with a warm, draft-free environment. Think of the proofing stage as a spa day for your dough; it needs warmth and peace to relax and expand properly. Cover the bowl loosely with a damp tea towel or plastic wrap and allow it to double in size. This can take anywhere from 60 to 90 minutes, depending on the temperature of your kitchen. Patience is a chef’s best accessory here.
Ingredients for Gluten-Free Garlic Knots
Here’s what you’ll need to make this delicious dish:
- Gluten-Free All-Purpose Flour BlendChoose a blend specifically designed for baking, ideally one that contains xanthan gum, or you will need to adjust the recipe accordingly.
- Active Dry YeastEssential for lift and flavor, ensure your yeast is fresh and properly stored in a cool, dry place before use.
- Warm WaterMust be between 105°F and 115°F (40°C to 46°C) to effectively activate the yeast without killing it.
- Granulated SugarA small amount acts as food for the yeast, helping it to bloom quickly and efficiently.
- SaltCrucial for balancing the flavors in the dough and controlling the yeast’s activity during fermentation.
- Olive OilUsed both in the dough for richness and elasticity and heavily in the finishing sauce for that signature garlicky coating.
- Xanthan GumIf your flour blend does not include it, this binder provides the necessary structure to prevent the knots from crumbling.
- Fresh GarlicThe star of the show; use high-quality, freshly minced garlic for the most pungent and authentic flavor profile.
- Dried or Fresh ParsleyAdds a beautiful green color and herbal brightness to the savory butter and oil topping.
- Plant-Based Butter AlternativeUsed alongside olive oil in the finishing glaze to create a creamy texture and enhance the overall savory notes.
The full ingredients list, including measurements, is provided in the recipe card directly below.
How to Make Gluten-Free Garlic Knots
Follow these simple steps to prepare this delicious dish:
-
Step 1: Activate the Yeast
In a large bowl or the bowl of a stand mixer, combine the warm water, granulated sugar, and yeast. Let this mixture sit undisturbed for 5 to 10 minutes until a foamy layer forms on top, indicating the yeast is active and ready.
-
Step 2: Prepare and Mix the Dough
Add the gluten-free flour blend, xanthan gum (if using), salt, and olive oil to the yeast mixture. Mix on low speed with a dough hook or vigorously by hand for about 3 minutes until a wet, sticky, cohesive dough forms. Scrape down the sides of the bowl.
-
Step 3: Proof the Dough
Transfer the sticky dough to a lightly oiled bowl, turning to coat. Cover the bowl tightly with plastic wrap or a damp kitchen towel. Place the bowl in a warm spot, like a slightly warmed oven (turned off!), and allow the dough to rise until roughly doubled in size, about 60 to 90 minutes.
-
Step 4: Shape and Bake the Knots
Gently turn the proofed dough out onto a lightly floured gluten-free surface. Cut the dough into 1-inch thick strips and carefully tie each strip into a simple knot. Arrange the knots on a baking sheet lined with parchment paper, leaving space between them. Preheat your oven to 400°F (200°C). Bake for 12 to 15 minutes, or until the knots are puffed and beautifully golden brown.
-
Step 5: Create the Garlic Coating
While the knots bake, prepare the irresistible topping. Melt the plant-based butter alternative in a small saucepan and stir in the minced fresh garlic, olive oil, and dried parsley. Gently simmer this mixture for about 2 minutes to meld the flavors, ensuring the garlic doesn’t burn.
-
Step 6: Glaze and Serve
Remove the hotGluten-Free Garlic Knotsfrom the oven. Immediately brush the generous garlic and herb mixture over every surface of the warm knots. The knots should soak up the flavor instantly. Transfer to plates and drizzle with any remaining sauce for the perfect finishing touch.
Troubleshooting Common Gluten-Free Knot Issues
Even with the best instructions, gluten-free baking can sometimes present unexpected challenges. If your knots came out dense, the most likely culprit is either inactive yeast or insufficient proofing time. Always check the yeast expiry date and make absolutely certain the water temperature is correct. If the yeast didn’t bloom, start over. If the dough didn’t double in size after the initial rise, place it in a warmer location and give it more time; sometimes, cool ambient temperatures slow the process dramatically. If the dough handles too sticky to knot, avoid the temptation to add excessive amounts of flour, as this dries out the final product. Instead, lightly oil your hands and the cutting surface, and work quickly.
Another common concern is the knots tasting too dry. This usually happens if they were baked too long. Gluten-free bread products can go from perfectly soft to rock-hard quickly. Start checking them at the 12-minute mark; they should be golden but still soft to the touch. The final coating of garlic oil also adds crucial moisture and flavor, so apply it generously right when the knots come out of the oven.
Perfect Pairings: Serving Suggestions for Garlic Knots
These garlicky delights are versatile culinary chameleons. They make an ideal appetizer alongside almost any Italian-inspired meal, such as a hearty vegetarian lasagna or a creamy tomato soup. They are also absolutely essential for dipping. Pair these savory dough treats with a high-quality, homemade marinara sauce or a robust roasted red pepper dip.
For something slightly unconventional, try serving them with a simple whipped ricotta spread seasoned with fresh herbs and black pepper. They also work wonderfully as a side to a main course featuring beef or lamb, offering a comforting, carby element to soak up rich sauces. Remember to serve these knots warm; reheating them briefly in the oven or air fryer helps restore their soft texture if they cool down.
FAQs About Gluten-Free Garlic Knots
Can I prepare the dough ahead of time?
Yes, you can prepare the dough through Step 3 (the initial rise). After the dough has doubled, punch it down gently, cover it tightly, and place it in the refrigerator for up to 24 hours. When ready to bake, remove the dough, let it sit at room temperature for 30 minutes, then proceed with shaping and baking.
What is the best type of gluten-free flour blend to use?
Look for commercial blends specifically labeled as “cup-for-cup” or “measure-for-measure.” Ensure they contain a mix of rice flour, potato starch, and tapioca starch, and, ideally, xanthan gum for the best texture in these savory dough treats.
How should I store leftovers?
Store leftover garlic knots in an airtight container at room temperature for up to two days, or in the refrigerator for up to four days. Reheat them briefly in a 350°F (175°C) oven or in a toaster oven for a few minutes until soft and warm again.
Can I freeze the baked garlic knots?
Absolutely. Once baked and fully cooled, place theGluten-Free Garlic Knotsin a freezer-safe bag or container. They can be frozen for up to two months. Thaw them overnight and reheat in the oven until heated through for the best results.
There is a specific kind of agony reserved for the gluten-intolerant, and it usually strikes when a pizza box is opened. It is the moment when the glorious, greasy, puffy scent of fresh dough hits you, followed immediately by the soul-crushing realization that you cannot participate in the buttery, garlicky joy of traditional bread knots. For years, I chased that ghost—the elusive, springy texture, the sharp punch of roasted garlic, and the satisfying pull of a perfect knot.
Most attempts at wheat-free alternatives result in what I affectionately call “brick-and-crumbles.” They are either so dense they could be used as doorstops, or they disintegrate into a sandy pile the moment they leave the oven. But after countless bags of specialized flour and enough failed experiments to open a gluten-free concrete factory, I cracked the code. Welcome to the world of truly irresistibleGluten-Free Garlic Knots—the kind that makes you question why you ever bothered with wheat in the first place.
The Quest for Texture: Why GF Baking Fails (and How We Win)
The biggest challenge in making any gluten-free bread product is mimicking gluten’s ability to trap gas and provide structure. When gluten is absent, you need a powerful combination of binders and starches. This recipe relies on a high-quality, pre-mixed gluten-free flour blend that already contains xanthan gum, coupled with a specific ratio of milk and butter to ensure the dough remains moist and pliable—not sticky, and certainly not brittle.
I remember serving my first successful batch of these rolls. My neighbor, a traditional Italian baker who uses yeast and flour like it’s a religious ritual, sniffed suspiciously at the basket. He took a tentative bite, his eyes wide, and then proceeded to finish four of them while mumbling about “the dark arts.” That, my friends, is the highest compliment any gluten-free baker can receive. These wheat-free rolls are soft, chewy, incredibly flavorful, and perfect for dipping into marinara sauce.
Essential Tools and Preparation
You don’t need a stand mixer, but it certainly speeds things up. The most critical tool, however, is patience. Gluten-free dough hydrates differently than wheat dough, so giving it time to rest is non-negotiable. Also, make sure your baking sheet is lined with parchment paper; these beauties are too precious to risk sticking.
The Magic Recipe for Gluten-Free Garlic Knots
Get ready to transform your kitchen into an Italian bakery—without the gluten guilt.
Ingredients for the Knots
- 2 ¼ teaspoons active dry yeast (one standard packet)
- 1 cup warm whole milk or non-dairy equivalent (around 105°F to 115°F)
- 1 tablespoon granulated sugar
- 3 cups all-purpose gluten-free flour blend (ensure it contains xanthan gum)
- 1 teaspoon salt
- 2 tablespoons melted unsalted butter, cooled slightly, plus extra for the bowl
- 1 large egg, lightly beaten
Ingredients for the Garlic Butter Infusion
- ½ cup unsalted butter (1 stick)
- 6 large cloves garlic, minced finely
- ¼ cup fresh parsley, finely chopped
- 1 teaspoon dried oregano (optional)
- Pinch of red pepper flakes (optional, for a kick)
Step-by-Step Instructions
Step 1: Activate the Yeast
In a small bowl, whisk together the warm milk and sugar. Sprinkle the yeast over the liquid. Let this mixture sit undisturbed for 5 to 10 minutes until it becomes foamy and bubbly. If it doesn’t foam, your yeast is likely old, or your milk was too hot or too cold—start over!
Step 2: Mix the Dry Ingredients
In a large mixing bowl, combine the gluten-free flour blend and salt. Make a well in the center of the flour mixture.
Step 3: Form the Dough
Pour the activated yeast mixture, the melted butter, and the beaten egg into the well. Mix with a spoon or a dough hook on a stand mixer until a soft, shaggy dough forms. Unlike traditional dough, you will not knead this heavily. Mix just until everything is incorporated and the dough pulls away from the sides of the bowl. It will be much softer than typical bread dough.
Step 4: The First Rise
Lightly grease a clean bowl with butter. Place the dough inside, turning it once to coat. Cover the bowl tightly with plastic wrap or a kitchen towel. Place it in a warm, draft-free spot (like an oven turned off with the light on) for 60 to 90 minutes. The dough should roughly double in size, though the rise will be less dramatic than traditional bread.
Step 5: Shape the Knots
Preheat your oven to 375°F (190°C). Line two baking sheets with parchment paper. Gently punch down the risen dough to release the air. Turn the dough out onto a lightly floured surface dusted with gluten-free flour.
Divide the dough into 18 to 20 equal pieces. Roll each piece into a small rope, about 5 to 6 inches long. Tie the rope into a simple overhand knot. Place the shaped knots onto the prepared baking sheets, leaving about an inch between them.
Step 6: The Second Rise (Optional but Recommended)
Cover the baking sheets loosely and let the knots rise again for 20 minutes while the oven finishes heating. This gives them a final bit of lift before baking.
Step 7: Bake to Golden Perfection
Bake theGluten-Free Garlic Knotsfor 15 to 18 minutes, or until they are puffed up and lightly golden brown on top. They should sound hollow when tapped gently.
Step 8: Prepare the Garlic Infusion
While the knots are baking, melt the ½ cup of butter in a small saucepan over medium-low heat. Add the minced garlic and cook gently for about 2 minutes, being careful not to brown or burn the garlic. Remove from the heat and stir in the fresh parsley, oregano, and red pepper flakes if using.
Step 9: Bathe and Serve
As soon as the knots come out of the oven, brush them generously with the warm garlic butter infusion. The hot rolls will soak up the melted butter immediately, locking in all that sensational flavor. Serve immediately with your favorite pasta dish or a simple bowl of soup.
Troubleshooting Common GF Issues
Why is my dough too sticky?
Gluten-free dough is notoriously sticky. If it is unmanageably wet after the first rise, slowly incorporate another tablespoon of gluten-free flour. Remember, a slightly sticky dough is better than a dry one, as dryness leads to that dreadful crumbly texture. Use oiled hands or a well-dusted surface when shaping the knots.
The knots didn’t rise much. What happened?
The most common culprit is yeast failure. Ensure your milk was the correct temperature (lukewarm, not hot). Also, make sure you are using fresh yeast. A secondary cause could be a cold environment; the dough needs warmth to thrive.
Perfecting the Cooking Process
Start by activating the yeast while you mix the dry ingredients thoroughly. Shape the knots quickly once the dough is pliable, ensuring even size for uniform baking. Bake until lightly golden before brushing generously with the fragrant garlic butter infusion.
Add Your Touch
Elevate the flavor with smoked paprika or dried oregano mixed into the garlic butter. For a cheesy twist, incorporate a tablespoon of nutritional yeast into the dough mixture. You can substitute the fresh parsley with chives or finely chopped basil for a different herbaceous note.
Storing & Reheating
Store cooled knots in an airtight container at room temperature for up to three days. To reheat, wrap them in foil and warm in a 350°F oven for five to seven minutes, restoring that delightful soft chewiness and releasing the trapped garlic scent.
Chef’s Expert Tips for Perfect Gluten-Free Rolls
My nephew, who usually despises gluten-free bread, devoured an entire basket of these knots, claiming they were better than the pizzeria version. I knew then I had finally nailed the recipe.
- Use warm, but not hot, water for activating the yeast; water that is too hot will kill the yeast and prevent a proper rise.
- Do not overbake the knots; they should look pale golden, as overbaking results in a dry, crumbly texture typical of subpar gluten-free items.
- Rest the dough for the full ten minutes after mixing. This allows the starches in the gluten-free flour blend to fully hydrate, preventing a gritty texture.
Frequently Asked Questions About Wheat-Free Bread
Can I freeze these Gluten-Free Garlic Knots?
Yes, absolutely! Once they have cooled completely and have been brushed with the garlic butter, place them in a freezer-safe bag. They will keep for up to three months. Thaw them overnight and reheat in the oven.
What is the best type of gluten-free flour blend to use?
Look for a quality “all-purpose” blend that specifically states it contains xanthan gum. Brands like King Arthur Measure for Measure or Bob’s Red Mill 1-to-1 Baking Flour often yield the best results for yeast breads.
Can I make the dough ahead of time?
While you can, gluten-free dough tends to dry out or over-ferment if left in the fridge for too long. For the freshest result, prepare the dough, let it complete its first rise, shape and bake immediately.
The Quest for Perfect Gluten-Free Dough Knots
If you grew up associating Friday night pizza deliveries with that magnificent, greasy, garlicky side order—the knotted bundles of dough that somehow tasted better than the pizza itself—then you know the struggle. Going gluten-free often means sacrificing those little pillars of comfort. We’ve all tried the store-bought versions that crumble into sad little pebbles, leaving a trail of regret and disappointment. But fear not, fellow bread enthusiasts! After countless kitchen battles involving sticky hands, questionable flour explosions, and several almost-edible bricks, I have finally cracked the code for truly phenomenalGluten-Free Garlic Knots.
These are not just good for being gluten-free; they are simply phenomenal. They boast a tender interior, a slight chewiness, and that intoxicating cloud of pungent garlic butter that makes your neighbors wonder what glorious feast you’re preparing. Forget dense, gritty bread—this recipe delivers light, fluffy, and perfectly shareable savory delights that satisfy that deep-seated carby craving.
Why Gluten-Free Dough Hates You (And How to Fix It)
Traditional bread relies on gluten strands to create structure and elasticity. When gluten is out of the picture, we have to trick the dough into behaving using specialized ingredients. The key players here are a quality gluten-free all-purpose flour blend (one that already contains xanthan gum is ideal) and careful hydration. GF dough is thirsty, and if you treat it exactly like wheat dough, it will rebel by turning into dry sand or a crumbly mess.
We need a slightly stickier consistency than you might be used to. Do not be tempted to add too much extra flour during kneading or shaping! We are not aiming for firm, bouncy dough; we are aiming for something cooperative that holds its shape once baked. Patience during the resting phase is also essential, allowing the starches and gums time to properly hydrate, ensuring your knots rise high and stay pillowy soft.
Tools and Ingredients for Your Garlic Knot Victory
Before you unleash the garlic storm, ensure you have the proper supplies lined up. While baking can sometimes feel like a complex chemistry experiment, making these savory gluten-free knots requires only basic kitchen equipment and a few specific ingredients that ensure maximum deliciousness without the gluten.
Essential Kitchen Gear
- Large mixing bowl
- Stand mixer with dough hook attachment (optional, but highly recommended)
- Measuring cups and spoons
- Baking sheet lined with parchment paper
- Small saucepan for melting the butter
- Pastry brush
Ingredients List for Authentic Gluten-Free Garlic Knots
- 1 ½ cups warm water (about 105°F to 115°F)
- 1 teaspoon sugar
- 2 ¼ teaspoons active dry yeast (one standard packet)
- 3 cups high-quality gluten-free all-purpose flour blend (must contain xanthan gum)
- 1 teaspoon fine sea salt
- 2 tablespoons olive oil, plus more for coating
- 4 tablespoons unsalted butter or plant-based butter alternative, melted
- 4 cloves garlic, finely minced
- ½ cup fresh parsley, chopped
- ½ teaspoon dried oregano
- Pinch of red pepper flakes (optional, for a little kick)
Step-by-Step Guide to Knot Nirvana
Preparing the Dough (The Sticky Phase)
In your large mixing bowl or the bowl of your stand mixer, combine the warm water and sugar. Sprinkle the yeast over the top and let it sit for about 5 to 10 minutes until it becomes frothy and foamy—that’s how you know the yeast is alive and ready to perform. Add the GF flour blend, salt, and 2 tablespoons of olive oil to the wet mixture. If using a stand mixer, mix on low speed until a shaggy dough forms, then increase to medium-low and mix for 3 to 4 minutes. If mixing by hand, stir vigorously until the dough comes together.
The dough will be wet and sticky, which is exactly what we want. Lightly oil a clean bowl. Place the dough ball inside, turning it to coat. Cover the bowl tightly with plastic wrap or a clean kitchen towel and place it in a warm spot. Let the dough rise for about 60 to 90 minutes, or until it has nearly doubled in size. This step is non-negotiable for achieving fluffy knots.
Knotting and Baking (The Transformation)
Preheat your oven to 375°F (190°C). Gently punch down the dough to release the air. Turn the dough out onto a lightly floured surface (use GF flour for dusting). It might be slightly sticky, so work quickly. Roll the dough into a rectangular shape, roughly ½ inch thick. Using a pizza cutter, slice the dough into strips about 1 inch wide and 6 inches long.
Now comes the fun part: knotting! Take one strip and tie it into a simple overhead knot, tucking the ends under the middle. Arrange the finished knots onto your prepared baking sheet, leaving about an inch of space between them. Bake for 15 to 18 minutes, or until the knots are golden brown and sound hollow when tapped. While they are baking, prepare the glorious garlic butter topping.
The Glorious Garlic Butter Bath
While the knots are finishing up in the oven, melt the butter in a small saucepan over low heat. Once melted, stir in the minced garlic, chopped parsley, dried oregano, and red pepper flakes (if using). Remove the sauce from the heat.
As soon as you pull those magnificent, goldenGluten-Free Garlic Knotsfrom the oven, immediately brush them generously with the pungent, herby butter mixture. Don’t be shy; you want every nook and cranny saturated with flavor. Serve immediately while they are still steaming hot for the ultimate comforting bite. These savory pull-aparts pair perfectly with rich beef stew or a simple marinara dipping sauce.
Conclusion for Gluten-Free Garlic Knots
Say goodbye to disappointing, dense gluten-free bread experiments and hello to a new standard of savory baking. These homemadeGluten-Free Garlic Knotsoffer the perfect combination of fluffy texture and intense, satisfying flavor, proving that dietary restrictions don’t mean sacrificing comfort food classics. The process might require a little patience during the rise, but the payoff—a batch of golden, buttery, garlicky perfection—is absolutely worth the effort. Whip up a batch for your next gathering or pizza night, and watch them disappear faster than you can say “extra garlic.” This recipe is guaranteed to be a new family favorite, earning a permanent spot in your rotation.
Print
Gluten-Free Garlic Knots
Achieve soft, pillowy garlic knots without the gluten! Our specialized yeast-activated blend yields a surprisingly smooth, sticky dough after a mandatory 60-minute rise.
- Total Time: 35 minutes
- Yield: 4 servings
Ingredients
- Gluten-Free All-Purpose Flour Blend (with xanthan gum): 2 cups
- Active Dry Yeast: 1 packet (about 2 ¼ teaspoons)
- Warm Water (105-115°F): 1 cup
- Granulated Sugar: 1 tablespoon
- Olive Oil (divided): 3 tablespoons
- Salt: 1 teaspoon
- Unsalted Butter (melted): ½ cup
- Minced Garlic (fresh, finely chopped): 4 large cloves
Instructions
- Step 1: In a large bowl or stand mixer, combine the warm water and granulated sugar. Sprinkle the active dry yeast over the mixture and let it sit for 5-10 minutes until foamy. Add the gluten-free flour blend, salt, and 2 tablespoons of olive oil to the yeast mixture. Mix with a dough hook or wooden spoon until a smooth, sticky dough forms (gluten-free dough will be softer than wheat dough).
- Step 2: Lightly grease a bowl with the remaining 1 tablespoon of olive oil. Place the dough in the bowl, cover it with plastic wrap or a damp towel, and allow it to rise in a warm place for 45 to 60 minutes, or until doubled in size. Preheat the oven to 375°F (190°C) and line a baking sheet with parchment paper.
- Step 3: Punch down the proofed dough gently. Turn it out onto a lightly floured gluten-free surface. Divide the dough into 12-15 equal pieces. Roll each piece into a rope approximately 6 inches long and ½ inch thick, then tie it into a simple knot shape, tucking the ends underneath.
- Step 4: Place the knots on the prepared baking sheet, leaving about 1 inch of space between them. Bake for 15-20 minutes, or until the knots are puffed up and golden brown. While the knots are baking, prepare the topping.
- Step 5: In a small bowl, combine the melted butter and the minced garlic. Remove the garlic knots from the oven and immediately brush the entire butter and garlic mixture over the hot knots, ensuring they are well coated. Serve warm.
Notes
- Reheat leftover knots by wrapping them in aluminum foil and baking in a 300°F (150°C) oven for 5 to 7 minutes to gently warm them through without drying out the gluten-free dough.
- For maximum freshness, store cooled leftovers in an airtight container at room temperature for up to three days, though they are best consumed within 24 hours.
- Since gluten-free dough is naturally softer and stickier, minimize the amount of extra flour used when rolling the ropes in Step 3; excess flour will make your final knots tough.
- Elevate your serving experience by pairing these knots with a generous bowl of warm marinara sauce for dipping, or as a savory side for a rich gluten-free lasagna or chicken parmesan.
- Prep Time: 15 minutes
- Cook Time: 20 minutes
- Method: Stovetop
- Cuisine: American
FAQs
Can I make the dough for these Gluten-Free Garlic Knots ahead of time?
Absolutely, you can prepare the dough for these delicious knots up to 24 hours in advance. Once you complete the first rise, gently punch the dough down, cover the bowl tightly, and place it in the refrigerator. The cold temperature slows the yeast activity dramatically. When you are ready to bake, pull the dough out of the fridge and let it sit at room temperature for about 30 minutes before shaping and knotting. This ensures the dough is pliable and ready to expand beautifully in the oven, resulting in tender, soft baked goods perfect for sharing.
What is the best way to store and reheat leftover knots?
If you somehow manage to have leftovers, store the cooled knots in an airtight container at room temperature for up to two days. For optimal freshness and texture, reheat them briefly. Wrap them loosely in aluminum foil and warm them in a 350°F (175°C) oven for about 5 to 7 minutes. Alternatively, you can use an air fryer for 3 minutes for a slightly crispier exterior. Avoid microwaving, as this tends to make the gluten-free dough tough and rubbery, compromising the perfect pillowy texture we worked so hard to achieve.
Can I freeze these Gluten-Free Garlic Knots for later use?
Yes, freezing these savory treats works wonderfully. You have two options: freezing the raw dough or freezing the fully baked knots. To freeze raw dough, complete the first rise, then shape and knot the dough, placing them on a parchment-lined baking sheet. Flash freeze them until solid, then transfer to a freezer bag. Bake from frozen, adding a few extra minutes to the baking time. To freeze baked knots, let them cool completely, then freeze them in an airtight container. Thaw at room temperature and refresh quickly in the oven before serving.
How can I adapt these Gluten-Free Garlic Knots to be dairy-free or vegan?
Making these already fantastic savory rolls dairy-free is remarkably simple. The recipe already uses water and oil, so the only adjustment necessary is the butter used in the topping. Simply substitute the melted unsalted butter with a high-quality, plant-based butter alternative. Most popular brands of plant-based butter melt and taste exactly like dairy butter when mixed with garlic and herbs. Ensure your GF flour blend is suitable for vegan diets if needed. This substitution ensures you maintain the rich, buttery flavor while keeping the knots entirely plant-based and incredibly delicious.


Leave a Comment