


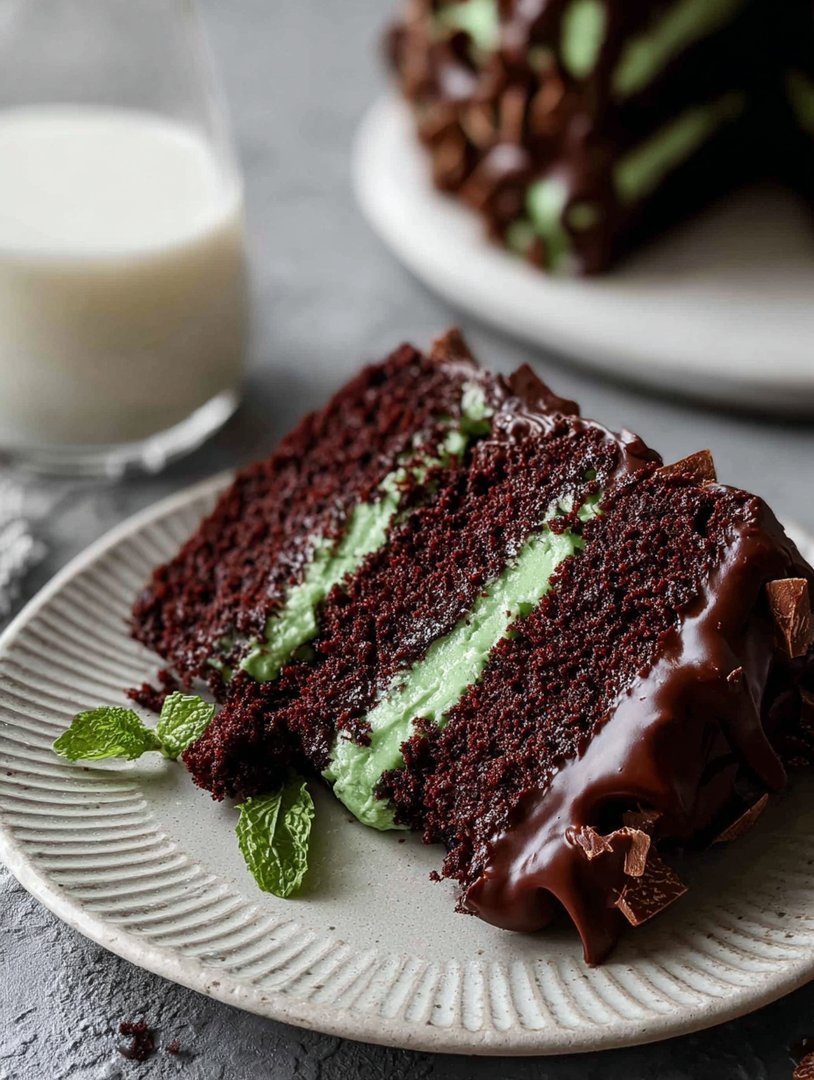
Forget those fussy desserts; this is the cake that makes you feel instantly seven again. The rich, dark cocoa meets that dazzling, cool burst of mint—it’s culinary magic, a perfect flavor combination.
This perfect marriage of flavors creates the ultimate treat: a decadentChocolate Mint Cakethat cures everything from Monday blues to existential dread.
This recipe delivers intense cocoa depth paired with a refreshing mint finish, avoiding any overly artificial or toothpaste-like taste.
Its striking two-tone presentation with dark chocolate layers and vibrant green frosting makes it a showstopper for any celebration.
The layers are surprisingly simple to bake and stack, proving you do not need professional training to create bakery-quality results.
Easily adaptable for cupcakes or a sheet cake, this versatile dessert is suitable for everything from picnics to formal dinners.
The Green Dream: Why Chocolate Mint Cake is Pure Nostalgia
Everyone has that one dessert that transports them instantly back to childhood. For me, it wasn’t some elaborate French pastry; it was the simple, unapologetic boldness of chocolate combined with the shocking freshness of mint. My introduction to this classic combination happened at a painfully suburban block party, where Aunt Mildred (bless her cotton socks) insisted her lukewarm lemon squares were the star of the show.
I was eight years old, tasked with guarding a suspiciously dense sheet cake, when I spied it: a triple-layered marvel, dripping with glossy, dark ganache and screamingly green frosting. It looked like a swamp creature’s wedding cake, but in the best possible way. I risked the wrath of Mildred, swiped a slice, and my life changed forever. The contrast was incredible—the deep, almost bitter cocoa layer softened by the cloud-like, cool mint buttercream. It wasn’t just cake; it was an experience. Mildred’s lemon squares, meanwhile, remained untouched, wilting slowly under the summer sun.
That memory is precisely what inspired this recipe. This isn’t just a cake; it’s a time machine designed to conjure joy, laughter, and perhaps a tiny bit of competitive spirit against any overly ambitious relatives. We are focusing on maximizing that rich, intense chocolate flavor using high-quality cocoa powder and coupling it with just the right amount of mint extract—enough to shine, but not so much that it tastes like you accidentally bit into a tube of toothpaste. This specificChocolate Mint Cakerecipe balances moisture and structure beautifully, ensuring the crumb stays tender even several days after baking. We achieve that depth by using hot liquid in the batter, which helps bloom the cocoa and gives the finished product an almost fudgy texture. Get ready to create a dessert that will undoubtedly steal the spotlight at your next gathering, leaving rival desserts in its shimmering, green shadow.
Ingredients for Chocolate Mint Cake
Here’s what you’ll need to make this delicious dish:
- All-Purpose FlourUse a standard spoon-and-level technique to measure the flour accurately, preventing a dense cake layer.
- Unsweetened Cocoa PowderOpt for high-quality, dark cocoa powder (like Dutch-process) for the richest, most intense chocolate flavor profile.
- Baking Soda and Baking PowderThis duo works together to provide the perfect lift and rise, ensuring a light and airy texture in the cake layers.
- SaltJust a small amount is crucial for balancing the sweetness and enhancing the deep chocolate notes.
- Granulated SugarProvides sweetness and helps keep the cake moist by dissolving into the batter during mixing.
- EggsEnsure the eggs are at room temperature before mixing, which allows them to emulsify better with the other ingredients, leading to a smoother batter.
- Vegetable OilUsing oil instead of butter contributes to a supremely moist cake that stays tender for longer.
- ButtermilkThe acidity reacts with the baking soda, tenderizing the cake crumb and adding a subtle tanginess that complements the chocolate.
- Vanilla Bean PasteAdds a depth of flavor to the chocolate layers, rounding out the sharpness of the cocoa.
- Hot Coffee or Hot WaterThis crucial liquid “blooms” the cocoa powder, releasing its full flavor potential and thinning the batter to the perfect consistency.
- Unsalted Butter (for frosting)Use softened, good-quality butter for a smooth, creamy base for the delicious mint buttercream.
- Powdered Sugar (for frosting)Must be sifted thoroughly to avoid lumps and ensure the buttercream is silky smooth.
- Peppermint Extract (for frosting)Use this carefully; a little goes a long way to achieve that signature cool mint flavor.
- Green Food Coloring (for frosting)Gel food coloring works best for achieving a vibrant, true green color without thinning the frosting.
The full ingredients list, including measurements, is provided in the recipe card directly below.
How to Make Chocolate Mint Cake
Follow these simple steps to prepare this delicious dish:
Step 1: Prep the Pans and Dry Ingredients
Preheat your oven to 350°F (175°C). Grease and flour two 9-inch round cake pans or line them with parchment paper circles. In a large bowl, whisk together the flour, cocoa powder, baking soda, baking powder, and salt. Make sure there are no lumps in the cocoa, creating a homogenous mixture.
Step 2: Combine Wet Ingredients and Sugars
In a separate, medium bowl, whisk the granulated sugar, room-temperature eggs, vegetable oil, buttermilk, and vanilla bean paste until they are fully combined and slightly frothy. This liquid mixture forms the foundation of the cake’s tenderness.
Step 3: Mix the Batter and Bloom the Cocoa
Gradually pour the wet ingredients into the dry ingredients, mixing on low speed until just combined. Slowly pour in the hot coffee or hot water while the mixer is running; the batter will be very thin, but this is exactly right. Divide the batter evenly between the two prepared cake pans.
Step 4: Bake the Layers
Bake the cake layers for 30 to 35 minutes, or until a wooden toothpick inserted into the center comes out with only moist crumbs attached. Cool the cakes in the pans for 10 minutes before inverting them onto a wire rack to cool completely. Do not attempt to frost warm cakes, as the buttercream will simply melt off.
Step 5: Prepare the Mint Buttercream
While the cakes cool, beat the softened butter until light and fluffy. Gradually add the sifted powdered sugar, alternating with a splash of milk or heavy cream if necessary, until the frosting reaches a pipeable consistency. Stir in the peppermint extract and a few drops of green food coloring until you achieve your desired color and flavor intensity.
Step 6: Assemble and Finish
Once the layers are completely cool, place the first layer on a serving platter. Spread a generous amount of mint buttercream evenly over the top, then carefully place the second cake layer on top. Frost the entire exterior of theChocolate Mint Cakewith the remaining buttercream, then decorate with chocolate shavings or cookie crumbs for the perfect finishing touch.
Tips and Tricks for a Perfect Bake
Baking a showstopper like this requires a few insider secrets to ensure your cake layers are moist, level, and bursting with flavor. The biggest mistake novice bakers make is over-mixing the batter, which develops the gluten too much, resulting in a tough or rubbery cake. Remember the cardinal rule: mix until the streaks of flour just disappear, then stop immediately. A slightly lumpy batter is always better than an overmixed one. Furthermore, always use room temperature ingredients for the wet components; cold eggs and buttermilk can cause the batter to curdle slightly and won’t incorporate as effectively with the fats.
Achieving the Ultimate Mint Flavor
The flavor of the mint is the defining characteristic of this dessert, but it is incredibly easy to overdo. Peppermint extract is potent, often much stronger than vanilla bean paste, so you must add it gradually. Start with half the amount specified in the recipe card and taste the frosting. If you want more intensity, add it drop by drop. You are aiming for a refreshing coolness, not a dominant, overwhelming flavor that distracts from the rich cocoa cake layers.
Layering Like a Pro
Uneven layers are the bane of every baker’s existence, but they are preventable. If your cake layers have slightly domed tops after baking, use a long, serrated knife to carefully slice off the dome, creating a perfectly flat surface for stacking. Before applying the final decorative layer of frosting, always apply a “crumb coat.” This involves applying a very thin layer of frosting to seal in all the loose crumbs, chilling the cake for 20 minutes, and then applying your final, smooth layer of buttercream.
Creative Variations to Try
Once you master the classicChocolate Mint Cake, the culinary world opens up for playful variations. If you prefer a lighter, less intense chocolate base, you can substitute 1/3 cup of the cocoa powder with all-purpose flour, though this will slightly change the color and density. For those who enjoy an additional layer of flavor, incorporate 1 teaspoon of espresso powder directly into the hot coffee when blooming the cocoa; this intensifies the chocolate notes without adding a coffee taste.
If you want to move beyond buttercream, consider topping the cake with a smooth, glossy dark chocolate ganache made with non-dairy cream for a richer finish. For textural contrast, fold finely chopped chocolate sandwich cookies (the dark cocoa kind) into the frosting before layering. If you plan to make a truly striking dessert with molded decorations, you can prepare a stable fruit carrageenan using pectin or agar-agar and flavor it with mint extract to create vibrant, translucent green garnishes that hold their shape beautifully.
Chocolate Mint Cake FAQs
Can I use fresh mint instead of extract?
While fresh mint provides a beautiful, natural aroma, it is difficult to infuse enough flavor into buttercream to create that strong, cool taste without adding excessive moisture. It is best to stick to high-quality peppermint extract for the frosting, reserving fresh mint leaves only for decorative purposes.
How should I store the leftover cake?
Store the finished cake, loosely covered or in an airtight container, at room temperature for up to three days, assuming your kitchen is cool. If you need to keep it longer, refrigerate it for up to a week. Always bring the cake back to room temperature for about an hour before serving to ensure the buttercream is soft and the cake layers are maximally moist.
What can I use if I don’t have buttermilk?
If buttermilk is unavailable, you can easily create a substitute by placing 1 tablespoon of white vinegar or lemon juice in a liquid measuring cup, then filling the rest of the cup up to the 1-cup mark with whole milk. Stir it gently and let it stand for 5 to 10 minutes until it slightly curdles and thickens. This acidic alternative performs similarly to real buttermilk in providing moisture and activating the baking soda.
There are two types of people in this world: those who believe that chocolate and mint are a match made in celestial pastry heaven, and those who are terribly, horribly wrong. If you fall into the first camp, prepare yourself, because we are about to dive headfirst into the creamy, decadent, and utterly refreshing world of the ultimateChocolate Mint Cake.
I remember the first time I attempted this flavor combination. I was a young, enthusiastic baker, convinced that if a little peppermint extract was good, a lot must be phenomenal. Spoiler alert: my first attempt tasted suspiciously like a freshly brushed set of teeth, coated in dark chocolate. My family, bless their hearts, ate it anyway, but the experience taught me the delicate dance required to balance richness with coolness. This recipe is the culmination of years of meticulous calibration, ensuring the mint whispers sweetly instead of shouting like a drill sergeant.
Forget those dry, dusty layers you sometimes encounter. We are building a moist, dark chocolate foundation that is practically fudgy, topped with a cloud of velvety smooth mint buttercream that is utterly irresistible. This isn’t just a dessert; it’s an event. It’s the perfect centerpiece for celebrations, or, let’s be honest, a Monday afternoon when you really deserve a treat.
Gathering Your Cake Supplies: The Chocolate Layer
Achieving that deep, moist chocolate flavor requires quality ingredients and a technique often called the “hot liquid” method, which helps bloom the cocoa powder and create a truly tender crumb. Make sure your cocoa is unsweetened and high-quality—it makes a difference!
- 2 cups all-purpose flour
- 2 cups granulated sugar
- 3/4 cup unsweetened cocoa powder
- 1 teaspoon baking soda
- 1/2 teaspoon salt
- 1 cup buttermilk (or 1 cup milk mixed with 1 tablespoon vinegar)
- 1/2 cup vegetable oil
- 2 large eggs
- 1 teaspoon vanilla bean paste
- 1 cup strong hot brewed coffee (or hot water if preferred)
Crafting the Cool Mint Buttercream
This frosting needs to be light, fluffy, and minty without being overpowering. We recommend starting with a small amount of extract and tasting as you go. You can also add a drop or two of green food coloring for that signature mint shade, though it’s optional.
- 1 cup (2 sticks) unsalted butter, softened
- 4 cups powdered sugar, sifted
- 1/2 cup heavy cream or milk
- 1 teaspoon pure peppermint extract
- Pinch of salt
- Green food coloring (optional)
Baking Instructions: Building the Decadent Chocolate Mint Cake
Step 1: Preparing the Batter for Ultimate Moisture
Preheat your oven to 350°F (175°C) and grease two 8-inch round cake pans. Line the bottoms with parchment paper for easy removal. In a large mixing bowl, whisk together the flour, sugar, cocoa powder, baking soda, and salt until they are thoroughly combined. This dry mixing step prevents pockets of unmixed ingredients later on.
In a separate medium bowl, combine the buttermilk, oil, eggs, and vanilla bean paste. Whisk these wet ingredients until they are smooth. Pour the wet mixture into the dry ingredients and beat on medium speed until the batter is just combined. Do not overmix at this stage; overmixing develops gluten and results in a tough cake.
Step 2: The Magic of Hot Liquid
Carefully pour the hot coffee (or hot water) into the batter while the mixer is running on low speed. The batter will be very thin—this is exactly what you want! The hot liquid blooms the cocoa and creates an incredibly moist cake crumb. Quickly divide the batter evenly between the two prepared pans.
Bake the layers for 30 to 35 minutes, or until a wooden skewer inserted into the center comes out clean. Let the cakes cool in the pans for 10 minutes before carefully turning them out onto a wire rack to cool completely. Cooling is crucial; attempting to frost a warm cake results in a sad, melty disaster.
Step 3: Whipping Up the Peppermint Frosting
While the layers cool, start your buttercream. In a large bowl or stand mixer, beat the softened butter on medium speed until it is light and creamy. Gradually add the sifted powdered sugar, one cup at a time, mixing well between additions.
Once all the sugar is incorporated, the frosting will look a little dry. Add the heavy cream, vanilla, peppermint extract, and a pinch of salt. Beat the mixture on high speed for 3 to 5 minutes until it is incredibly fluffy and pale. If using, add a single drop of green food coloring until you achieve your desired hue. Taste test and adjust the peppermint extract if needed. Remember, this frosting needs to enhance the rich chocolate, not fight it!
Step 4: Assembly of the Perfect Chocolate Mint Cake
Once the cake layers are completely cooled, place one layer on your serving platter or cake stand. Spread about a third of the mint buttercream evenly over the top. Place the second layer carefully on top. Use the remaining frosting to generously cover the sides and top of the cake. For a professional look, chill the cake briefly after applying a thin crumb coat, then apply the final layer of frosting.
Garnish the finished cake with chocolate shavings, finely chopped fresh mint leaves, or small chocolate wafers. Serve immediately and watch the delighted faces of your guests. This refreshing chocolate dessert always steals the show. Achieving a deliciousChocolate Mint Cakeis easier than you think when you follow these key steps.
The beauty of theChocolate Mint Cakeis how it elevates simple ingredients into something truly memorable. Whether you are a baking novice or a seasoned dessert artist, this recipe offers a foolproof path to achieving minty, chocolatey perfection. Enjoy the process, don’t skimp on the quality cocoa, and prepare for a standing ovation from anyone lucky enough to taste a slice of this magnificent creation!
Now that you have mastered the essential layers and the refreshing frosting, you are ready to impress any crowd. Remember that balance is key when working with peppermint—a little finesse goes a long way in delivering the best chocolate experience possible.
Perfecting the Cooking Process
For maximum efficiency when making thisChocolate Mint Cake, start by brewing your hot coffee and prepping your cake pans. While the cake layers bake, you can sift the powdered sugar and soften the butter, ensuring the buttercream comes together smoothly the moment the cakes are cool enough to frost.
Add Your Touch
Try substituting the peppermint extract with spearmint for a milder flavor, or incorporate mini chocolate chips into the buttercream for added texture. For an extra decadent look, drizzle a rich chocolate ganache over the top before adding the mint frosting swirls to enhance the overall visual appeal.
Storing & Reheating
Store leftover slices of the finishedChocolate Mint Cakein an airtight container in the refrigerator for up to four days. To maintain optimal moisture, allow individual slices to sit at room temperature for about 15 minutes before serving again, ensuring the buttercream softens slightly.
I once had a friend who swore she didn’t like mint desserts, but after a single slice of this cake at a birthday party, she confessed she ate the leftovers for breakfast. It truly changes minds!
Expert Baking Secrets for a Showstopper
-
Always sift your powdered sugar and cocoa powder; this prevents lumps and guarantees a smooth, velvety texture in both the cake layers and the delicious frosting.
-
Measure the peppermint extract meticulously. Start with 3/4 teaspoon and increase slowly if necessary, as too much extract can quickly overwhelm the delicate flavor profile.
-
Ensure your butter is truly at room temperature for the frosting. This allows the butter to whip properly, incorporating maximum air for a light, cloud-like buttercream consistency.
Frequently Asked Questions About Baking the Chocolate Mint Cake
How can I make the cake layers even flatter?
To ensure flat tops on your cake layers, wrap a moistened baking strip (available at most craft stores) around the outside of each pan. This technique slows the cooking on the edges, allowing the cake to rise evenly in the center for easy stacking.
Can I substitute the hot coffee for something else?
Yes! While coffee enhances the chocolate flavor without tasting like coffee, you can substitute it entirely with plain hot water or hot unsweetened almond milk. The liquid’s heat is key for blooming the cocoa powder, regardless of the type of liquid used.
How far in advance can I make this Chocolate Mint Cake?
You can bake the cake layers up to two days ahead of time. Once completely cool, wrap them tightly in plastic wrap and store them at room temperature. Frost the cake the day you plan to serve it for the freshest results, especially if you are using perishable garnishes.
Why did my buttercream look curdled?
Buttercream often appears curdled if the butter and the cream are at wildly different temperatures. If this happens, try beating the frosting on high speed for an additional minute or two, or try heating a small portion and mixing it back in to help stabilize the emulsion.
What is the best way to slice a tall cake like this?
For clean slices, ensure the cake has chilled for at least 30 minutes after frosting. Use a sharp, thin-bladed knife, warming the knife slightly under hot water and wiping it clean between every cut. This prevents the mint frosting from sticking and tearing the cake layers.
Conclusion for Chocolate Mint Cake
We have navigated the buttery rapids and emerged victorious with a stunning, palate-cleansing Chocolate Mint Cake. This dessert proves that two flavors can indeed live in perfect harmony—the rich, dark depth of cocoa meeting the bright, refreshing lift of peppermint. Whether you are baking for a special occasion or simply trying to impress your cat (we don’t judge), this recipe is guaranteed to deliver applause. Stop waiting for the perfect moment; grab your whisk and create this rich mint confection. It’s more than a cake; it’s a refreshing culinary adventure wrapped in velvety chocolate.
Print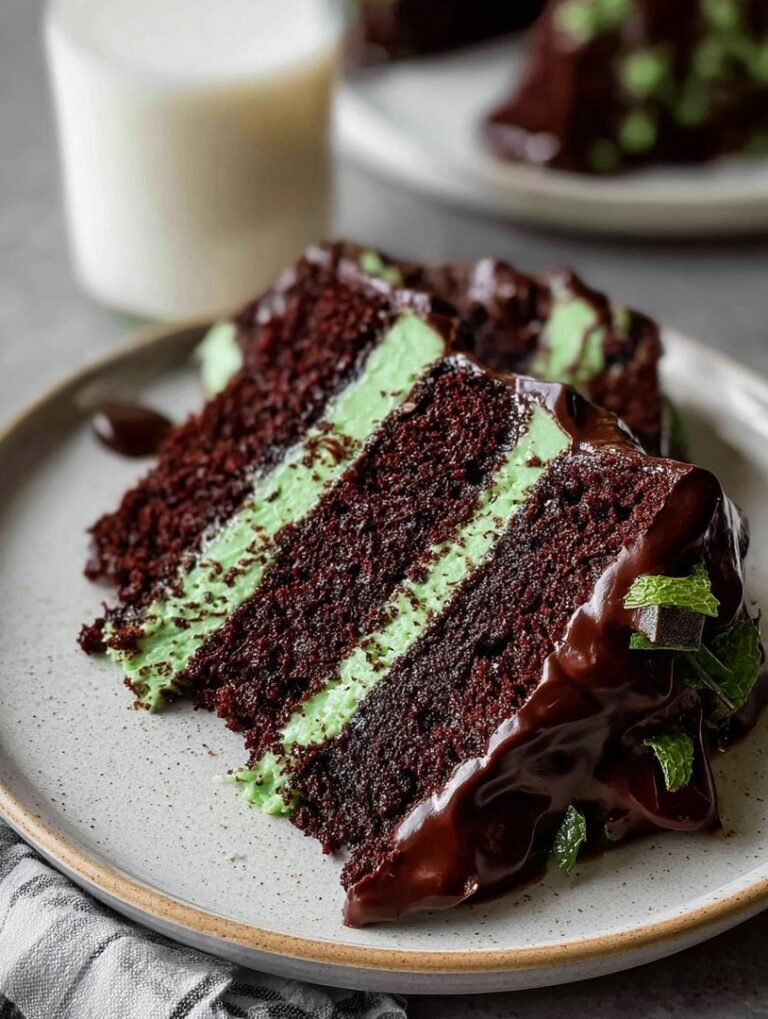
Chocolate Mint Cake
Experience decadent depth! This rich chocolate cake uses 3/4 cup cocoa and a refreshing peppermint extract blend. Whisk dry ingredients, then mix wet for a perfectly smooth batter.
- Total Time: 35 minutes
- Yield: 4 servings
Ingredients
- All-purpose flour: 2 cups
- Granulated sugar: 2 cups
- Unsweetened cocoa powder: 3/4 cup
- Baking soda: 1 1/2 teaspoons
- Large eggs: 2
- Buttermilk: 1 cup
- Vegetable oil: 1/2 cup
- Pure peppermint extract: 1 teaspoon
Instructions
- Step 1: Preheat your oven to 350°F (175°C). Grease and flour two 9-inch round cake pans. In a large bowl, whisk together the flour, sugar, cocoa powder, and baking soda until well combined.
- Step 2: In a separate medium bowl, combine the eggs, buttermilk, vegetable oil, and 1/2 teaspoon of the peppermint extract. Pour the wet ingredients into the dry mixture and beat on medium speed until the batter is smooth and fully incorporated.
- Step 3: Divide the cake batter evenly between the prepared pans. Bake for 30 to 35 minutes, or until a toothpick inserted into the center of the cakes comes out clean. Let the cakes cool in the pans for 10 minutes.
- Step 4: Remove the cakes from the pans and transfer them to a wire rack to cool completely. While cooling, prepare a chocolate or buttercream frosting, incorporating the remaining 1/2 teaspoon of peppermint extract and optional green food coloring for mint flavor.
- Step 5: Once the cake layers are entirely cooled, place the first layer on a serving plate and spread a generous layer of mint frosting on top. Carefully place the second layer over the frosting and finish by covering the top and sides of the entire cake with the remaining frosting.
Notes
- To maintain moisture, store the finished cake in an airtight container at cool room temperature for up to 3 days, or place in the refrigerator if your frosting is cream-based.
- If the cake has been chilled, let it stand at room temperature for 20 to 30 minutes before serving; this restores the texture of the buttermilk crumb and softens the peppermint frosting perfectly.
- Enhance the cooling mint flavor by serving each slice with a light dusting of cocoa powder or a dollop of fresh whipped cream.
- Since peppermint extract is potent, resist the urge to add more than the specified amount, as the dual addition (in the batter and the frosting) is designed to provide balanced, not overwhelming, mint flavor.
- Prep Time: 15 minutes
- Cook Time: 20 minutes
- Method: Stovetop
- Cuisine: American
FAQs
Why does my mint buttercream split sometimes?
Buttercream drama is real, but usually fixable! Splitting often happens when your butter and sugar are at different temperatures. Ensure your butter is truly soft (but not melted) and your powdered sugar is fully incorporated before adding the mint extract or coloring. If it looks curdled, try gently warming a small portion in a separate bowl and then slowly whisking it back into the main batch. This temperature adjustment usually brings the frosting back into a smooth, velvety consistency, perfect for topping your wonderful minty chocolate dessert.
How can I achieve a vibrant green color for my Chocolate Mint Cake without using excessive food coloring?
Achieving that stunning, natural emerald hue for your frosting doesn’t require dumping half a bottle of neon dye into the bowl. A great tip is to use high-quality gel food coloring, which is much more concentrated than liquid coloring. For a truly subtle and unique green, some bakers utilize a tiny amount of spinach juice (don’t worry, you won’t taste it!) alongside a drop of blue coloring to deepen the shade. Remember, the color intensifies slightly as the frosting sets, giving your finished Chocolate Mint Cake that professional, cool appearance.
Can I make this cool chocolate sponge dessert gluten-free?
Absolutely! Swapping out traditional flour for a reliable cup-for-cup gluten-free blend is usually successful in most cake recipes, including this cool chocolate sponge dessert. However, remember that gluten-free flour absorbs liquid differently, so you might need to slightly increase the liquid content (perhaps an extra tablespoon of buttermilk or milk) to maintain the batter’s proper consistency. Always allow the batter to rest for about 10 minutes before baking, which helps the starches fully hydrate, ensuring a tender and moist crumb, not a dry, crumbly disaster.
What is the best way to store leftover slices of Chocolate Mint Cake?
The survival rate of leftover Chocolate Mint Cake is usually zero, but if you manage to preserve a slice, proper storage is key to retaining that refreshing flavor. Store any remaining cake in an airtight container at room temperature for up to two days. If you need longer preservation, move the container to the refrigerator. If refrigerating, always allow the slice to come back to room temperature before serving—this softens the crumb and revives the buttercream texture, making every bite taste freshly baked and perfectly moist.


Leave a Comment