

Forget complex appetizers; we’re talking about pure, unadulterated comfort food that disappears faster than a teenager’s paycheck. The smell of roasted garlic and melted butter wrapping around these incredible, gooeyPillsbury Biscuit Garlic Butter Cheese bombsis a promise of happiness you can deliver in under thirty minutes.
They are the ultimate party trick, the easiest weeknight snack, and arguably the reason why sweatpants were invented. Get ready for an explosion of savory flavor with minimal effort and maximum reward—your kitchen is about to become the epicenter of deliciousness.
- Ready in under 30 minutes, using pre-made dough, making them ideal for last-minute entertaining or sudden, overwhelming snack cravings.
- A savory explosion of rich, roasted garlic combined with sharp, melted cheddar and herbaceous Italian seasoning in every delectable bite.
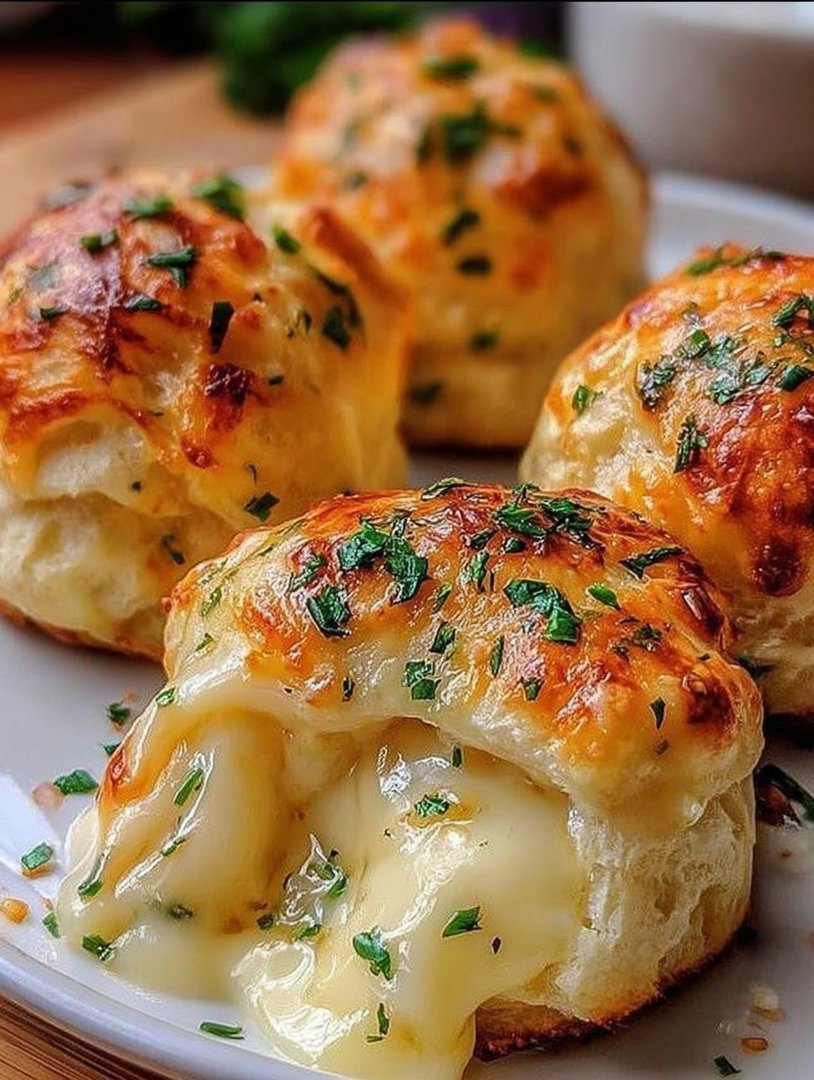
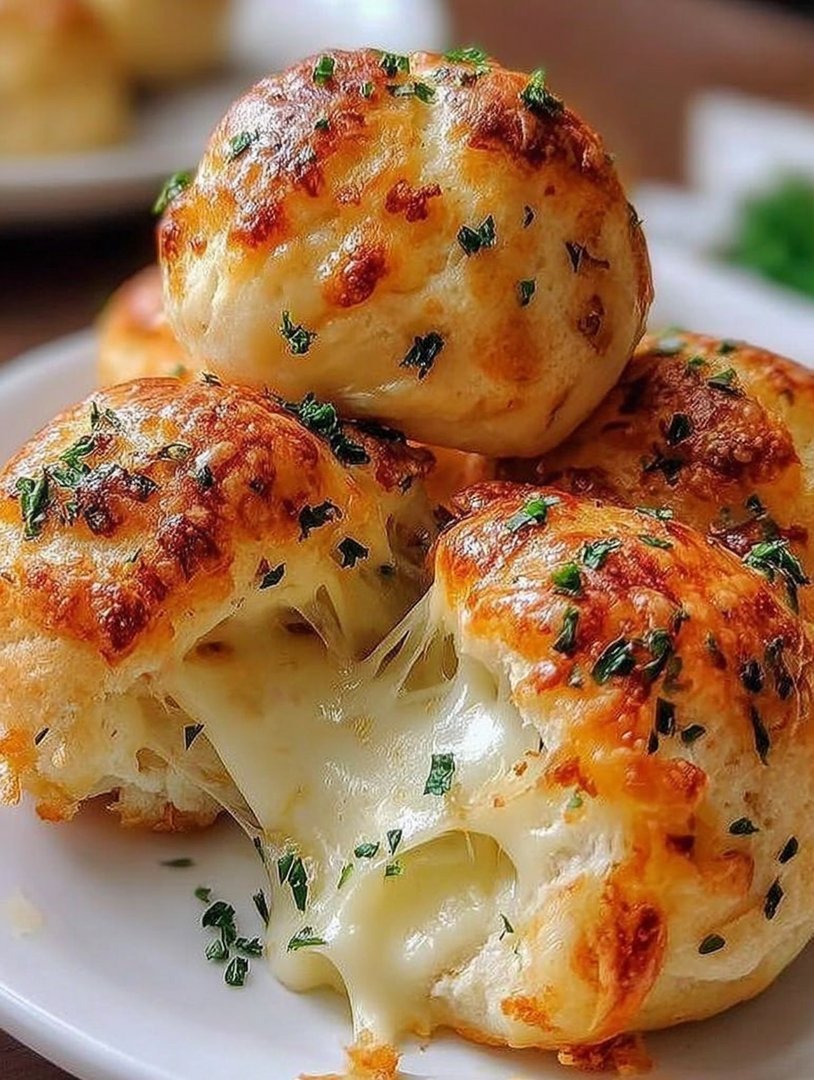
- Golden brown on the outside and incredibly gooey and stretchy inside, these pull-apart morsels are utterly irresistible straight from the hot oven.
- Serve them as an amazing, comforting side dish for your favorite hearty soup, a thrilling appetizer, or a dangerously delicious movie night snack.
Ingredients for Pillsbury Biscuit Garlic Butter Cheese bombs
Here’s what you’ll need to make this delicious dish:
- Pillsbury Grands! Refrigerated BiscuitsUse the eight-count flaky layers or buttermilk variety; the dough acts as the perfect structural base for your bombs.
- Unsalted ButterButter provides the rich vehicle for the garlic and herbs, ensuring the biscuits bake up moist and flavorful rather than dry.
- Fresh GarlicAlways opt for freshly minced garlic over pre-minced jarred versions; the flavor difference is dramatic and essential for that signature aroma.
- Italian SeasoningA classic blend of oregano, basil, rosemary, and thyme that instantly elevates the profile from simple garlic butter to savory complexity.
- Shredded Mozzarella CheeseMozzarella offers the best stretch and melt factor, creating that satisfying, gooey pull when the bombs are served hot.
- Shredded Sharp Cheddar CheeseAdding sharp cheddar provides a necessary tangy depth and contrasts beautifully with the mild, milky flavor of the mozzarella.
- Fresh ParsleyUsed as an optional garnish, a sprinkle of fresh chopped parsley adds a beautiful pop of color and freshness right before serving.
The full ingredients list, including measurements, is provided in the recipe card directly below.
How to Make Pillsbury Biscuit Garlic Butter Cheese bombs
Follow these simple steps to prepare this delicious dish:
Step 1: Prep and Preheat the Oven
Preheat your oven to 400°F (200°C). This high temperature ensures the biscuits cook quickly, achieving a crispy exterior while the cheese melts beautifully inside. While the oven heats, take a standard 9×13 inch baking dish or a 10-inch round cake pan and lightly grease it with cooking spray or a thin layer of butter. Open the can of biscuits and use a sharp knife to slice each biscuit horizontally in half, creating sixteen thinner rounds ready for stuffing.
Step 2: Create the Signature Garlic Butter Blend
In a small, microwave-safe bowl, melt the unsalted butter until it is completely liquid. Once melted, stir in the freshly minced garlic and the Italian seasoning until they are thoroughly combined. If you want a little kick, this is the perfect time to incorporate a small pinch of red pepper flakes into the mixture. Set the bowl aside to allow the flavors to marry while you prepare the dough rounds.
Step 3: Stuffing the Cheese Bombs
Lay out one biscuit half and gently place a small spoonful of the mozzarella and cheddar cheese mixture right in the center. Use a total of about half an ounce of cheese for each bomb; overstuffing will lead to messy cheese leaks during baking. Take the edges of the dough and stretch them up and over the cheese, pinching the seams tightly to form a small, sealed ball. If the biscuit halves are resisting, slightly flatten them first, but ensure they are sealed well to keep the gooey goodness trapped inside.
Step 4: Coating and Arranging the Dough
Carefully roll each sealed biscuit ball through the garlic butter mixture, making sure the entire exterior is coated. This crucial step is what gives the finished product its glossy, aromatic crust. Place the coated cheese bombs snugly, but not overly crowded, into your prepared baking dish. If you are using a round pan, arrange them in a circular pattern; in a rectangular dish, line them up evenly. Reserve any leftover garlic butter for a later step.
Step 5: Baking the Pillsbury Biscuit Garlic Butter Cheese bombs
Place the dish containing the garlic butter cheese bombs into the preheated oven. Bake them for approximately 12 to 18 minutes. The exact time depends on your oven and whether you prefer them softer or firmer. Look for a beautiful deep golden brown color on the surface. Once they reach this shade, carefully remove the dish from the oven. Brush the remaining garlic butter mixture over the hot bombs immediately after removal for an extra layer of flavor and shine.
Transfer the piping hot cheese bombs to a serving platter and garnish generously with fresh chopped parsley for the perfect finishing touch and a vibrant contrast.
Mastering the Bomb: Tips for Perfect Garlic Butter Biscuits
While this recipe is famously easy, a few simple tricks can elevate your results from good to legendary. Sometimes the smallest adjustments make the biggest difference in achieving that bakery-quality texture and rich flavor profile we are aiming for.
The Art of the Seal
The number one mistake people make when crafting these delightful bites is a weak seal. If the biscuit dough doesn’t securely envelop the cheese, all that glorious mozzarella will escape during baking, leaving you with dry dough and a messy, scorched pan. Take an extra thirty seconds per biscuit to pinch the seams together firmly, ensuring there are no thin spots or gaps. If you feel the dough is too stiff to seal, let the biscuits sit at room temperature for five minutes before slicing and stuffing; this slight softening makes the dough more pliable and cooperative.
Choosing the Right Cheese Blend
We use a combination of mozzarella and sharp cheddar because they offer a balanced texture and flavor profile. Mozzarella provides the necessary stringiness and melt, while cheddar delivers a much-needed savory bite. Avoid using pre-shredded cheese that is coated in anti-caking agents, if possible, as these can slightly inhibit a smooth melt. If you must use pre-shredded, ensure you increase the baking time by a minute or two to account for the slower melting speed. You could also experiment with a smoky provolone for depth or Monterey Jack for mild creaminess, but always keep mozzarella as your base.
Don’t Skimp on the Butter Bath
The garlic butter is not just a flavor layer; it is the key to preventing the biscuits from drying out. When you are rolling the cheese bombs, make sure the entire surface is coated. If your leftover garlic butter has solidified slightly while waiting, give it a quick 10-second blast in the microwave to make it liquid again for the final brush after baking. This step ensures that the very top layers of the biscuit stay moist and fragrant, creating a superior crust.
Using the Right Pan for Pull-Apart Texture
For the best results, arrange the dough balls close together, but not so tight that they lose their shape. When they are packed moderately tightly, they rise up against each other, creating that classic ‘pull-apart’ texture that makes them so fun to eat. If you spread them too far apart, they will cook individually like standard biscuits, losing the signature “bomb” factor. A round cake pan often works best for a beautifully cohesive final presentation.
Flavor Variations and Serving Suggestions
While the classicPillsbury Biscuit Garlic Butter Cheese bombsrecipe is a masterpiece in its own right, these versatile appetizers are perfect canvases for culinary creativity. You can easily adapt the flavor profile to match whatever meal you are serving or whatever craving you are currently battling. A little experimentation goes a long way toward personalizing this amazing snack.
Herbaceous Upgrades
If you want to move beyond the traditional Italian seasoning, consider adding other robust herbs to your melted butter mixture. A teaspoon of finely chopped fresh rosemary introduces a deeply woodsy flavor that pairs wonderfully with beef dishes or hearty vegetable stews. Alternatively, if you prefer a brighter, sunnier taste, incorporate a tablespoon of finely chopped fresh dill and a squeeze of lemon juice into the butter before coating. Don’t forget the heat; a dash of cayenne pepper or a sprinkle of finely diced jalapeño pieces mixed into the cheese blend adds a surprising warmth that is highly addictive.
Dipping Sauce Dynamics
These cheesy biscuit bombs are absolutely delightful on their own, but they reach peak snacking glory when paired with a good dipping sauce. For a classic pizzeria feel, serve them alongside a robust, warm marinara sauce. The acidity of the tomato cuts through the richness of the butter and cheese beautifully. If you prefer something creamy, homemade ranch or a cooling yogurt-based dip with fresh chives offers a refreshing contrast. They are also fantastic dipped into a simple, high-quality balsamic vinegar glaze for an unexpected sweet-and-sour complexity.
Making Them a Meal Side
These garlic butter bombs are substantial enough to serve as a stellar side dish. They are the perfect companions for a deep bowl of creamy tomato soup or a classic beef chili on a cold evening. For a weeknight meal, place them on the table next to baked chicken or simple lamb chops. Their satisfying carb content and cheesy interior make them far more exciting than a standard bread roll, ensuring your entire family cleans their plates and asks for seconds immediately.
Why These Cheese Bombs Are Your New Go-To Recipe
The beauty of this recipe lies in its simplicity. It requires minimal active cooking time, relies on readily available ingredients, and guarantees a result that elicits gasps of delight every single time. There is no complicated dough to mix, no hours spent proofing, and certainly no risk of failure—just pure, buttery, cheesy success waiting to happen. In a world full of lengthy, intimidating recipes, these biscuit bombs prove that sometimes, the best food is the fastest and easiest to prepare.
Whether you need a quick snack for game day, an impressive appetizer for unexpected guests, or just want to treat yourself to something truly comforting, you cannot go wrong with a fresh batch of these. They manage to be sophisticated enough for entertaining yet simple enough for a Tuesday night. Trust us when we say that once you realize how effortless and delicious these cheesy, garlicky pull-aparts are, you’ll find yourself stocking up on Pillsbury biscuits whenever they go on sale.
The culinary gods have a funny way of working. Sometimes, the most earth-shattering, soul-satisfying recipes don’t come from hours of meticulous technique or ancient family cookbooks. They spring forth from sheer, unadulterated panic, usually around 6:00 PM on a Tuesday when your fridge looks suspiciously like a deserted wasteland. That is precisely how I stumbled upon the glory of the garlic butter cheese bomb—a creation so simple, so absurdly flavorful, that it should honestly be illegal.
I call them “pull-aparts of profound happiness.” You might know them by their slightly more formal name: Pillsbury Biscuit Garlic Butter Cheese bombs. These are the appetizers that require virtually no skill, yet elicit the kind of gasps you usually reserve for dramatic movie reveals or finding a forgotten $20 bill in your winter coat pocket. They’re fluffy, they’re intensely garlicky, and they house a molten, gooey core of mozzarella that stretches into infinity. They are the definition of instant gratification, requiring only four main ingredients and about fifteen minutes of your undivided attention.
My first attempt involved a desperate search for dinner ingredients while entertaining a crowd of hungry teenagers who operated on the metabolism of small nuclear reactors. I had one tube of refrigerated biscuits, some leftover shredded cheese, and a suspicious amount of butter. I melted the butter, loaded it with garlic powder like I was trying to ward off vampires, stuffed the cheese inside, and hoped for the best. The resulting silence, broken only by enthusiastic chewing sounds, confirmed I had found gold. Since then, I’ve perfected the technique, turning a hurried mistake into a consistently perfect crowd-pleaser.
The Accidental Discovery of Sunshine on a Plate
I once hosted a spontaneous movie night and realized I had exactly thirty minutes and only canned biscuits and cheese. Panic set in until inspiration struck! These glorious garlic cheese bombs—a beautiful, buttery accident—were born from desperation, proving that culinary genius often emerges from sheer laziness. They were sunshine on a plate.
Ingredients for the Perfect Cheesy Pull-Aparts
Success starts with having the right components. You need quality ingredients, but nothing too fancy. The beauty of this recipe lies in its approachable simplicity. Make sure to use unsalted butter so you can control the salt level perfectly.
- 1 (16.3-ounce) tube refrigerated large flaky biscuits (8 count)
- 4 tablespoons unsalted butter, melted
- 2 cloves fresh garlic, minced, or 1 teaspoon garlic powder
- 1 teaspoon dried Italian seasoning or dried oregano
- 1 cup shredded low-moisture mozzarella cheese, divided
- 1/4 cup grated Parmesan cheese
- Pinch of fresh parsley, chopped (for garnish, optional)
- Optional dipping sauce: Marinara or ranch dressing
Preparing the Dough and Filling
The preparation sequence is vital for ensuring your cheesy biscuit bombs are evenly coated and sealed properly. First, preheat your oven to 375°F (190°C) and lightly grease a standard 9-inch round cake pan or a muffin tin if you prefer individual servings. If you use a muffin tin, the bombs will be slightly taller and hold their shape better, which is helpful if you plan on layering them in the pan.
Next, focus on the dough. Unroll the biscuits and separate them. Gently stretch or flatten each biscuit into a slightly wider, thinner circle. This creates more surface area for the cheese filling. Now, place about a tablespoon of mozzarella cheese right in the center of each flattened biscuit circle. The cheese quantity matters; too much, and the bomb might explode in the oven; too little, and the cheese pull will be disappointing. Bring the edges of the dough up and over the cheese, pinching them firmly together to create a completely sealed ball. Ensure there are no cracks where the molten cheese can escape while baking.
Perfecting the Cooking Process
The key to perfect pull-aparts is preparation efficiency. First, melt the butter and infuse it heavily with garlic and herbs. Next, cut and stuff the dough immediately. Finally, bake them hot and fast until golden brown, ensuring the cheese melts completely before the crust hardens too much.
The Buttery, Garlicky Coating
In a small, microwave-safe bowl, melt the unsalted butter. Once melted, stir in the minced fresh garlic (or garlic powder) and the Italian seasoning. This mixture is the liquid gold that transforms ordinary biscuits into the magnificent Pillsbury Biscuit Garlic Butter Cheese bombs we crave. Take each sealed biscuit ball and roll it gently in the prepared garlic butter mixture, ensuring every crevice is coated.
After coating, arrange the biscuit bombs snugly in the prepared cake pan or muffin tin. If you are using a cake pan, arrange them in a single layer, not stacked, so they cook evenly. Sprinkle the entire top surface with the grated Parmesan cheese. The Parmesan adds a sharp, nutty crust that complements the sweet butter and savory garlic.
Baking for Golden Perfection
Place the pan into the preheated oven. Bake for approximately 12 to 15 minutes. Baking time can vary slightly depending on your oven and whether you are using a cake pan or a muffin tin. You are looking for a few key visual indicators: the biscuits should be puffed up, deeply golden brown on top, and the cheese that might have peeked out should be bubbling and caramelized. Once removed from the oven, let them cool in the pan for two minutes before serving. Garnish with a sprinkle of fresh parsley if you want to be extra fancy and pretend these weren’t ridiculously easy to make. Serve immediately with a side of warm marinara sauce for dipping.
Add Your Touch
Customize these cheesy biscuit bombs easily. Swap mozzarella for provolone or smoked gouda for depth. Instead of traditional garlic powder, use a teaspoon of chili flakes for a spicy kick. You can also press small cubes of cooked chicken or turkey into the center before baking.
The core recipe is fantastic on its own, but feel free to experiment. For an extra herbaceous kick, try adding a teaspoon of finely chopped fresh rosemary to the melted butter mixture. If you love heat, a tiny dash of cayenne pepper incorporated into the Parmesan sprinkle will wake up your taste buds without overpowering the dish. For a richer texture, mix a spoonful of cream cheese into the shredded mozzarella before stuffing the dough; this ensures an even creamier interior.
Storing & Reheating
Store leftovers, if they exist, in an airtight container at room temperature for up to two days. For reheating, skip the microwave! Warm them in an oven or air fryer at 300°F (150°C) for five minutes. This brings back the crispy exterior and gooey center beautifully.
- Use high-quality unsalted butter and fresh garlic cloves; this simple foundation maximizes the overall savory flavor profile.
- Make sure you seal the edges of the biscuit dough thoroughly after stuffing them with cheese, preventing any glorious molten cheese leakage during baking.
- Toss the fully stuffed dough gently in the garlic butter mixture right before baking, ensuring every surface gets a glorious, crispy coating.
My nephew, who refuses to eat anything green, dipped one of these into marinara sauce last week and declared them “adult chicken nuggets.” It was the highest praise imaginable.
Conclusion for Pillsbury Biscuit Garlic Butter Cheese bombs
These buttery, garlicky biscuit bites are more than just a quick snack; they are the ultimate solution for unexpected guests and intense cheese cravings. Mastering the Pillsbury Biscuit Garlic Butter Cheese bombs is simple, requiring minimal fuss and delivering maximum flavor. Remember to seal the edges firmly after stuffing the cheese and bake them until perfectly golden brown, ensuring that delightful pull-apart texture. Whether serving them as an appetizer for game night or a simple side dish to your main meal, prepare for instant empty plates and happy sighs.
This recipe truly proves that the simplest concepts, built on the solid foundation of butter, garlic, and cheese, often create the most unforgettable culinary moments, proving you don’t need a professional kitchen to achieve pure, buttery satisfaction.
Print
Pillsbury Biscuit Garlic Butter Cheese bombs
Flaky biscuit dough seals a hot, gooey mozzarella core, drenched in melted garlic Parmesan butter. These savory cheese bombs explode with flavor! Full instructions and nutrition breakdown inside.
- Total Time: 35 minutes
- Yield: 4 servings 1x
Ingredients
- 1 (10.2 oz) tube Pillsbury Grands! Flaky Layers Biscuits (8 biscuits)
- 4 oz low-moisture mozzarella cheese, cut into 8 cubes
- 1/2 cup unsalted butter, melted
- 2 cloves garlic, finely minced
- 1/4 cup grated Parmesan cheese
- 1 teaspoon dried parsley flakes
- 1/4 teaspoon kosher salt
Instructions
- Step 1: Preheat the oven to 375°F (190°C). Line a standard baking sheet with parchment paper or lightly grease a 9-inch round cake pan or cast iron skillet.
- Step 2: Separate the biscuit dough rounds. Gently flatten each biscuit slightly and place one cube of mozzarella cheese in the center. Carefully pull the edges of the biscuit dough up and over the cheese, pinching the edges firmly to create a complete seal and form a ball.
- Step 3: In a small bowl, melt the butter, then whisk in the minced garlic, Parmesan cheese, dried parsley flakes, and kosher salt until well combined.
- Step 4: Dip each sealed cheese bomb into the garlic butter mixture, turning to ensure all sides are coated. Place the bombs seam-side down on the prepared baking sheet, spacing them slightly apart.
- Step 5: Bake for 12–15 minutes, or until the biscuit bombs are puffed, cooked through, and golden brown on top. Serve immediately while the cheese filling is hot and gooey.
Notes
- Keep any leftover cheese bombs in an airtight container at room temperature for maximum flavor and softer texture if you plan to enjoy them within 24 hours.
- If reheating, avoid the microwave—pop the cooled bombs into an air fryer or oven at 300°F (150°C) for about 5 minutes until the cheese is melted and the crust is slightly crispy again.
- Elevate the experience by serving these bombs alongside a small dish of warm marinara or pizza sauce for an irresistible dipping treat.
- The secret to a perfect cheese pull is ensuring a complete, firm seal when closing the dough around the mozzarella cube; leaky seals cause the cheese to run out and burn on the pan.
- Prep Time: 15 minutes
- Cook Time: 20 minutes
- Method: Stovetop
- Cuisine: American


Leave a Comment