

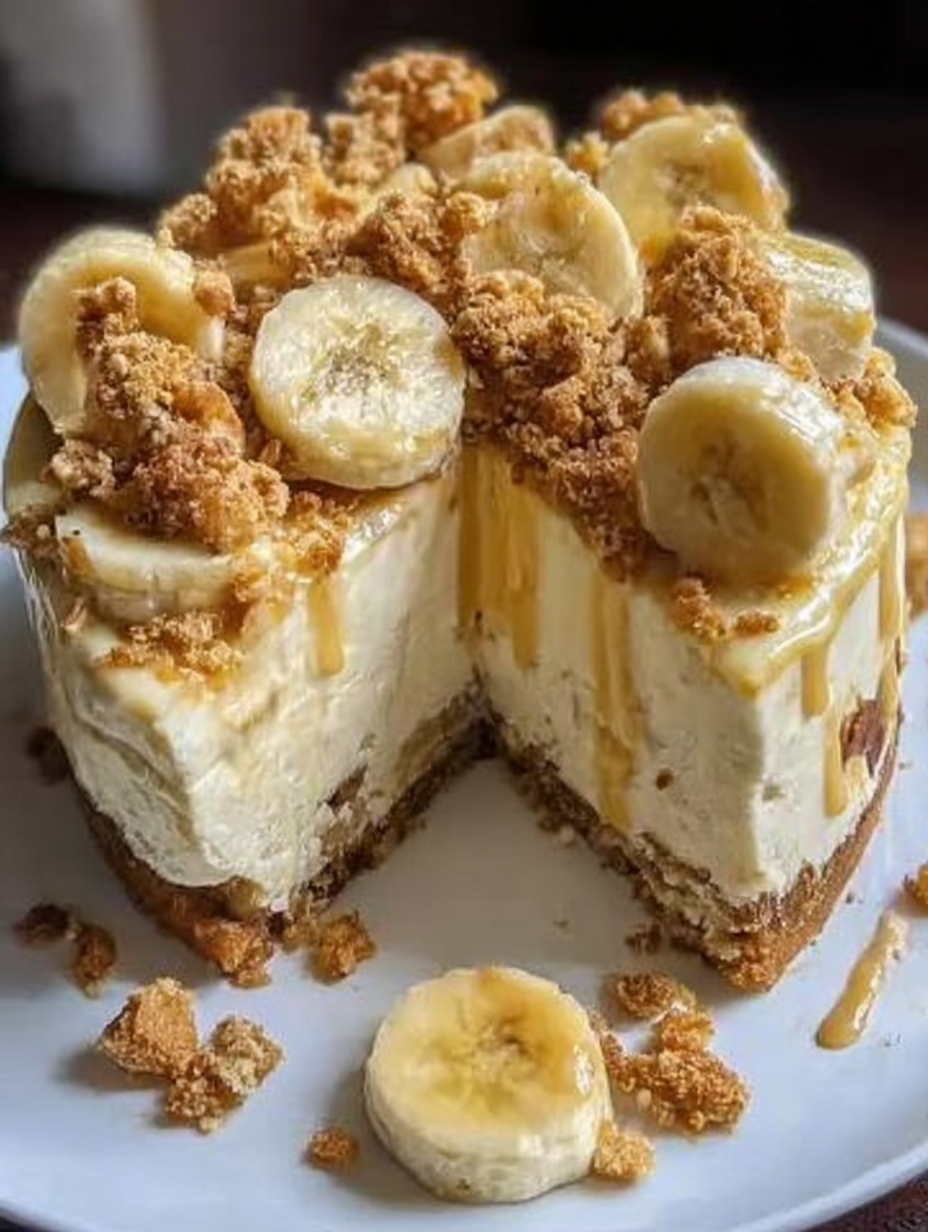
I once tried to make banana pudding cheesecake without the crunch, and honestly, it felt like a betrayal. This dessert is meant to sing with layers of creamy bliss and textural intrigue! If you crave that cool, tangy satisfaction paired with a dramatic, golden contrast, then buckle up.
You are about to discover the pinnacle of comfort food engineering. Welcome to theBEST RECIPE For Banana Pudding Crunch Cheesecake, a dessert so good it might just steal the show from the main course.
- Achieve an unparalleled flavor profile that perfectly balances the sweet, caramelized notes of ripe bananas with the signature tangy cream cheese richness.
- The preparation is surprisingly simple for a deep-dish cheesecake, significantly reducing complexity while ensuring show-stopping, professional-level results for any occasion.
- This decadent dessert boasts a spectacular visual appeal, featuring distinct, smooth layers and a golden, crunchy topping that guarantees compliments from every guest.
- It offers incredible versatility, serving equally well as an elegant dinner party centerpiece or transforming a simple weekend gathering into a memorable celebration.
The Secret to the Crunch: Why This Recipe Works
Forget everything you thought you knew about banana desserts. Most banana pudding recipes are delicious, certainly, but they often lack the structural integrity and richness required to stand up as a true centerpiece dessert. Then you try to smash that into a cheesecake, and disaster looms. Soggy crusts, separated fillings, and a topping that melts into sadness.
My journey to find the ultimate combination involved weeks of kitchen experimentation, resulting in a stack of failed cheesecakes that looked more like modernist art installations than dessert. The breakthrough wasn’t just adding banana flavor; it was perfecting the trifecta: a rock-solid, flavorful crust, a smooth, dense filling that doesn’t crack, and most importantly, the titular crunch that withstands refrigeration.
The secret lies in treating the vanilla wafer crumbs differently. Instead of just pressing them into the base, we toast them lightly and caramelize a portion for the topping, ensuring they retain their crispness even when meeting the moist cream cheese filling. This layering technique separates the creamy cheesecake base from the pudding element, providing defined textures and preventing the dreaded ‘mush factor.’ This particular method of construction elevates the dessert from simple comfort food to sophisticated patisserie, giving you a delicious contrast with every single spoonful.
Ingredients for BEST RECIPE For Banana Pudding Crunch Cheesecake
Here’s what you’ll need to make this delicious dish:
- Vanilla Wafer CrumbsUse high-quality vanilla wafer cookies, crushed finely in a food processor, to create the flavorful and sturdy base and the caramelized crunch topping.
- Unsalted ButterEssential for binding the crust together; melt it completely before mixing with the crumbs to ensure an even distribution and firm setting.
- Cream CheeseUse full-fat brick-style cream cheese, ensuring it is fully softened to room temperature for a lump-free, supremely smooth filling.
- Granulated SugarProvides the necessary sweetness for both the crust and the filling, balancing the tanginess of the cream cheese.
- EggsAct as the primary binder and structure builder in the cheesecake batter; use large eggs and ensure they are also at room temperature for better emulsion.
- Sour Cream or Plain Greek YogurtAdds moisture, flavor complexity, and helps achieve that signature velvety texture found in professional cheesecakes.
- Vanilla Bean PasteUse pure vanilla bean paste, not imitation, to enhance the depth of flavor in the cheesecake base.
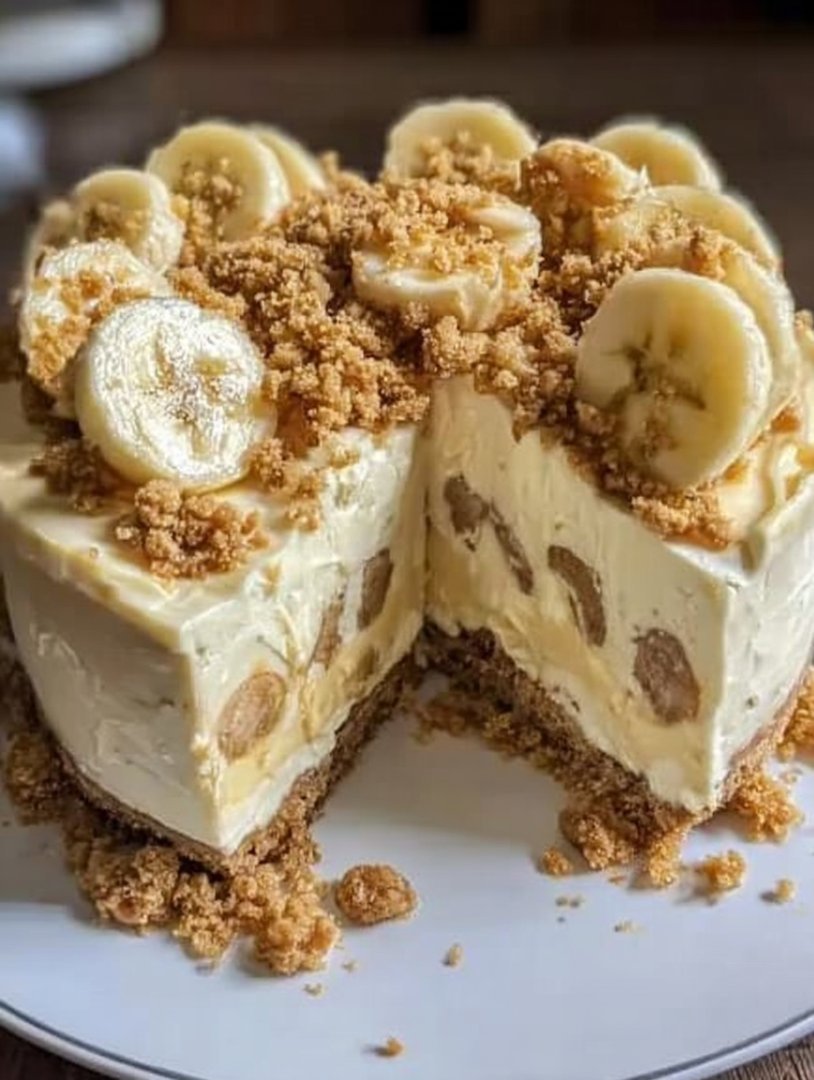
- Ripe BananasSelect bananas with some brown spots; mash them well for the filling and slice firm ones for layering over the finished cheesecake.
- Instant Banana or Vanilla Pudding MixUsed to create the top pudding layer; be sure to use the instant variety for speed and texture.
- Whole MilkNecessary for mixing with the instant pudding mix to create a stable and creamy pudding layer for the top of the cake.
- Plant-Based Whipped ToppingUsed for garnishing and incorporating into the final pudding layer for a lighter, fluffier texture.
The full ingredients list, including measurements, is provided in the recipe card directly below.
How to Make BEST RECIPE For Banana Pudding Crunch Cheesecake
Follow these simple steps to prepare this delicious dish:
-
Prepare the Crust and Water Bath Setup
Preheat your oven to 325°F (160°C). Mix 1½ cups of the vanilla wafer crumbs with melted butter until thoroughly coated. Press this mixture firmly into the bottom and slightly up the sides of a 9-inch springform pan. Wrap the outside of the pan securely in two layers of heavy-duty aluminum foil to protect it during the water bath. Bake the crust for 10 minutes and then let it cool completely while you prepare the filling.
-
Whip the Cheesecake Filling
Using a stand mixer or hand mixer, beat the softened cream cheese and sugar together on medium speed until the mixture is light and fluffy, scraping down the bowl several times. Add the sour cream, vanilla bean paste, and mashed bananas, beating only until just combined. Next, gently incorporate the room temperature eggs one at a time, mixing on low speed only until the yolk disappears. Overmixing the eggs can incorporate too much air, which leads to cracks.
-
Bake the Cheesecake
Pour the filling over the cooled crust in the prepared springform pan. Place the foil-wrapped pan inside a larger roasting pan. Carefully pour boiling water into the roasting pan, ensuring the water level comes about halfway up the sides of the springform pan. Bake for 60 to 75 minutes. The cheesecake should be mostly set but still slightly jiggly in the center (about 3 inches wide). Turn off the oven, prop the door open slightly, and let the cheesecake cool inside the oven for one hour.
-
Chill and Prepare the Pudding Layer
Remove the cheesecake from the water bath, carefully remove the foil, and let it cool completely on a wire rack before transferring it to the refrigerator. Chill for at least 6 hours, preferably overnight. Once fully chilled, prepare the instant pudding mix according to package directions using whole milk. Gently fold in about half of the prepared whipped topping to lighten the texture.
-
Assemble the Crunch and Topping
Spread the prepared banana pudding mixture evenly over the chilled cheesecake layer. Slice the remaining firm bananas thinly and arrange them decoratively over the pudding layer. To create the crunch, toss the remaining ½ cup of wafer crumbs with a teaspoon of sugar and lightly toast them in a dry skillet until golden brown and fragrant. Sprinkle this caramelized crunch generously over the top just before serving.
Transfer the slices to plates and top with an extra dollop of whipped topping for the perfect finishing touch and presentation.
Tips for Cheesecake Perfection
Baking a cheesecake can seem daunting, but armed with a few professional secrets, you can achieve magnificent results every time. Remember, patience is the main ingredient in any successful cheesecake endeavor.
Avoiding the Dreaded Crack
Cheesecakes crack primarily due to rapid temperature changes or overmixing. To prevent this culinary tragedy, ensure all your dairy and eggs are at true room temperature. When mixing, beat the cream cheese first, and then add the eggs last, mixing only until combined. Finally, cooling is key: use the technique of turning off the oven and letting the cake cool slowly inside for that gentle temperature decrease, which keeps the surface smooth and prevents shrinking.
The Art of the Water Bath
A water bath (or ‘bain-marie’) provides crucial insulation for the delicate custard-like filling, ensuring the edges do not cook faster than the center. This creates even heat distribution, resulting in a supremely creamy and uniform texture from edge to edge. Always use heavy-duty foil and wrap the pan tightly to prevent any water seepage. Waterlogged crusts are no fun!
Flavor Enhancements and Variations
While theBEST RECIPE For Banana Pudding Crunch Cheesecakeis perfect as written, you can certainly play with the flavors. For a deeper, caramelized note, try replacing a tablespoon of the granulated sugar in the filling with light brown sugar. Alternatively, incorporate a small amount of finely ground nutmeg or a touch of cardamom into the crust mixture for a subtle, unexpected warmth. If you prefer a nuttier base, you could substitute a quarter of the wafer crumbs with finely chopped pecans or walnuts for an added layer of flavor complexity.
Pairing and Presentation Suggestions
The richness and sweetness of this banana pudding crunch cheesecake demand a pairing that is crisp, refreshing, or slightly bitter to cleanse the palate. For beverages, consider strong, dark-roasted coffee or a robust black tea. If serving for a special event, non-alcoholic sparkling cider or a homemade ginger-lemon spritzer provides a beautiful contrast to the decadent texture of the cake. When presenting, always slice the cheesecake using a long, thin knife dipped in hot water and wiped clean between each cut. This ensures perfectly clean edges, showcasing the beautiful layering of the crust, filling, and pudding.
Storage and Make-Ahead Tips
Cheesecake is an ideal make-ahead dessert, which is perfect for stress-free entertaining. You can bake the cheesecake filling and crust up to three days in advance. Cool it completely and then cover it tightly before refrigerating. Wait to add the pudding layer, the fresh banana slices, and especially the caramelized crunch topping until just a few hours before serving.
If you add the fresh banana slices too far in advance, they will brown and soften, affecting both the look and texture. Store the leftover cheesecake, covered, in the refrigerator for up to 5 days. For freezing, slice the fully baked and cooled cheesecake (without the pudding topping yet), wrap individual slices tightly in plastic wrap, and then foil. It will keep well in the freezer for up to one month. Thaw slices overnight in the refrigerator before adding the final toppings.
Frequently Asked Questions About Banana Pudding Cheesecake
Can I use frozen bananas for the filling?
While frozen bananas work well for smoothies, fresh, ripe bananas are best for this cheesecake filling. Frozen bananas hold too much water, which can potentially alter the smooth texture of the cream cheese batter. Use bananas that are starting to show brown spots for the best natural sweetness.
What if I don’t have a springform pan for the cheesecake?
You can substitute a 9-inch deep-dish pie plate or a standard 9-inch cake pan, but be aware that unmolding will be impossible. For easy serving, line the pan with parchment paper, leaving an overhang on two sides to act as “handles” for lifting the chilled cheesecake out before slicing.
How do I prevent the cheesecake from sinking in the middle?
Sinking usually happens when the cheesecake is underbaked or cooled too quickly. Ensure you bake it until it is just set, with only a slight wobble remaining in the center. Crucially, follow the slow cooling method in the turned-off oven. This slow decrease in temperature prevents the edges from setting too firmly before the center has time to stabilize.
A Final Word on the Crunch Cheesecake
This recipe transforms a beloved classic into a show-stopping dessert that offers the best of both worlds: the comforting nostalgia of banana pudding combined with the elegance and richness of a premium baked cheesecake. Trust the process, embrace the water bath, and enjoy the moment when you take that first bite of creamy filling and glorious, golden crunch.
The Legend of the Split Decision Dessert
For years, I faced a culinary conundrum. Do I choose the smooth, decadent richness of a classic New York-style cheesecake, or do I surrender to the comforting, nostalgic layers of banana pudding? It’s the ultimate dessert dilemma, like choosing between a favorite sibling—impossible, stressful, and usually ending in tears (of joy, from eating both). One fateful afternoon, after a particularly fierce internal debate, I realized the solution was obvious: stop choosing. Why not combine them into one magnificent, towering dessert? Thus began the quest to create the ultimate fusion dessert—what I proudly call theBEST RECIPE For Banana Pudding Crunch Cheesecake.
This isn’t just a dessert; it’s an experience. We take the buttery, crunchy vanilla wafer crust, elevate it with creamy cheesecake, and then top it all off with a rich, homemade banana pudding layer studded with sliced fresh bananas and extra crunchy wafers. It’s sweet, salty, creamy, and crunchy—hitting every textural pleasure center you possess. Prepare your elastic waistbands, friends, because this creation will instantly become your signature bake.
Gathering Your Dessert Arsenal
Successful baking begins with precision. Make sure all your dairy ingredients—especially the cream cheese and eggs—are perfectly at room temperature. This prevents lumps and guarantees that unbelievably smooth texture we demand in a cheesecake. Resist the urge to substitute the vanilla wafers; they provide that quintessential, nostalgic flavor profile that makes the banana pudding element sing. We are skipping the boxed mixes here; a homemade custard truly elevates this dish.
Ingredients for the Vanilla Wafer Crunch Crust
- 2 cups vanilla wafers, finely crushed
- 1/4 cup light brown sugar
- 1/2 teaspoon ground cinnamon
- 1/2 cup (1 stick) unsalted butter, melted
Ingredients for the Cheesecake Filling
- 3 (8-ounce) packages full-fat cream cheese, softened
- 1 1/2 cups granulated sugar
- 1/2 cup sour cream (full fat is mandatory!)
- 1 tablespoon pure vanilla bean paste
- 4 large eggs, room temperature
- 1/4 teaspoon salt
Ingredients for the Banana Pudding Layer
- 1 cup heavy cream
- 1/2 cup whole milk
- 1/2 cup granulated sugar
- 3 large egg yolks
- 1/4 cup cornstarch
- 1 teaspoon vanilla bean paste
- 1/4 teaspoon agar-agar powder (for stabilization)
- 3 large bananas, sliced (reserve for layering)
For the Topping and Garnish
- 1 cup heavy cream
- 2 tablespoons powdered sugar
- 1 teaspoon vanilla bean paste
- 1/2 cup crushed vanilla wafers (for finishing)
Baking Instructions: Achieving Crunch Nirvana
Creating this masterpiece requires patience and proper technique. Unlike a quick batch of cookies, cheesecake needs gentle heat and slow cooling to prevent cracking. Don’t worry about the water bath—we have a foolproof method that skips that messy step while still achieving perfection.
Step 1: Preparing the Crunch Crust
Preheat your oven to 350°F (175°C). Lightly grease a 9-inch springform pan. Combine the crushed vanilla wafers, brown sugar, and cinnamon in a medium bowl. Pour the melted butter over the mix and stir until every crumb is thoroughly moistened. Press the mixture firmly into the bottom and slightly up the sides of the prepared springform pan. Bake the crust for 8 to 10 minutes until lightly golden. Remove it from the oven and let it cool completely while you prepare the filling.
Step 2: Crafting the Silky Cheesecake Filling
In the bowl of a stand mixer fitted with the paddle attachment, beat the softened cream cheese on medium speed until it is entirely smooth and lump-free. Gradually beat in the granulated sugar until just combined. Add the sour cream, vanilla bean paste, and salt, mixing until fully incorporated. Reduce the mixer speed to low. Add the eggs one at a time, mixing only until each egg yolk disappears into the batter. Do not overmix the filling once the eggs are added; excessive whipping incorporates too much air, which leads to cracks during baking. Pour the cheesecake filling over the cooled crust.
Step 3: The Gentle Bake
Reduce your oven temperature to 325°F (160°C). Place the springform pan on a baking sheet (just in case of leaks). Bake the cheesecake for 55 to 70 minutes. The edges should look set, but the center 2-3 inches should still have a slight wobble, like soft set custard. Turn off the oven, prop the oven door open slightly with a wooden spoon, and leave the cheesecake inside for one hour. This gradual cooling prevents sudden temperature changes that cause cracking. After the hour, remove the cheesecake and cool it completely on a wire rack before refrigerating it for at least 6 hours, or preferably overnight.
Step 4: Whipping Up the Banana Pudding Layer
While the cheesecake chills, prepare the pudding layer. In a medium saucepan, whisk together the milk, heavy cream, and agar-agar powder. Bring the mixture to a low simmer over medium heat, stirring constantly until the agar-agar dissolves. In a separate bowl, whisk together the egg yolks, cornstarch, and sugar until pale and thick. Slowly temper the egg mixture by whisking in about half a cup of the hot cream mixture. Return the tempered egg mix back into the saucepan. Cook, stirring constantly, until the pudding thickens considerably and coats the back of a spoon—about 2 to 3 minutes after boiling begins. Remove from heat and stir in the vanilla bean paste. Pour the custard into a bowl, cover the surface directly with plastic wrap (to prevent a skin from forming), and chill completely.
Step 5: Assembly and Grand Finale
Once the cheesecake is fully chilled, run a thin knife around the edge before releasing the springform ring. Arrange a single layer of sliced bananas over the top of the cheesecake. Spread the chilled banana pudding custard evenly over the bananas. Whip the remaining heavy cream, powdered sugar, and vanilla bean paste until stiff peaks form. Pipe or dollop the whipped cream around the edge or over the entire top. Finish theBEST RECIPE For Banana Pudding Crunch Cheesecakeby sprinkling the reserved crushed vanilla wafers just before serving. Slice and receive immediate applause.
Expert Tips for Cheesecake Perfection
My first attempt at combining these two classic desserts was a delicious disaster. The pudding slid off the cheesecake, the crust was soggy, and frankly, it looked like a dessert that had lost a fight. Over time, I refined the process, and these three tips are the essential secrets I learned along the way.
- Use room temperature ingredients for the filling; cold cream cheese yields lumpy batter, making a dense, less creamy final texture.
- Do not skip the gradual cooling step in the oven; rapid temperature changes are the number one culprit for unsightly cheesecake cracks.
- Stabilize the banana pudding with agar-agar or cornstarch to ensure it sets firmly and holds its shape beautifully atop the heavy cheesecake layer.
My family declared this cheesecake recipe a required staple after I finally perfected the pudding’s consistency, making it the star of every Sunday dinner moving forward.
Perfecting the Cooking Process
Focus on sequential timing for maximum efficiency. While the crust bakes and cools, immediately prepare the cheesecake filling, ensuring you refrigerate the completed cake overnight before even thinking about making the pudding layer. This allows the two components to marry perfectly.
Add Your Touch
If you prefer a chocolate note, try swapping out half of the vanilla wafers in the crust for crushed chocolate graham crackers. For a richer banana flavor, consider blending a tablespoon of pureed banana into the cheesecake filling itself. A drizzle of caramel is also a fantastic addition.
Storing & Reheating
Store the finished cheesecake covered tightly in the refrigerator for up to 4 days; since this dessert involves fresh bananas, extended storage is not recommended. If you must freeze it (without the final whipped cream), wrap it securely and thaw slowly in the refrigerator.
FAQs: Your Cheesecake Quandaries Answered
How far ahead can I make this cheesecake?
You can bake the cheesecake base up to two days in advance, but only add the banana pudding, fresh banana slices, and whipped cream topping on the day you plan to serve it for the freshest results.
Why did my cheesecake crack during baking?
Cheesecakes commonly crack due to overmixing the batter (adding too much air) or rapid temperature changes. Always use the low and slow baking method and the crucial gradual oven cooling process to prevent fissures.
Can I use instant pudding instead of homemade custard?
While instant pudding saves time, it often doesn’t set as firmly or provide the rich flavor necessary to stand up to the cheesecake. If you must use instant pudding, add an extra tablespoon of cornstarch to the mix for stability.
How do I know when the banana pudding is set correctly?
The pudding should be thick enough to hold a clean line when you run your finger across the back of a spoon. It will firm up considerably as it cools completely in the refrigerator before layering onto the cheesecake.
What is the BEST RECIPE For Banana Pudding Crunch Cheesecake to serve with?
Since this dessert is rich and complex, pair it with simple, light beverages like strong iced coffee, a classic black tea, or sparkling water infused with fresh mint and citrus slices.
The Ultimate Dessert Dilemma: Cheesecake Meets Banana Pudding
There are desserts, and then there are legendary desserts—the kind that solve complex life problems simply by existing. We all know the classic banana pudding holds a special place in our hearts, evoking memories of Sunday dinners and potlucks. But sometimes, a sophisticated occasion calls for something more structured, something with a crisp crust and a luxurious, tangy bite. That’s where the cheesecake enters the chat, ready to elevate the situation from casual comfort food to celebratory extravagance.
This recipe isn’t just a simple mashup; it’s the culmination of two dessert titans finding sweet, perfect harmony. We take the cool, creamy comfort of a homemade vanilla custard, layer it with ripe, sliced bananas, and then tuck it all onto a cloud of rich, baked cheesecake. But we didn’t stop there. We added the ‘crunch’—a salty-sweet, toasted nut brittle that sends this entire creation into the stratosphere. Get ready to forget every other dessert you have ever loved, because this is about to become your new favorite obsession.
Why This Banana Pudding Crunch Cheesecake Will Ruin All Other Desserts
Texture is everything in this creation. Many banana pudding cheesecakes fall flat because they lack structural integrity or the flavors clash. Our secret lies in three distinct layers that offer a symphony of contrast. First, the crust provides a sturdy, buttery foundation. Second, the cheesecake filling is baked low and slow until it achieves that perfect, dense, yet silky texture. Finally, the unbaked top layer of vanilla pudding and fresh bananas brings that essential moistness, cutting through the richness of the cheese. The sprinkle of the brown sugar pecan crunch on top ensures every bite delivers sweet, tangy, and textural satisfaction.
Ingredients for the BEST RECIPE For Banana Pudding Crunch Cheesecake
Making this spectacular dessert requires focus, patience, and high-quality ingredients. Trust us, every step is worth the wait when you pull this masterpiece from the refrigerator.
The Crispy Vanilla Wafer Crust
- 1 ½ cups vanilla wafer cookies, finely crushed
- ¼ cup light brown sugar, packed
- ½ teaspoon ground cinnamon
- ½ cup (1 stick) unsalted butter, melted
The Rich, Creamy Filling
- 3 (8-ounce) packages full-fat cream cheese, softened
- 1 ½ cups granulated sugar
- ¼ cup cornstarch (to prevent cracks)
- 1 teaspoon pure vanilla bean paste
- 4 large eggs, room temperature
- ½ cup sour cream or full-fat Greek yogurt
The Luscious Pudding, Topping, and Crunch
- 1 box instant vanilla pudding mix (large size, 5.1 oz)
- 3 cups cold milk (dairy or non-dairy equivalent)
- 1 teaspoon vanilla bean paste
- 4 medium ripe bananas, sliced
- 1 cup chopped pecans or walnuts
- ¼ cup butter
- ¼ cup brown sugar
- Pinch of sea salt
Step-by-Step Guide: Baking Perfection
Phase 1: Building the Foundation (The Crust)
Preheat your oven to 325°F (160°C). Grease a 9-inch springform pan. Combine the crushed vanilla wafers, brown sugar, and cinnamon in a medium bowl. Pour in the melted butter and stir until the mixture resembles wet sand. Press this mixture firmly and evenly onto the bottom and slightly up the sides of the prepared pan. Bake the crust for 8 minutes, then remove it from the oven and set it aside to cool slightly while you prepare the filling. This pre-baking step helps create a stronger foundation.
Phase 2: The Creamy Heart (The Filling)
In a large mixing bowl, beat the softened cream cheese until it is perfectly smooth, scraping down the sides often. Gradually add the sugar and cornstarch, mixing until just combined and lump-free. Stir in the vanilla bean paste and sour cream. Beat in the eggs one at a time, ensuring each egg is fully incorporated before adding the next. Be careful not to over-mix at this stage, as too much air can cause cracking during the bake. Pour the filling over the slightly cooled crust.
Place the springform pan inside a larger baking pan. Fill the larger pan with about an inch of hot water—this water bath (or bain-marie) is essential for slow, even baking and preventing cracks. Bake for 60 to 75 minutes, or until the edges are set and the center jiggles only slightly when gently nudged. Turn off the oven, prop the door open slightly, and allow the cheesecake to cool inside the oven for one hour. This gradual cooling prevents sudden temperature changes and collapse.
Phase 3: The Grand Finale (Pudding and Chill)
Once cooled, remove the cheesecake from the oven and water bath. Let it cool completely on a wire rack before refrigerating it for at least 6 hours, preferably overnight. While the cheesecake chills, prepare the pudding layer and the crunch topping. Whisk together the pudding mix, cold milk, and vanilla bean paste until thickened, then refrigerate for 30 minutes.
For the crunch, melt the butter and brown sugar together in a small pan. Add the chopped nuts and salt. Cook until the sugar caramelizes slightly and the nuts are toasted, about 5 minutes. Spread the crunch mixture onto parchment paper and allow it to cool completely and harden. Once cool, chop the crunch into small, manageable pieces.
Before serving, carefully spread the vanilla pudding evenly over the chilled cheesecake. Arrange the sliced bananas attractively on top of the pudding layer. Sprinkle liberally with the prepared nut crunch. Slice, serve, and accept the immediate standing ovation from your delighted guests. This dessert holds well in the refrigerator for up to three days, though it rarely lasts that long.
Conclusion for BEST RECIPE For Banana Pudding Crunch Cheesecake
The journey to creating the BEST RECIPE For Banana Pudding Crunch Cheesecake might require a little time and attention to detail, but the resulting dessert is an unforgettable masterpiece that perfectly balances comfort and elegance. We’ve combined the nostalgic flavors of vanilla custard and ripe bananas with the luxurious tang of baked cream cheese, all tied together with a satisfying, salty-sweet nut crunch. This recipe is destined to be the showstopper at your next gathering, proving that sometimes, two desserts are exponentially better than one. Follow these steps for foolproof baking, and prepare to elevate your dessert status permanently. Enjoy this decadent fusion of flavor and texture!
*
Print
BEST RECIPE For Banana Pudding Crunch Cheesecake
Experience the ultimate fusion dessert! A buttery Vanilla Wafer crunch base supports a cloud-like, 32oz cream cheese core. Baked gently via water bath for supreme richness.
- Total Time: 35 minutes
- Yield: 4 servings
Ingredients
- Vanilla Wafers: 3 cups, finely crushed, plus extra for topping
- Unsalted Butter: 1/2 cup (1 stick), melted
- Cream Cheese: 32 ounces, full fat, softened
- Granulated Sugar: 1 1/2 cups
- Large Eggs: 4, room temperature
- Instant Vanilla Pudding Mix: 1 (3.4 oz) package
- Heavy Cream: 1/2 cup
- Ripe Bananas: 3, sliced
Instructions
- Step 1: Prepare the Crust and Filling Base. Preheat oven to 325°F (160°C). Combine the crushed vanilla wafers and melted butter. Press the mixture firmly into the bottom and slightly up the sides of a 9-inch springform pan. Bake the crust for 8 minutes, then remove and let cool slightly while preparing the filling.
- Step 2: Mix and Bake the Cheesecake Layer. In a large bowl, beat the softened cream cheese and sugar until light and fluffy. Add the eggs one at a time, mixing only until just combined after each addition. Pour the filling over the prepared crust. Place the springform pan in a large roasting pan and fill the roasting pan with hot water halfway up the sides of the springform pan (water bath).
- Step 3: Bake and Chill. Bake for 60 to 75 minutes, or until the edges are set but the center still has a slight jiggle. Turn off the oven, prop the door open, and leave the cheesecake inside for 1 hour. Remove the cheesecake from the water bath, cool completely on the counter, then cover and refrigerate for at least 6 hours, or preferably overnight.
- Step 4: Create the Banana Pudding Crunch Topping. Whisk together the instant vanilla pudding mix and the heavy cream until thickened. Remove the chilled cheesecake from the springform pan. Gently spread the pudding mixture evenly over the top of the cheesecake.
- Step 5: Layer and Serve. Arrange the sliced ripe bananas over the pudding layer. Crush additional vanilla wafers (for the crunch) and sprinkle generously over the bananas. Return the cheesecake to the refrigerator for at least 1 hour before slicing and serving.
Notes
- Store leftovers tightly wrapped in the refrigerator for a maximum of 3 days, as the fresh banana topping will start to brown and deteriorate quickly after that time.
- For optimal creamy texture, remove the whole cheesecake from the fridge about 30 minutes before cutting, but wait to add the sliced bananas and wafer crunch until right before you plan to serve.
- Balance the richness of the cheesecake by pairing each slice with a small scoop of vanilla bean ice cream or a light dusting of cinnamon sugar.
- When creating the cheesecake batter, be sure to only incorporate the eggs until just combined to prevent overmixing, which introduces air and leads to frustrating cracks during baking and cooling.
- Prep Time: 15 minutes
- Cook Time: 20 minutes
- Method: Stovetop
- Cuisine: American
FAQs
Can I make the BEST RECIPE For Banana Pudding Crunch Cheesecake ahead of time?
You absolutely can, and in fact, we highly recommend it! The cheesecake itself requires a minimum of six hours, but ideally twelve hours, of refrigeration to fully set. You can bake the cheesecake component up to two days in advance. However, hold off on adding the banana slices and the vanilla pudding layer until just a few hours before you plan to serve it. This strategy ensures the bananas stay fresh and vibrant, and the vanilla wafers in the crust maintain their crispness for the most delightful textural contrast. Simply store the crunch topping in an airtight container at room temperature until ready to garnish.
What is the secret to a perfectly smooth cheesecake filling?
Achieving a silky-smooth texture relies on two main factors: ingredient temperature and mixing technique. Always ensure your cream cheese and eggs are at true room temperature. Cold cream cheese results in lumps that will never dissolve. When mixing, start slow. Beat the cream cheese alone until fluffy before adding sugar. Add eggs last, one at a time, and mix only until combined. Over-mixing introduces too much air, which can cause the cheesecake to puff up and then crack as it cools. The inclusion of cornstarch in this particular BEST RECIPE For Banana Pudding Crunch Cheesecake also aids in stabilization.
How do I prevent the bananas from turning brown in the pudding layer?
Bananas naturally oxidize quickly once sliced, turning an unappetizing brown color. To combat this, you have a couple of easy kitchen tricks. The best method is dipping the banana slices briefly into a very small amount of lemon juice or pineapple juice before layering them onto the pudding. The acid in the fruit juice slows down the browning process effectively without significantly altering the flavor of this decadent dessert. Additionally, applying the banana slices immediately before serving, rather than hours ahead, drastically improves their appearance and freshness.
What substitution works best for the vanilla wafer crust base?
While the vanilla wafers are integral to achieving the authentic banana pudding flavor profile in this recipe, you certainly have substitution options if needed. A delicious alternative that still provides a crisp crunch is graham crackers or digestive biscuits, mixed with a little extra brown sugar for sweetness. For a different but equally good flavor, you could use shortbread cookies or even ginger snaps if you enjoy a spicy contrast. Whatever you choose, ensure you finely crush the cookies and use the proper ratio of melted butter so the crust holds together beautifully when baked.

Leave a Comment