


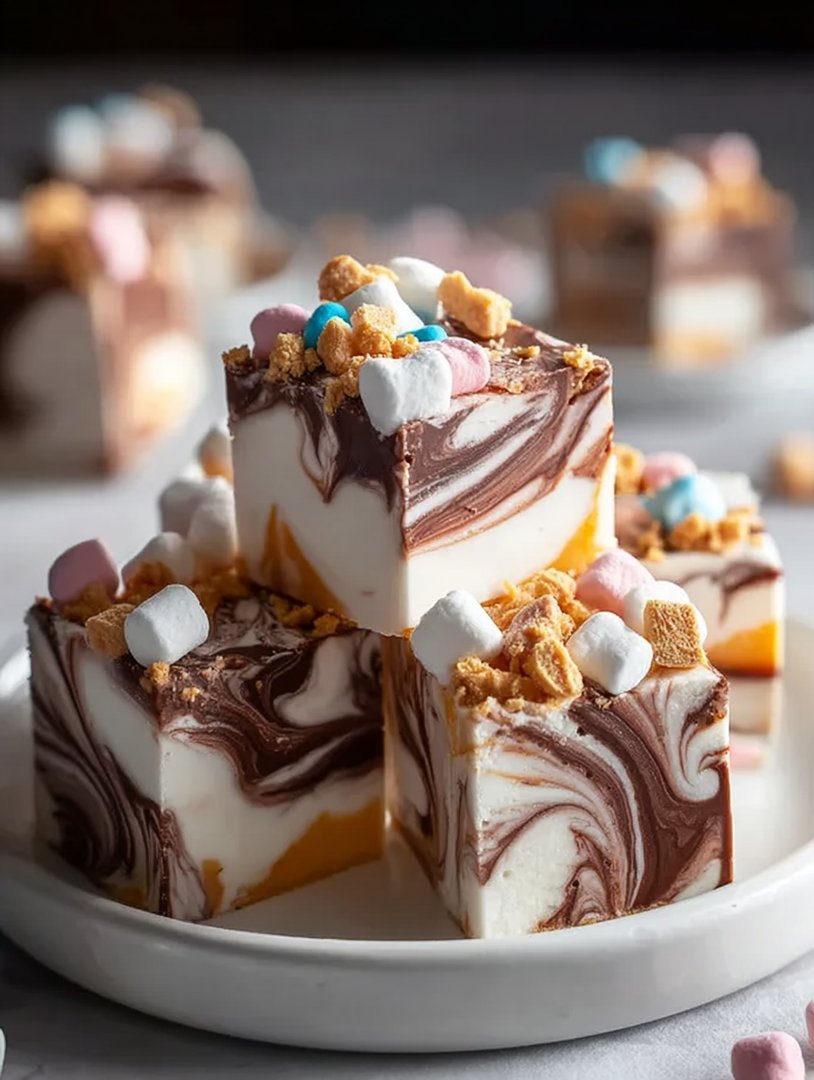
Imagine a dessert that’s both a fluffy cloud and a decadent dream, where creamy fudge dances with sweet marshmallow swirls in a symphony of sugary delight. This Marshmallow Swirl Fudge is not just a treat; it’s an edible hug.
It reminds me of childhood sleepovers, armed with flashlights and whispered secrets, always capped off with something sweet and homemade. This fudge captures that carefree, joyful spirit in every bite.
- Effortlessly simple to make, this fudge requires no candy thermometer or fancy equipment.
- A harmonious blend of rich chocolate flavor and sweet marshmallow creates an irresistible taste.
- The captivating swirls of marshmallow add a whimsical and visually appealing touch.
- Perfect for gifting, parties, or simply indulging in a well-deserved sweet treat.
Ingredients for Marshmallow Swirl Fudge
Here’s what you’ll need to make this delicious dish:
The full ingredients list, including measurements, is provided in the recipe card directly below.
How to Make Marshmallow Swirl Fudge
Follow these simple steps to prepare this delicious dish:
Step 1: Prepare the Pan
Line an 8×8 inch baking pan with parchment paper, leaving an overhang on two sides. This makes it easy to lift the fudge out later.
Step 2: Melt the Chocolate Base
In a large, microwave-safe bowl, combine the chocolate chips, sweetened condensed milk, and butter. Microwave in 30-second intervals, stirring in between, until completely melted and smooth. Be careful not to overheat the chocolate!
Step 3: Add Vanilla and Salt
Stir in the vanilla extract and a pinch of flaky sea salt (if using) until well combined. This step brings out the flavor and adds a touch of sophistication.
Step 4: Create the Marshmallow Swirl
Drop spoonfuls of marshmallow creme over the chocolate mixture, spacing them evenly. Use a knife or skewer to gently swirl the marshmallow into the chocolate, creating a marbled effect. Don’t overmix, or the swirls will disappear!
Step 5: Chill and Set
Pour the fudge mixture into the prepared pan and spread it evenly. Cover with plastic wrap and refrigerate for at least 2 hours, or until firm. Patience is key here!
Step 6: Slice and Serve
Once the fudge is firm, lift it out of the pan using the parchment paper overhang. Cut it into squares and serve. Enjoy this decadent Marshmallow Swirl Fudge with a cup of coffee or as a sweet ending to any meal.
Variations on Marshmallow Swirl Fudge (H2)
Peanut Butter Bliss (H3)
For those who love the classic combination of chocolate and peanut butter, add 1/2 cup of peanut butter to the chocolate mixture before melting. The nutty flavor complements the sweetness perfectly.
Mint Chocolate Marvel (H3)
Add 1/4 teaspoon of peppermint extract to the chocolate mixture for a refreshing twist. You can also sprinkle crushed peppermint candies on top for extra flair.
Nutty Delight (H3)
Stir in 1/2 cup of chopped nuts, such as walnuts or pecans, to the chocolate mixture for added texture and flavor. Toast the nuts beforehand for an even richer taste.
Caramel Craze (H3)
Drizzle caramel sauce over the top of the fudge before chilling for a gooey, caramel-infused treat. A little extra salt on top enhances the caramel flavor even more.
Tips for Perfect Marshmallow Swirl Fudge (H2)
Choosing Quality Chocolate (H3)
The quality of your chocolate chips significantly impacts the overall taste of the fudge. Opt for semi-sweet chocolate chips from a reputable brand for the best flavor and texture. Cheaper chocolate chips may not melt as smoothly and can have a waxy texture.
Avoiding Overheating (H3)
When melting the chocolate, be careful not to overheat it. Overheated chocolate can become grainy and seize up. Microwave in short intervals and stir frequently to ensure even melting. If melting on the stovetop, use a double boiler to prevent scorching.
Swirling Techniques (H3)
The key to beautiful marshmallow swirls is to avoid overmixing. Gently swirl the marshmallow creme into the chocolate using a knife or skewer, being careful not to blend them completely. Less is more when it comes to swirling!
Storing Your Fudge (H3)
Store your Marshmallow Swirl Fudge in an airtight container in the refrigerator for up to a week. You can also freeze it for longer storage. Wrap the fudge tightly in plastic wrap and then place it in a freezer bag. It will keep in the freezer for up to 2 months.
Why This Marshmallow Swirl Fudge Recipe Works (H2)
This recipe works because it’s simple, forgiving, and delivers incredible results. The combination of sweetened condensed milk and butter creates a creamy, smooth fudge that melts in your mouth. The marshmallow swirls add a touch of sweetness and visual appeal, making it a treat that’s both delicious and beautiful. Plus, the variations offer endless possibilities for customization.
Serving Suggestions for Marshmallow Swirl Fudge (H2)
As a Gift (H3)
Marshmallow Swirl Fudge makes a wonderful homemade gift. Package it in a decorative tin or box and tie it with a ribbon. Add a handwritten card for a personal touch.
For Parties (H3)
Cut the fudge into small squares and arrange them on a platter for parties. It’s a crowd-pleasing dessert that’s sure to be a hit.
With Coffee or Tea (H3)
Enjoy a square of Marshmallow Swirl Fudge with a cup of coffee or tea for a sweet afternoon treat. The rich chocolate flavor pairs perfectly with the warmth of the beverage.
As a Dessert Topping (H3)
Crumble the fudge over ice cream or yogurt for a decadent dessert topping. It adds a touch of sweetness and texture to any treat.
Common Mistakes to Avoid When Making Marshmallow Swirl Fudge (H2)
Using Evaporated Milk (H3)
Sweetened condensed milk is essential for the creamy texture of the fudge. Evaporated milk will not give you the same results.
Overmixing the Swirls (H3)
Overmixing the marshmallow creme will cause the swirls to disappear. Gently swirl it into the chocolate for a marbled effect.
Not Chilling Long Enough (H3)
Chilling the fudge for at least 2 hours is necessary for it to set properly. Rushing this step will result in a soft, sticky fudge.
The History of Fudge (H2)
While this recipe features the fun addition of marshmallow, the original story of fudge is quite intriguing. Fudge is thought to have originated in the late 19th century in the United States. The most popular story attributes its creation to a batch of caramels that went wrong, resulting in a “fudged” batch. Whether accidental or intentional, this delicious mistake quickly gained popularity and evolved into the many variations we know and love today.
Final Thoughts on Marshmallow Swirl Fudge (H2)
This Marshmallow Swirl Fudge is more than just a recipe; it’s an experience. It’s a journey back to childhood, a sweet escape from the everyday, and a chance to create something truly special. So go ahead, indulge your sweet tooth and whip up a batch of this irresistible treat. You won’t regret it! The ease of this recipe, combined with its delicious flavor and eye-catching appearance, makes it a winner for any occasion. Whether you’re making it for a holiday gathering, a birthday celebration, or simply a weeknight treat, this Marshmallow Swirl Fudge is sure to bring a smile to everyone’s face. Enjoy!
Perfecting the Cooking Process
To craft the most magnificent marshmallow swirl fudge, melt your chocolate first, then gently incorporate the marshmallow fluff to avoid burning. Prepare your pan before you even start mixing—trust me, future you will be grateful for the quick cleanup.
Add Your Touch
Feeling adventurous? Substitute dark chocolate for milk chocolate, or white chocolate for a sweeter edge. Consider adding chopped walnuts or pecans for a delightful crunch. For a hint of coffee flavor, try espresso powder; it elevates the fudge beautifully.
Storing & Reheating
Store your marshmallow swirl fudge in an airtight container at room temperature. It’ll last for about a week—if it lasts that long! No need to reheat; this fudge is best enjoyed straight from the container (or the fridge if you prefer a firmer bite).
Here are a few insider tips to help you become a marshmallow swirl fudge master:
- Always use high-quality chocolate; it makes a world of difference in both taste and texture. Skimping here is a culinary crime!
- Gently fold in the marshmallow fluff; overmixing can deflate it, leaving you with a less-than-perfect swirl. Be gentle, like you’re tucking it into bed.
- Line your pan with parchment paper; this ensures your fudge comes out cleanly and easily. Trust me, it’s worth the extra step.
(Personal anecdote)
I once made this for a potluck, and it disappeared so fast! My friend swore it was the best fudge she’d ever tasted. Now, I make a double batch every time!
Conclusion for Marshmallow Swirl Fudge
This marshmallow swirl fudge is simple to make, yet utterly irresistible. You can easily customize it with different extracts, and the beautiful swirls are a guaranteed crowd-pleaser. With attention to temperature and proper chilling time, you’ll be rewarded with a smooth, creamy fudge that melts in your mouth. So go ahead, unleash your inner chocolatier and whip up a batch of this delightful treat. Enjoy!
Print
Marshmallow Swirl Fudge
Delicious marshmallow swirl fudge recipe with detailed instructions and nutritional information.
- Total Time: 35 minutes
- Yield: 4 servings 1x
Ingredients
- 3 cups granulated sugar
- 3/4 cup unsweetened cocoa powder
- 1 1/2 cups (3 sticks) unsalted butter, cut into pieces
- 3/4 cup evaporated milk
- 1/4 teaspoon salt
- 1 teaspoon vanilla extract
- 7 ounces marshmallow creme
- 1 cup chopped walnuts or pecans (optional)
Instructions
- Step 1: Grease and line an 8×8 inch baking pan with parchment paper, leaving an overhang on two sides.
- Step 2: In a large saucepan, combine sugar, cocoa powder, butter, evaporated milk, and salt. Cook over medium heat, stirring constantly, until the mixture comes to a full rolling boil.
- Step 3: Boil for 5 minutes, stirring constantly to prevent scorching. Remove from heat and stir in vanilla extract.
- Step 4: Immediately beat the fudge mixture with an electric mixer until it starts to thicken, about 5 minutes.
- Step 5: Quickly fold in the marshmallow creme and nuts (if using). Do not overmix; you want swirls of marshmallow.
- Step 6: Pour the fudge into the prepared pan and spread evenly. Chill in the refrigerator for at least 2 hours, or until firm. Use the parchment paper overhang to lift the fudge out of the pan and cut into squares.
Notes
- Store the fudge in an airtight container at room temperature for the best texture.
- If you want a warm, gooey treat, microwave individual squares for just a few seconds.
- Serve the fudge with a dollop of whipped cream and a sprinkle of extra nuts for an elegant dessert.
- For extra fudgy results, be sure to beat the mixture with the electric mixer until it just *begins* to thicken before adding the marshmallow creme.
- Prep Time: 15 minutes
- Cook Time: 20 minutes
- Method: Stovetop
- Cuisine: American
FAQs
How do I achieve the perfect marshmallow swirl in my fudge?
Getting that gorgeous swirl in your marshmallow swirl fudge is easier than you might think! The key is to avoid completely mixing the marshmallow fluff into the chocolate base. Drop dollops of fluff on top of the fudge after it’s poured into the pan. Then, use a knife or skewer to gently swirl the marshmallow into the chocolate. Don’t overdo it, or you’ll end up with a homogenous mixture, losing the distinct swirl effect we’re after. Quick, light movements are your friend here. Consider chilling the fudge slightly before swirling to prevent the marshmallow from completely dissolving into the warm base.
Can I use different extracts to customize my Marshmallow Swirl Fudge?
Absolutely! This Marshmallow Swirl Fudge recipe is a fantastic base for experimenting with different flavors. Vanilla extract is a classic choice, but feel free to swap it out for other extracts like almond, peppermint, or even orange for a citrusy twist. Just be sure to use a high-quality extract, as the flavor will really shine through in the finished fudge. Start with a small amount (about 1/2 teaspoon) and adjust to your liking. It’s your fudge adventure, so don’t be afraid to get creative and find your perfect flavor combination.
What’s the best way to store my homemade Marshmallow Swirl Fudge?
Storing your homemade marshmallow swirl fudge properly is crucial to keep it fresh and delicious. The best way to store it is in an airtight container at room temperature. This will prevent it from drying out and becoming crumbly. If you live in a warmer climate, you can store it in the refrigerator, but be aware that this might make the fudge a bit harder. Just let it sit at room temperature for a few minutes before serving to soften it up. Your fudge will stay good for about a week, but let’s be honest, it probably won’t last that long!
My Marshmallow Swirl Fudge is too soft. What did I do wrong?
If your marshmallow swirl fudge is too soft, chances are the chocolate mixture didn’t reach a high enough temperature during cooking, or you didn’t let it set long enough. Use a candy thermometer to make sure it reaches the soft-ball stage (around 235-240°F or 112-115°C). Once you remove the fudge from the heat, stir in the marshmallow fluff and be sure to let the fudge set completely in the refrigerator for at least two hours, or preferably overnight, before cutting it. Patience is key! If it’s still too soft after chilling, you can try popping it back in the fridge for another hour or so.


Leave a Comment