


Imagine biting into a cookie that tastes like pure, unadulterated fun, a sweet treat that brings the digital world to your kitchen. Get ready to embark on a delightful culinary adventure, crafting the most epic **Minecraft Cookies Recipe** this side of the Overworld.
These cookies aren’t just delicious; they’re a pixel-perfect party in your mouth, turning any occasion into a block-tastic celebration. So, grab your apron, sharpen your crafting skills, and prepare for a recipe that will have everyone shouting, “Creeper? Aw, man! These cookies are amazing!”.
Here’s why this **Minecraft Cookies Recipe** is about to become your new go-to bake:
- These cookies are ridiculously easy to make, perfect for novice bakers and seasoned pros alike, ensuring everyone can join the fun.
- With a delightful vanilla flavor, these cookies provide a blank canvas for you to unleash your inner artist, perfect for decorating.
- The vibrant colors and blocky shapes make these cookies visually stunning, guaranteed to impress both gamers and dessert enthusiasts.
- Ideal for birthday parties, gaming nights, or just a fun afternoon project, these cookies bring a touch of the digital world into your real life.
Ingredients for Minecraft Cookies Recipe
Here’s what you’ll need to make this delicious dish:
The full ingredients list, including measurements, is provided in the recipe card directly below.
How to Make Minecraft Cookies Recipe
Follow these simple steps to prepare this delicious dish:
Step 1: Prepare the Dough
In a large bowl, cream together the softened butter and granulated sugar until light and fluffy. Beat in the eggs one at a time, then stir in the vanilla extract. In a separate bowl, whisk together the flour, baking powder, and salt. Gradually add the dry ingredients to the wet ingredients, mixing until just combined. Do not overmix.
Step 2: Chill and Roll
Divide the dough in half, flatten each half into a disc, and wrap in plastic wrap. Refrigerate for at least 1 hour, or preferably overnight. This chilling process is important as it helps the gluten relax and prevents the cookies from spreading too much during baking.
Step 3: Cut Out Shapes
Preheat oven to 375°F (190°C). On a lightly floured surface, roll out one disc of dough to about 1/4 inch thickness. Use square cookie cutters of varying sizes to cut out Minecraft-inspired shapes. If you don’t have square cutters, use a knife to carefully cut the shapes.
Step 4: Bake the Cookies
Place the cookie cutouts onto a baking sheet lined with parchment paper. Bake for 8-10 minutes, or until the edges are lightly golden. Let the cookies cool on the baking sheet for a few minutes before transferring them to a wire rack to cool completely.
Step 5: Prepare the Royal Icing
In a large bowl, beat together the powdered sugar, meringue powder, and water until smooth and stiff peaks form. Divide the icing into separate bowls and add gel food coloring to each bowl, creating the desired Minecraft colors (green, brown, blue, etc.). Transfer the icing to piping bags fitted with small round tips.
Step 6: Decorate the Cookies
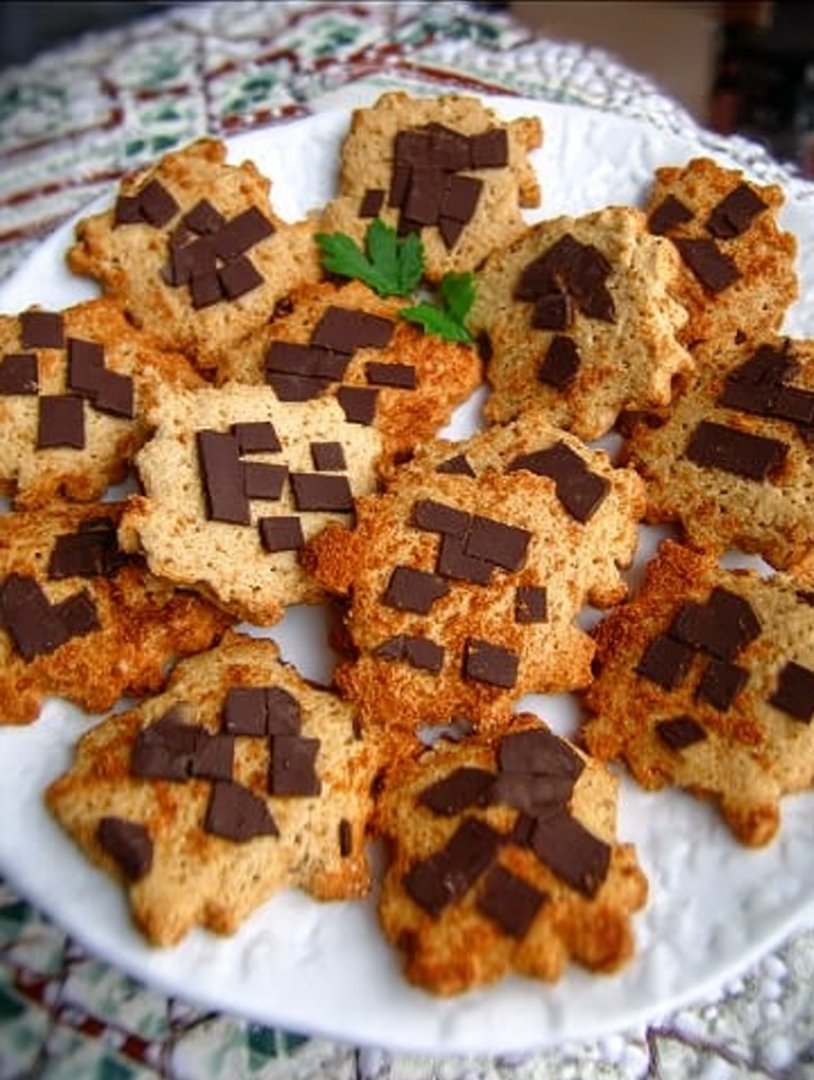
Decorate the cooled cookies with the colored royal icing to resemble Minecraft blocks, characters, and tools. Let the icing dry completely before serving. The drying time can vary, but it usually takes a few hours.
Transfer to a serving platter and watch as these delightful, blocky treats bring joy to everyone. These **Minecraft Cookies Recipe** are perfect for any occasion, promising a fun and delicious experience.
Perfecting the Cooking Process
For flawless cookies, cream the butter and sugar until light and fluffy before gradually adding the dry ingredients. Don’t overmix the dough. Chill it before baking for less spread and sharper edges, ensuring perfectly square Minecraft cookies every time.
Add Your Touch
Feel free to swap vanilla extract for almond extract for a nutty twist. For extra crunch, fold in some chopped nuts or dried fruit. You could even add a dash of orange zest to the dough for a bright, citrusy flavor.
Storing & Reheating
Store the cooled Minecraft cookies in an airtight container at room temperature to keep them fresh for up to a week. To refresh slightly stale cookies, pop them in a low oven (around 300°F) for a few minutes.
Here are some helpful tips to bake the ultimate blocky treats:
- Always measure your ingredients accurately; baking is a science, and precision is key for the perfect texture and rise!
- Use parchment paper or a silicone baking mat to prevent the cookies from sticking, which makes removal easier and cleanup a breeze.
- Don’t overcrowd the baking sheet, giving each cookie enough space to spread evenly and bake uniformly to a golden brown hue.
(Personal anecdote formated as paragraph subheading)
Last holiday season, I made a batch of these Minecraft cookies for my nephew’s birthday. Seeing his eyes light up when he saw the creeper face was the best feeling ever.
Minecraft Cookies Recipe: A Blocky Adventure in Baking!
Alright, fellow gamers and dessert enthusiasts, prepare to embark on a culinary quest like no other! Today, we’re diving headfirst into the pixelated world of Minecraft to bring you a recipe that’s as fun to make as it is to devour: the **Minecraft Cookies Recipe**! Forget those boring, round cookies; we’re building edible blocks of deliciousness that will have your taste buds singing the Minecraft theme song.
Now, I know what you might be thinking: “Cookies? Minecraft? What’s the connection?” Well, my friends, the connection is pure, unadulterated fun! Imagine creating your own little edible Minecraft world, one perfectly square cookie at a time. These aren’t just cookies; they’re tiny, tasty works of art, ready to be devoured by hungry adventurers of all ages. So grab your apron, dust off your crafting skills, and let’s get baking!
Why This Minecraft Cookies Recipe Is a Game Changer
Why should you try this recipe, you ask? Let me tell you, these **Minecraft Cookies Recipe** aren’t just your average cookies. They’re a guaranteed crowd-pleaser, a conversation starter, and a surefire way to level up your baking game. Here’s why this recipe will become your new favorite:
- **Nostalgia Overload:** Whether you’re a seasoned Minecraft veteran or a newbie to the blocky universe, these cookies will transport you back to the days of mining, crafting, and avoiding creepers.
- **Creativity Unleashed:** The square shape of these cookies provides the perfect canvas for decorating. You can create any Minecraft character, block, or scene you can imagine. The possibilities are endless!
- **Kid-Friendly Fun:** Get the little ones involved in the baking process. They’ll love rolling out the dough, cutting out the squares, and decorating their favorite Minecraft creations.
- **Perfect for Parties:** Hosting a Minecraft-themed birthday party? These cookies are a must-have. They’re easy to make in large batches and are guaranteed to be a hit with all the guests.
- **Deliciously Addictive:** Let’s not forget the most important part: these cookies taste amazing! They’re soft, buttery, and perfectly sweet, making them impossible to resist.
Trust me, once you’ve tried this **Minecraft Cookies Recipe**, you’ll be hooked. Get ready to become the hero of your own blocky baking adventure!
Gather Your Resources: The Ingredient List
Before we start our baking journey, let’s make sure we have all the necessary resources. Here’s what you’ll need to craft these delectable Minecraft cookies:
- **All-Purpose Flour:** The foundation of our blocky creations. 3 cups should do the trick.
- **Baking Powder:** To give our cookies a little lift and that perfect, soft texture. 1 teaspoon.
- **Salt:** Just a pinch to balance the sweetness.
- **Unsalted Butter:** Softened, of course. 1 cup (2 sticks) will work wonders.
- **Granulated Sugar:** For that sweet, sweet flavor. 1 cup.
- **Large Eggs:** The binding agent that holds it all together. 2 of these bad boys.
- **Vanilla Extract:** A dash of vanilla magic to enhance the flavor. 1 teaspoon.
- **Powdered Sugar:** For creating that smooth, flawless frosting. 4 cups.
- **Milk:** To thin out the frosting to the perfect consistency. Start with 1/4 cup and add more as needed.
- **Food Coloring:** Gel food coloring is your best bet for achieving vibrant Minecraft colors.
With these ingredients in hand, you’re ready to start crafting some seriously awesome **Minecraft Cookies Recipe**. Now, let’s move on to the recipe!
Mining for Success: Step-by-Step Instructions
Alright, adventurers, it’s time to put on your crafting hats and get to work! Here’s how to make these incredible Minecraft cookies:
Step 1: Prepare Your Workspace
First things first, preheat your oven to 375°F (190°C) and line your baking sheets with parchment paper or silicone baking mats. This will prevent sticking and make your life a whole lot easier.
Step 2: Mix the Dry Ingredients
In a medium bowl, whisk together the flour, baking powder, and salt. This ensures that the baking powder is evenly distributed, which is crucial for achieving a consistent texture.
Step 3: Cream the Butter and Sugar
In a large bowl, cream together the softened butter and granulated sugar until light and fluffy. This is where a good stand mixer comes in handy, but you can also use a hand mixer or even a good old-fashioned wooden spoon. The goal is to incorporate air into the mixture, creating a tender crumb.
Step 4: Add the Eggs and Vanilla
Beat in the eggs one at a time, then stir in the vanilla extract. Make sure each egg is fully incorporated before adding the next. This helps create a smooth, homogenous batter.
Step 5: Combine Wet and Dry
Gradually add the dry ingredients to the wet ingredients, mixing until just combined. Be careful not to overmix the dough, as this can result in tough cookies.
Step 6: Chill Out
Wrap the dough in plastic wrap and chill it in the refrigerator for at least 30 minutes. This will make the dough easier to handle and prevent the cookies from spreading too much in the oven.
Step 7: Roll and Cut
On a lightly floured surface, roll out the dough to about 1/4-inch thickness. Use a square cookie cutter (or a knife if you’re feeling extra crafty) to cut out the cookies.
Step 8: Bake ‘Em Up
Place the cookies on the prepared baking sheets, leaving a little space between each one. Bake for 8-10 minutes, or until the edges are lightly golden brown.
Step 9: Cool and Decorate
Let the cookies cool on the baking sheets for a few minutes before transferring them to a wire rack to cool completely. Once they’re cool, it’s time to unleash your inner artist and decorate them with colorful frosting to create your favorite Minecraft characters and blocks!
Follow these steps, and you’ll be well on your way to creating the most epic **Minecraft Cookies Recipe** the world has ever seen. Now let’s dive deeper and discuss how to elevate your baking techniques and customization options to make these cookies truly your own.
Level Up Your Baking Game: Pro Tips and Tricks
Want to take your **Minecraft Cookies Recipe** to the next level? Here are some pro tips and tricks to help you bake like a boss:
- **Use Room Temperature Butter:** Softened butter is essential for achieving that light and fluffy texture. If you forget to take the butter out of the fridge in advance, you can microwave it in short bursts, but be careful not to melt it.
- **Measure Flour Accurately:** Too much flour can result in dry, tough cookies. Use the “spoon and level” method: spoon the flour into your measuring cup and then level it off with a knife.
- **Chill the Dough:** Don’t skip the chilling step! Chilling the dough prevents the cookies from spreading too much in the oven and helps develop the flavors.
- **Don’t Overbake:** Overbaked cookies are dry and crumbly. Keep a close eye on the cookies while they’re baking and remove them from the oven when the edges are lightly golden brown.
- **Get Creative with Frosting:** Use gel food coloring to achieve vibrant, true-to-Minecraft colors. You can also use different piping tips to create different textures and patterns.
With these tips and tricks in your arsenal, you’ll be baking **Minecraft Cookies Recipe** like a seasoned pro in no time!
Frosting Fun: Decorating Your Edible Creations
The real magic happens when you start decorating your **Minecraft Cookies Recipe**. This is where you can let your creativity shine and bring your favorite Minecraft characters and blocks to life. Here are some ideas to get you started:
- **Creepers:** Use green frosting to create the iconic creeper face.
- **Steve:** Use brown frosting for the hair, blue for the shirt, and tan for the skin.
- **Grass Blocks:** Use green frosting for the grass and brown frosting for the dirt.
- **Water Blocks:** Use blue frosting for a refreshing splash.
- **Diamond Blocks:** Use light blue frosting with a touch of sparkle.
Remember, the sky’s the limit when it comes to decorating. Don’t be afraid to experiment with different colors, textures, and techniques. You can even use edible markers to add fine details.
Conclusion for Minecraft Cookies Recipe :
Making these Minecraft Cookies Recipe is a delightful adventure. Remember to chill the dough for clean cuts and feel free to experiment with different extracts. Storing them properly ensures their freshness, and adapting the recipe for gluten-free friends is totally doable. So, gather your ingredients, channel your inner pixel artist, and bake up a batch of these fun, delicious treats. Happy baking, fellow crafters!
Print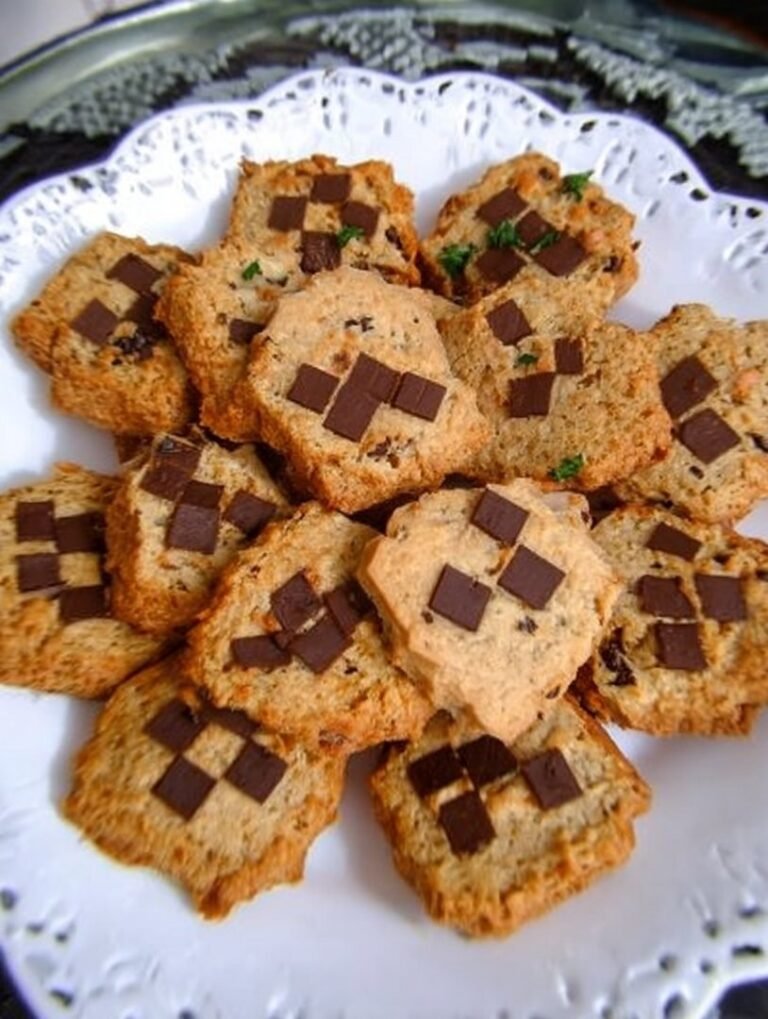
Minecraft Cookies Recipe
Delicious minecraft cookies recipe recipe with detailed instructions and nutritional information.
- Total Time: 35 minutes
- Yield: 4 servings
Ingredients
- All-purpose flour: 2 1/4 cups
- Baking soda: 1 teaspoon
- Salt: 1 teaspoon
- Unsalted butter, softened: 1 cup
- Granulated sugar: 3/4 cup
- Brown sugar, packed: 3/4 cup
- Large eggs: 2
- Vanilla extract: 1 teaspoon
Instructions
- Step 1: Preheat oven to 375°F (190°C). In a small bowl, whisk together the flour, baking soda, and salt. Set aside.
- Step 2: In a large bowl, cream together the softened butter, granulated sugar, and brown sugar until light and fluffy.
- Step 3: Beat in the eggs one at a time, then stir in the vanilla extract.
- Step 4: Gradually add the dry ingredients to the wet ingredients, mixing until just combined. Be careful not to overmix.
- Step 5: Drop by rounded tablespoons onto ungreased baking sheets.
- Step 6: Bake for 9-11 minutes, or until edges are golden brown. Let cool on baking sheets for a few minutes before transferring to a wire rack to cool completely.
Notes
- Store cooled cookies in an airtight container to keep them soft and prevent them from drying out.
- For a warm, melty treat, microwave a single cookie for about 10 seconds.
- Serve these blocky delights with a tall glass of milk for the ultimate Minecraft-inspired snack.
- Creaming the butter and sugars well is key to a soft and chewy cookie, so don't rush that step!
- Prep Time: 15 minutes
- Cook Time: 20 minutes
- Method: Stovetop
- Cuisine: American
FAQs :
How do I get the perfect square shape for my Minecraft Cookies?
Ah, the eternal quest for pixel-perfect cookies! Fear not, aspiring block builders! The key is chilling your dough. Seriously, a good 30 minutes in the fridge makes all the difference. Then, when you roll it out, use a ruler and a sharp knife or pizza cutter to ensure those edges are straight and true. If you’re feeling fancy, you can even find Minecraft-themed cookie cutters online. Remember, even in Minecraft, not every block is perfect, so don’t stress too much about minor imperfections. Embrace the slightly wonky pixel!
Can I use different extracts to flavor my Minecraft Cookies Recipe?
Absolutely! Vanilla is a classic, but feel free to unleash your inner alchemist. Almond extract adds a lovely nutty note, while lemon or orange extract can bring a zesty brightness. Even a tiny drop of peppermint extract can be fun, though use it sparingly, unless you want your cookies to taste like toothpaste (not that there’s anything wrong with that… for *some* people). Experiment and see what blocky flavors your taste buds crave. Just be sure to adjust the amount according to the extract’s strength.
What’s the best way to store these Minecraft Cookies to keep them fresh?
To keep your blocky creations from turning into crumbly cobblestone, store them in an airtight container at room temperature. They’ll stay delicious for about 3-5 days… if they last that long! I mean, who can resist a perfectly pixelated cookie staring them in the face? For longer storage, you can freeze them. Just wrap them individually or in small stacks to prevent freezer burn. When you’re ready to devour them, let them thaw at room temperature.
Can I make these Minecraft Cookies gluten-free?
Yes, you can create gluten-free Minecraft Cookies! Simply substitute the all-purpose flour with a gluten-free flour blend. Make sure it’s a blend that includes xanthan gum, as this helps bind the ingredients together and gives the cookies structure. Gluten-free flours can sometimes be a bit drier than regular flour, so you might need to add a tablespoon or two of extra liquid (like milk or juice) to the dough to achieve the right consistency. Always check the ingredients of your gluten-free flour blend to ensure it’s free of any unwanted additions!
Leave a Comment